Manual for Admin UI page
1General
The Admin UI Page is a system that contains various functions to manage configuration of the SMASHDOCs system, documents, users and templates. With the help of functions on Admin UI Page you can perform such actions as:
●enable/disable features that are available in a particular SMASHDOCs system;
●apply particular default settings for SMASHDOCs system, such as language, conversation type, style etc.;
●manage documents by uploading/deleting them from the system;
●create and manage templates for different formats;
●create and manage inline styles, special characters, component tags;
●manage users by inviting, confirming, editing, deactivating or deleting them, as well as setting and resetting passwords for the users.
To open the Admin page you should add sign ‘slash’ and word “admin” in the link after the indicated domain of your SMASHDOCs system. So the finite link to the admin page looks like this: internal.smashdocs.net/admin. Such a modal window appears when you enter the link:
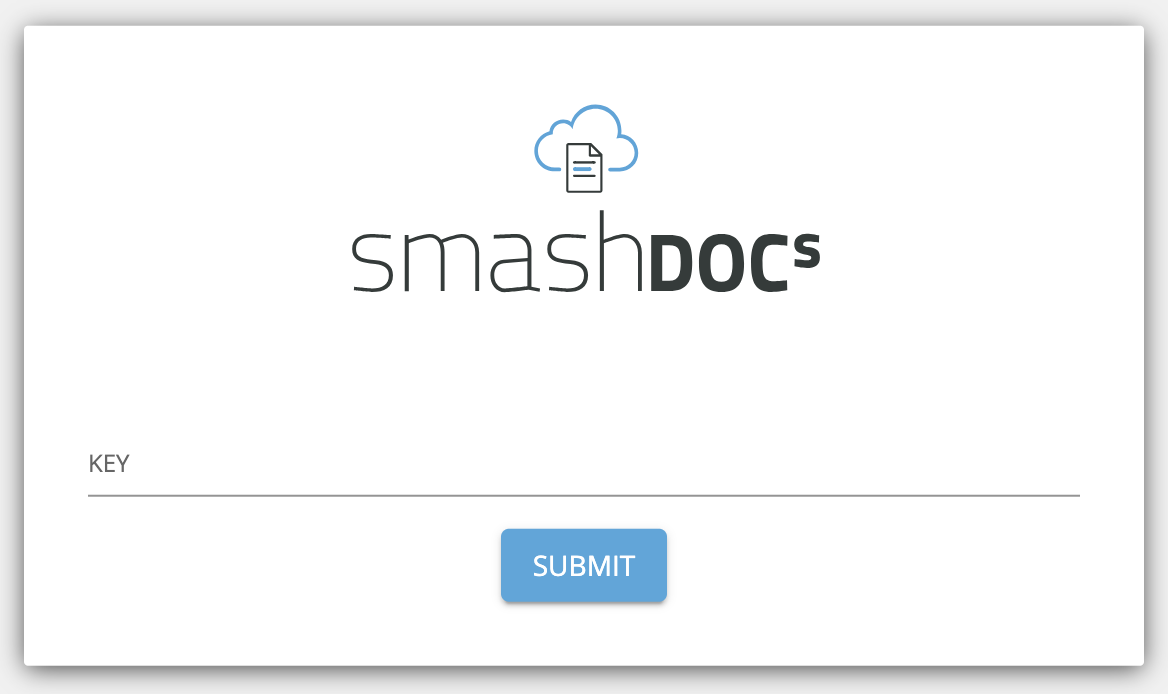
Modal window after inserting link of the Admin page highlighted
To move to the Admin page you need to insert required provisioning key in the line “Key”. This key you should request and receive at our SMASHDOCs administration. After you insert the provisioning key, you will move to the Admin page, that looks like this:

The window with organisations highlighted
To pass to the list of features of the Admin page, where you will be able to find all available functionalities, click “DETAILS” (see Image 2).
On the left side of the page you can find a toolbar with all available settings that you can apply to your SMASHDOCs system through the Admin page.
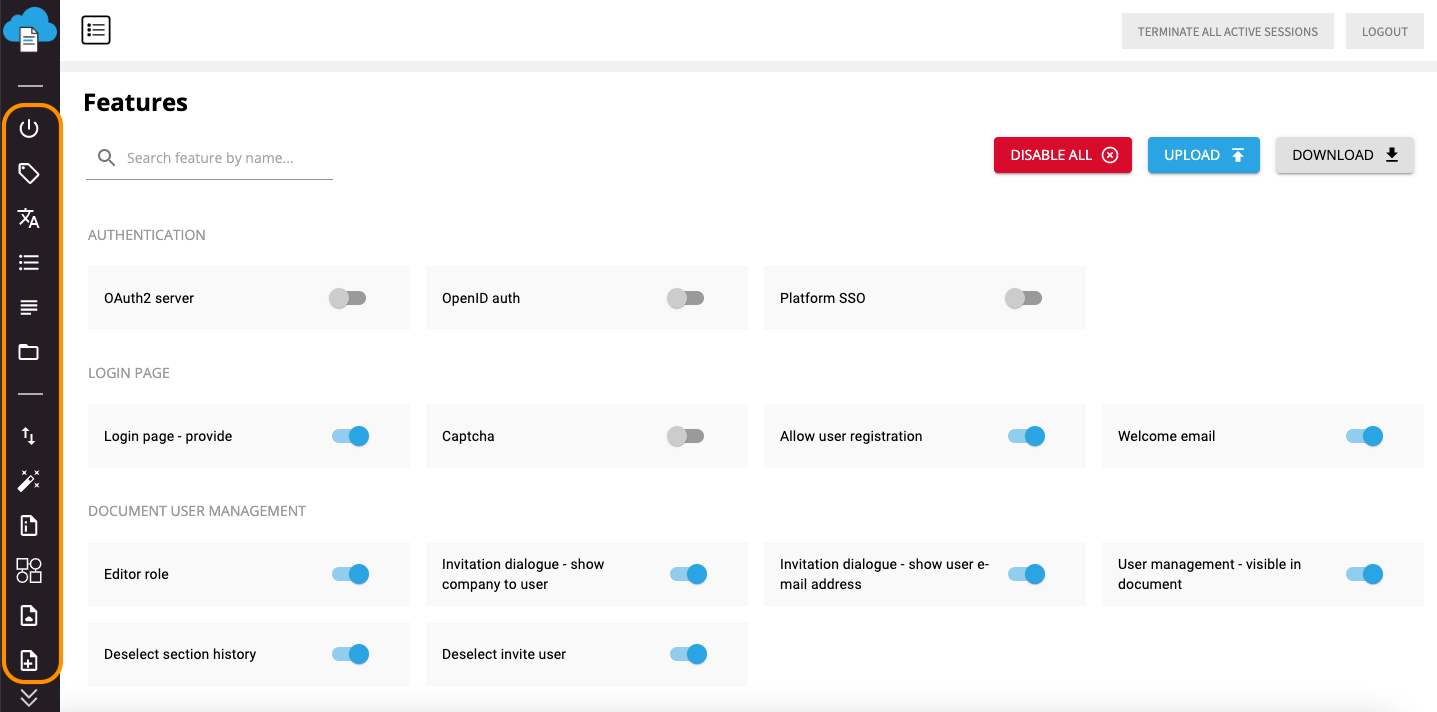
Toolbar with available settings on Admin page highlighted
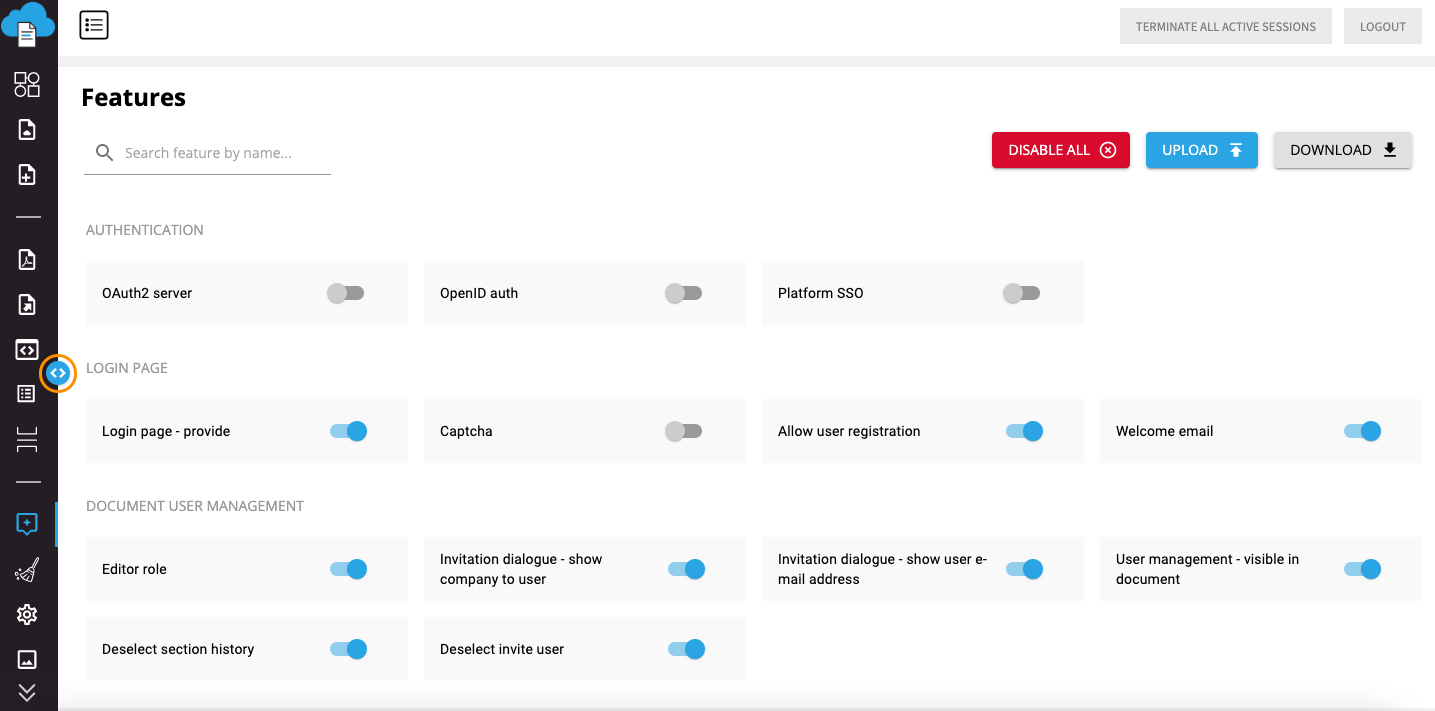
In the list of tabs in the leftwing menu there is a special button which users can click to move this list up and down.
Button to move the list of tabs up and down
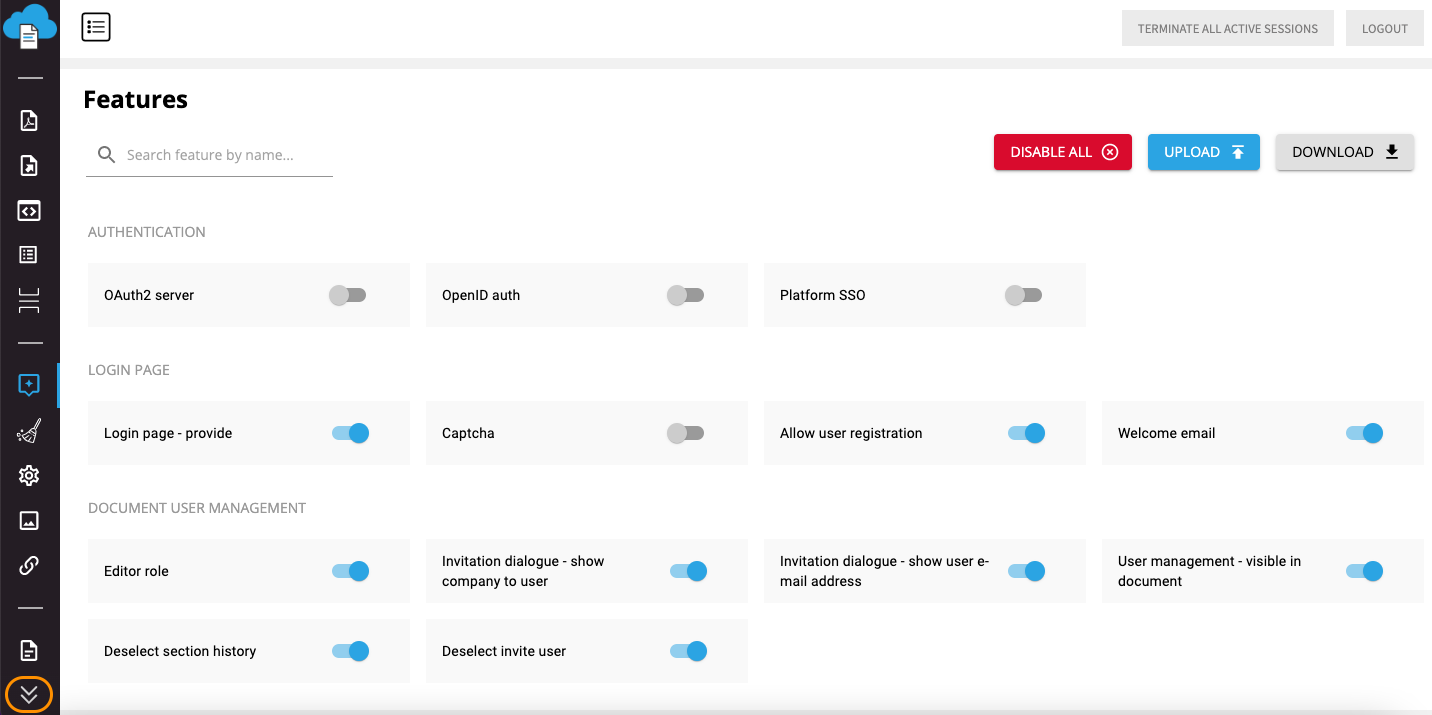
The leftwing menu can be displayed in both ways: as short and as large menu. By default, it is displayed as short menu, to make it large you have to click corresponding button.
Button to enlarge the leftwing menu
The large menu will look like this:
Large menu highlighted
Also, all tabs in the leftwing menu are thematically grouped. There are following groups and tabs that refer to each of them:
●Editor
●Quick Format Buttons
●Component Tags
●Special Characters
●Inline Styles
●Paragraph Decorators
●XRef Groups
●Creation
●Import Settings
●Magic Import
●Sample Documents
●Workflows
●SDOX Templates
●SmartDocuments
●Export
●Export Templates
●Word Templates
●ParsX Mapping
●Hyphenation Dictionary
●Division separators
●Global Configuration
●Features
●Cleanup Routines
●Default Settings
●Identity
●URLs
●Management
●Documents
●Users
Now we are going to get more detailed information, how to work with each feature in the Admin UI page.
2Quick Format Buttons
With the help of Quick Format Buttons functionality, you can fixate your most-used formatting styles in the toolbar in the SMASHDOCs editor and reach them in seconds.
In Quick Format Buttons settings in the Admin page you can add new style to find it then in the toolbar while working with a document in SMASHDOCs editor. For that pass to Quick Format Buttons settings and click the green button “Add style” or the blue button ‘Upload’ to upload a .json file with required Quick Format buttons.
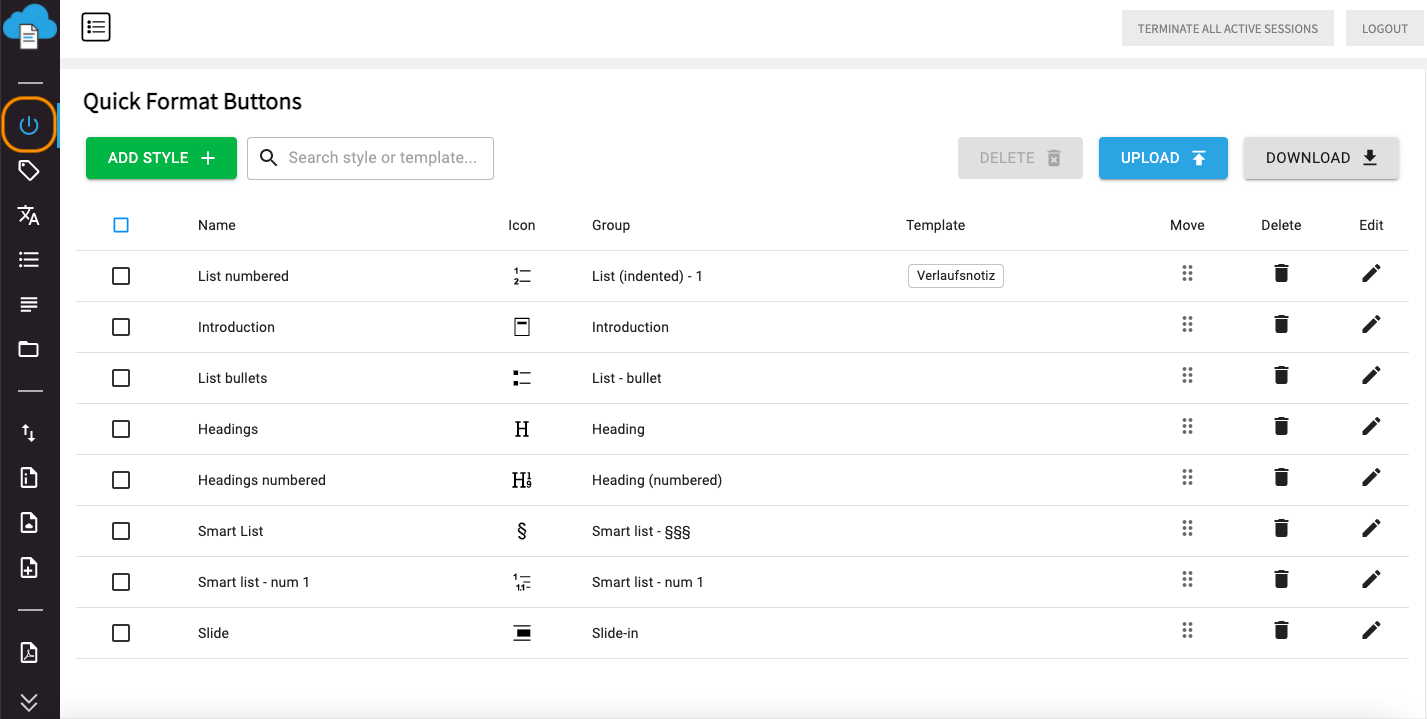
Quick Format Buttons
If you choose to create a new Quick Format button through the clicking “Add style”, you should enter all required information about it.
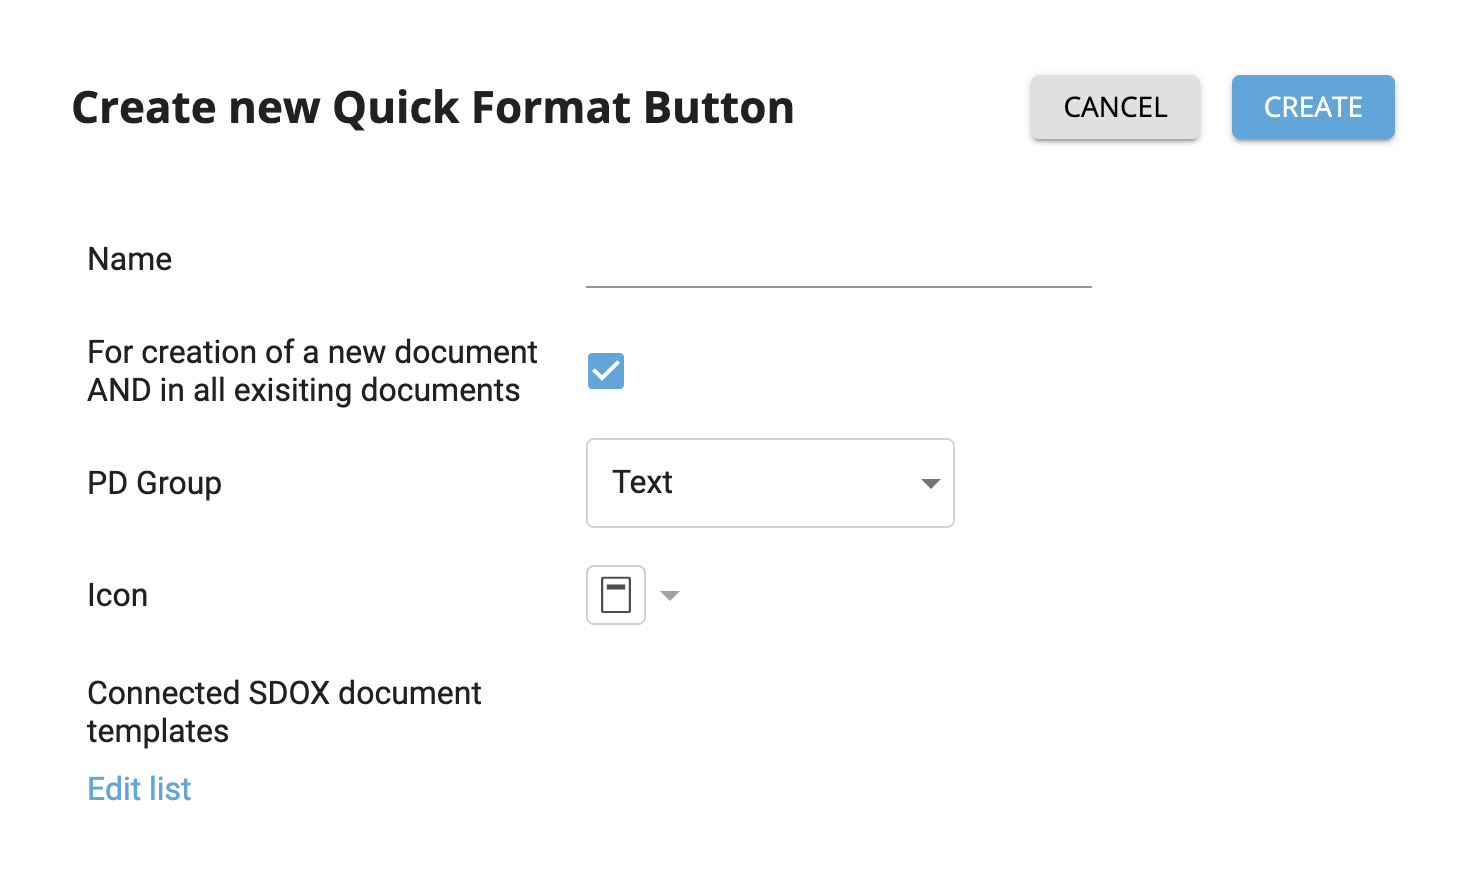
Metadata of a new Quick Format button
The information that you have to insert is a name of a new Quick Format button, activate a checkbox near “For creation of a new document AND in all existing documents”, if there are SDOX templates where this quick format button is enabled, PD group, icon and you can also click “Edit list” to select SDOX templates where this quick format button will be set.
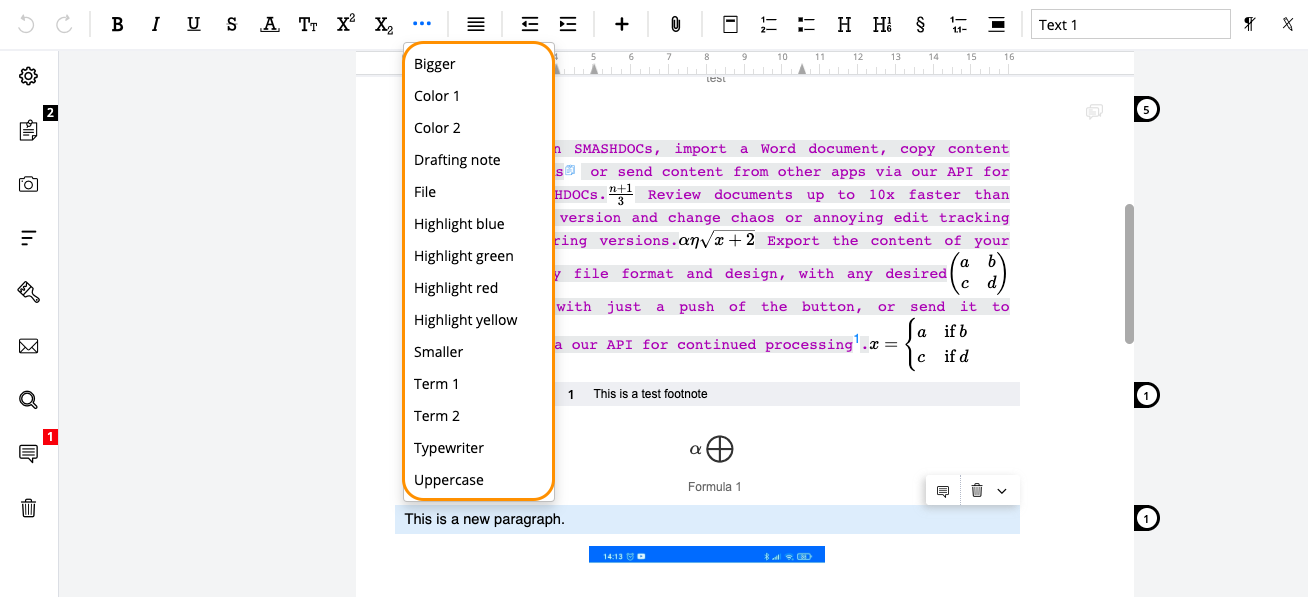
The added Quick Format Button you can find in SMASHDOCs editor in the toolbar above the page.
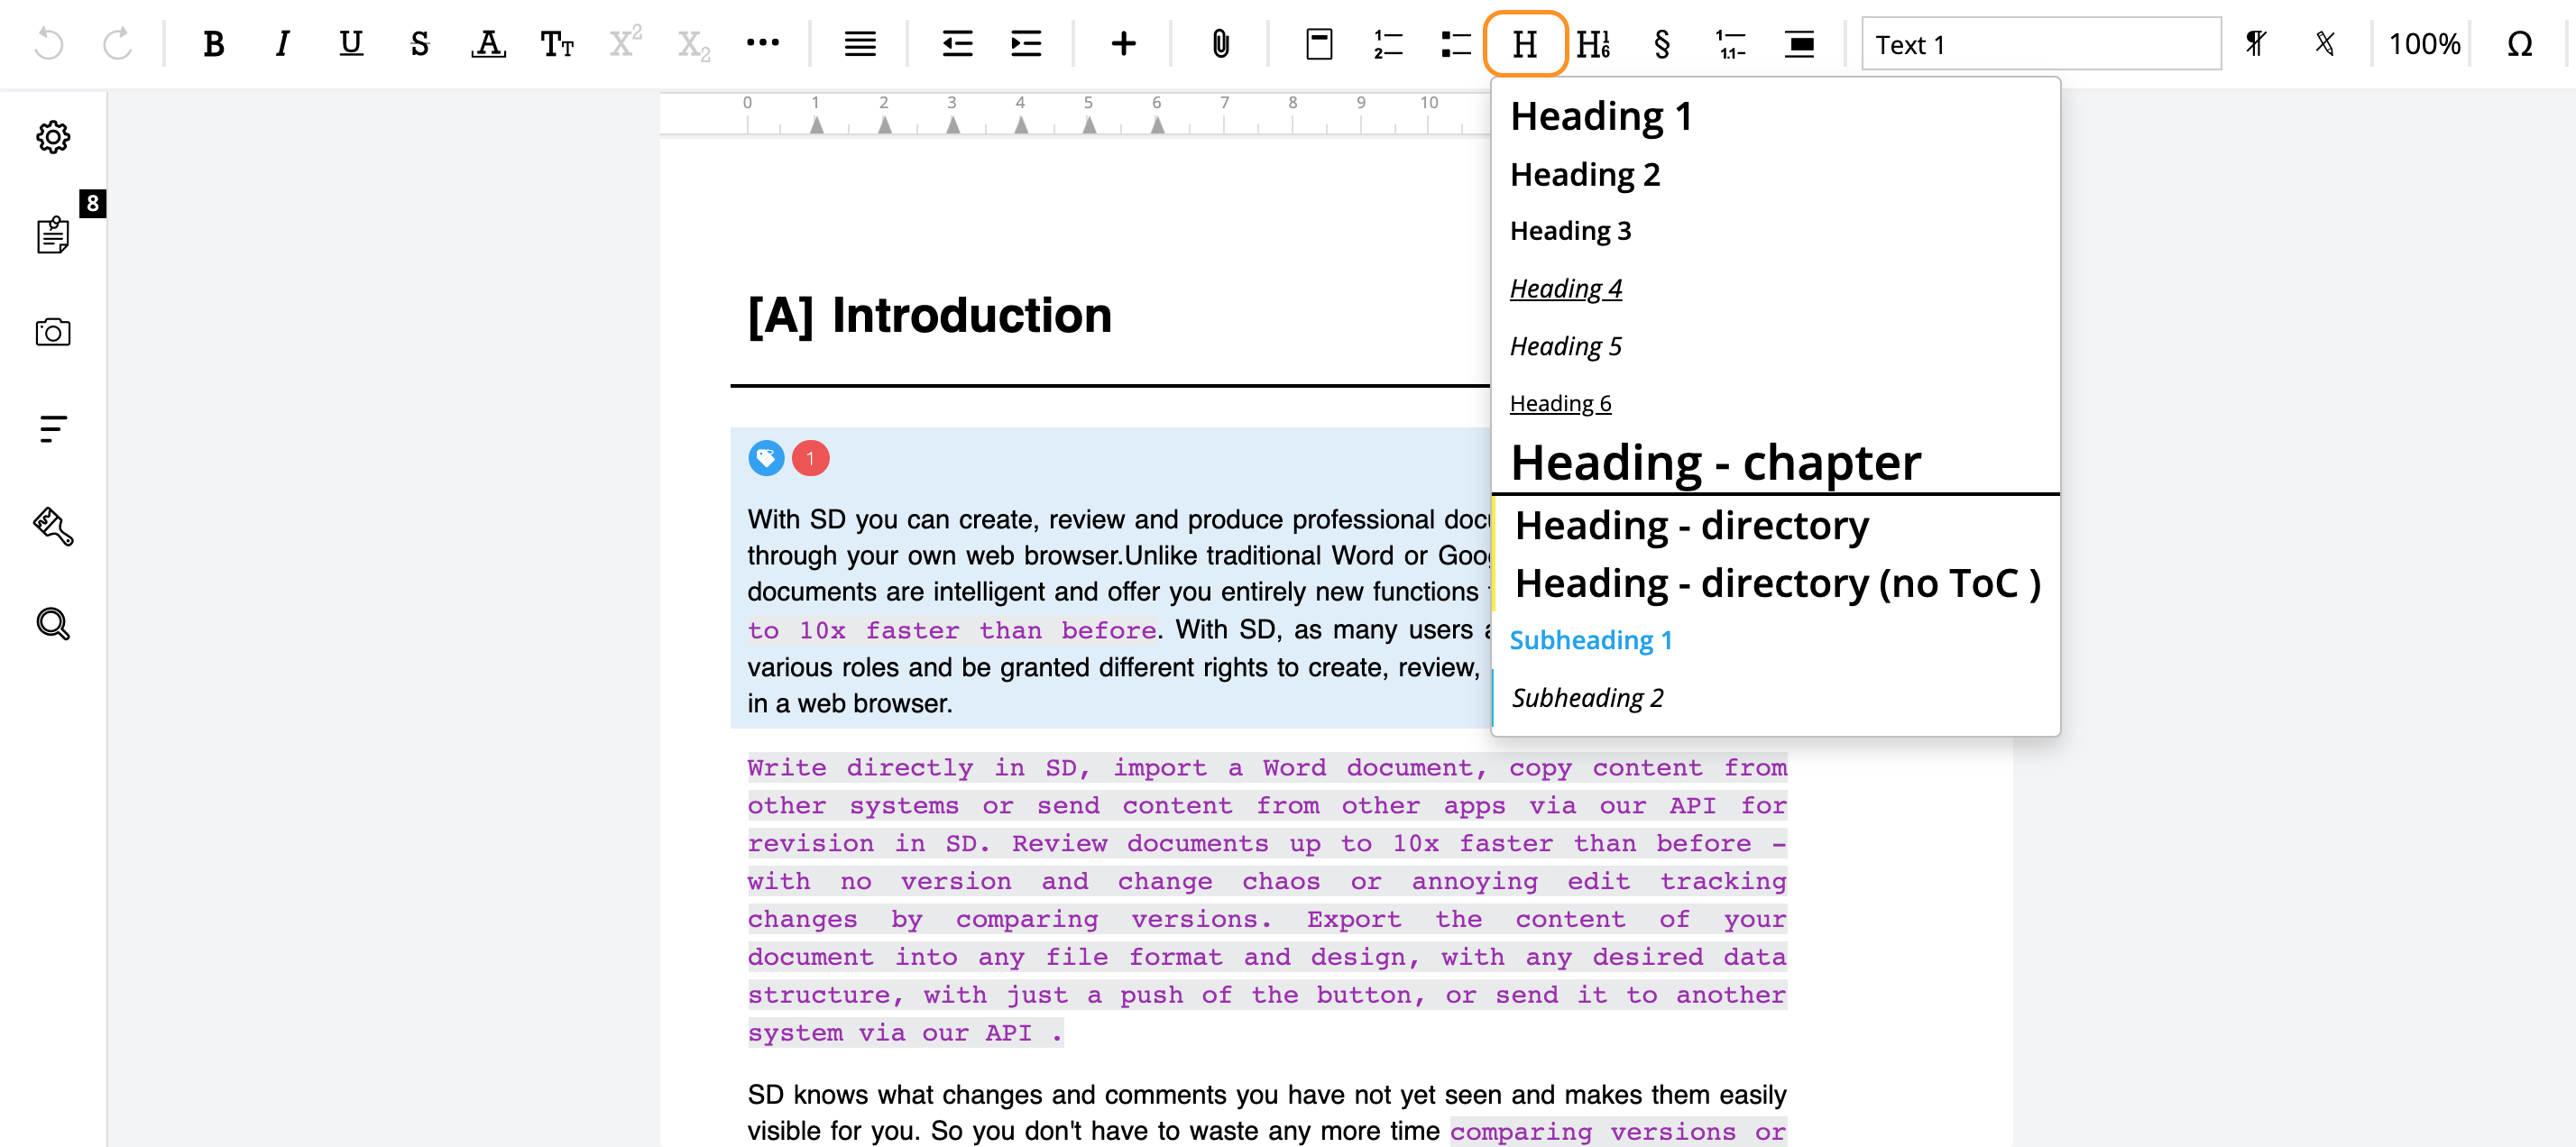
Added Quick Format Button
The order of Quick Format buttons in the editor corresponds to the order of these buttons in AdminUI settings. If you click "Move" in AdminUI page and move the button to any other place, the order in the editor will be also changed then.
Furthermore, Quick Format Button can be shown everywhere in the editor, meaning both when writing a document from scratch, importing a Word file, or using the available sample by document creation. For this, the option “Show everywhere” should be activated for the desired Quick Format Button (see Image 8).
To have a thorough view of existing Quick Format buttons, download a .json file with a required list by clicking ‘Download’ (see Image 7).
3Component Tags
Component tags give an opportunity to mark components for the selective highlighting of information. Thus, tagged components create the guidelines for searching specific data in the document later on. Component tags can define the status of a component or a document, priority, category of a document.
In components tags settings in the admin page it is possible to add a new component tag by clicking a corresponding button, delete component tags, upload a .json file with new component tags and download a .json file with already existing tags.
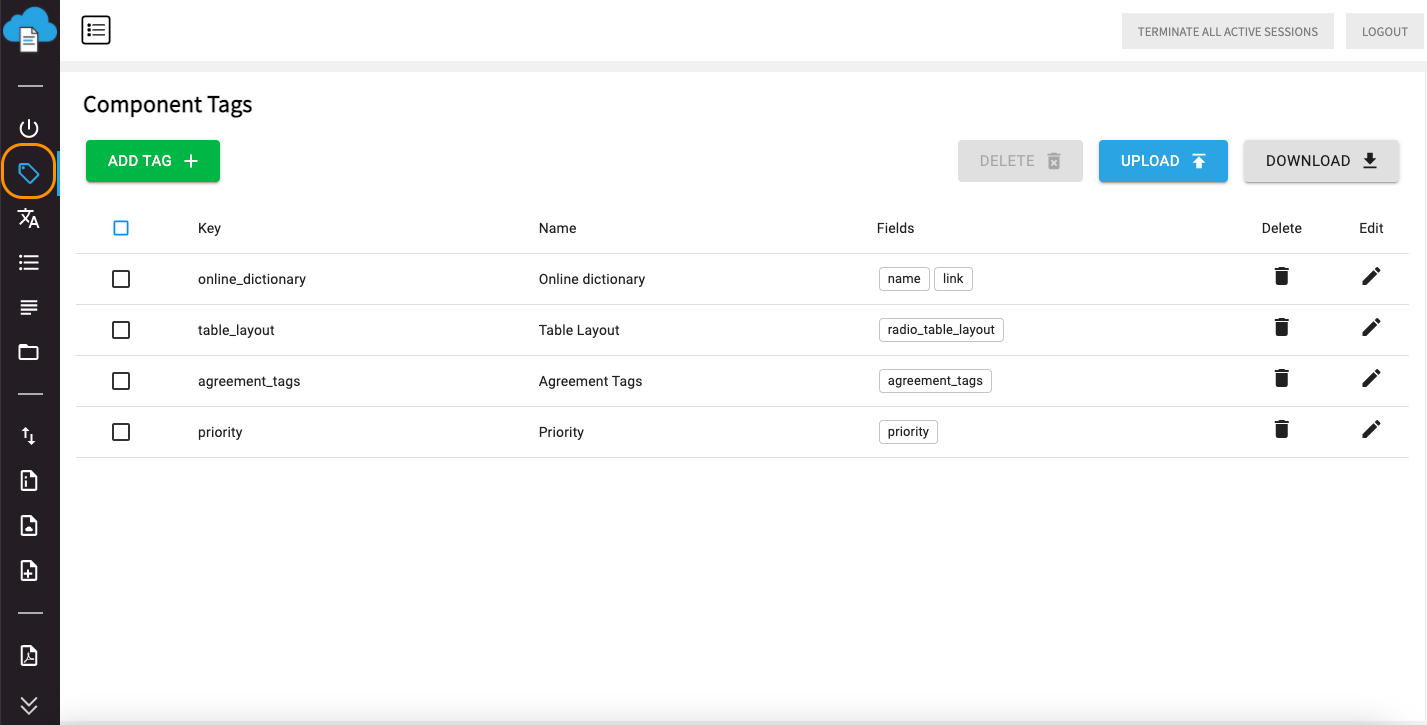
Component Tags settings
Component tags can be added manually or a JSON file containing needed component tag configuration can be uploaded on the component tags page.
If you would like to do it manually, click “Add tag”. You need to fill in all required information about created tag:
●tag key - must include words and low line, if needed, only;
●component types - which component this tag will be applicable for (text, table, image);
●display key - is set automatically after the tag key is inserted;
●allowed paragraph decorators - if you set allowed PD, it means that only for this PD adding the component tag will be available; if you leave this field empty, adding the component tag will be available for all PDs;
●text and filling colors;
●name in all supported languages.
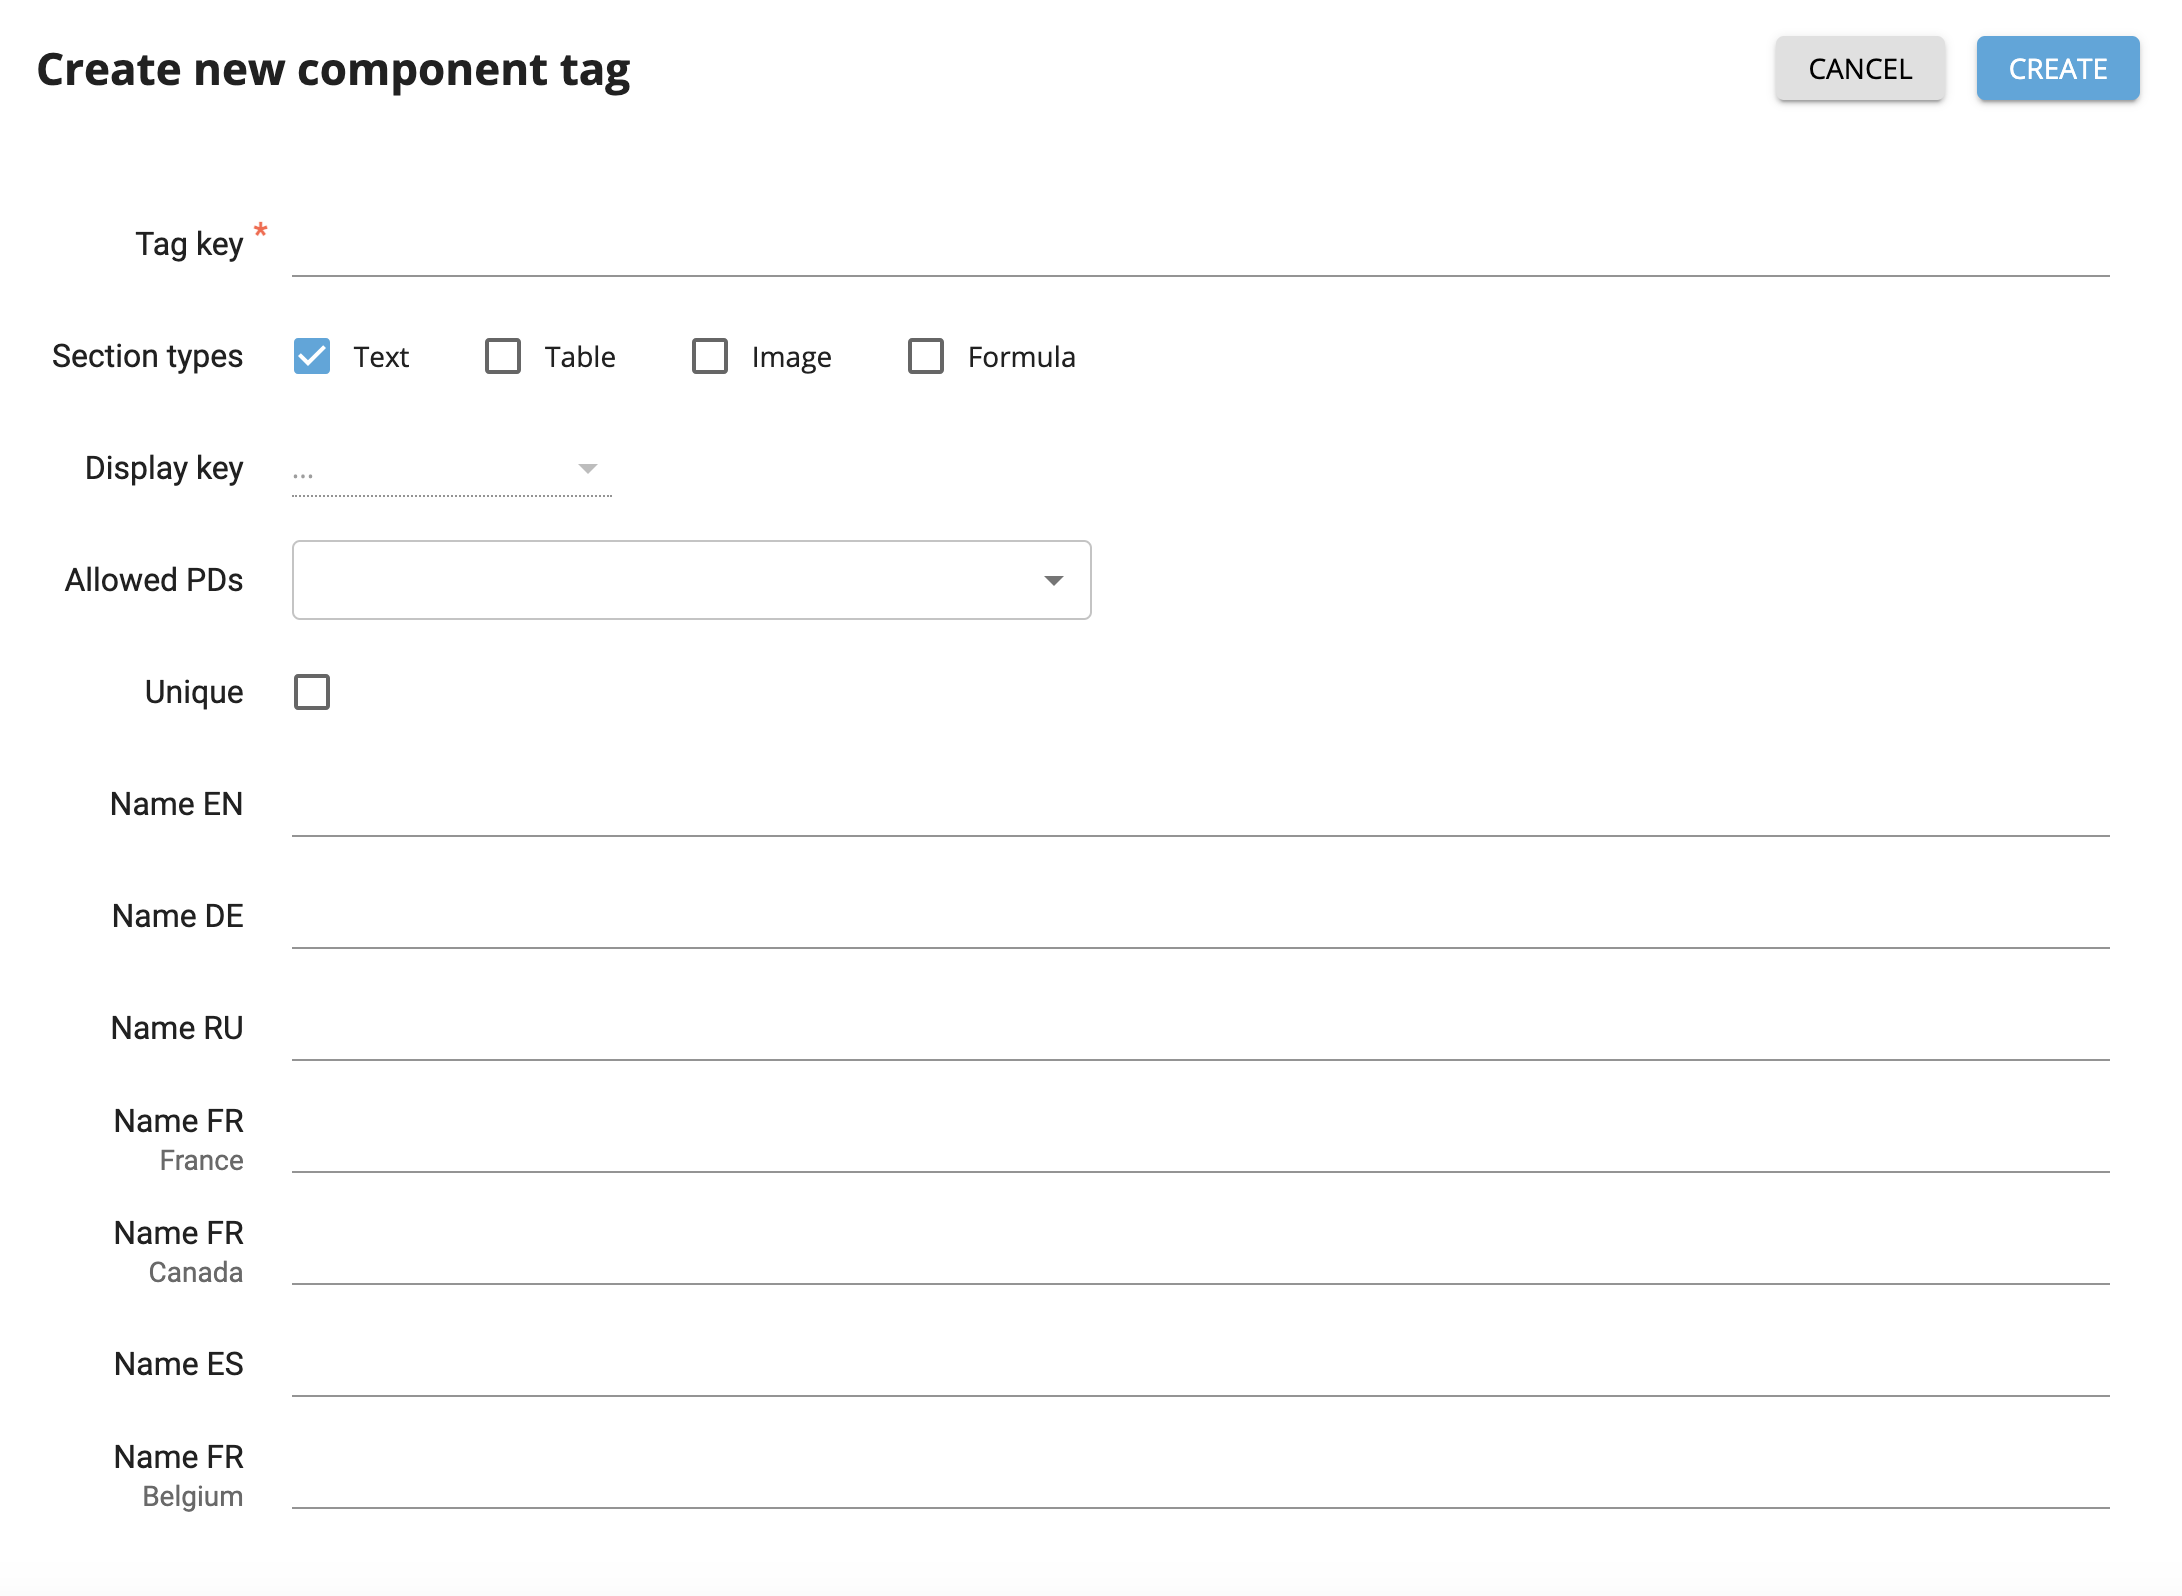
Details of a new component tag
Also, you have to decide, whether a new component tag is unique - in this case this component tag can be used only once per document. The newly created component tag will be shown in the editor during the choosing which component tag should be added.
Newly created component tag highlighted
After that, you have to work on a field of a tag. You have to insert field key in all supported languages and choose a field type and decide whether it is required.
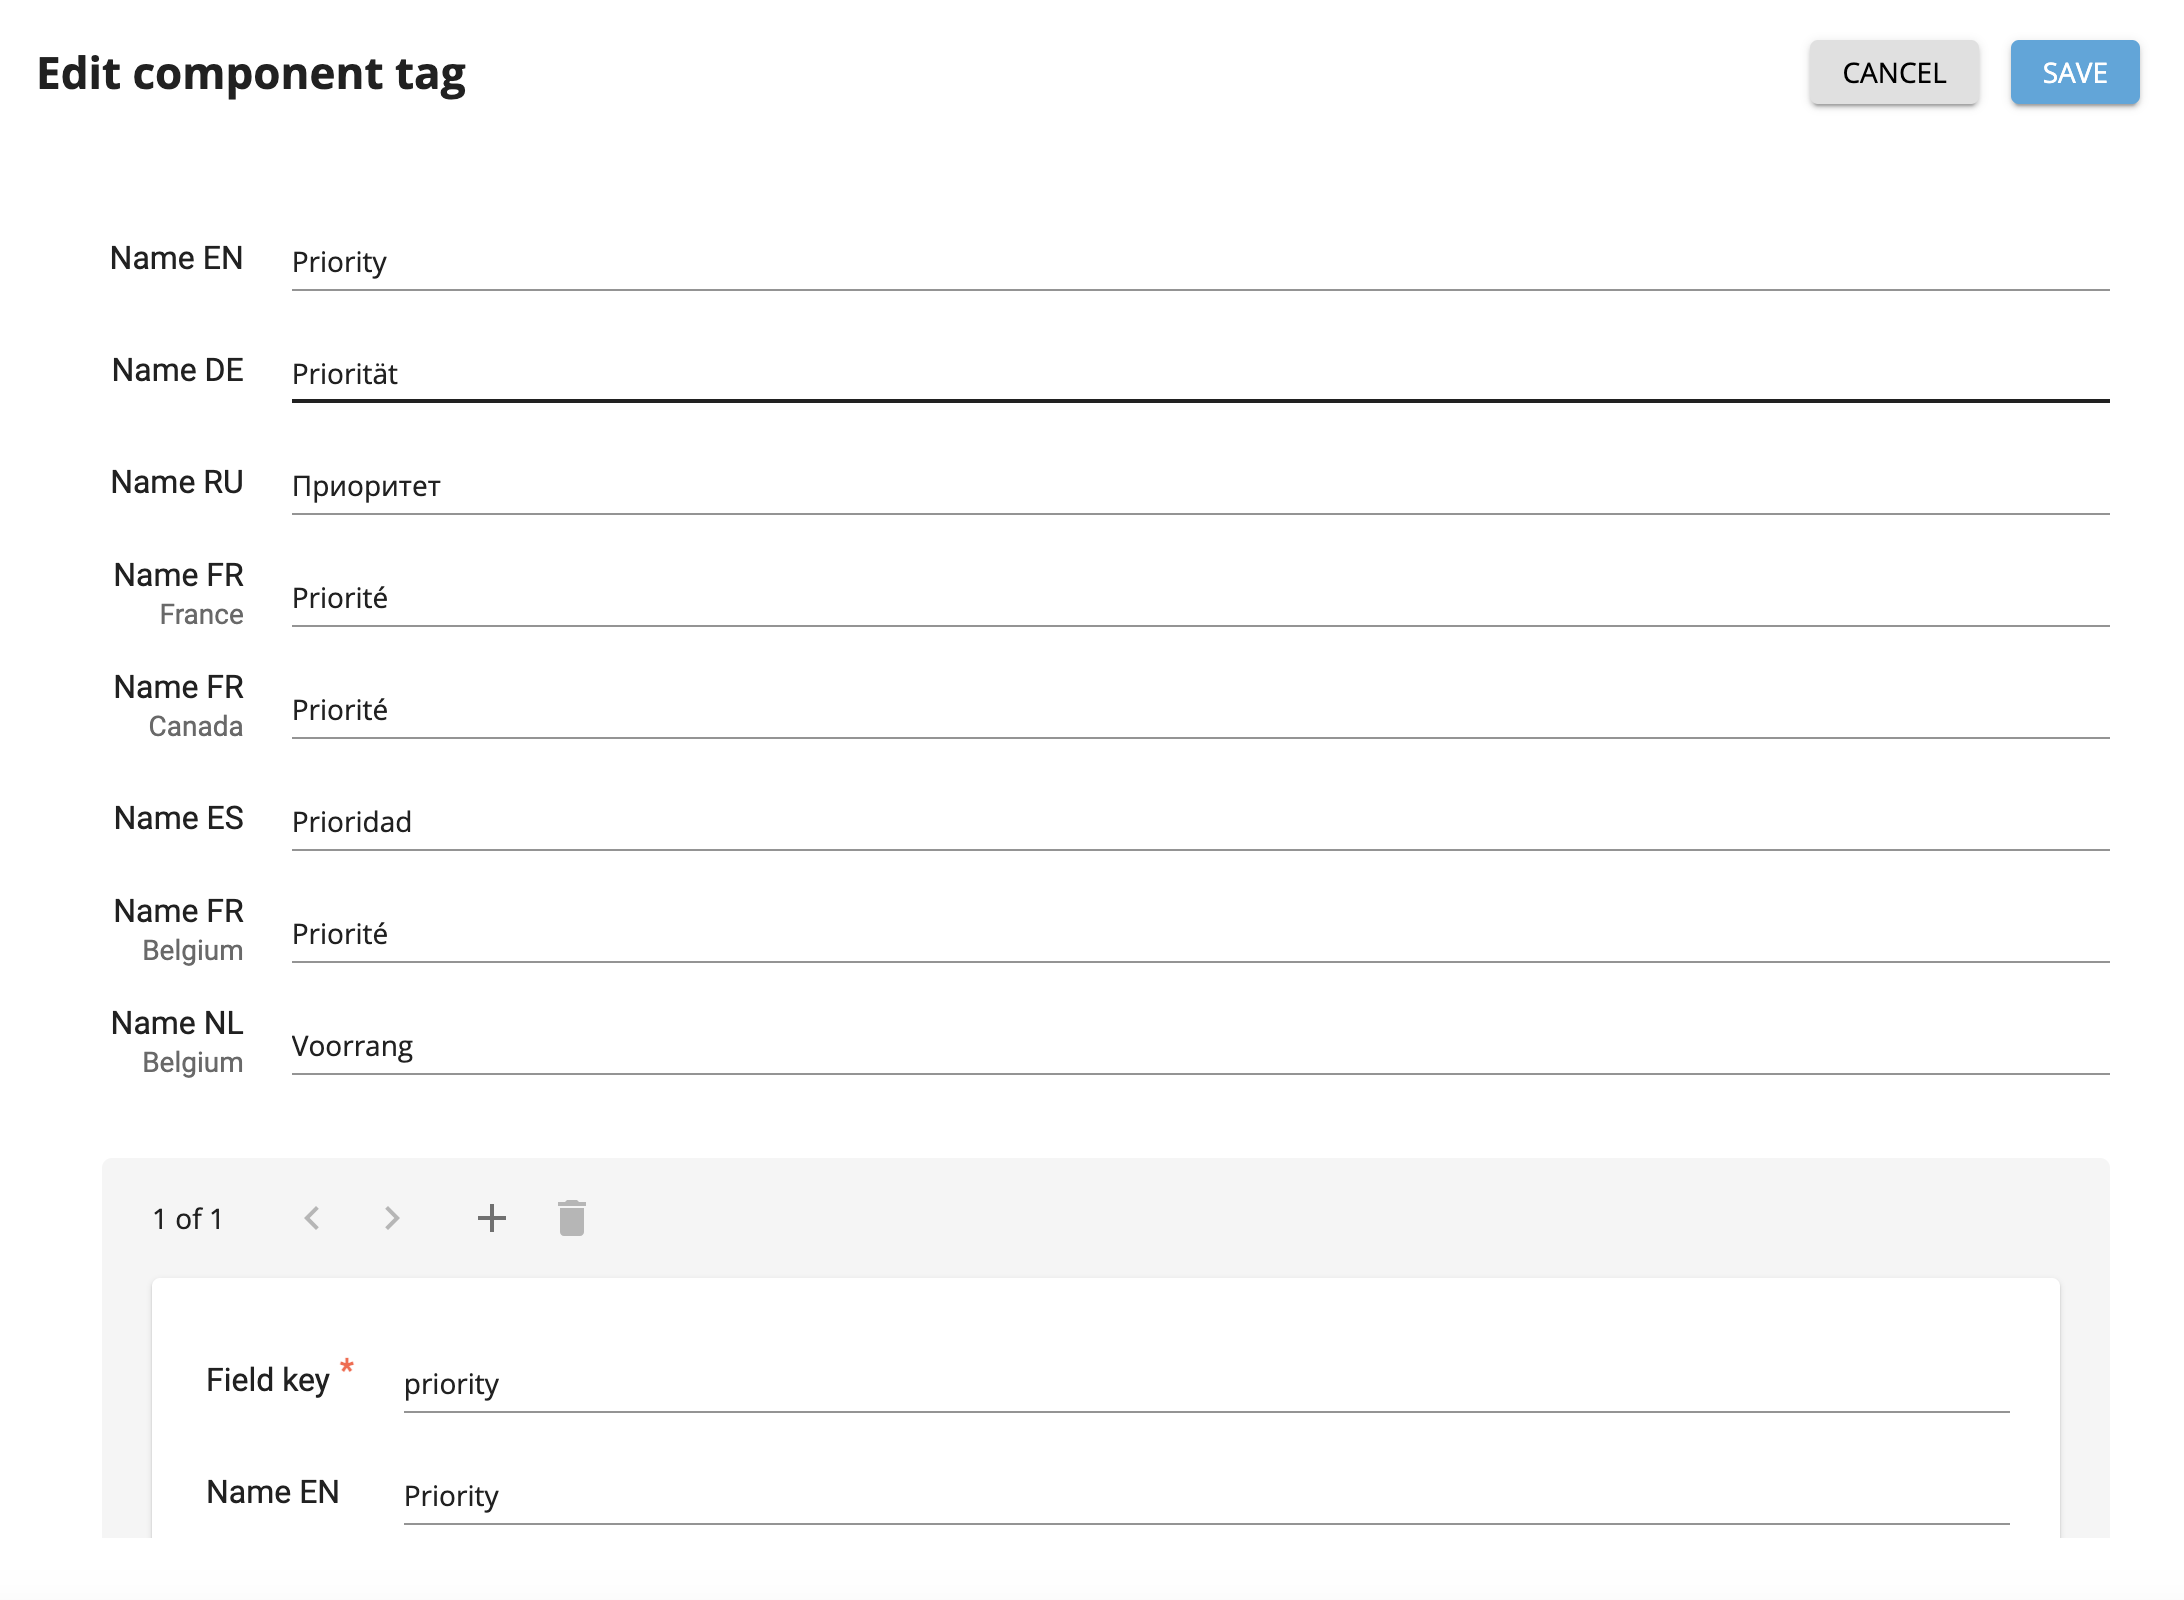
Field key of a component tag
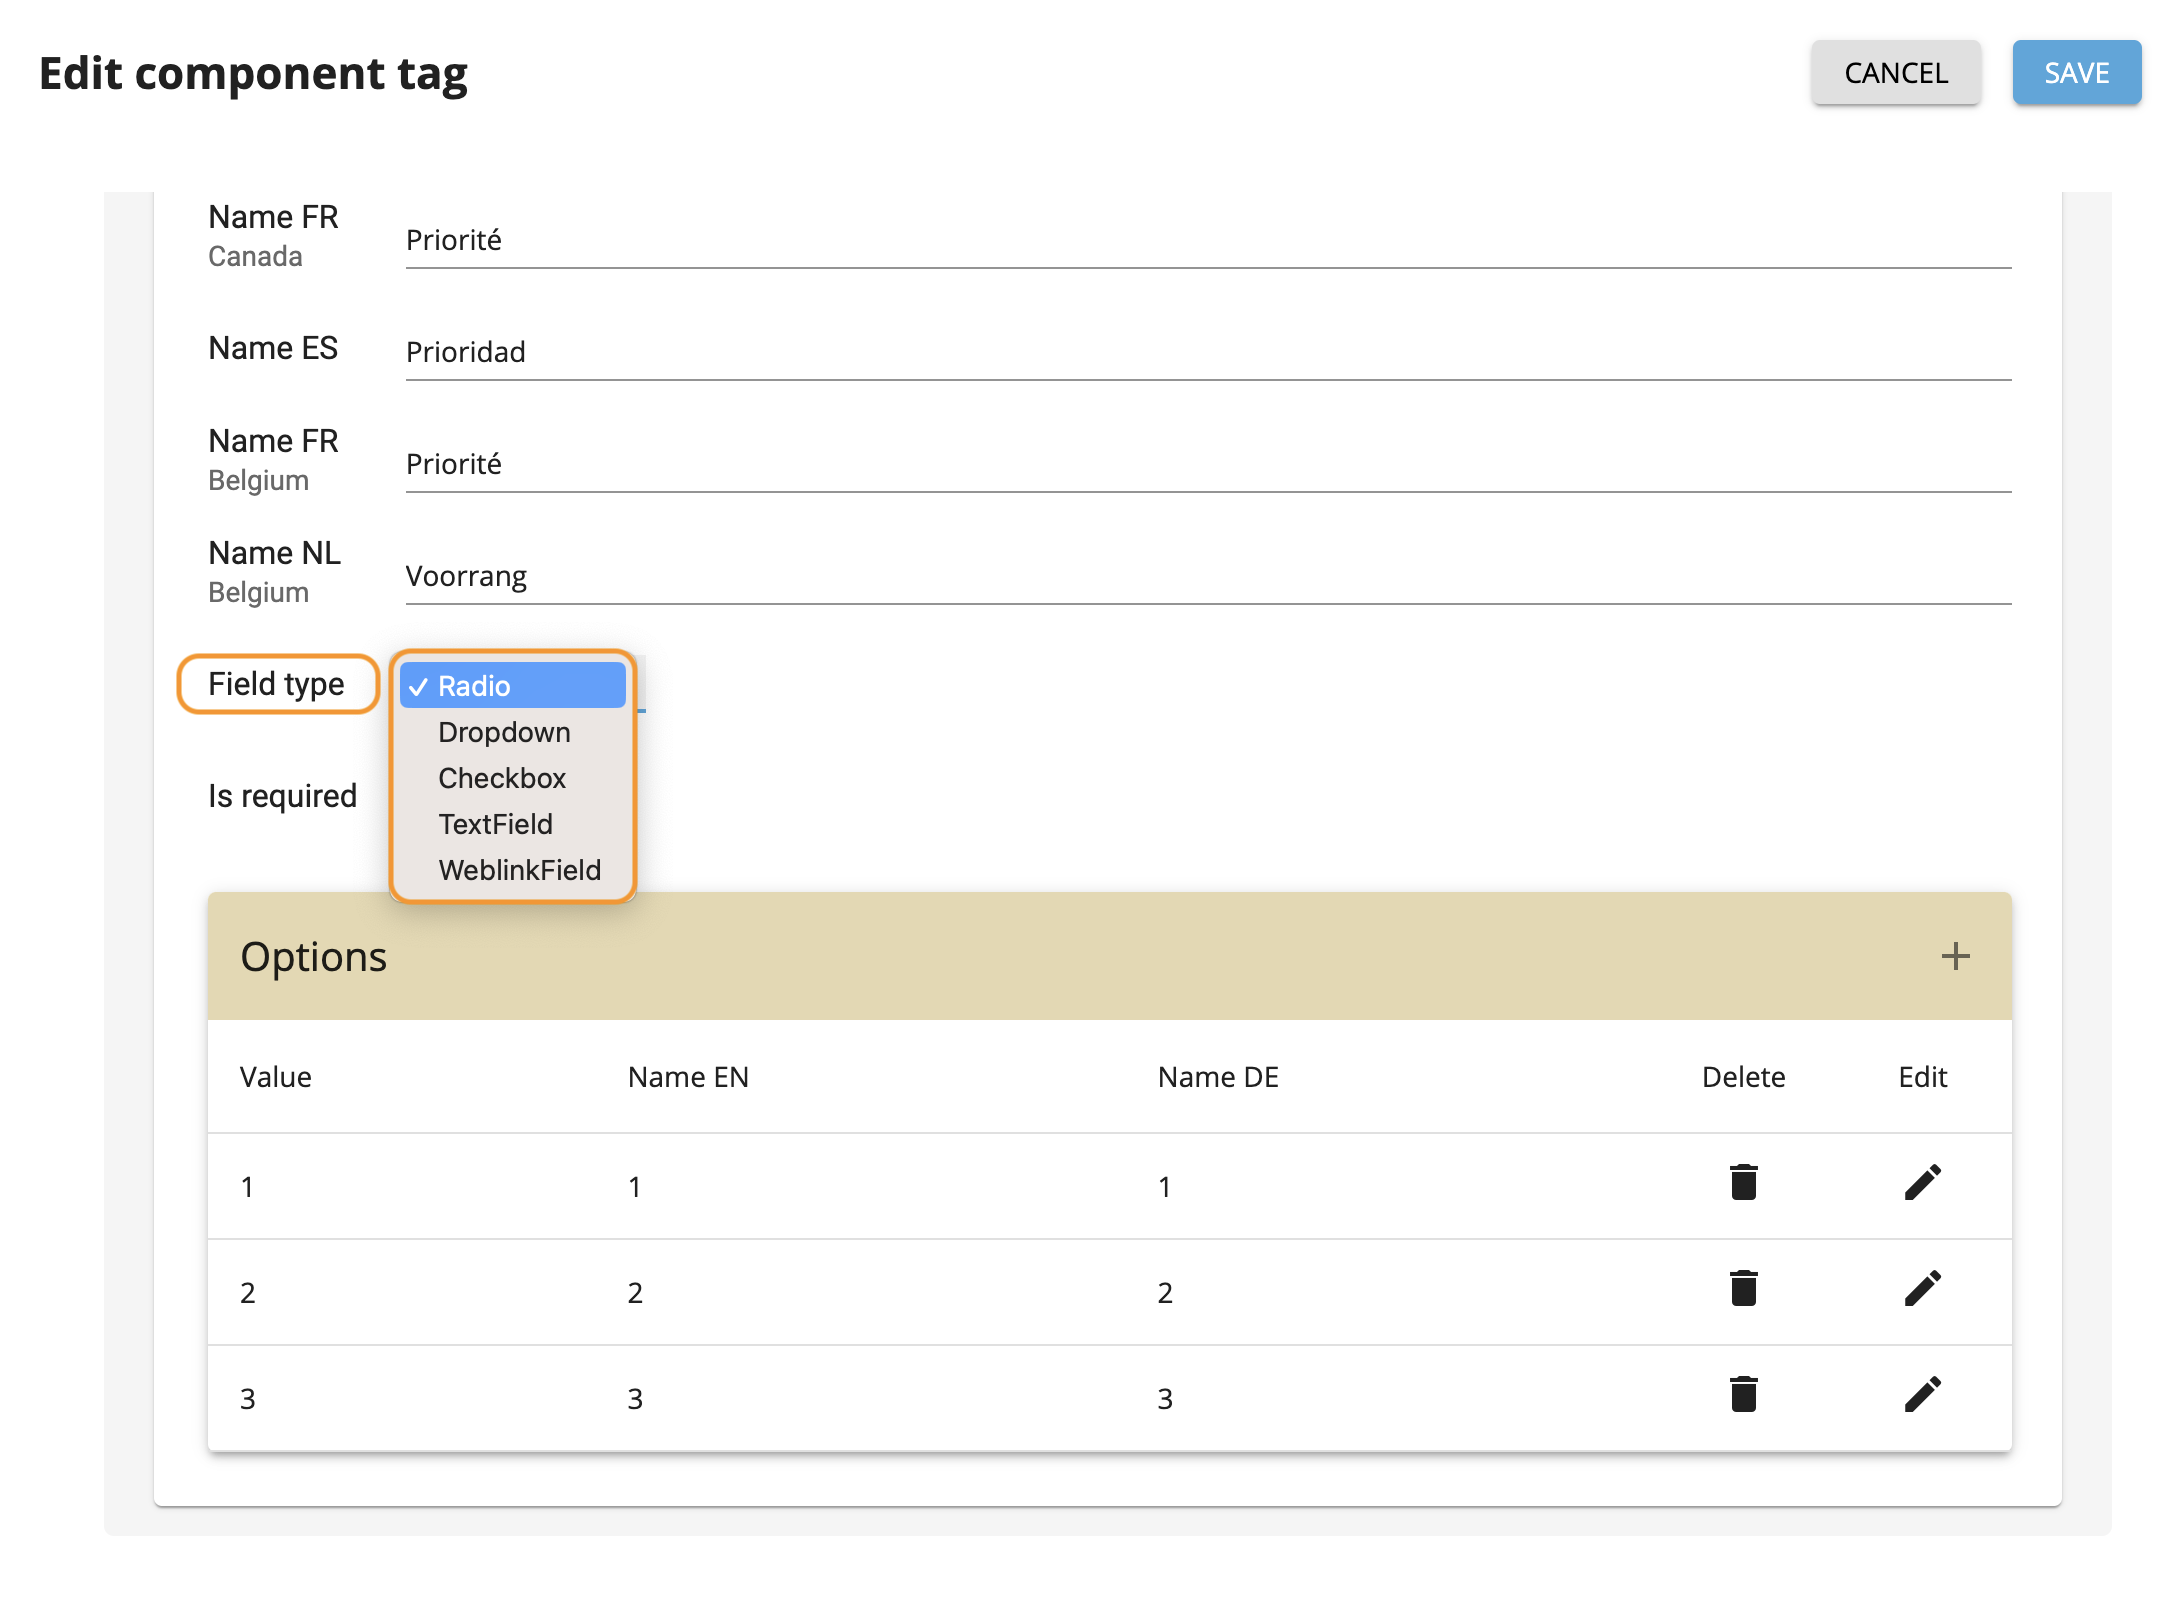
Field types highlighted
Field type is a type of button in component tags feature and after field type has been chosen, it will be displayed then in the editor on the right side of the document.
Component tag field highlighted
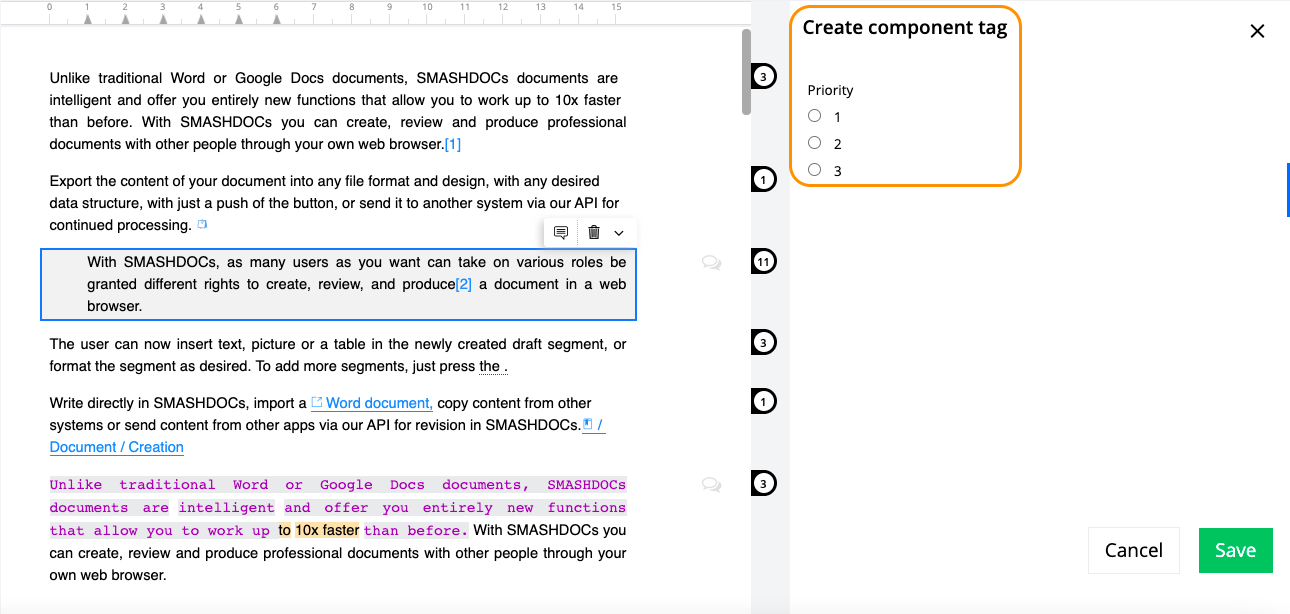
The last thing to set before the component tag is ready is options. In the system there can be component tags which include different states. The part ‘Options’ is responsible for creating and naming those states. For example, a component tag ‘Priority’ has been created. There are different states of priority - 1, 2, 3. Therefore, these states should be added to ‘Options’.
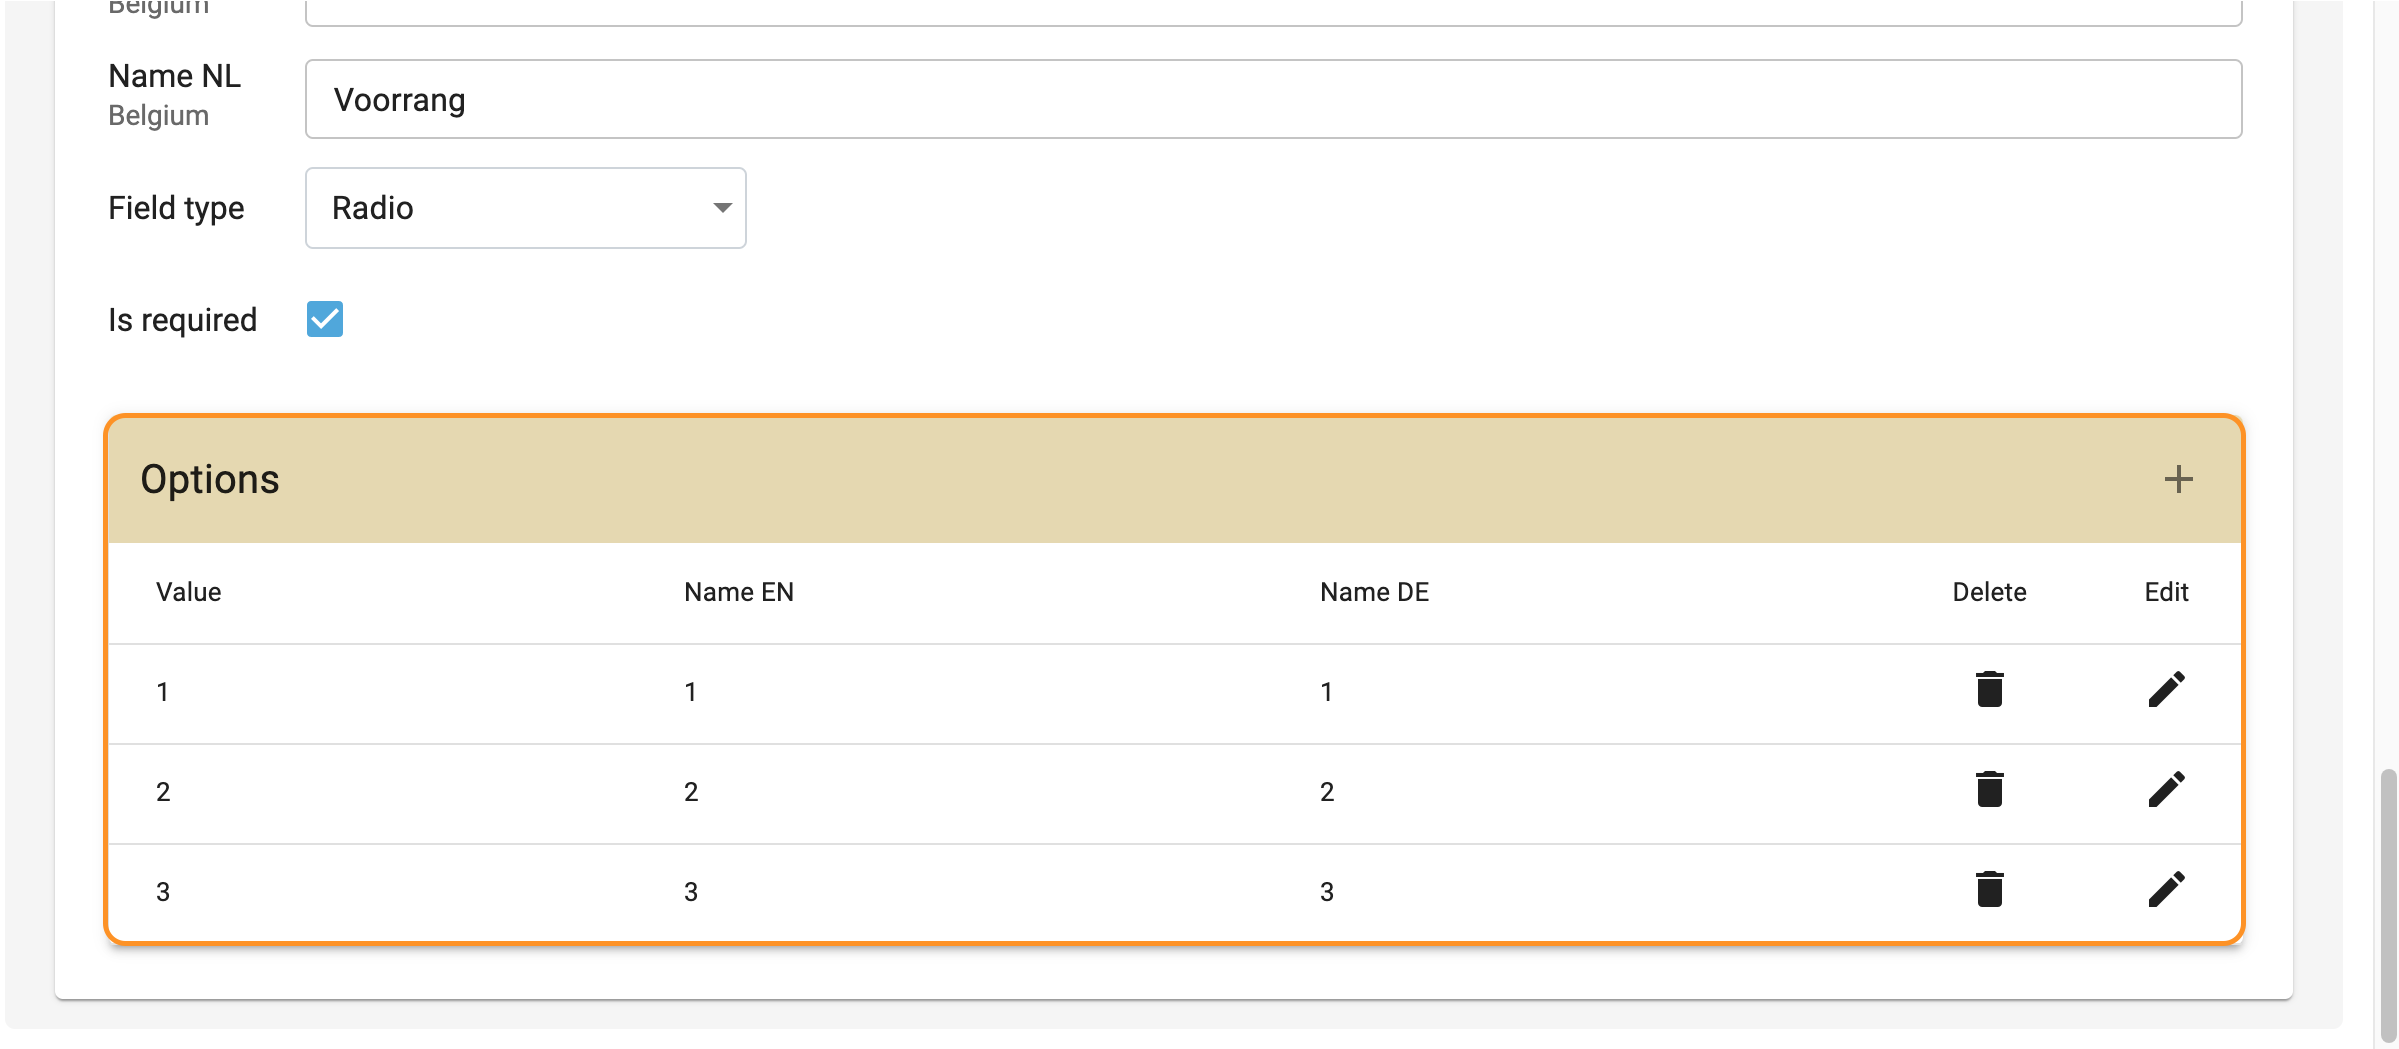
Options highlighted
If we provide another example with a component tag ‘Status’, there are also different statuses and all of them are set in ‘Options’.
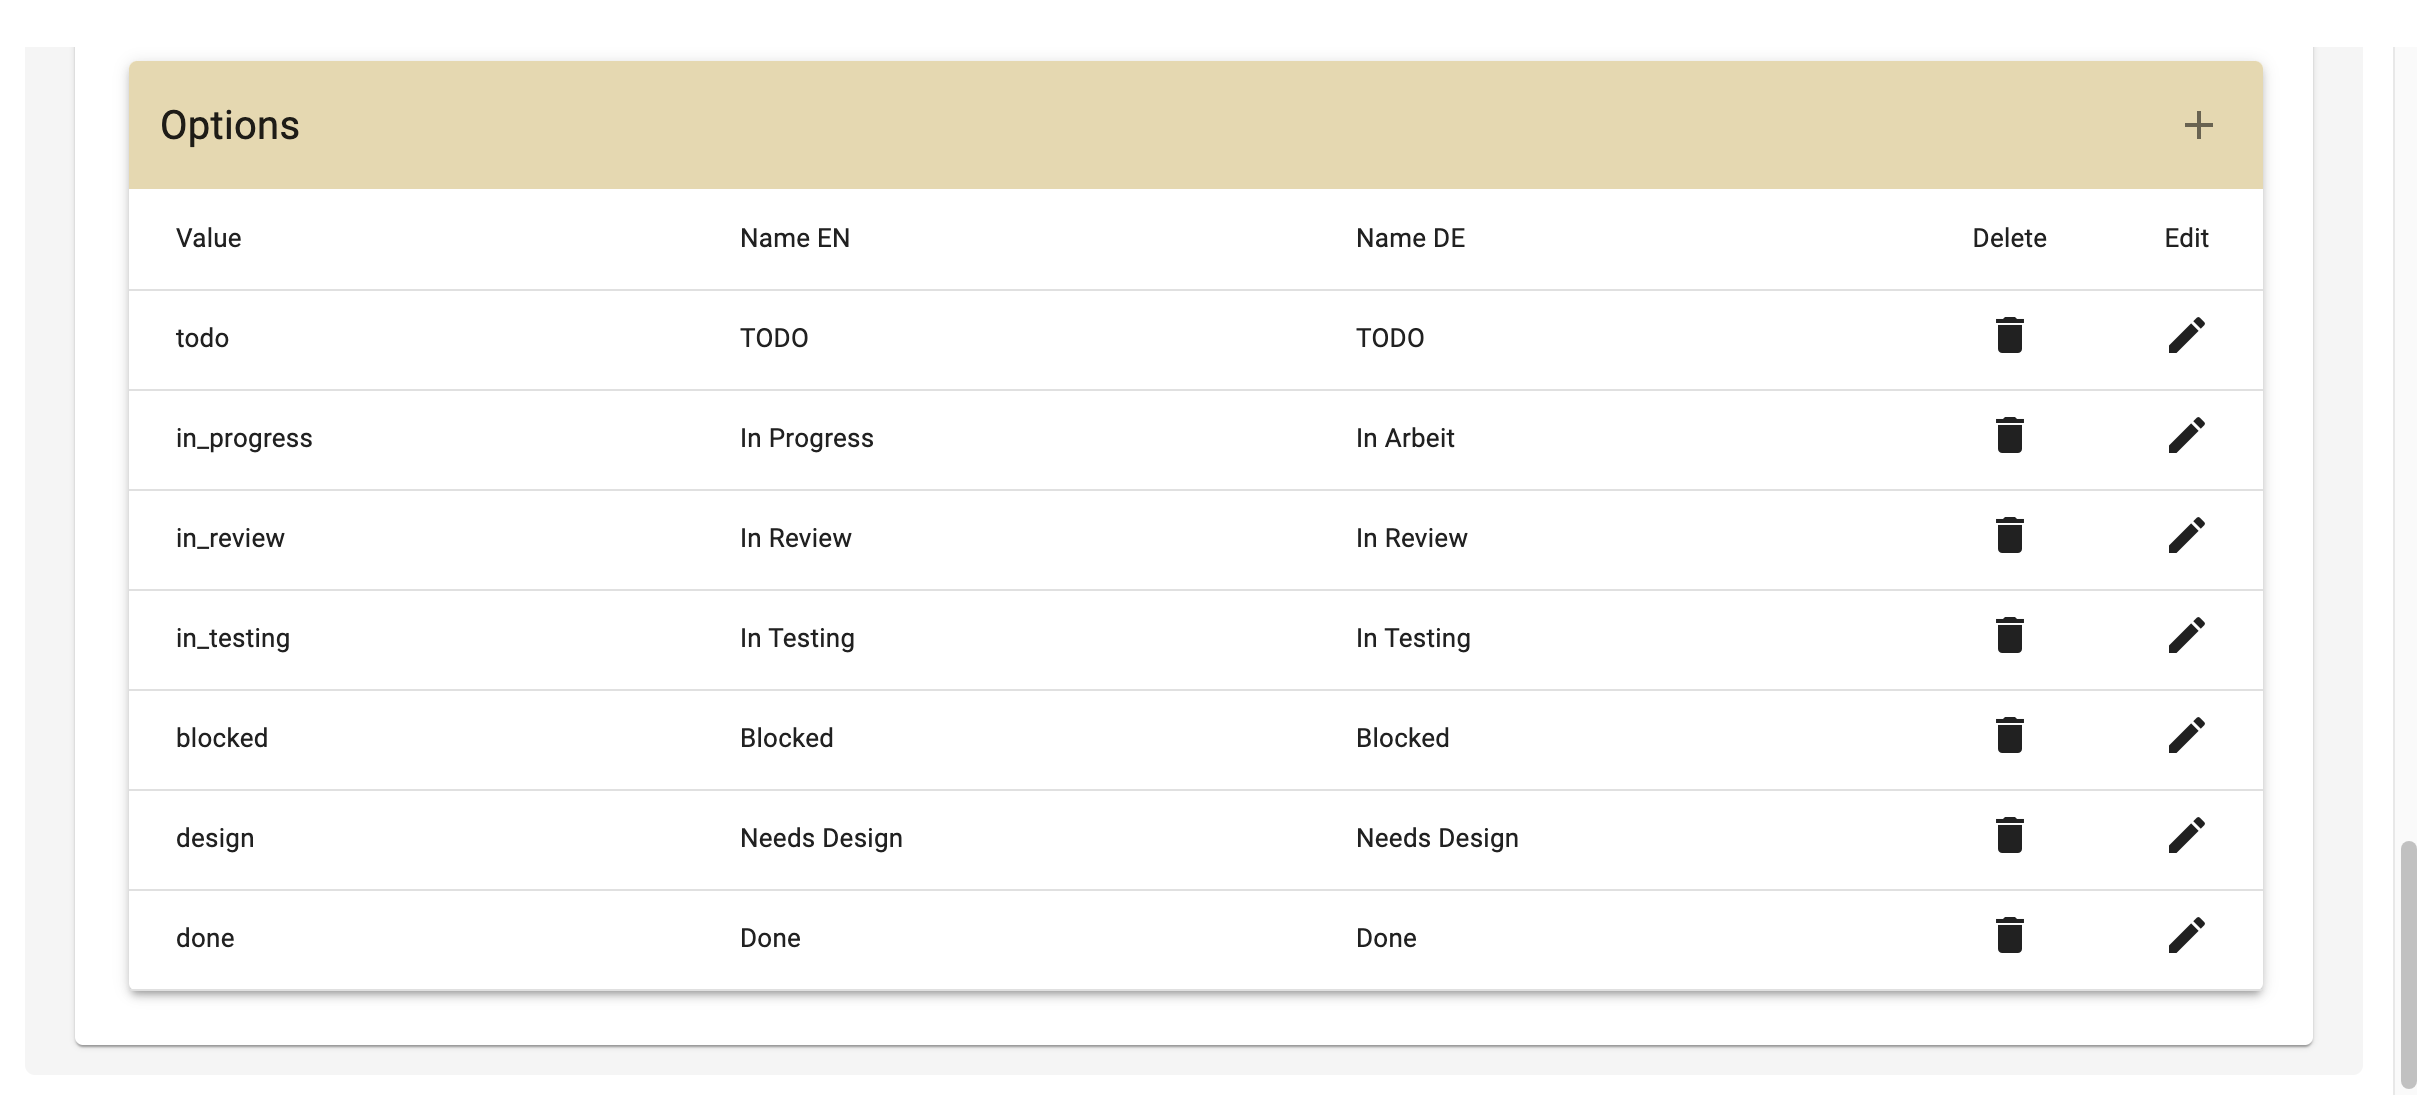
Options for a component tag 'Status'
In the options you have to insert value (can consist of numbers, words and low lines only) and name in English and German or other supported languages. Also you can edit or delete an option. To create a new one, click ‘Plus’ at the end of the line ‘Options’ (see Image 16).
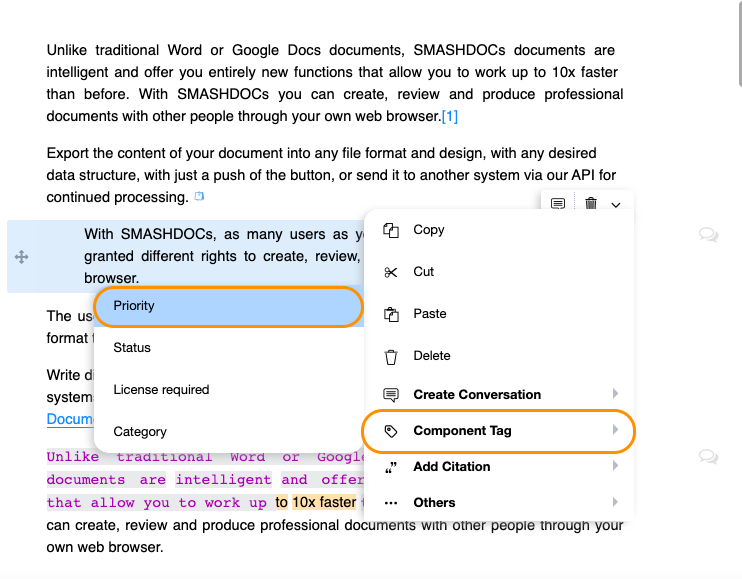
Once the component tags are created or uploaded on the specific system, they can be find in SMASHDOCs editor, when you add a component tag to any components.
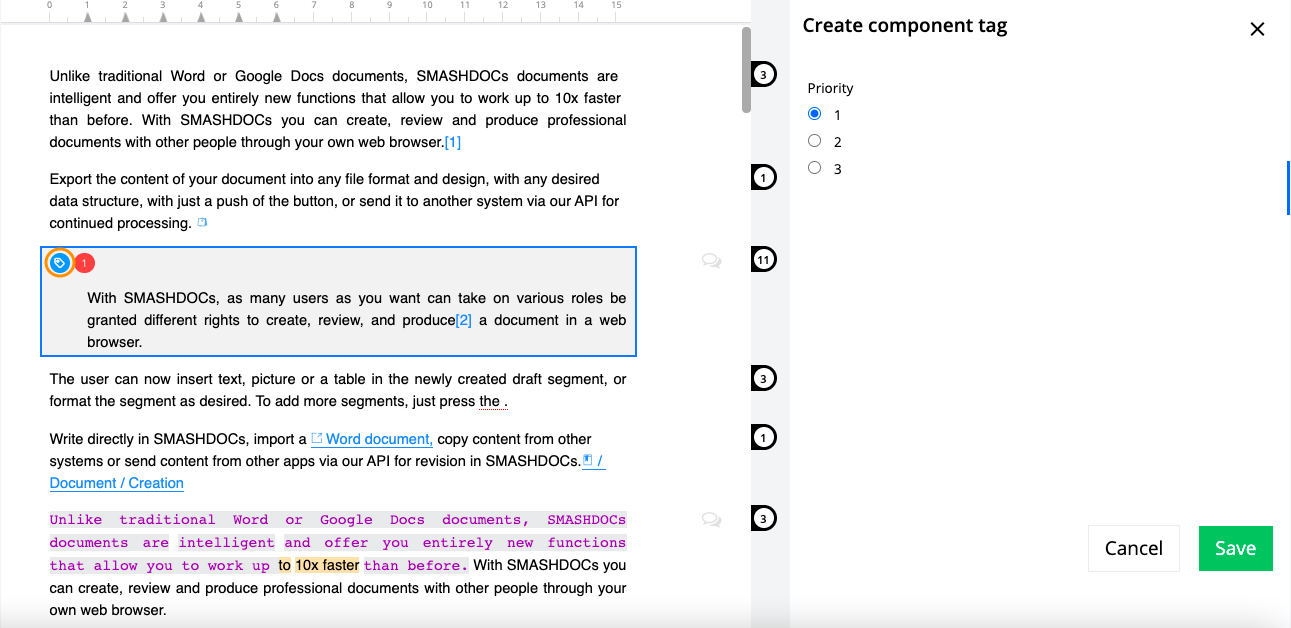
A new component tag highlighted
In text component you can see the name of component tag, filling color (blue, as in settings) and text color (white, as in settings).
4Special Characters
In Special Characters settings you can also create a new special character, edit and delete it.
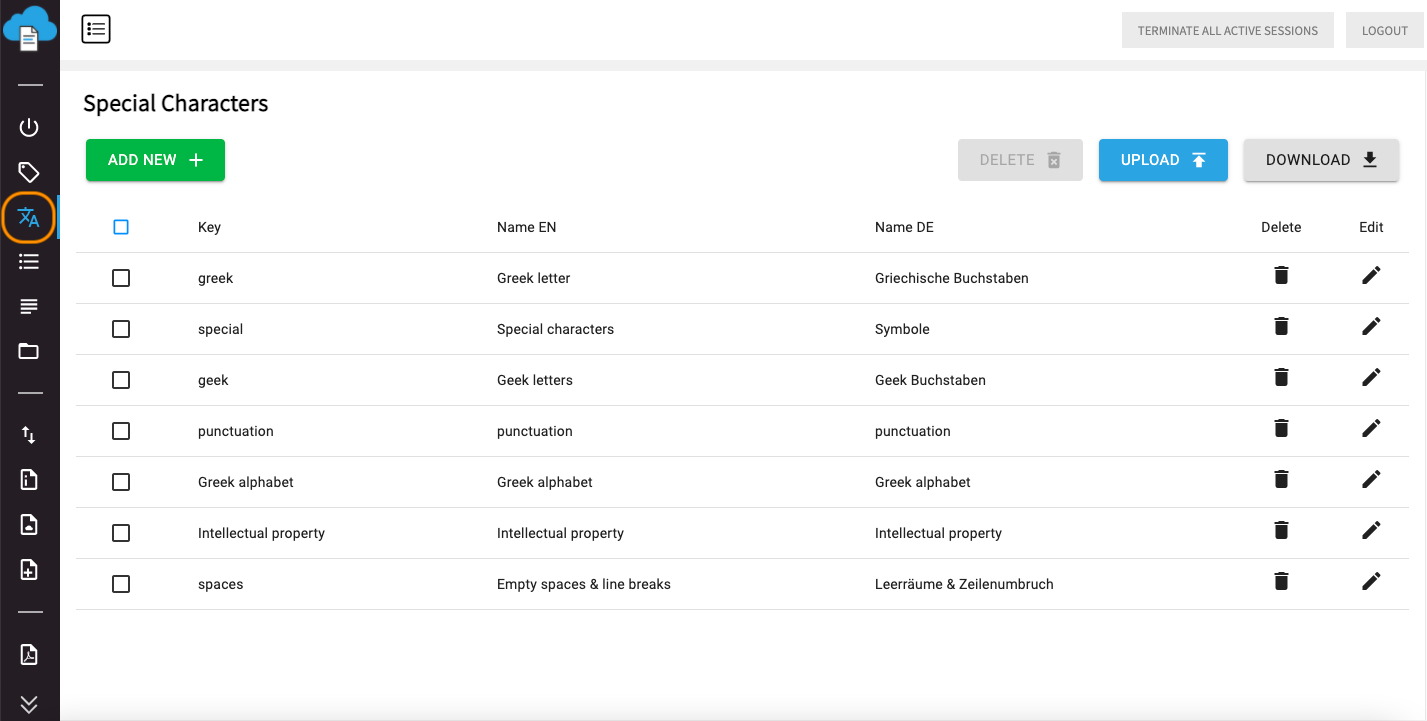
Special Characters settings
You also have an opportunity to upload a file with component tags to the Admin page in .json format to add them to your system and download a .json file with already existing special characters in the Admin page to have a clear overlook of codes, names and key names in all supported languages within a single document.
If you need to create new special characters, press the button “Add new”. You are able to create special characters menu, where you have to insert key and name of it in all supported languages. Special characters menu allows a user to create several characters related to one group (e.g. Arrows - means, that codes of all special characters that refer to ‘arrows’ in the Admin page will be displayed in a single special characters menu).
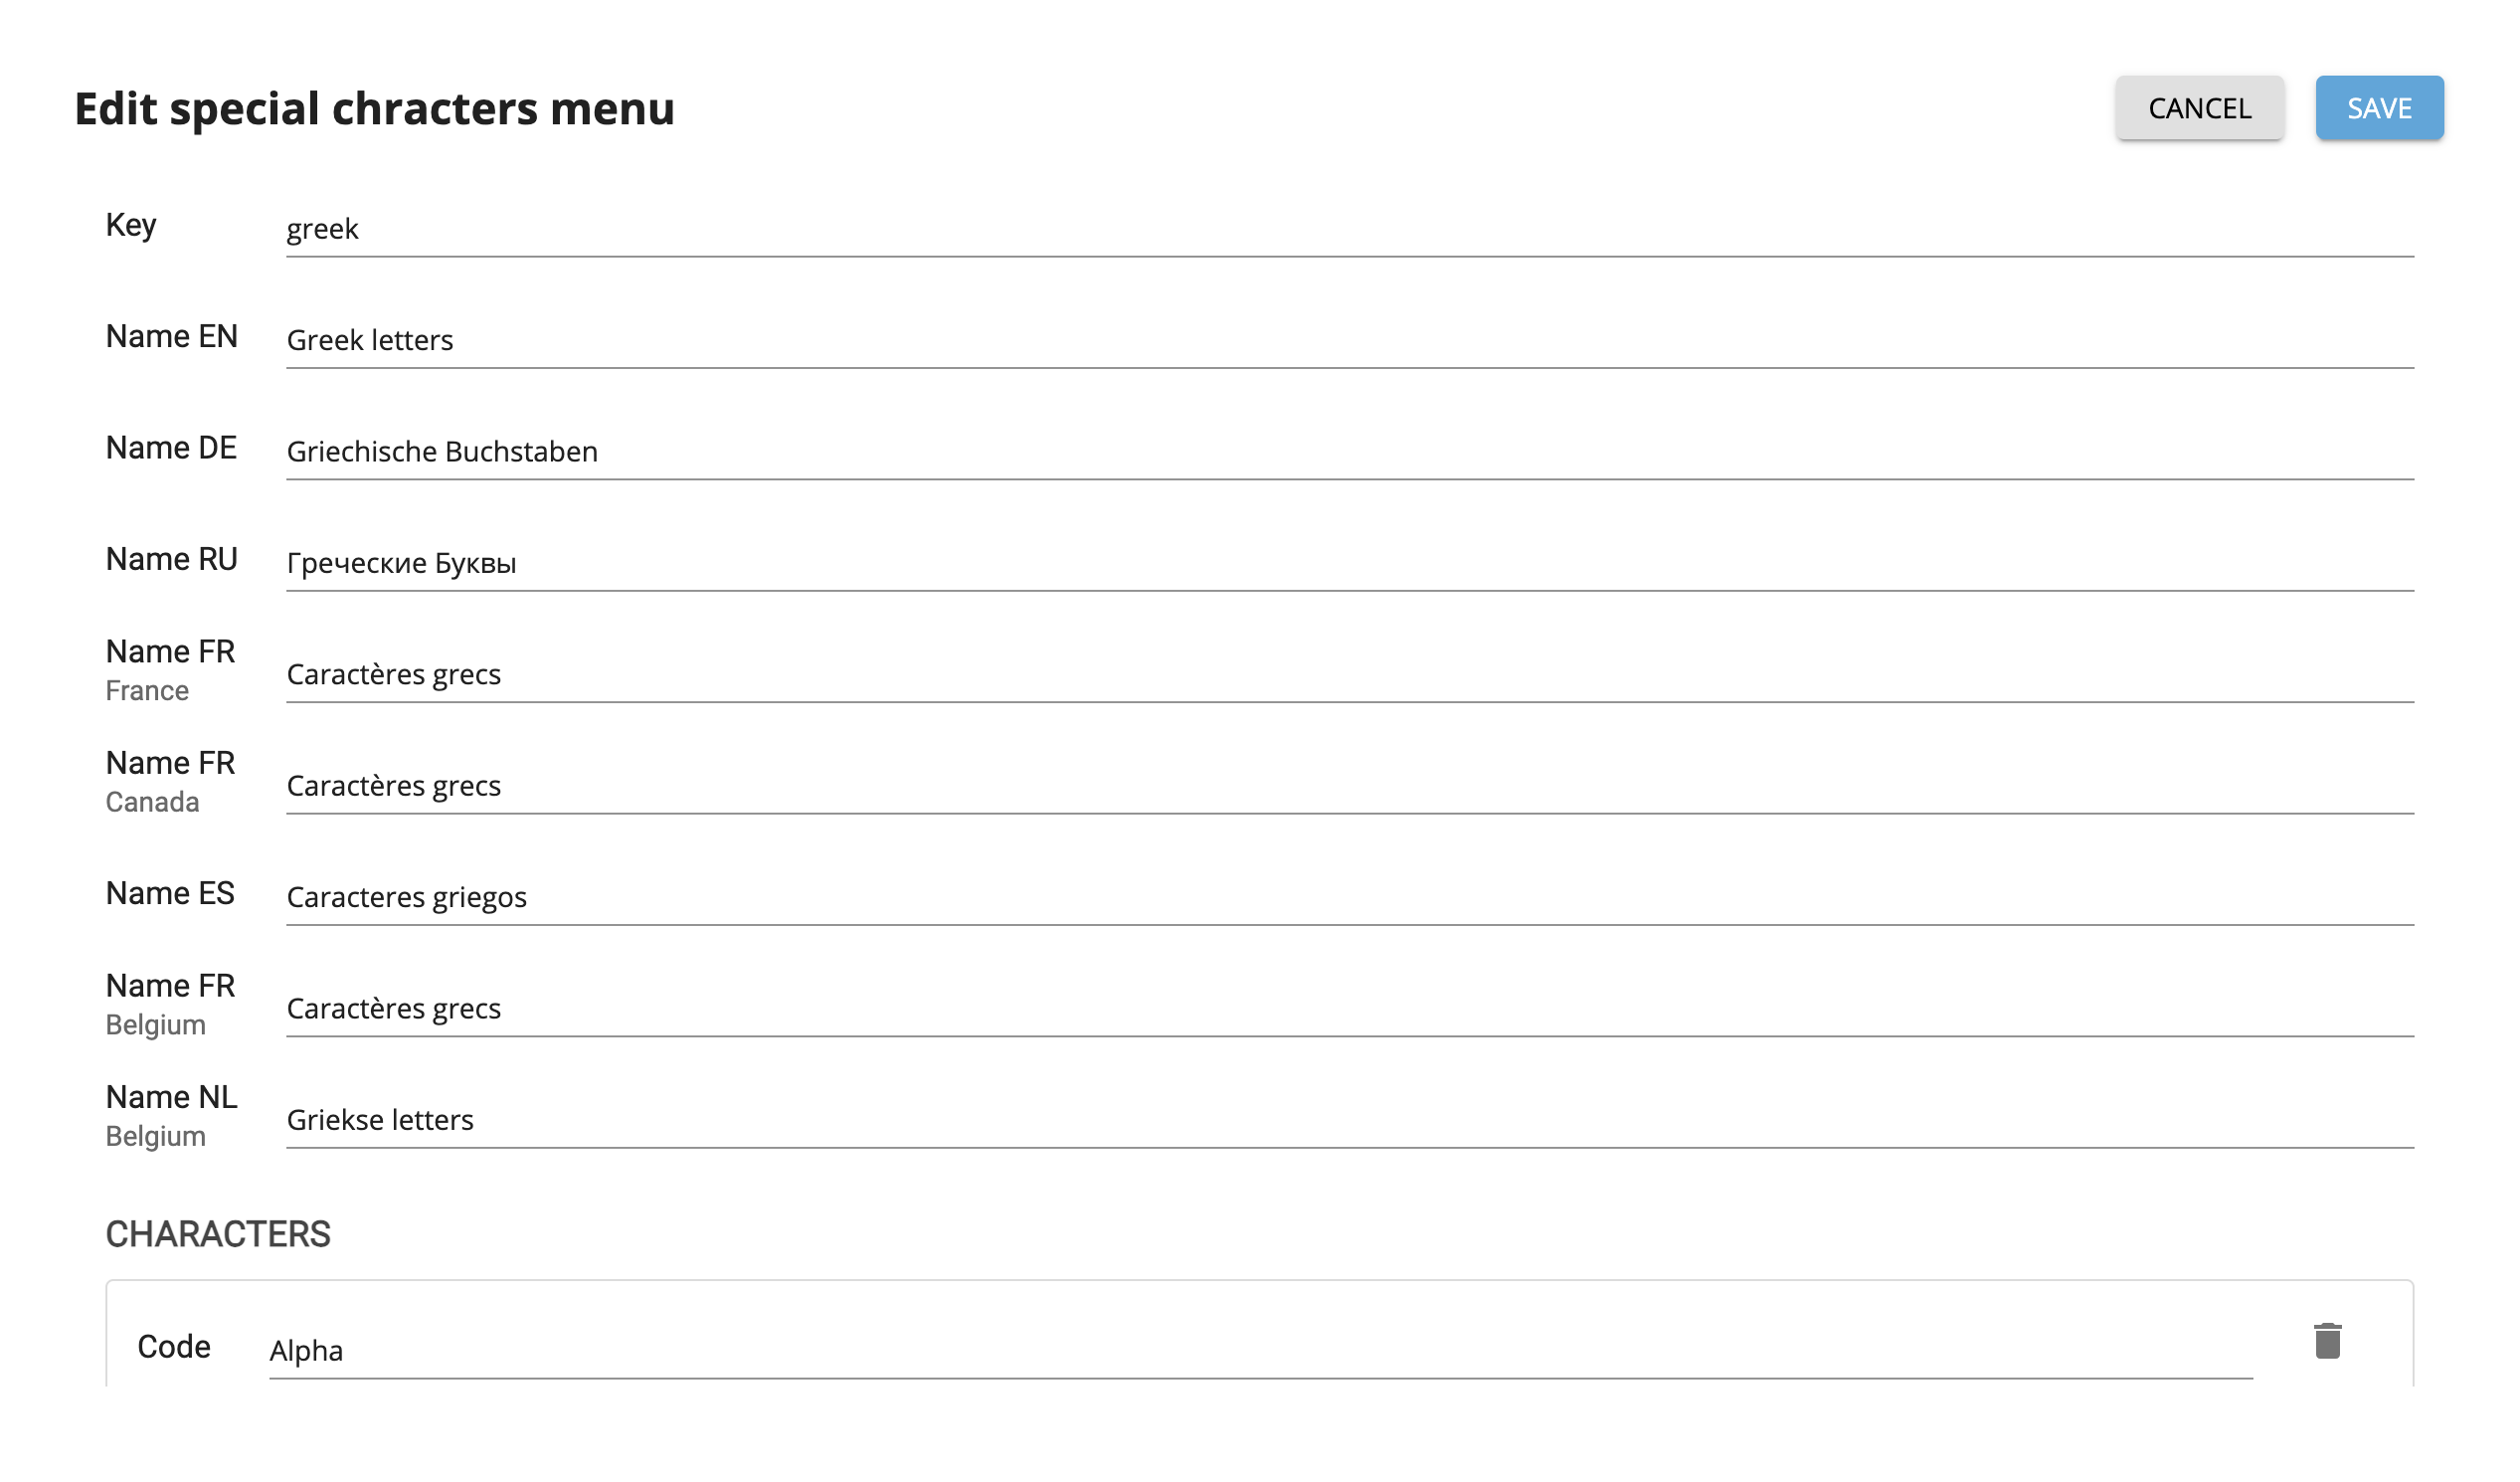
Create special characters menu
Scroll down, and you will find an option to create a special character by adding code and a name. Press “+New” and you will create one more character in this group.
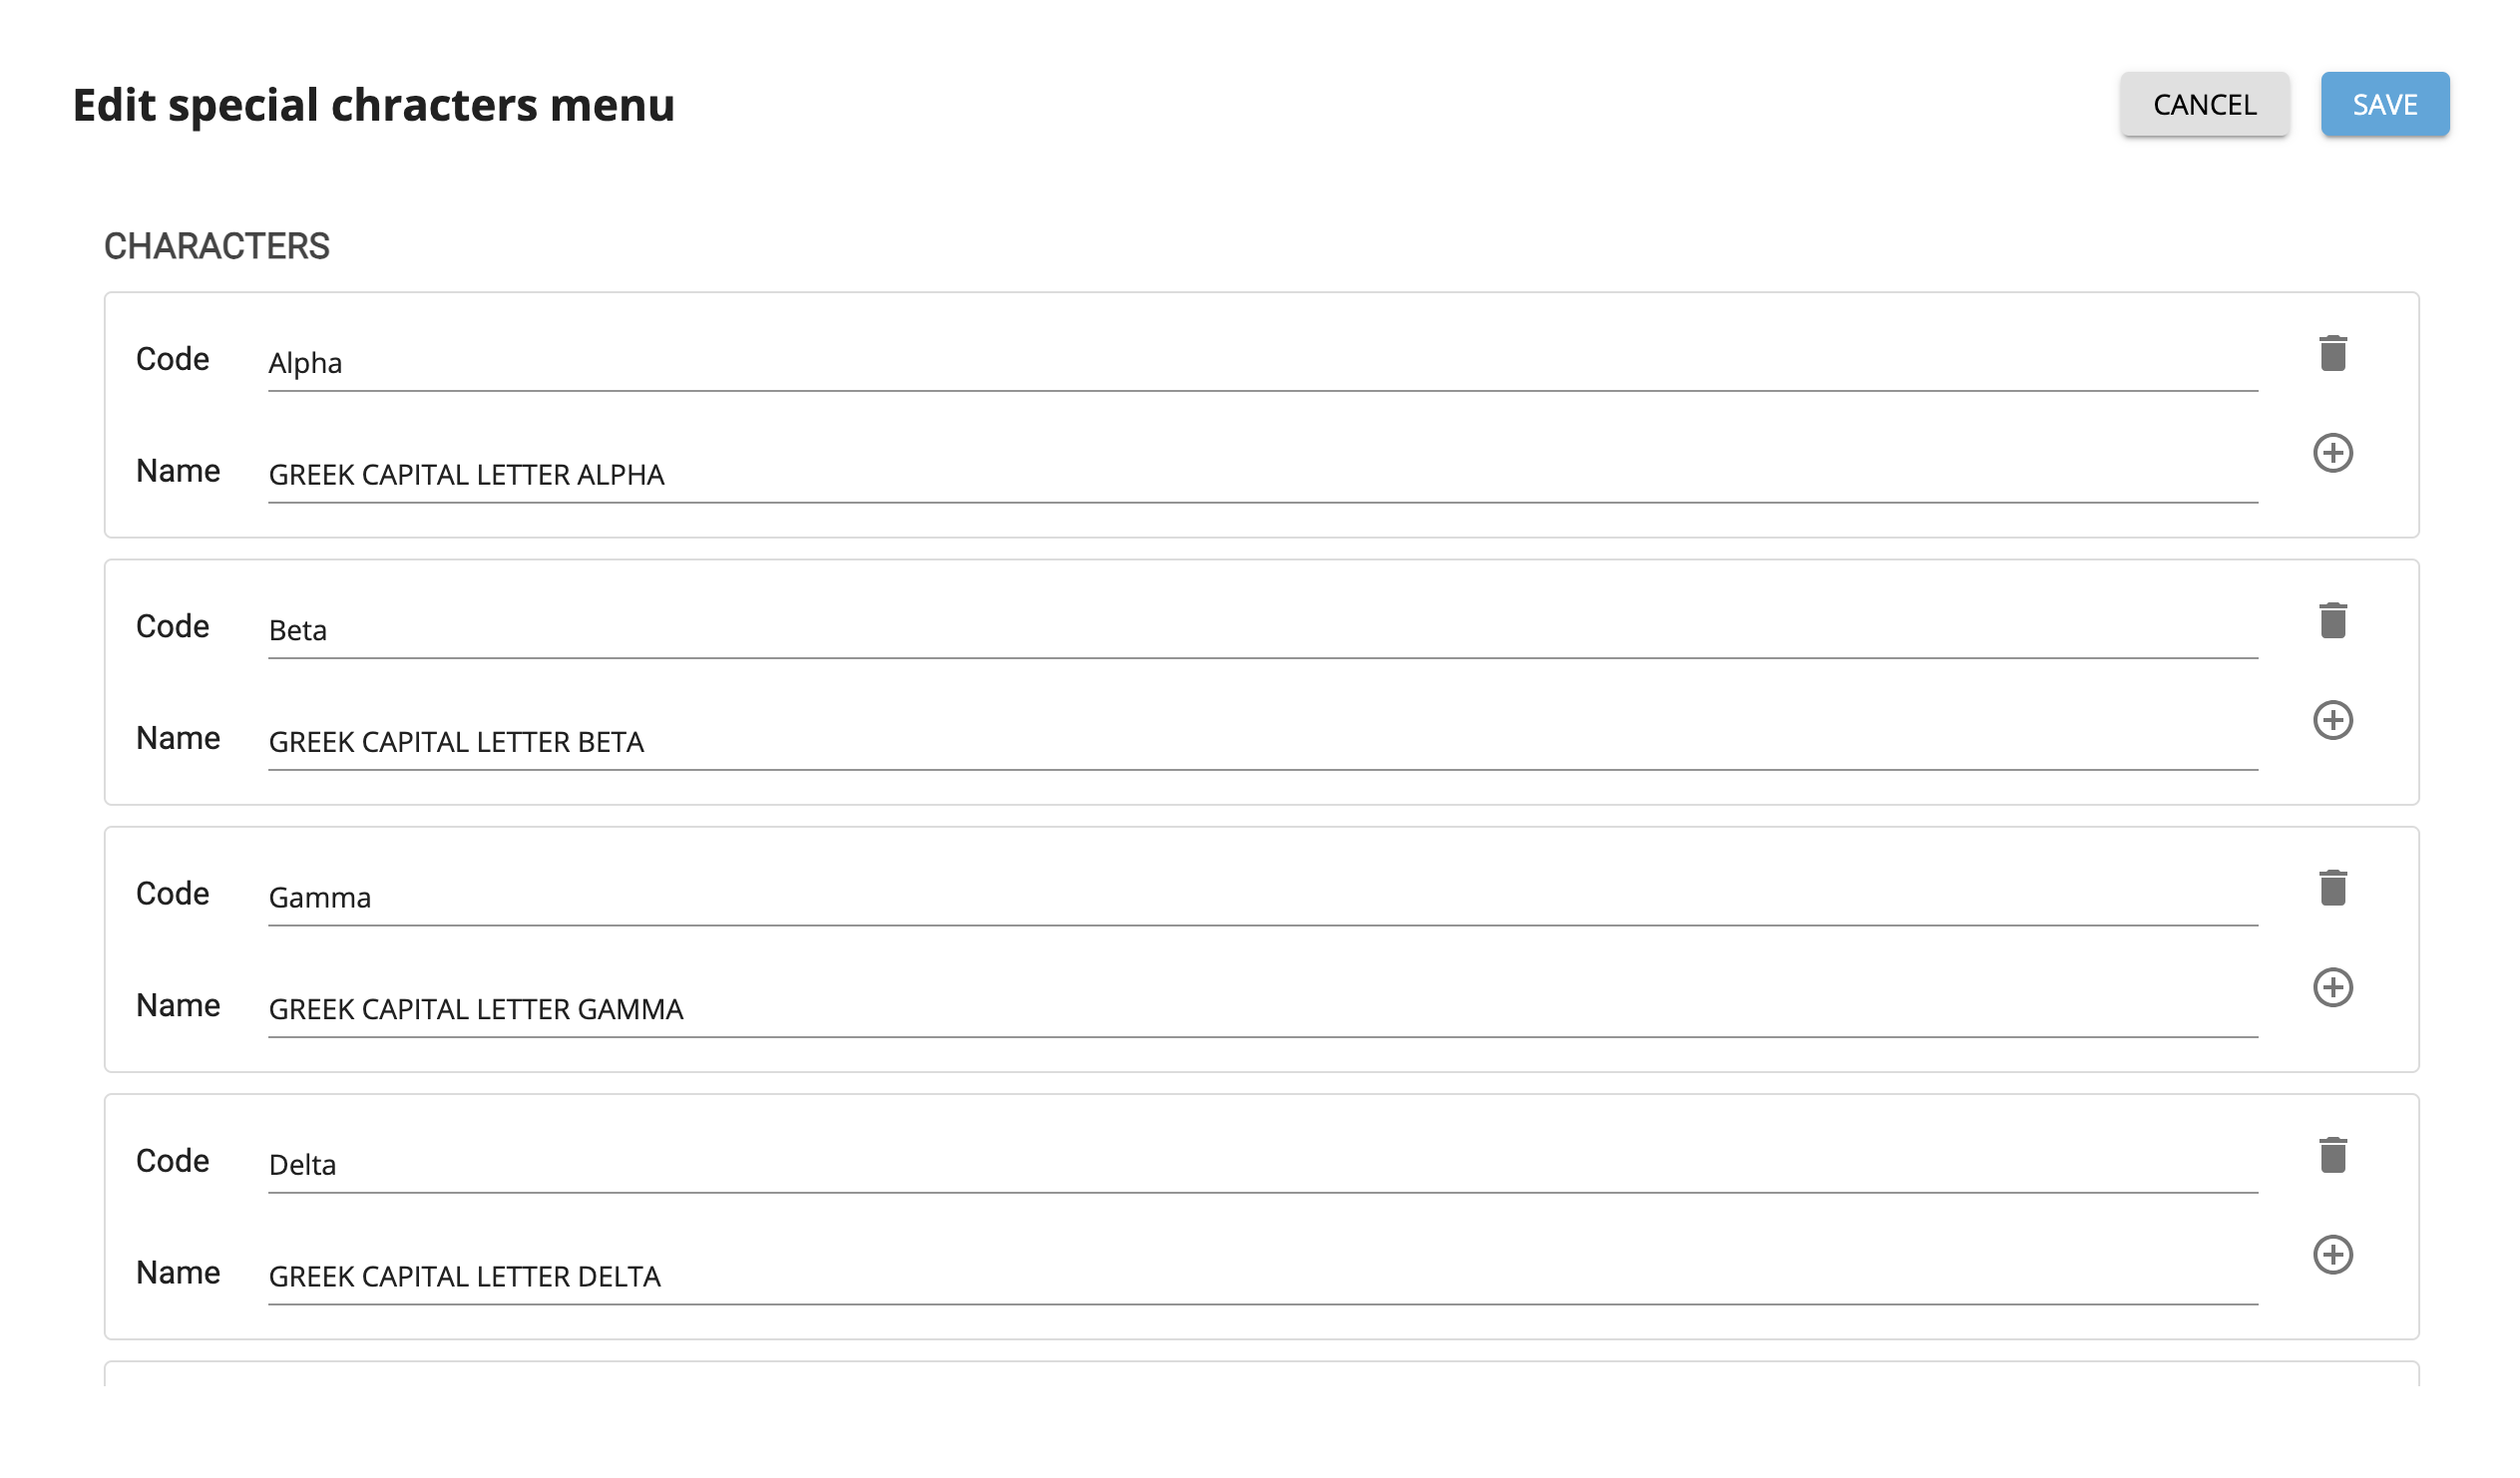
Codes and names of special characters
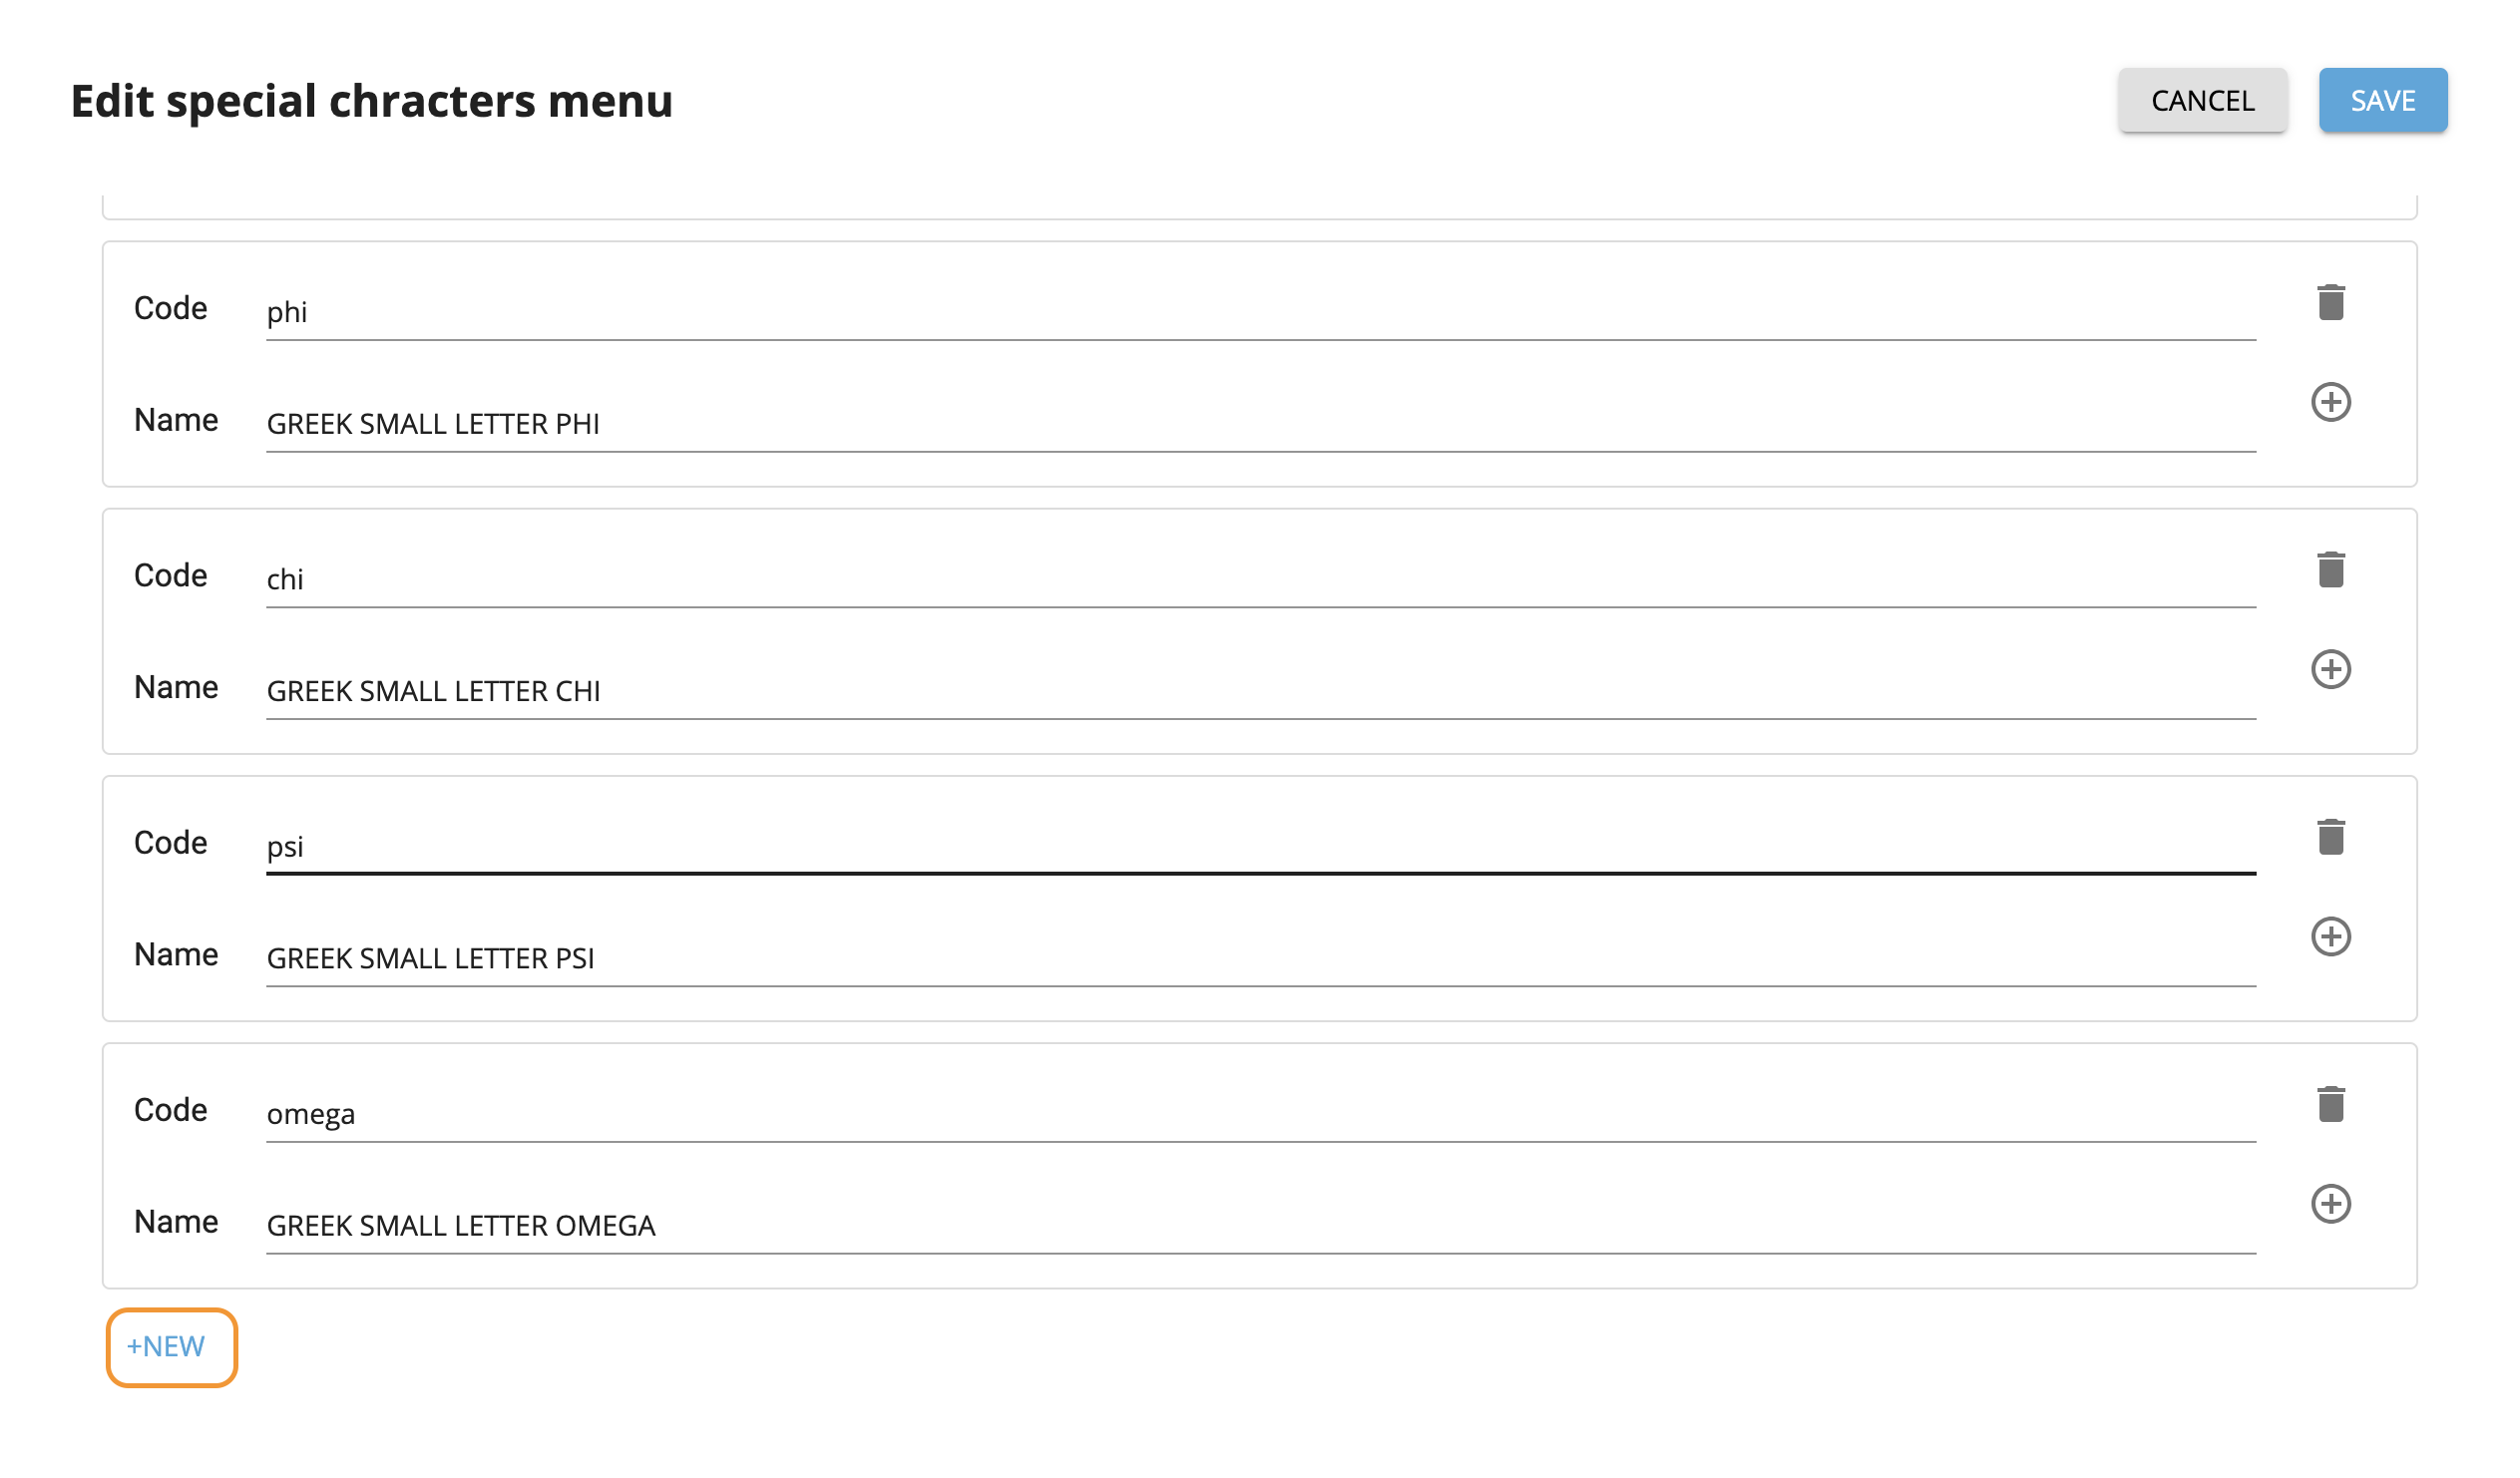
Button "+New" highlighted
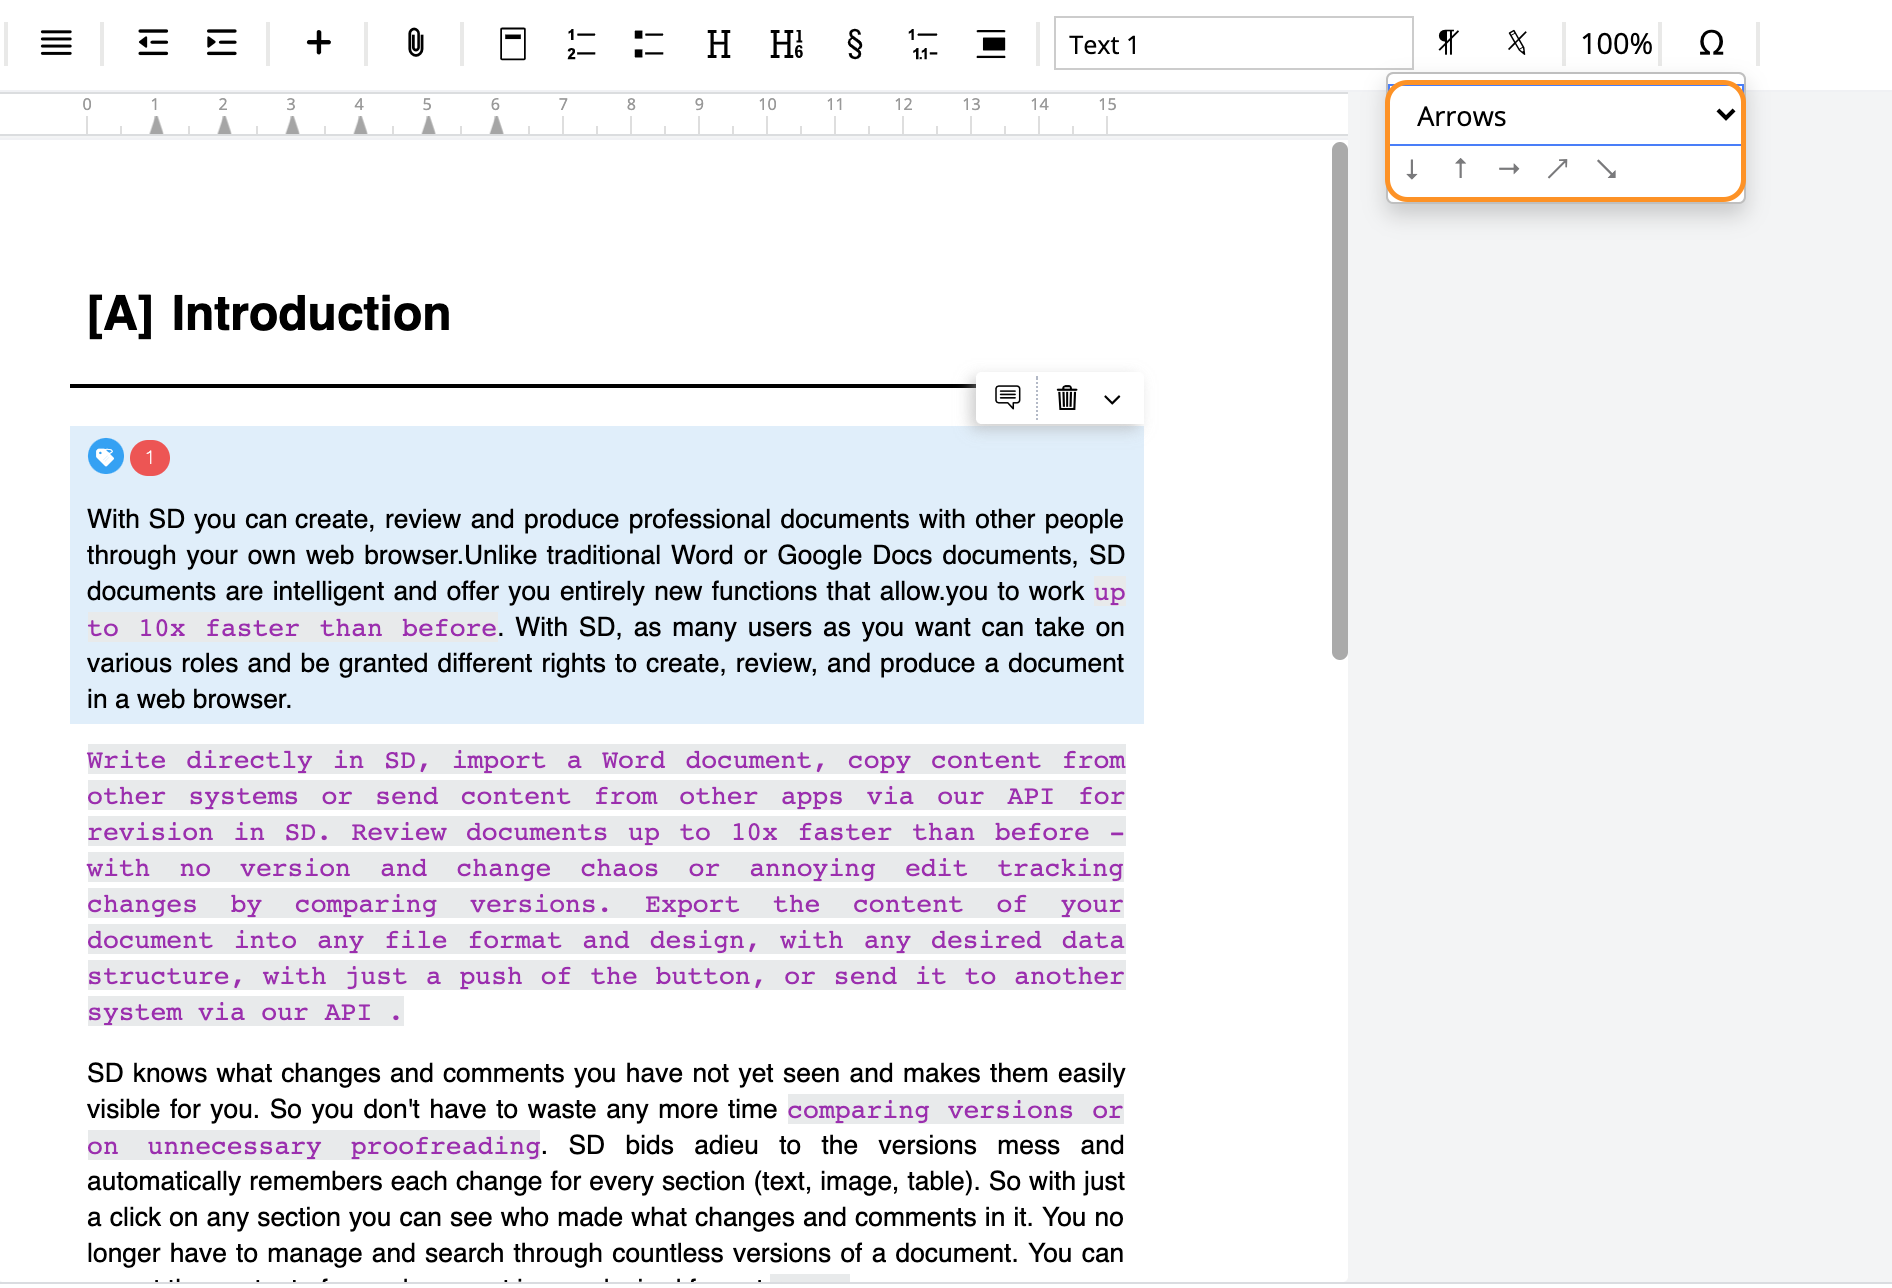
After you click “Save” above the dialog window, the new special characters menu will be added to the list. In SMASHDOCs editor the new set of special characters from the created menu will be displayed under the sign “Special characters”.
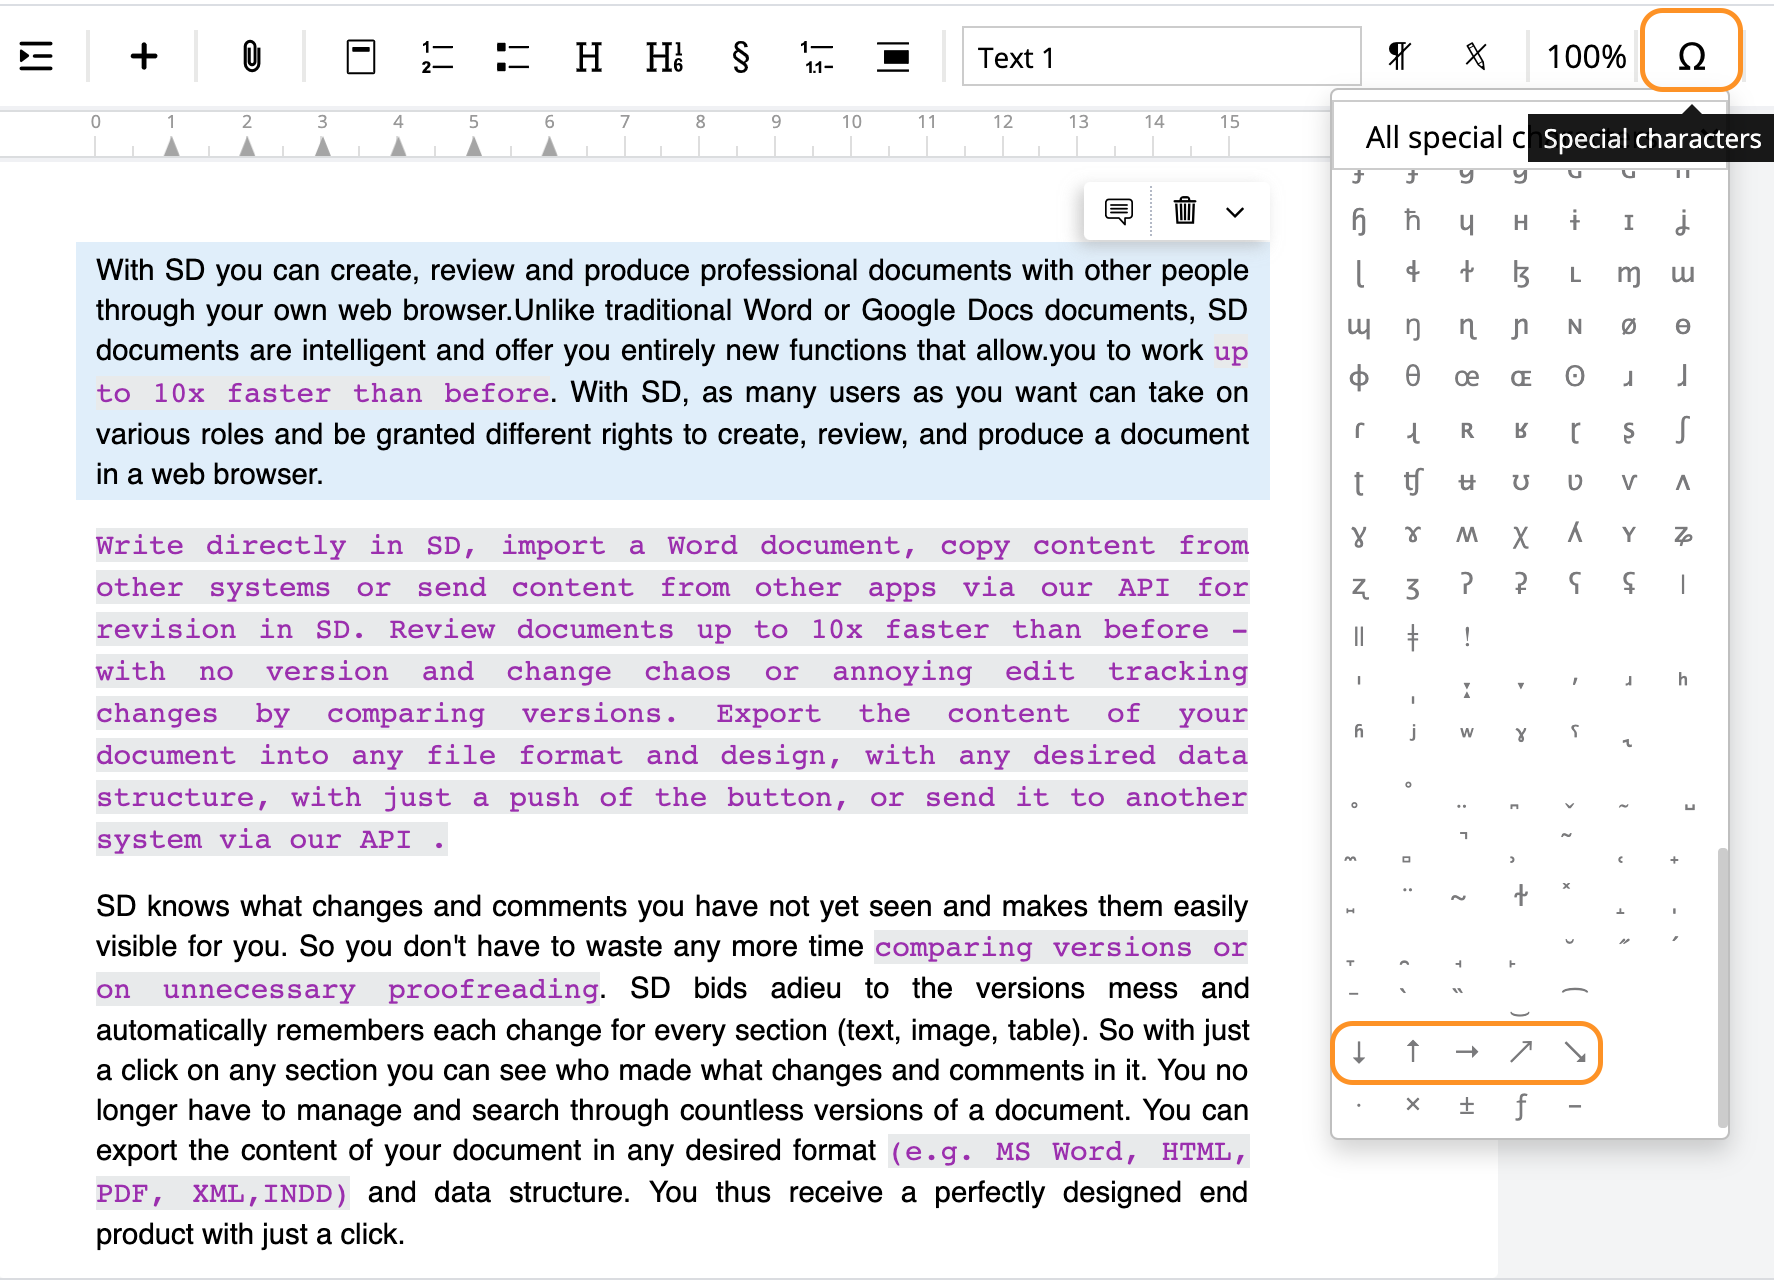
Newly added special characters highlighted
All arrow-signs, that are called downwards, upwards, global rise and global fall appear in the SMASHDOCs editor after adding their codes in the Admin page and are available to use.
You can also find groups of particular special characters by clicking “All special characters”.
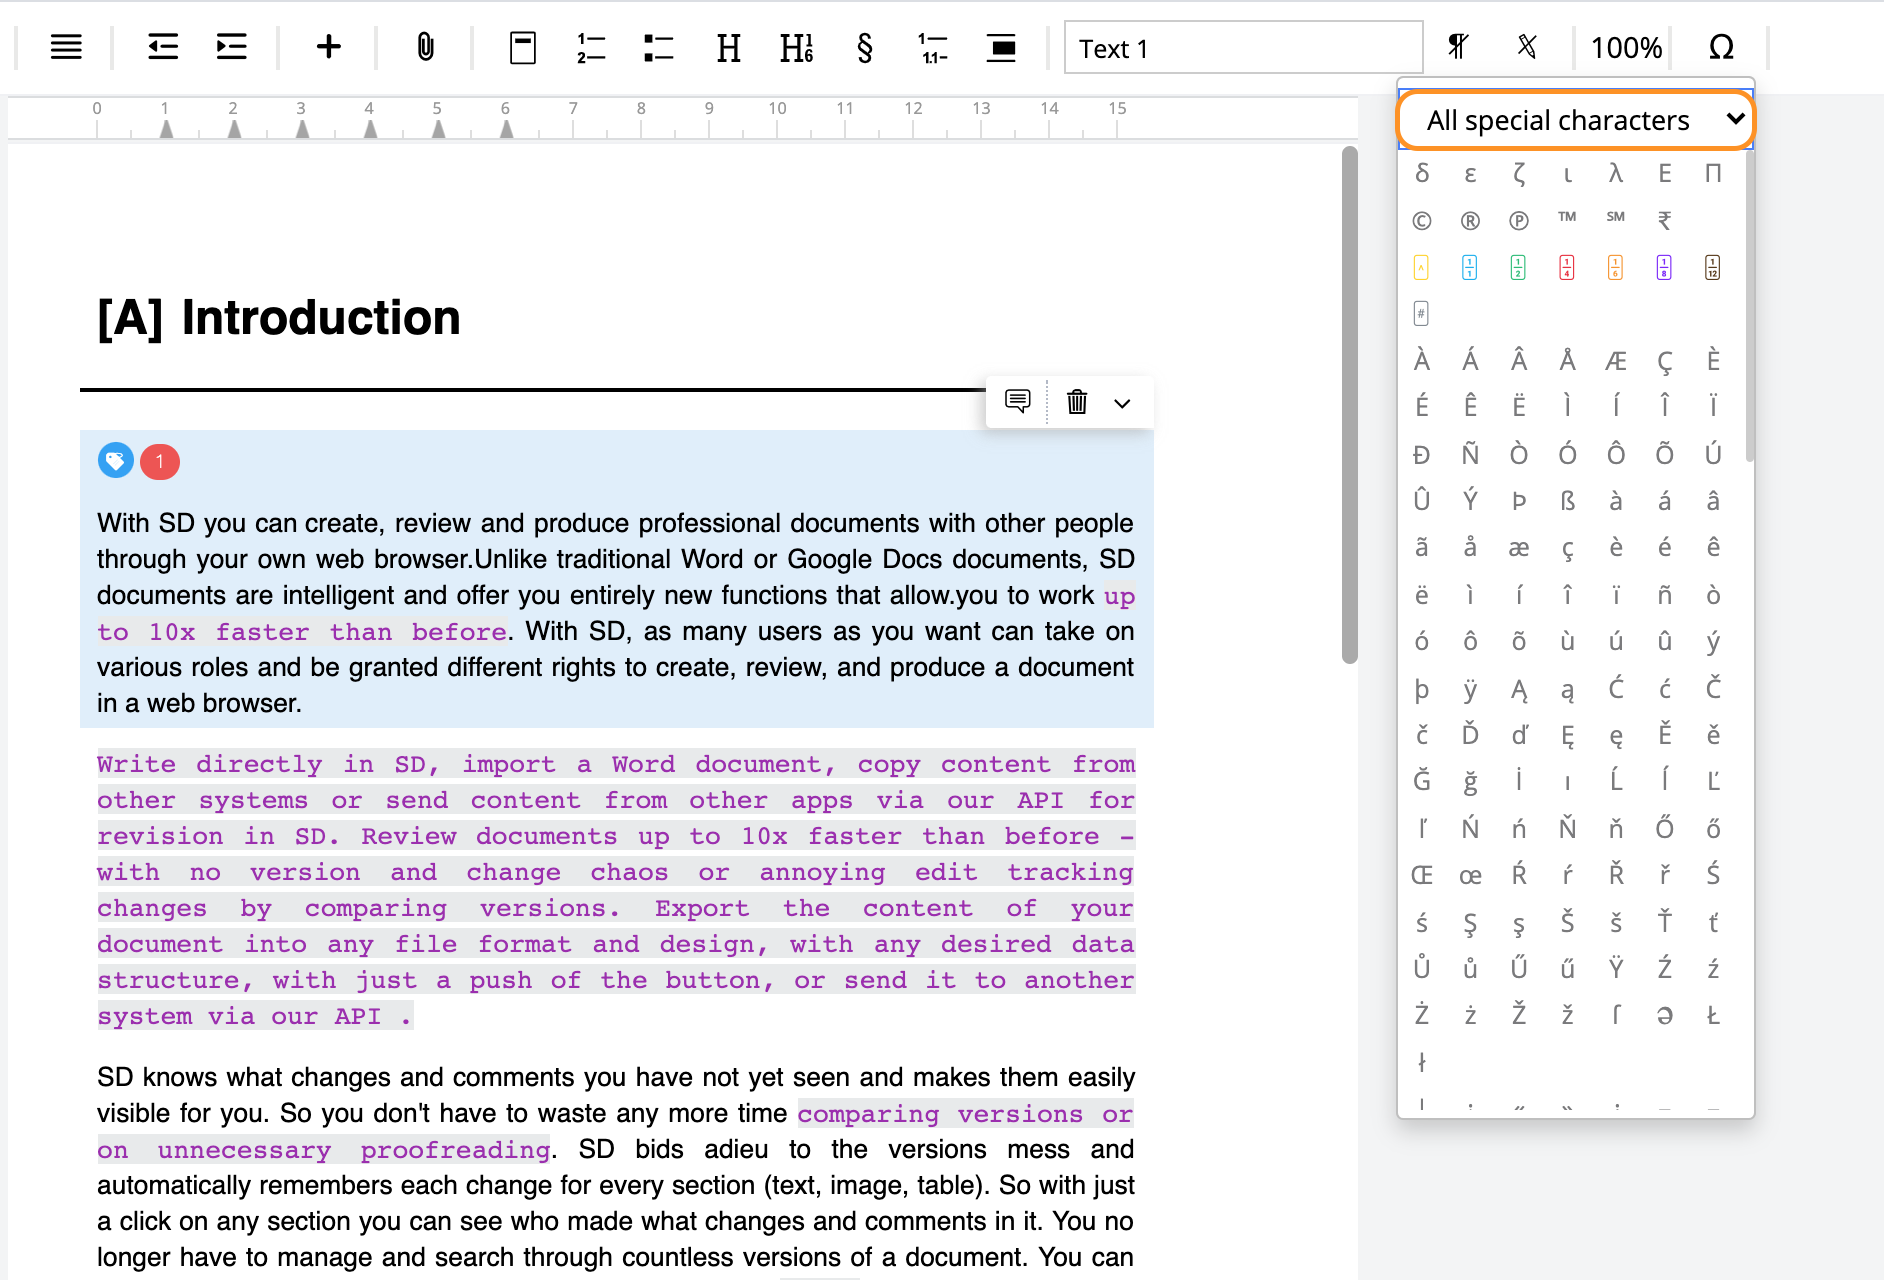
All special characters highlighted
Then you will see the list of groups of special characters. Choose one that you need to find.
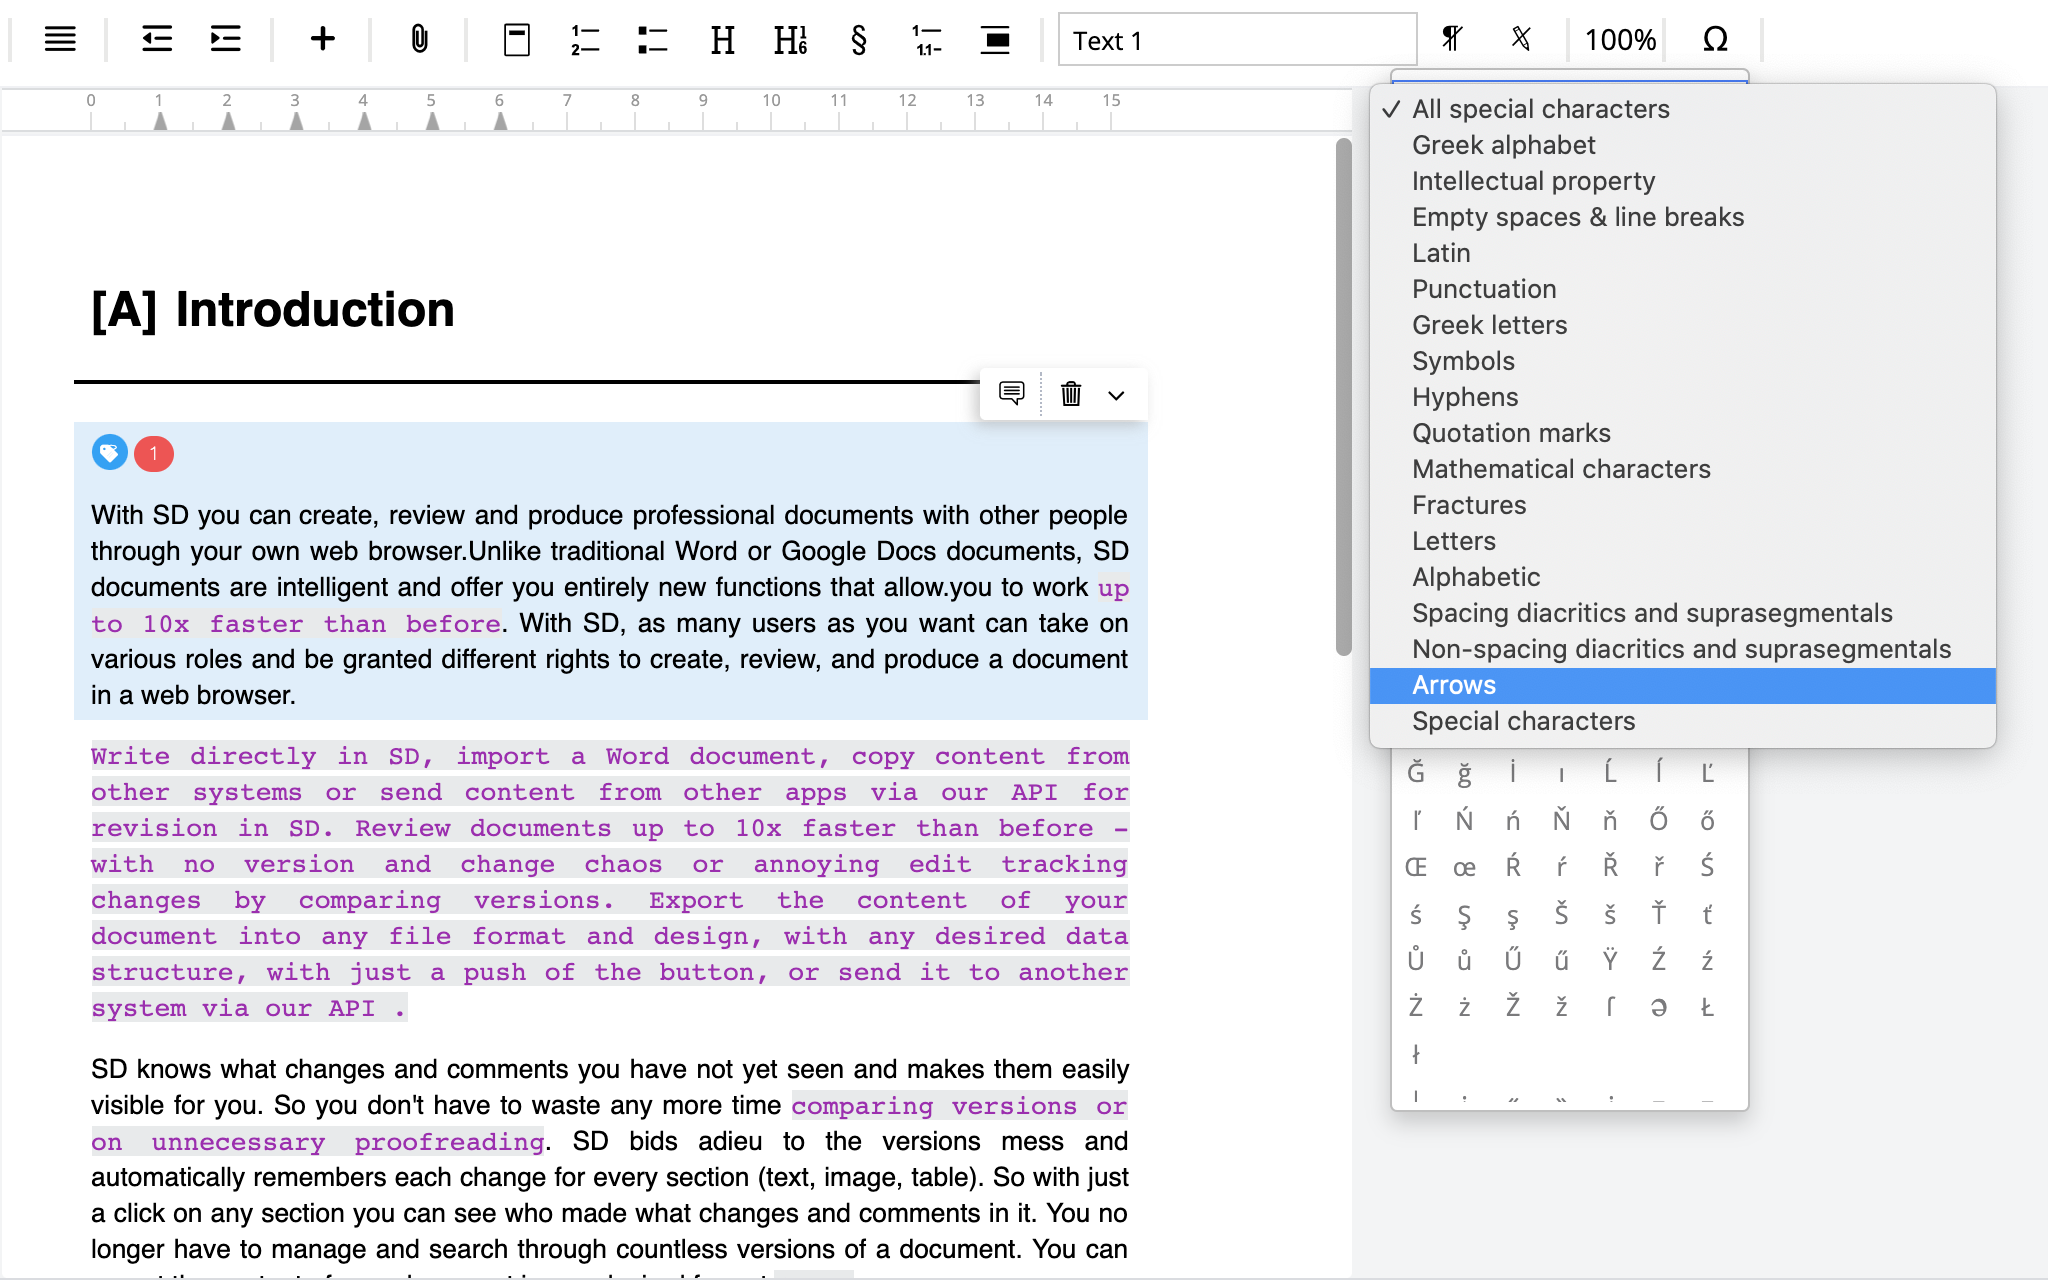
Required group of special characters highlighted
Click on the group and it will be separated for you to find appropriate character more quickly.
Separated group of special characters highlighted
5Inline Styles
In the Admin page it is possible to add, edit and delete an inline style. Click the related icon in the left toolbar and you can create a new inline style that will be added then to your SMASHDOCs system and will be available to be applied in a document.
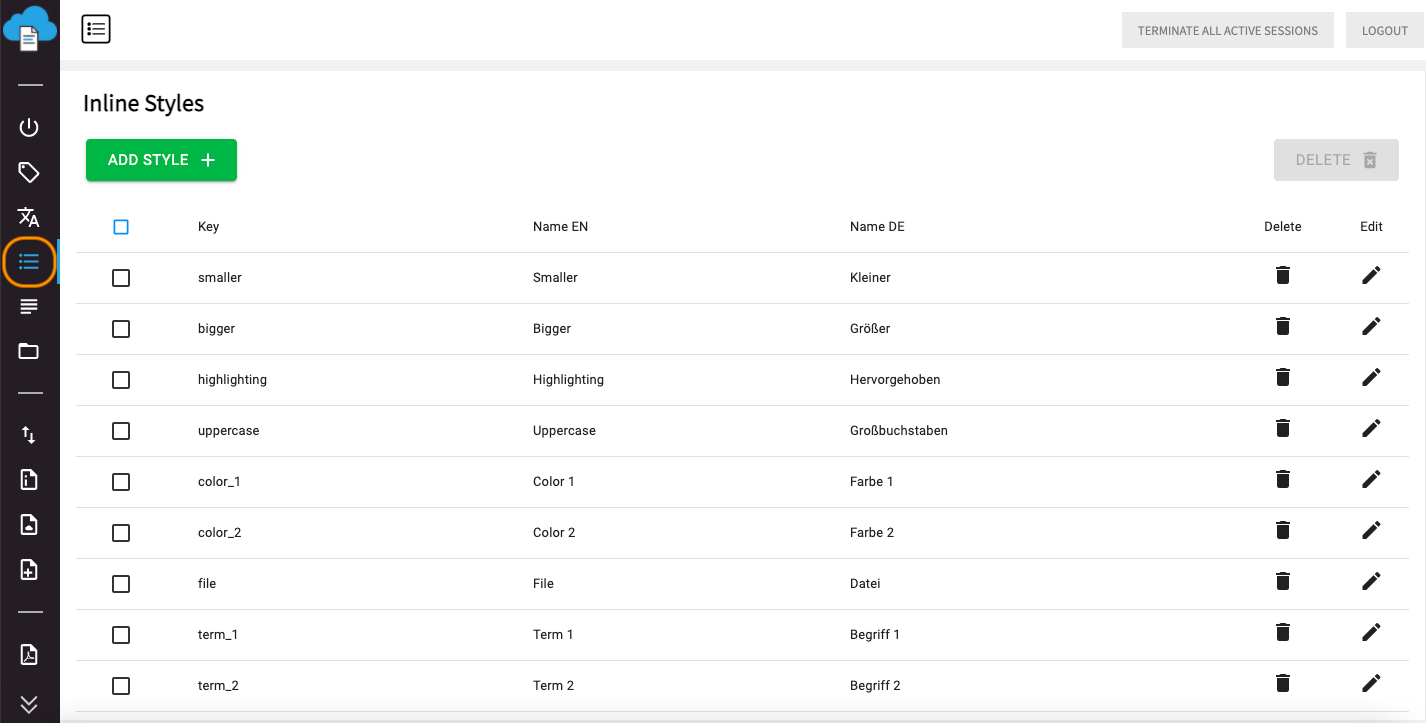
Inline Styles settings
After clicking the button “Add style”, the dialog appears, where you get two parts of settings: "Names" and "Settings".
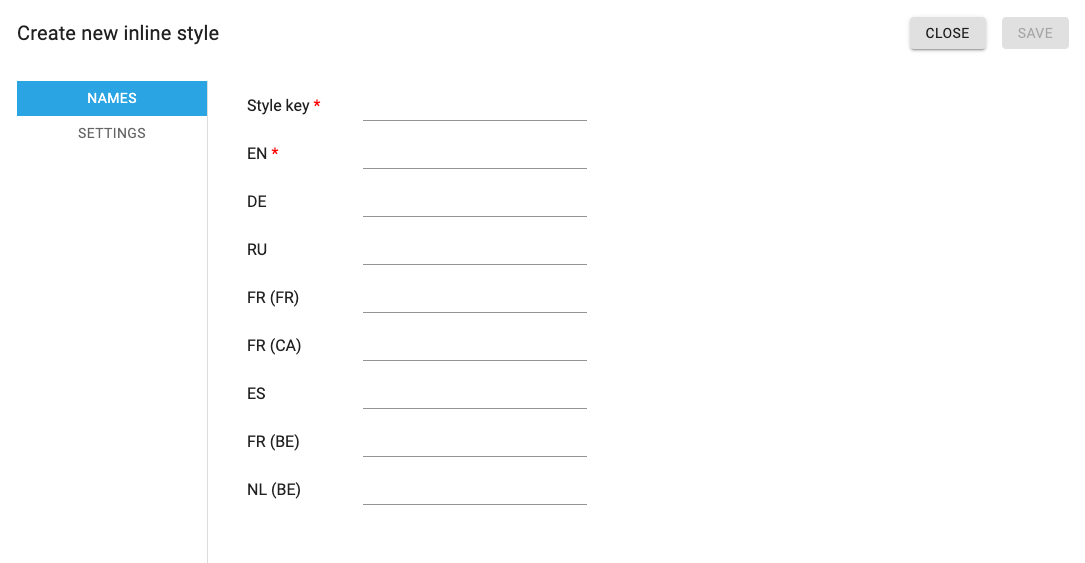
Adding style key and its name in all supported languages during inline style creation
In the part "Names" you should insert a style key and the name of a style in all supported languages.
In the part "Settings" you apply characteristics of the newly created style:
●Font family - in case style changes the script of a text part, where it is applied;
●Font size - if text part with this style should be smaller/bigger than the whole text line;
●Font color - color of text in the style;
●Highlighting - if text in the style should be highlighted in some color;
●Text shadow - optionally, if it is required in the style;
●Stylings - optionally, if any of suggested stylings are required;
●Letter case - in case the style should have outlook of any from suggested letter cases;
●Position - if text part with this style should be upper/lower than the whole text line;
●Shortcut - if shortcuts are applicable to this style.
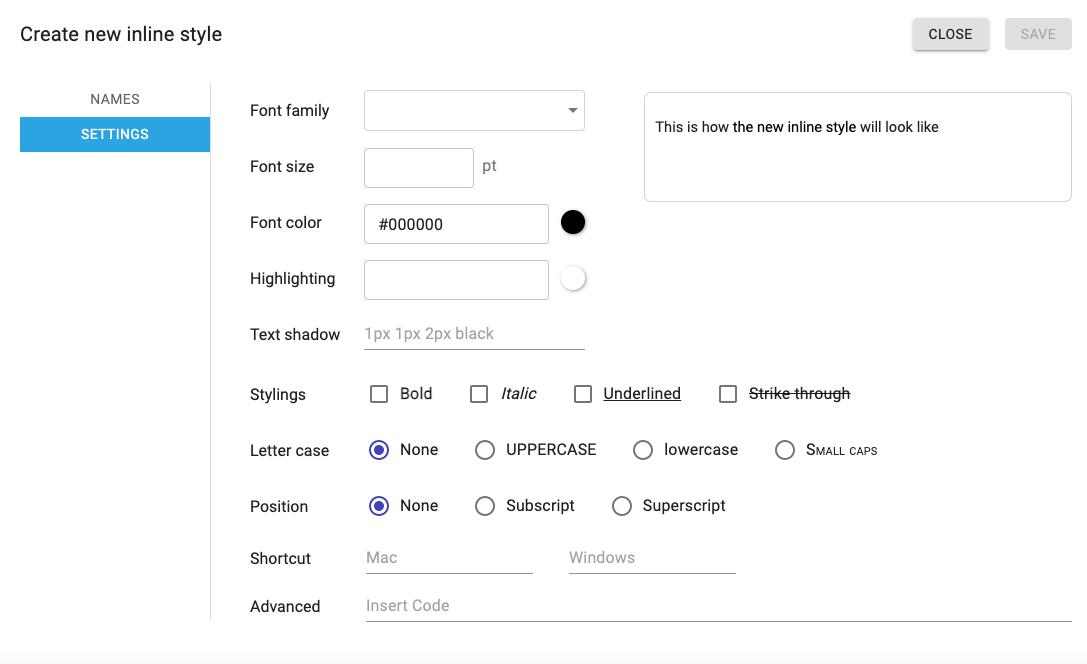
Settings during inline style creation
Then click “Save” and a new inline style will be available for usage in your system. To check a new inline style in the system, open a document in your SMASHDOCs account and click on the list of inline styles above the page.
The list of added inline styles highlighted
6Paragraph Decorators
After Export templates settings on the toolbar goes Paragraph decorators page.
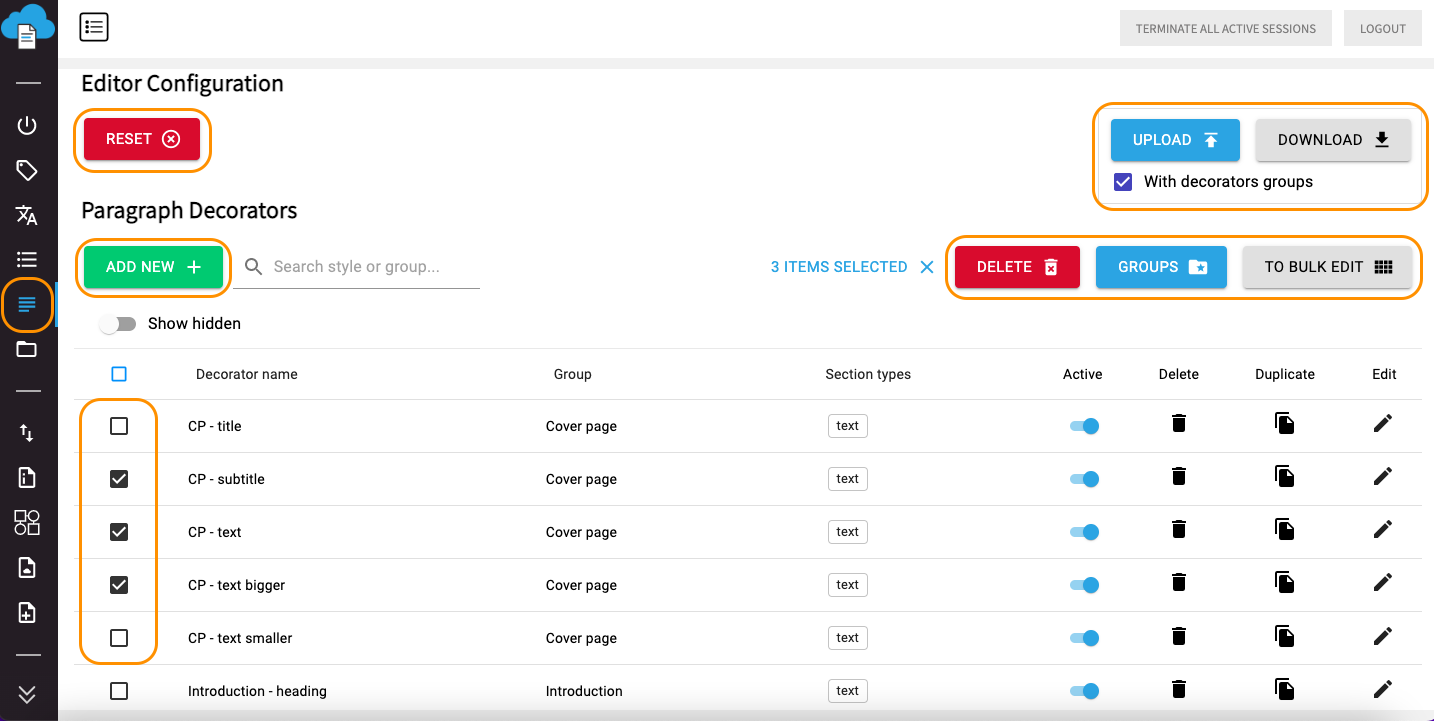
Paragraph Decorators page
Such options are available on this page:
●Add new - add new paragraph decorator
●Reset - delete all decorators, inlines, Xref and QuickStart Menus
●Select - select all or a few items to be able to proceed with further actions such as deletion or download of them all/those few.
●Delete - delete button gets activated once at least one item has been selected.
●Upload/download with decorators groups - including decorators group is now optional and you can turn it off any time. While downloading paragraph formats you will get an Excel file with the list of all paragraph decorators configured in the system; while uploading paragraph formats to configure them in the system only Excel files will be accepted.
●To bulk edit - quick viewing of specified properties for a decorators group.
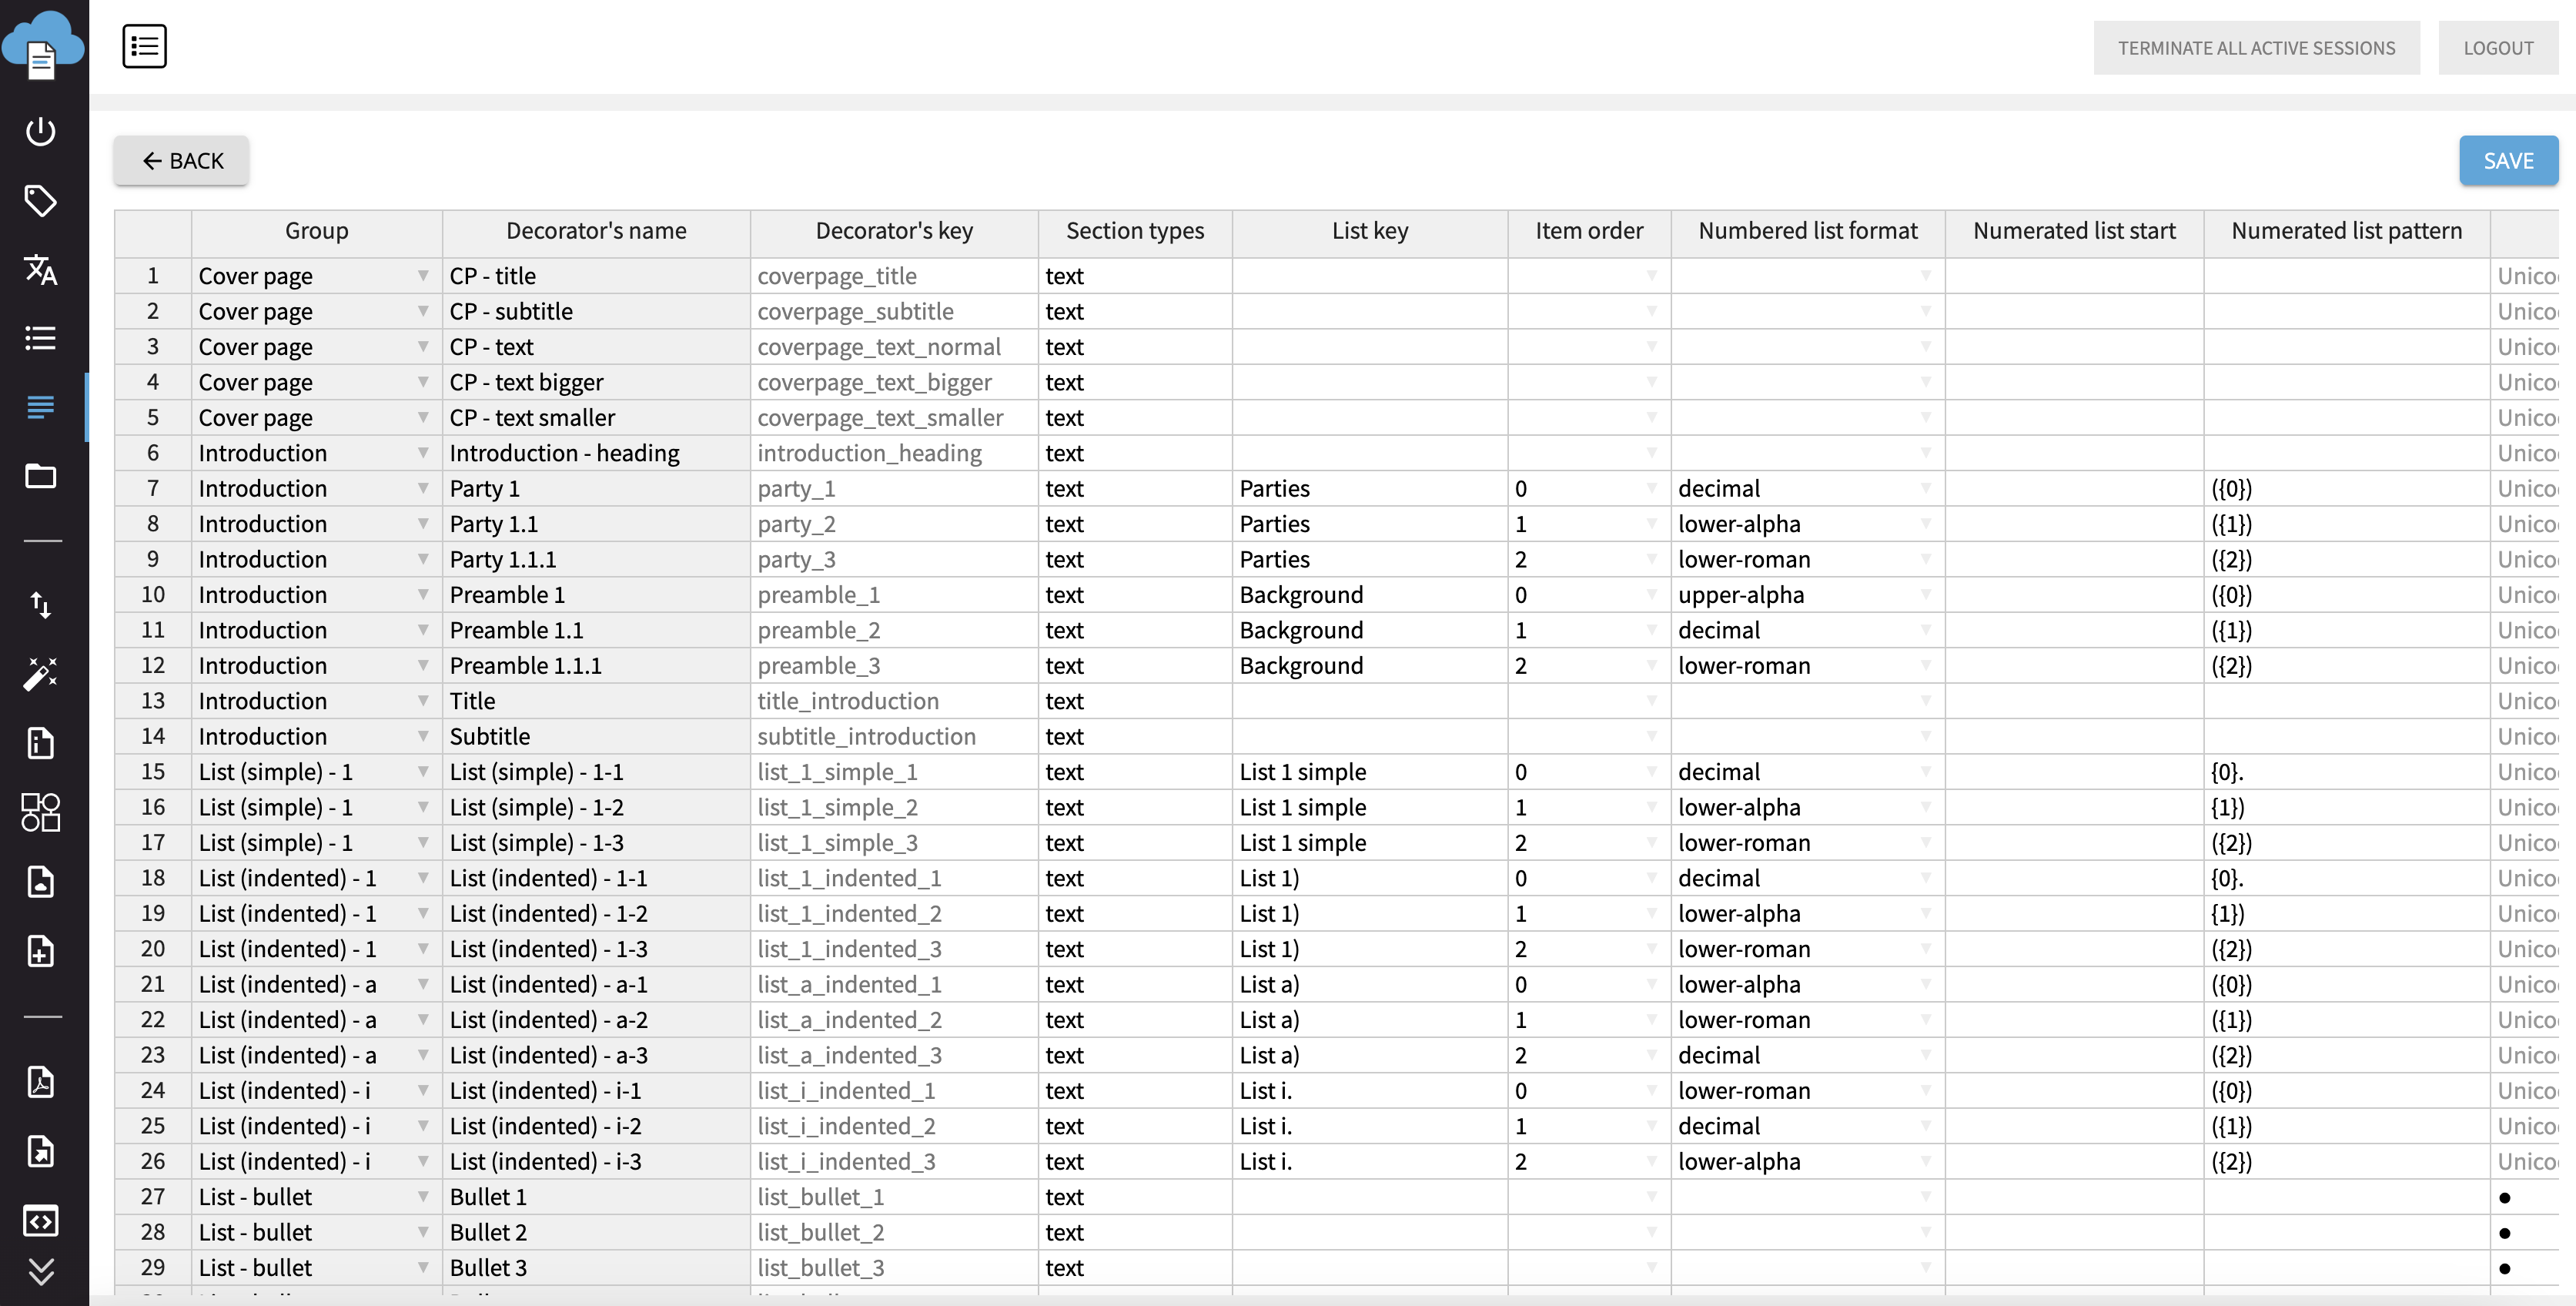
Bulk edit window
There you can get thorough information about each decorators group, including name, key, component type, list key, item order, numbered list pattern, numbered list format etc. However, you cannot edit styles there.
Apart from highlighted options in the paragraph decorators page, there are two more possible ones, with the help of which you can show hidden paragraph decorators (see Image 31). You can turn on/off these options. Moreover, you have also an opportunity to duplicate, edit, delete certain decorator and turn on/off the active status of each decorator.
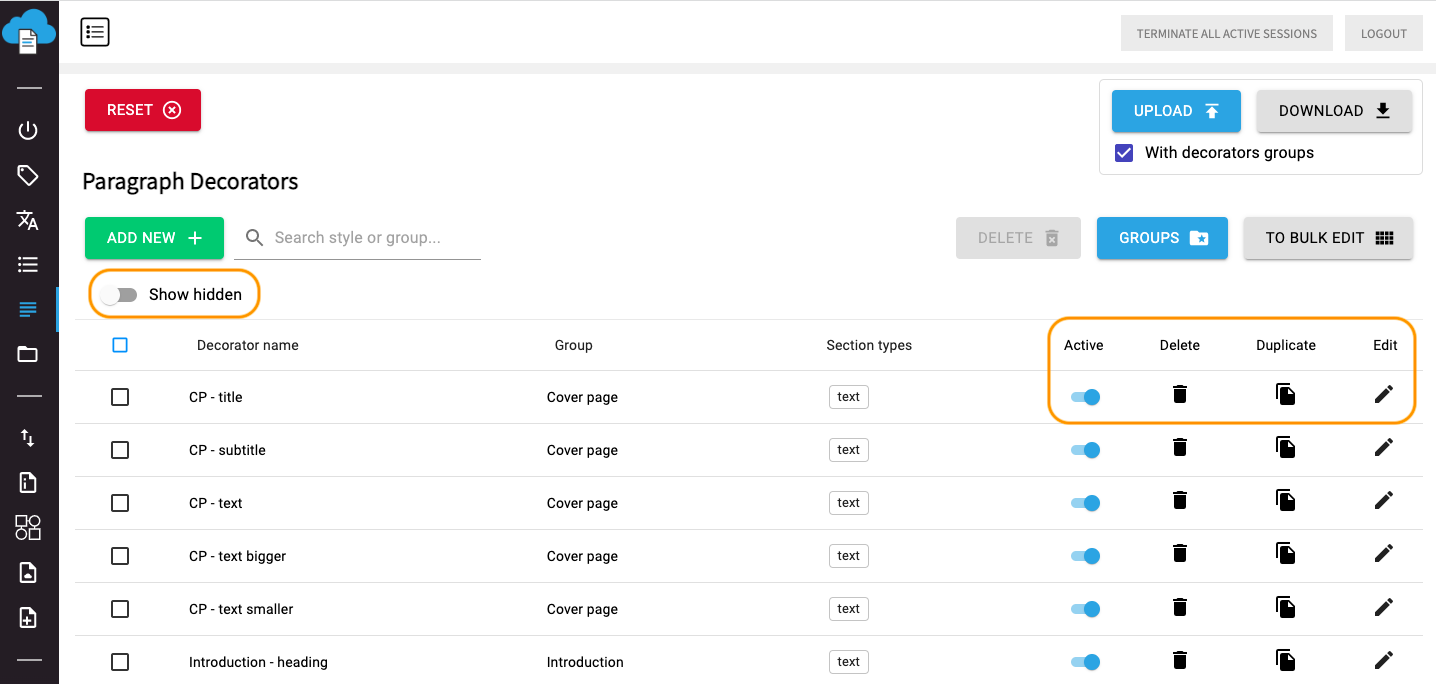
Applicable options to paragraph decorators highlighted
6.1How to create a new style
To create a new style in the Admin page click “Add new” in the section “Paragraph decorators” (see Image 33). A new modal window with different tabs will be displayed, starting with “Decorators name”.
(a)Decorator’s name
In the ‘Decorator’s name’ tab you have to insert such details as a key for a decorator, a proper component type, a group, the name of a decorator in all supported languages and decide whether the newly created decorator is active in the system. Key must be inserted in English only and can consist of words and low lines, no other symbols and spaces must be inserted in this line. Component types line describes which component this new decorator will be applied to - text, table or image.
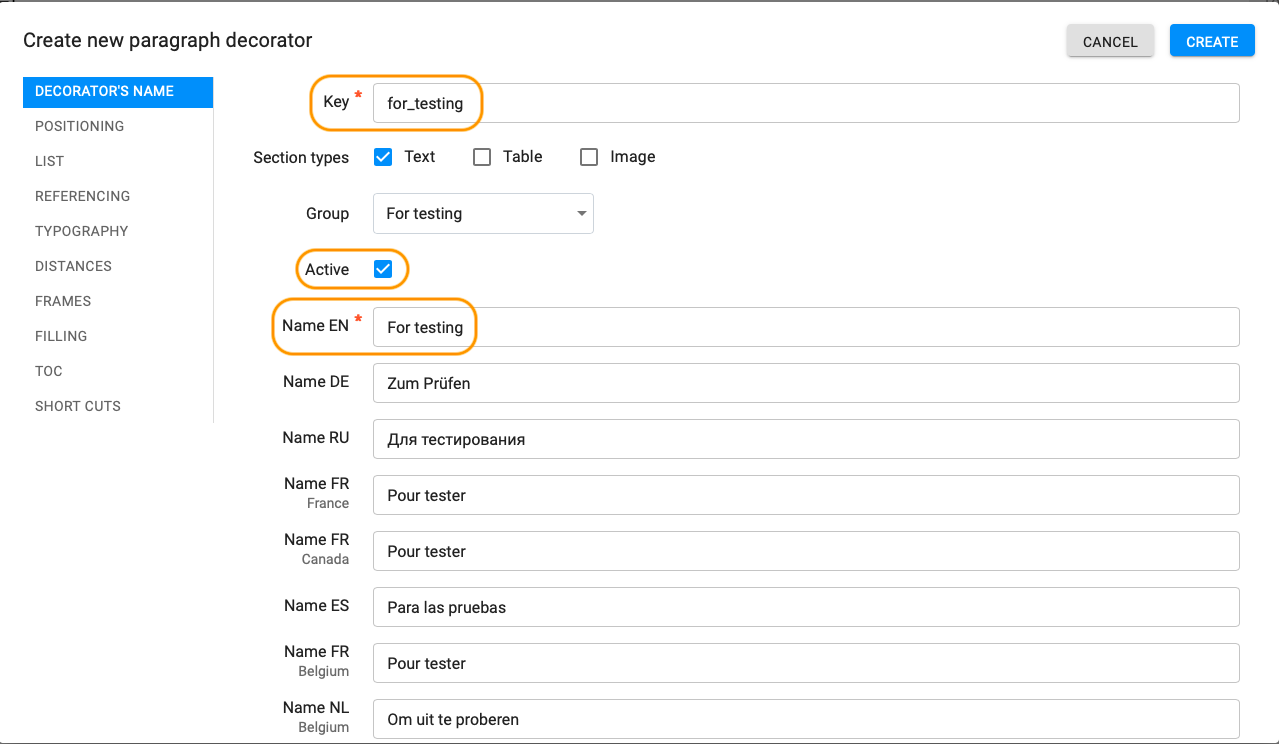
Key, name of the style in English and option "active" highlighted
The name of a decorator is obligatory to insert in English, all other languages are optional. However, numbered decorator names are displayed not only in the editor, but also in restart numbering settings in "Projects" features.
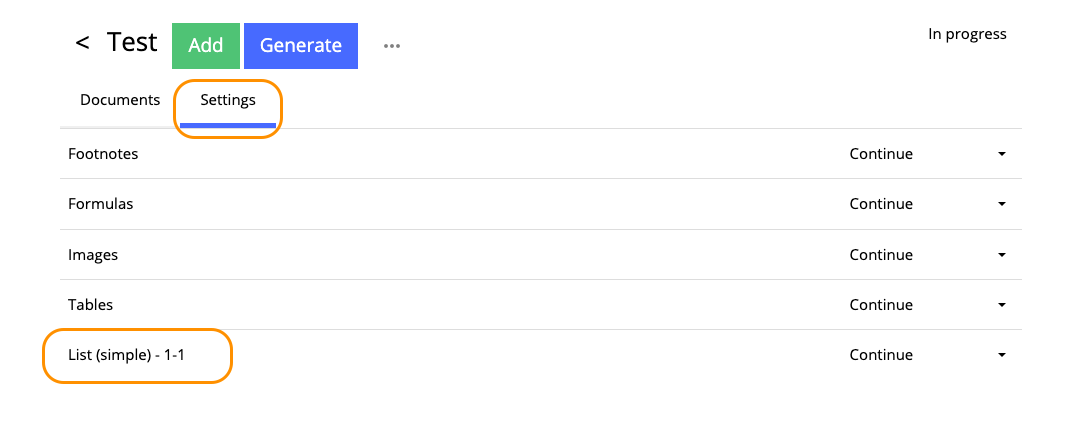
Display of decorator name in project settings
Decorator names are displayed in that language, depending on which interface language has been selected in SMASHDOCs account. Therefore, you need to insert decorator name in frequently applied language of interface, for the decorator to be displayed correctly in the editor and in project settings.
After filling out the data in the first tab, move to the next one - tab “Positioning”.
(b)Positioning
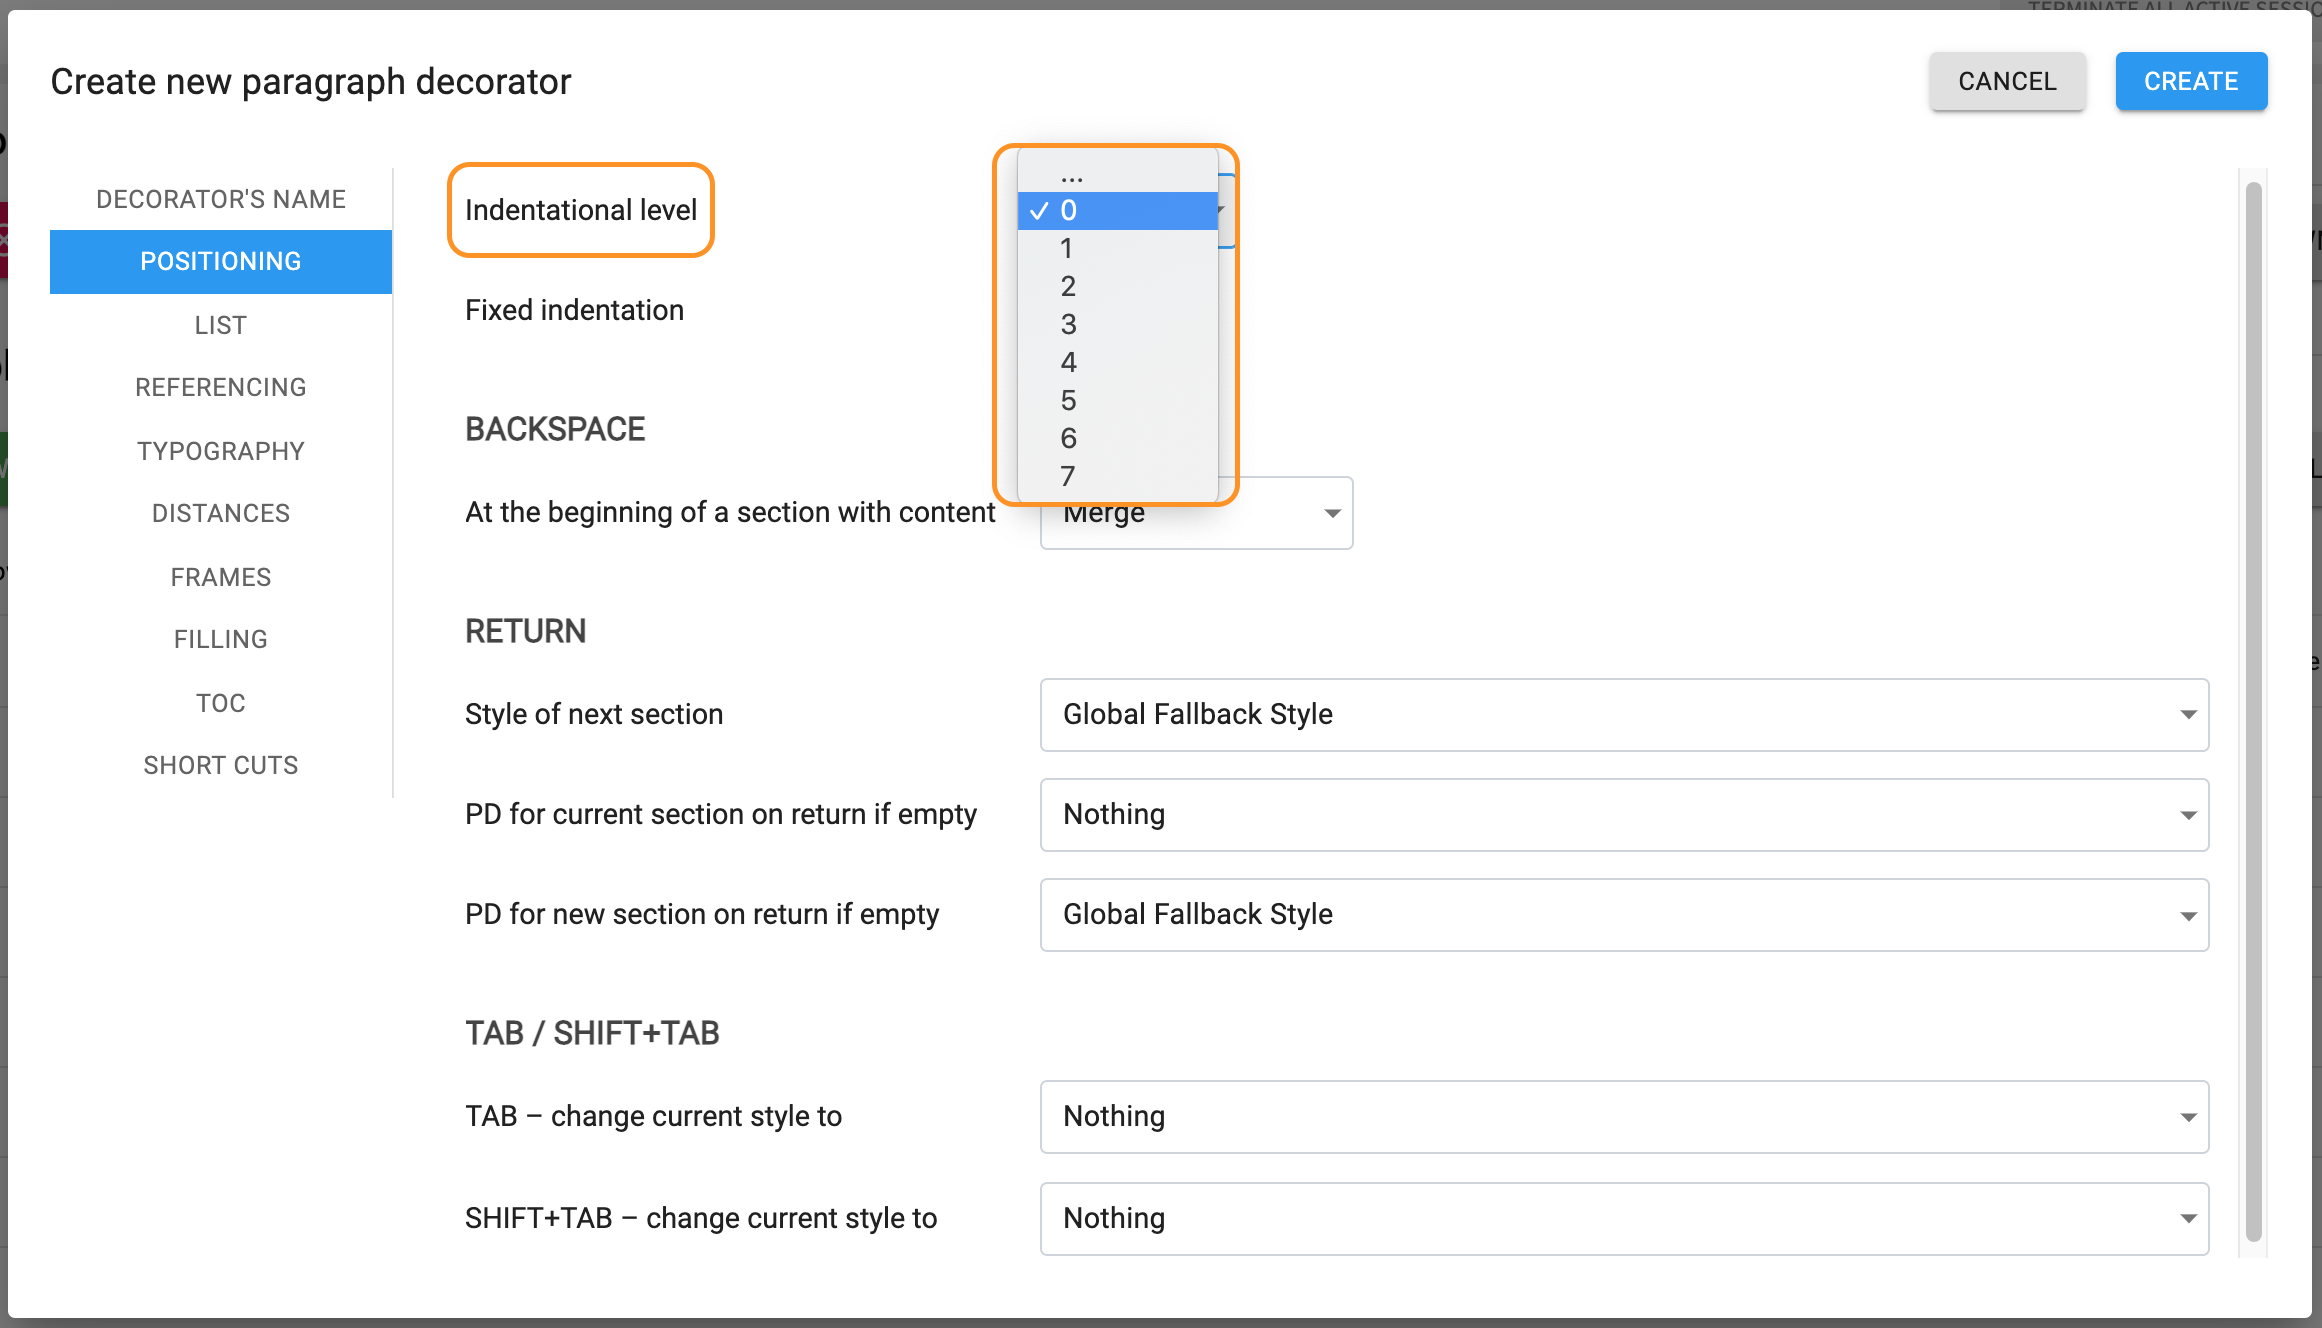
Indentational level highlighted
Indentational level - level where your text starts at the grid in the document.
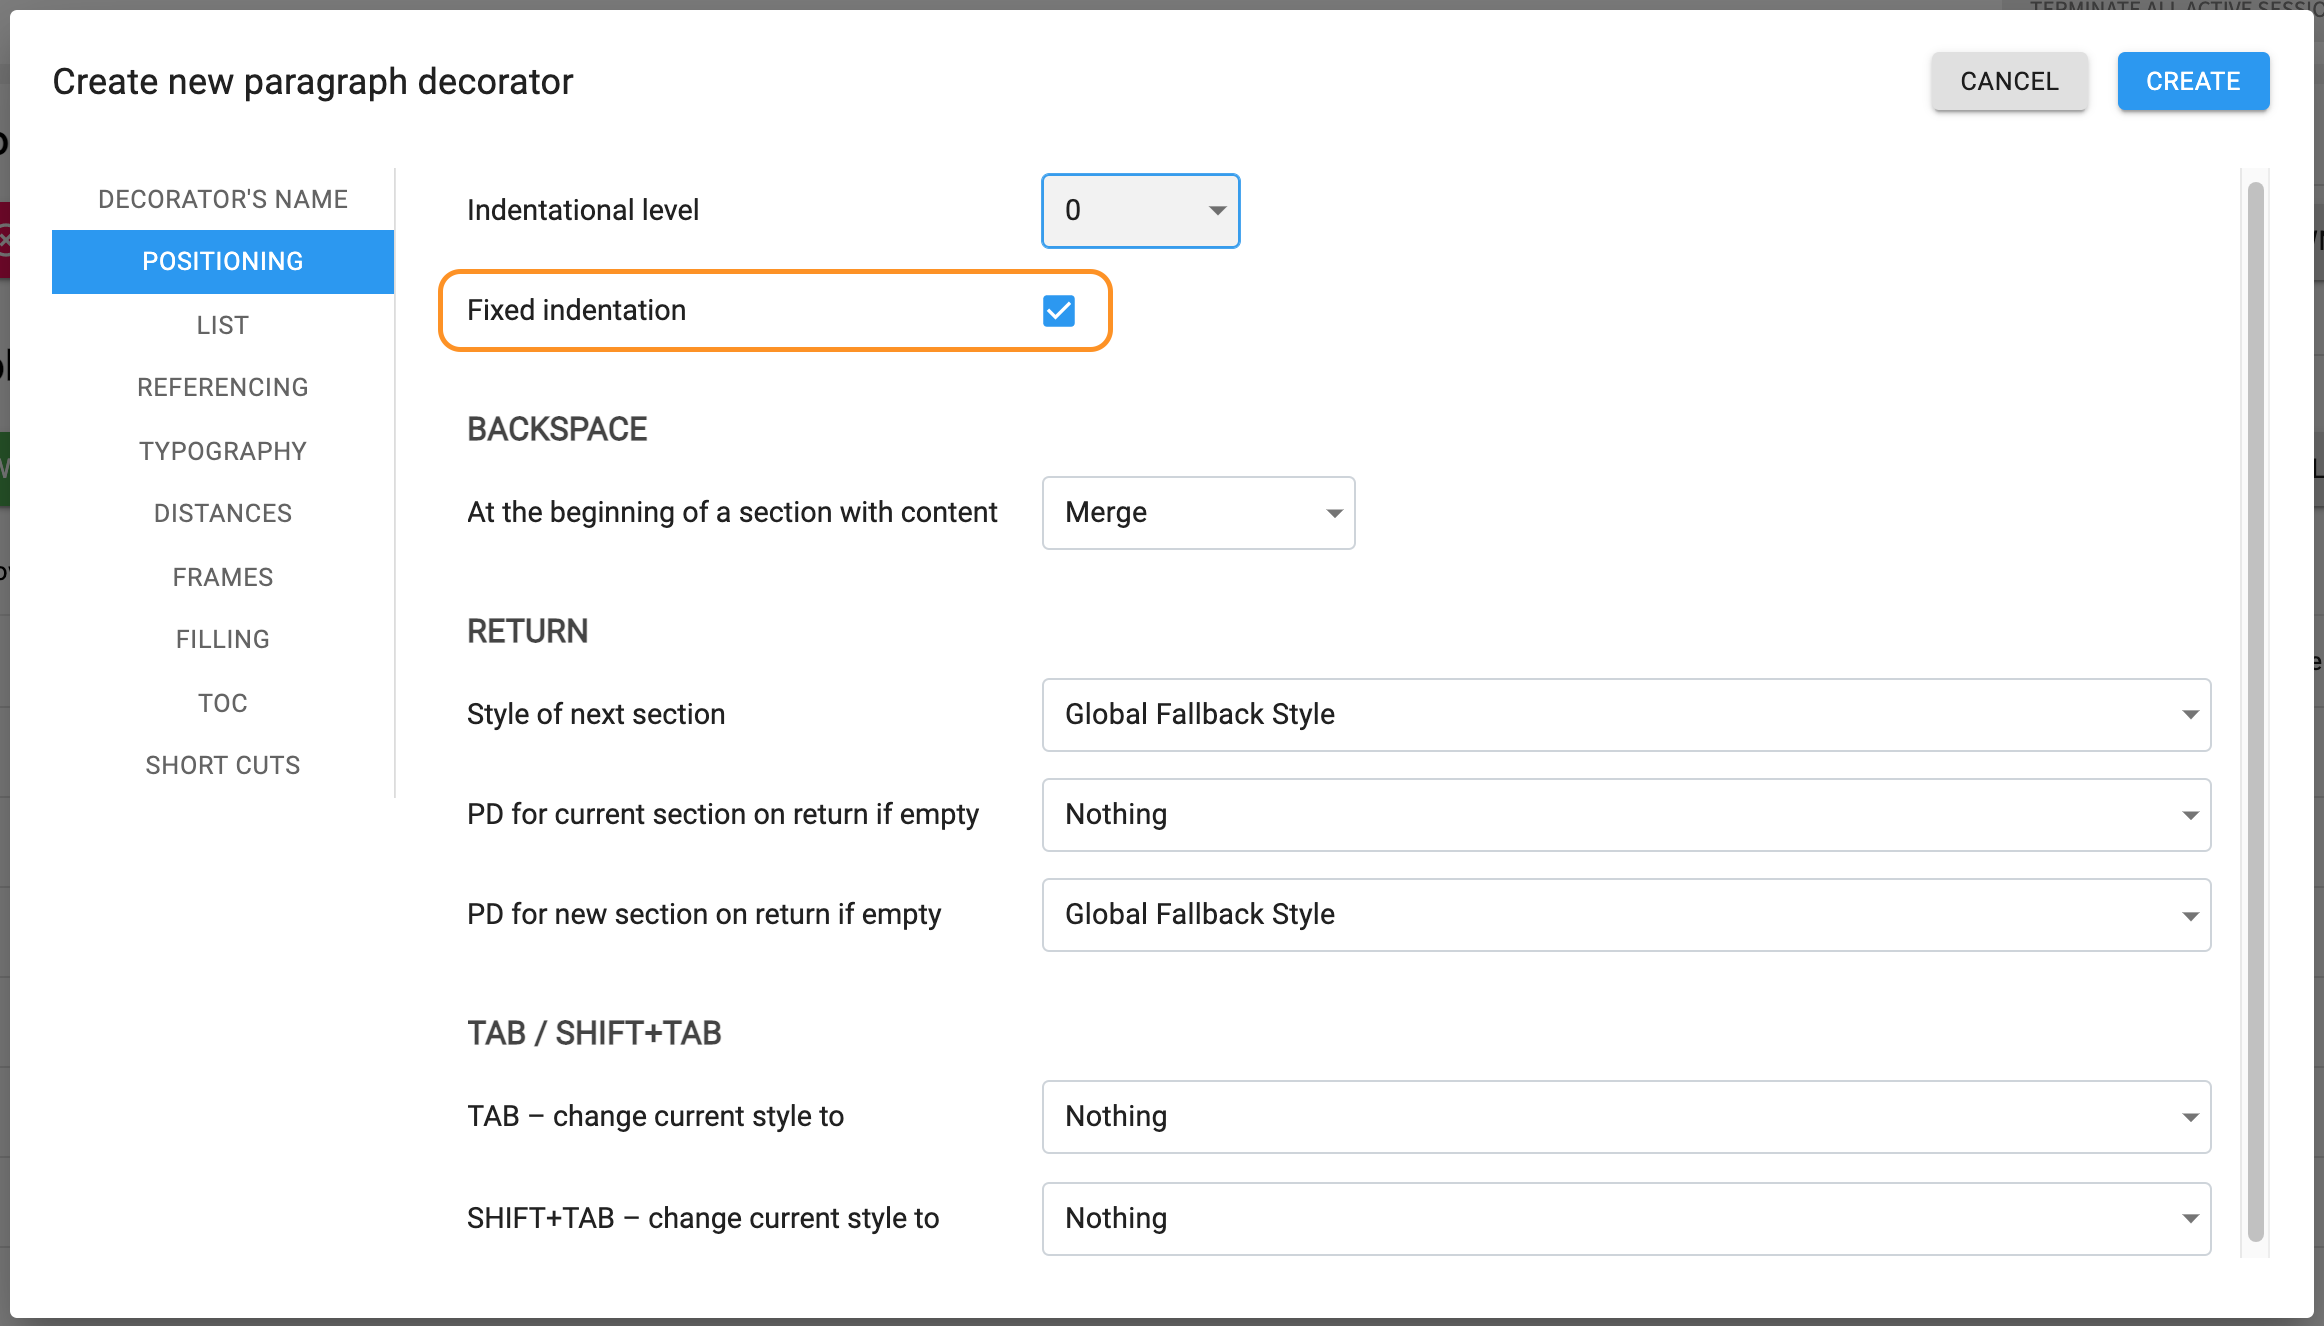
Activated fixed indentation highlighted
Fixed indentation - if active, the text is not moving after pressing TAB / Shift+TAB (TAB and Shift+TAB movings must not be set in this case).
BACKSPACE = DELETE
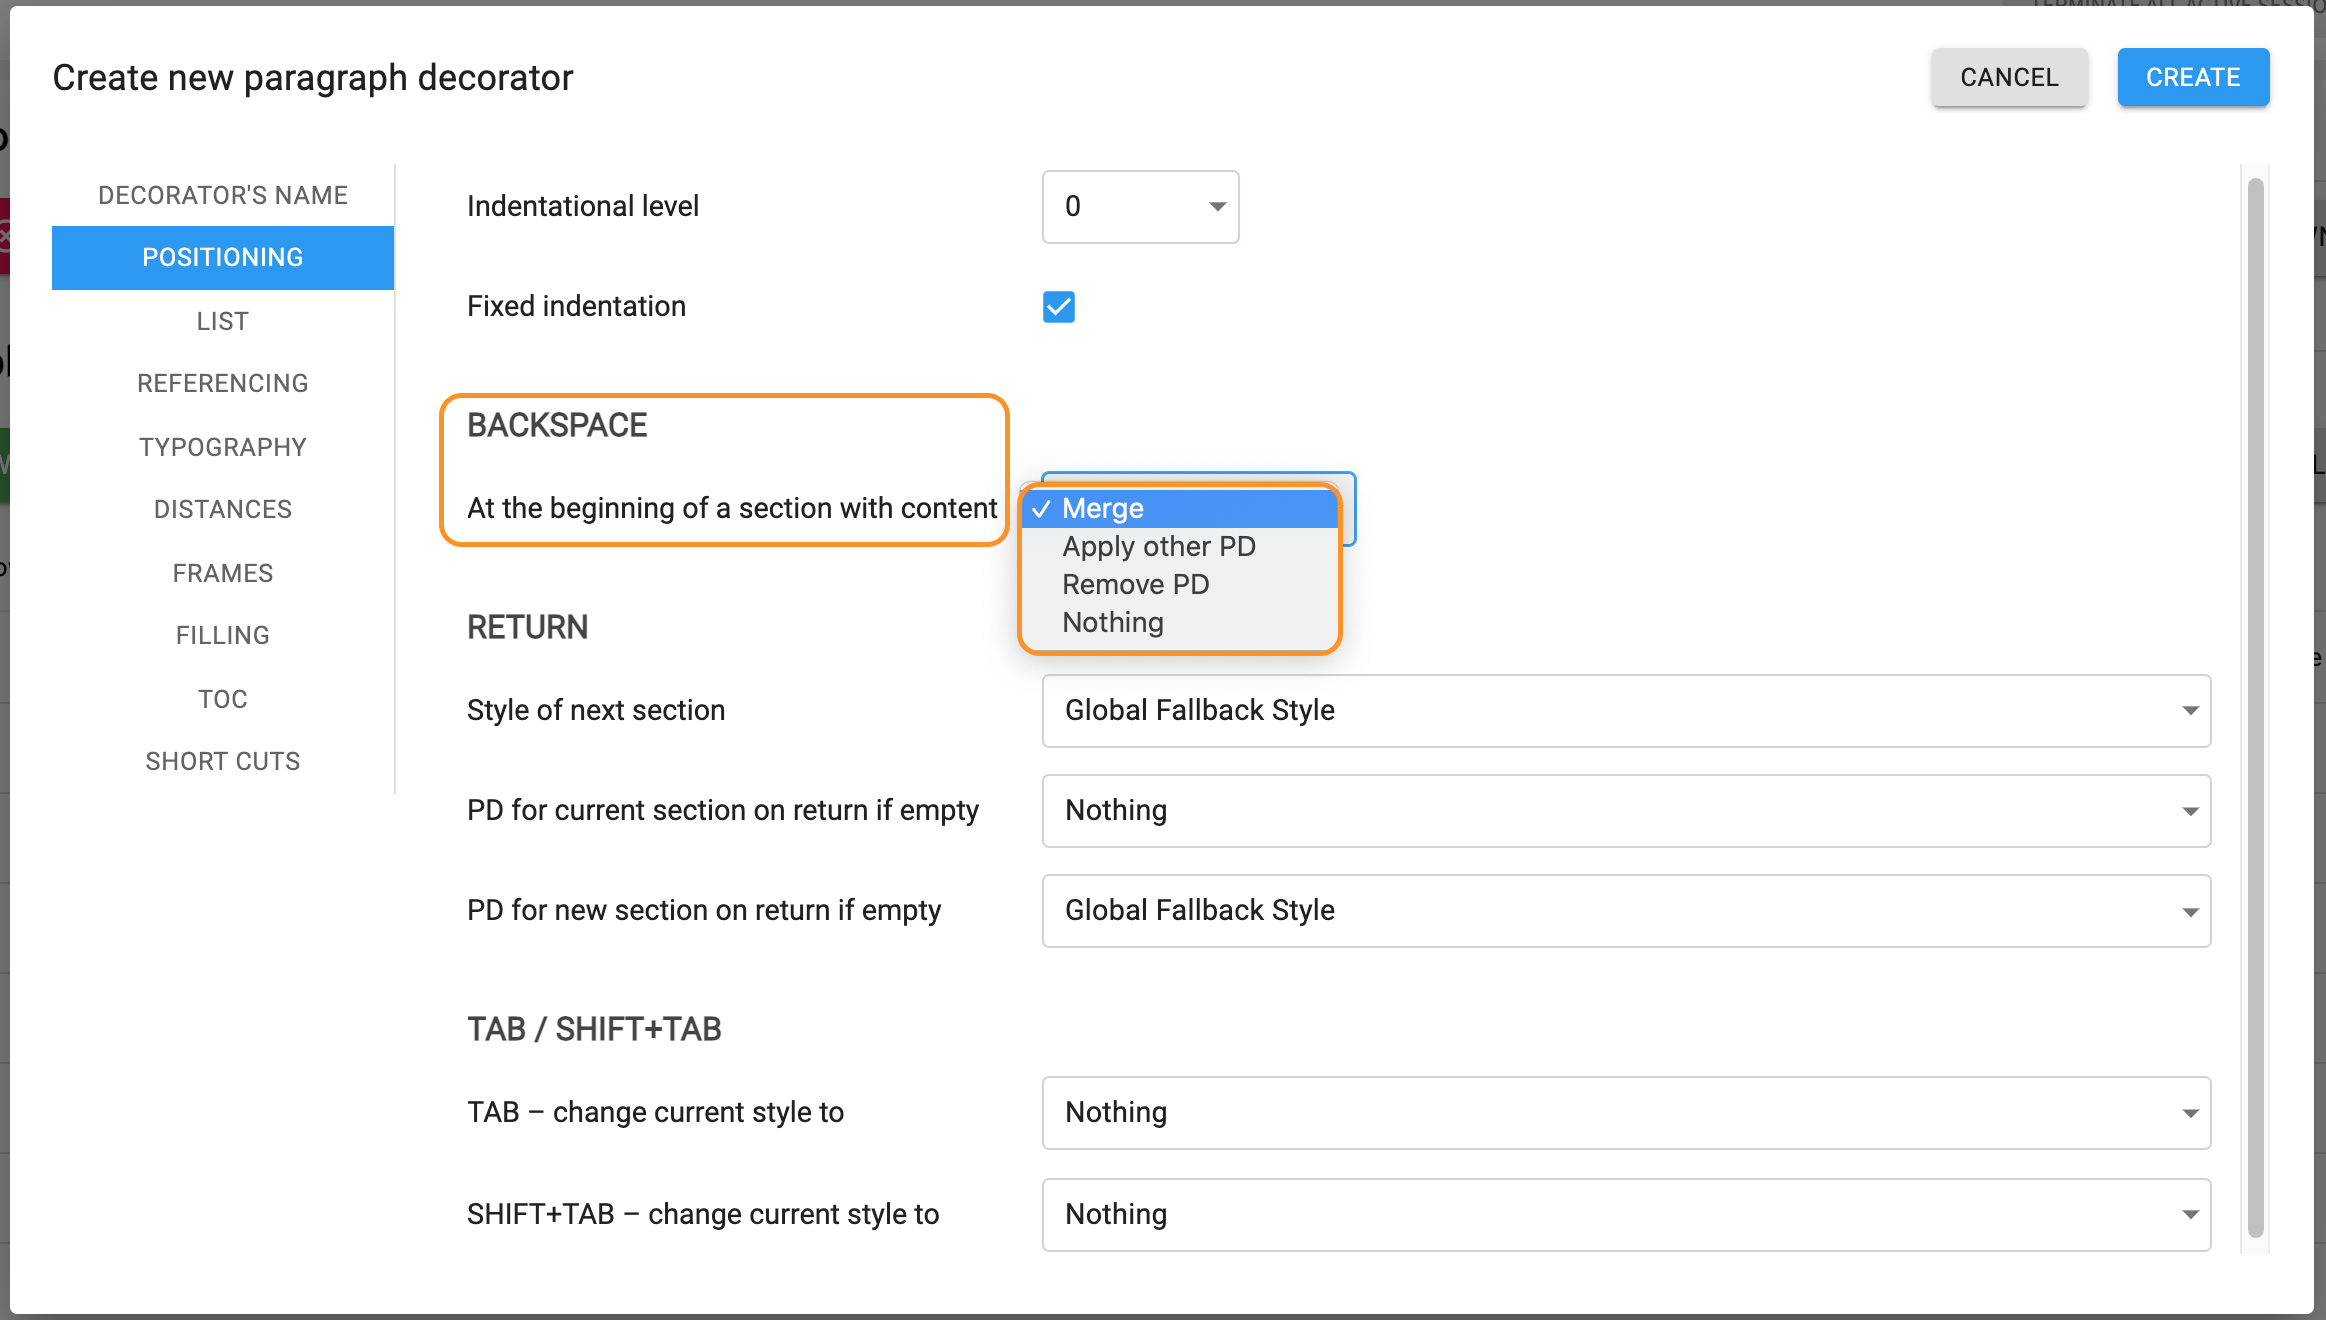
Options for backspace at the beginning of a component with content highlighted
At the beginning of a component with content:
●Merge (after pressing Backspace at the beginning of a component, it will be merged with a previous component)
●Apply other PD (after pressing Backspace at the beginning of a component, other PD will be applied)
●Remove PD (after pressing Backspace at the beginning of a component, current PD will be removed)
●Nothing (after pressing Backspace at the beginning of a component, nothing will happen)
RETURN = ENTER
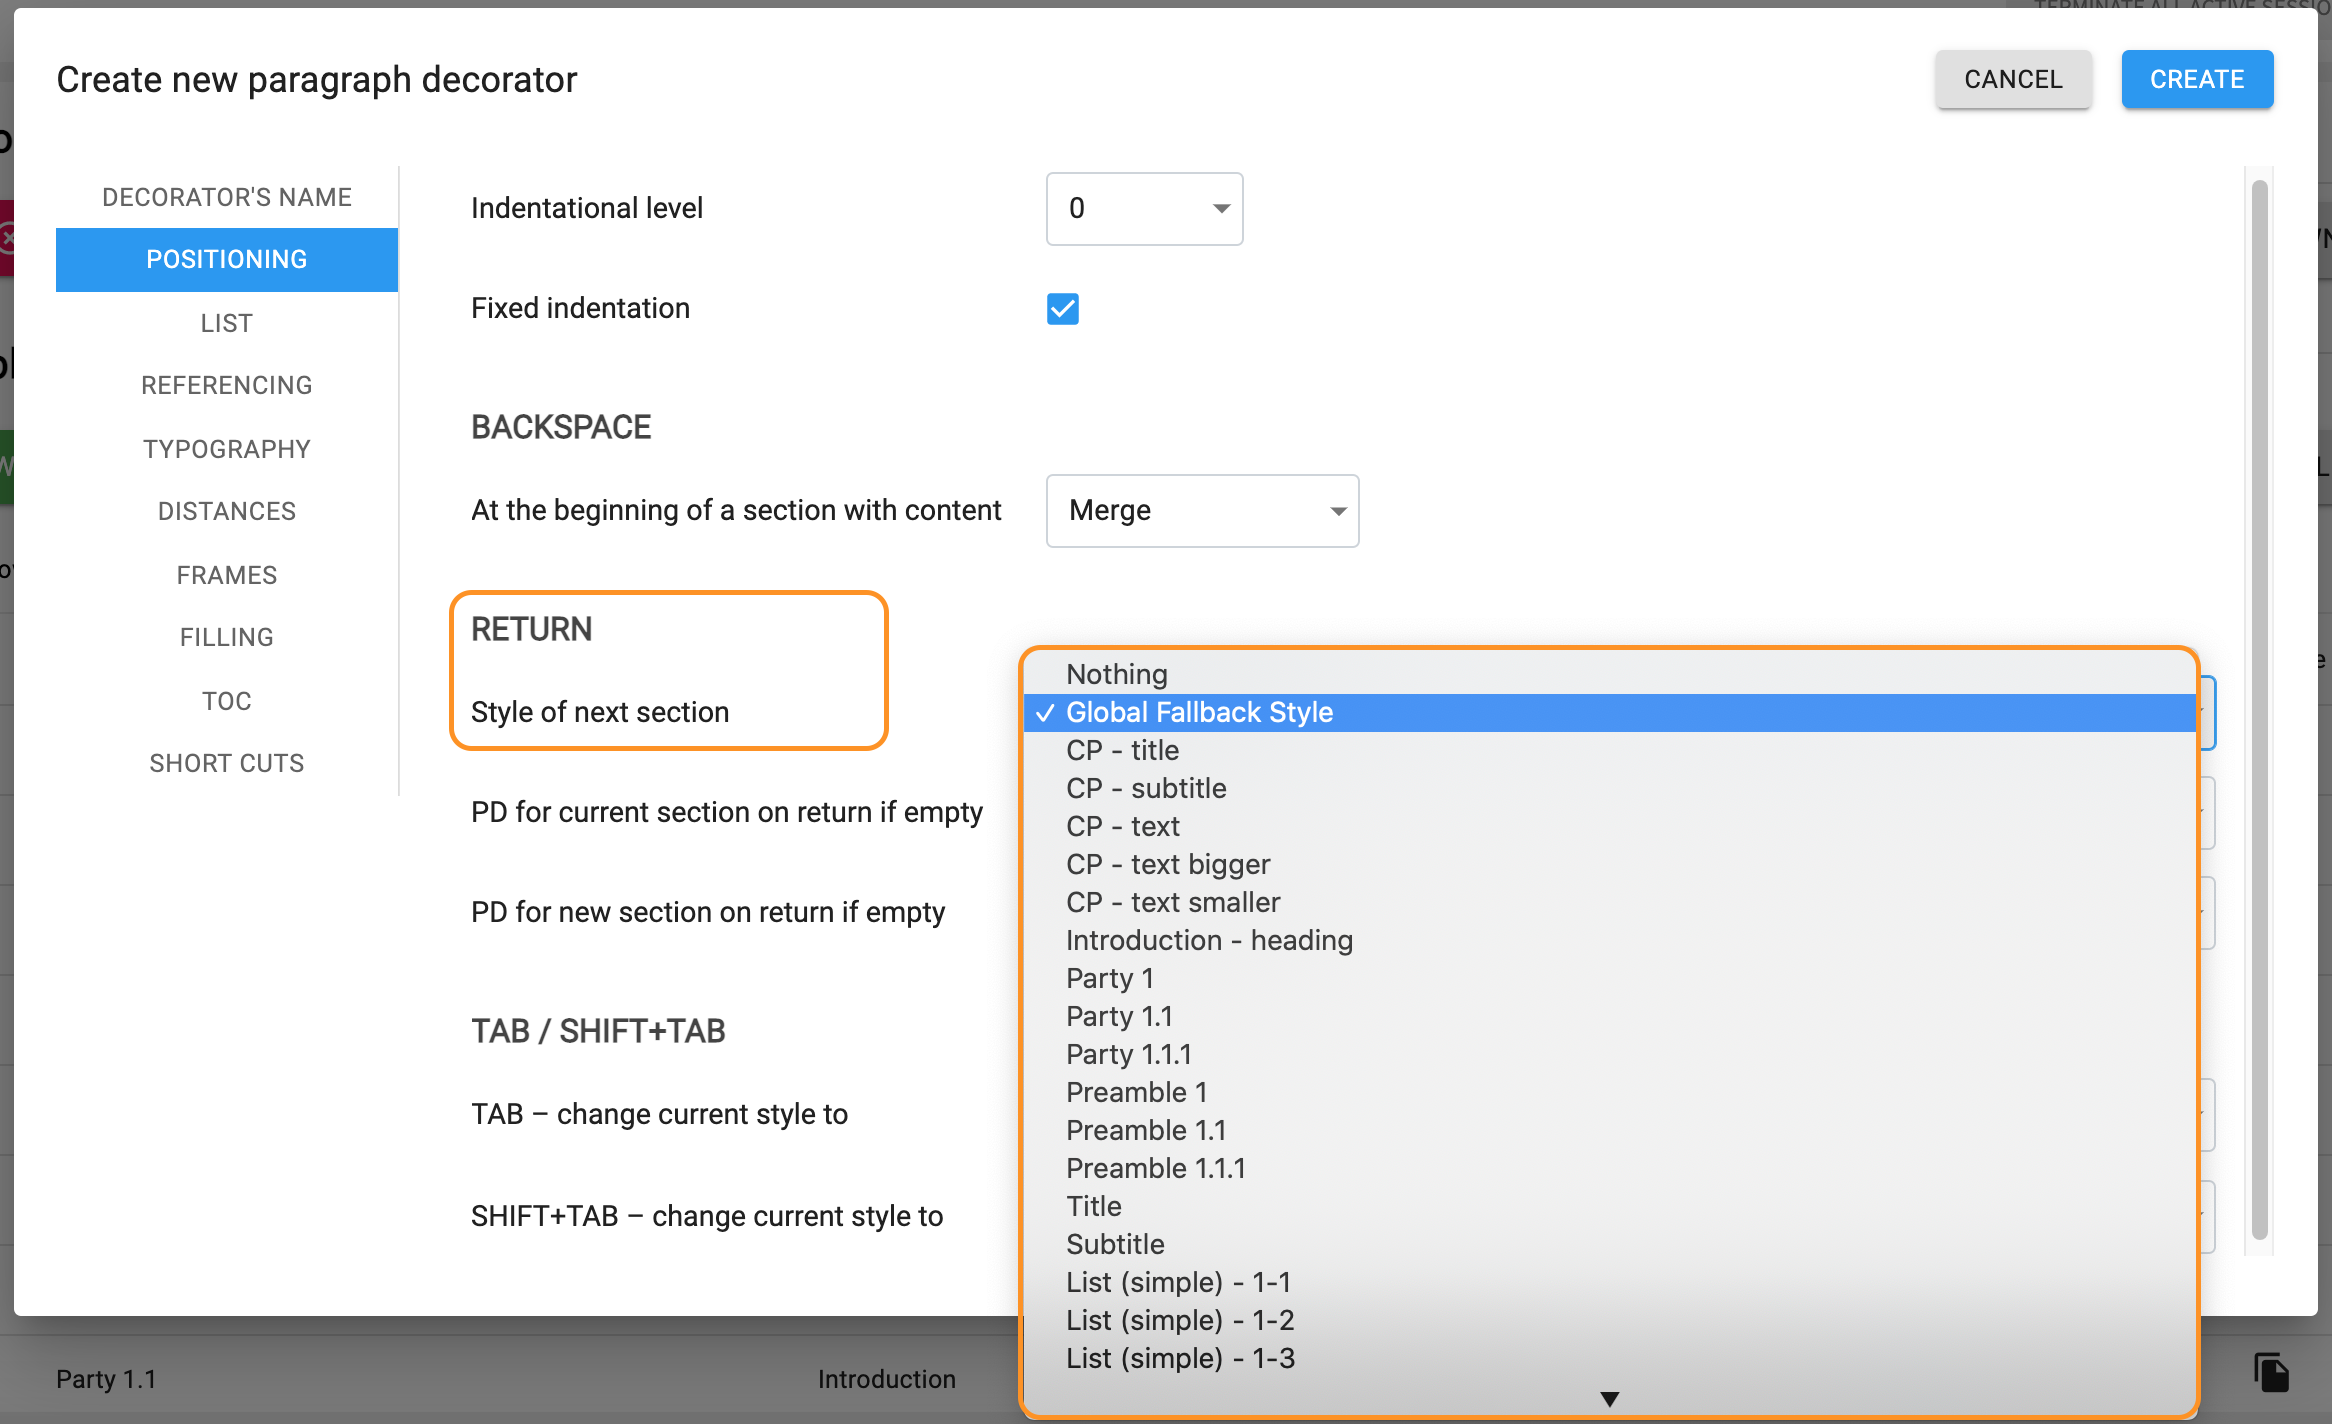
Options for the style of next component on Return highlighted
Style of next component
●Nothing (after pressing Return at the end of a component, component with standard “Text 1” will be applied)
●Global Fallback Style (after pressing Return at the end of a component, set Global Fallback Style will be applied)
●Any other style available in the system (after pressing Return at the end of a component, style chosen from the list of available styles will be applied)
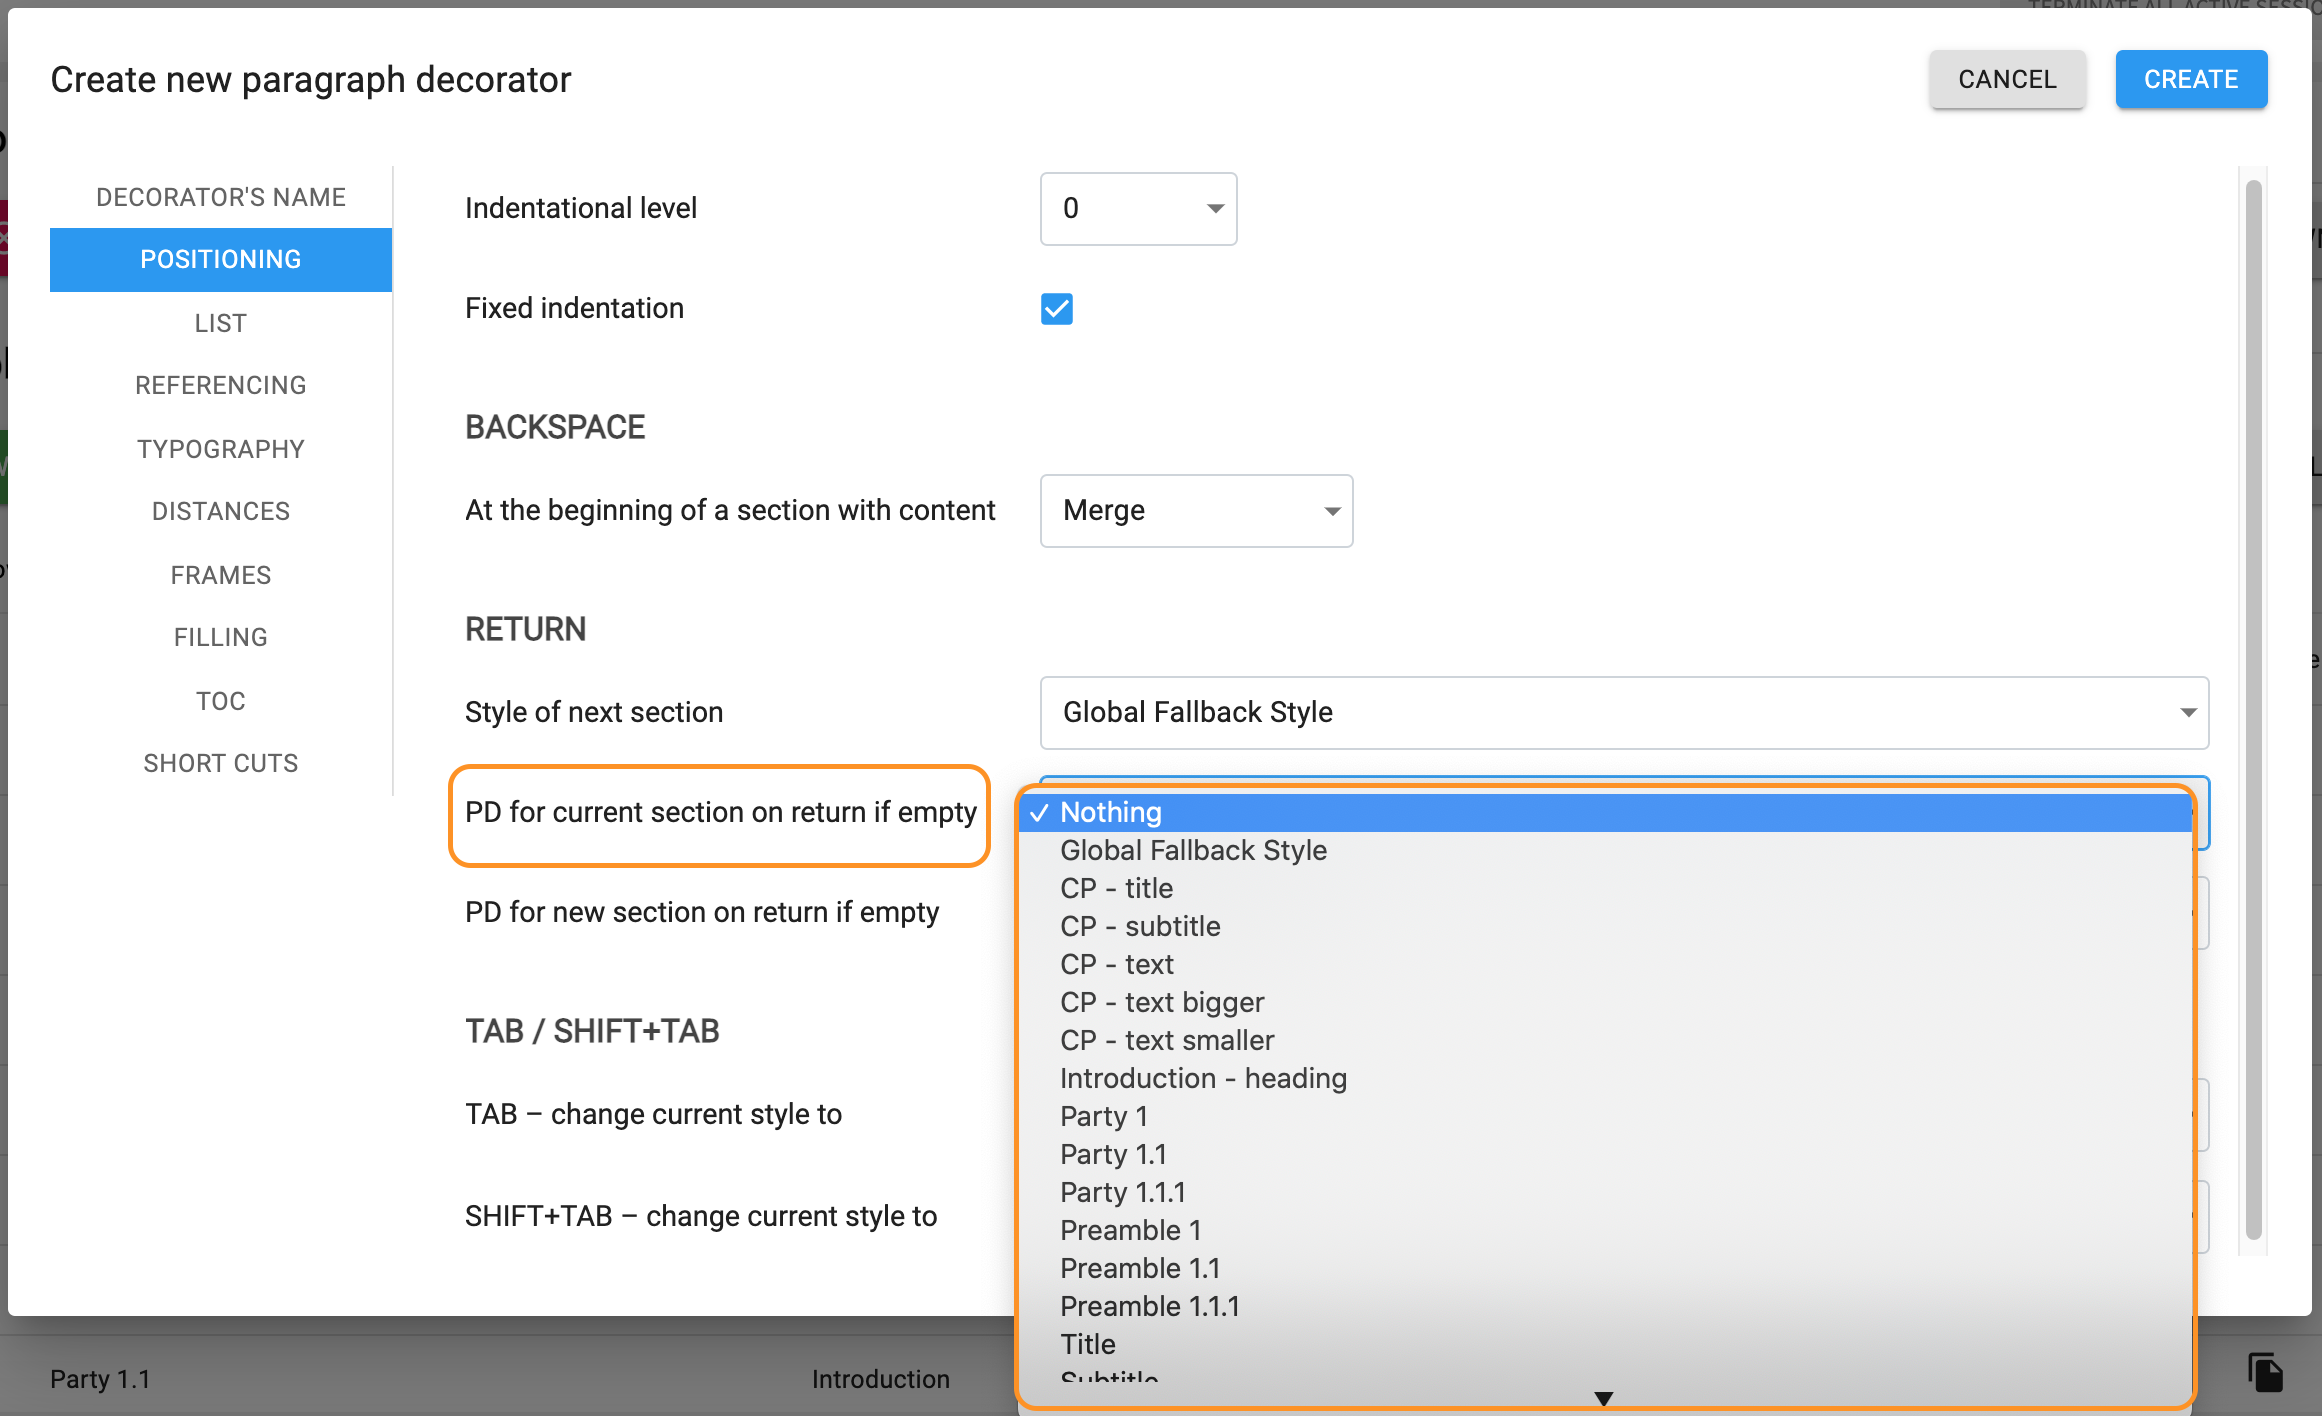
Options for PD for current component on return if empty highlighted
PD for current component on return if empty
●Nothing (after pressing Return at the end of a component, the style of a new empty component will be “Text 1”)
●Global Fallback Style (after pressing Return at the end of a component, the style of a new empty component will be Global Fallback Style)
●Any other style available in the system (after pressing Return at the end of a component, the style of a new empty component will be the chosen style from the list of available styles)
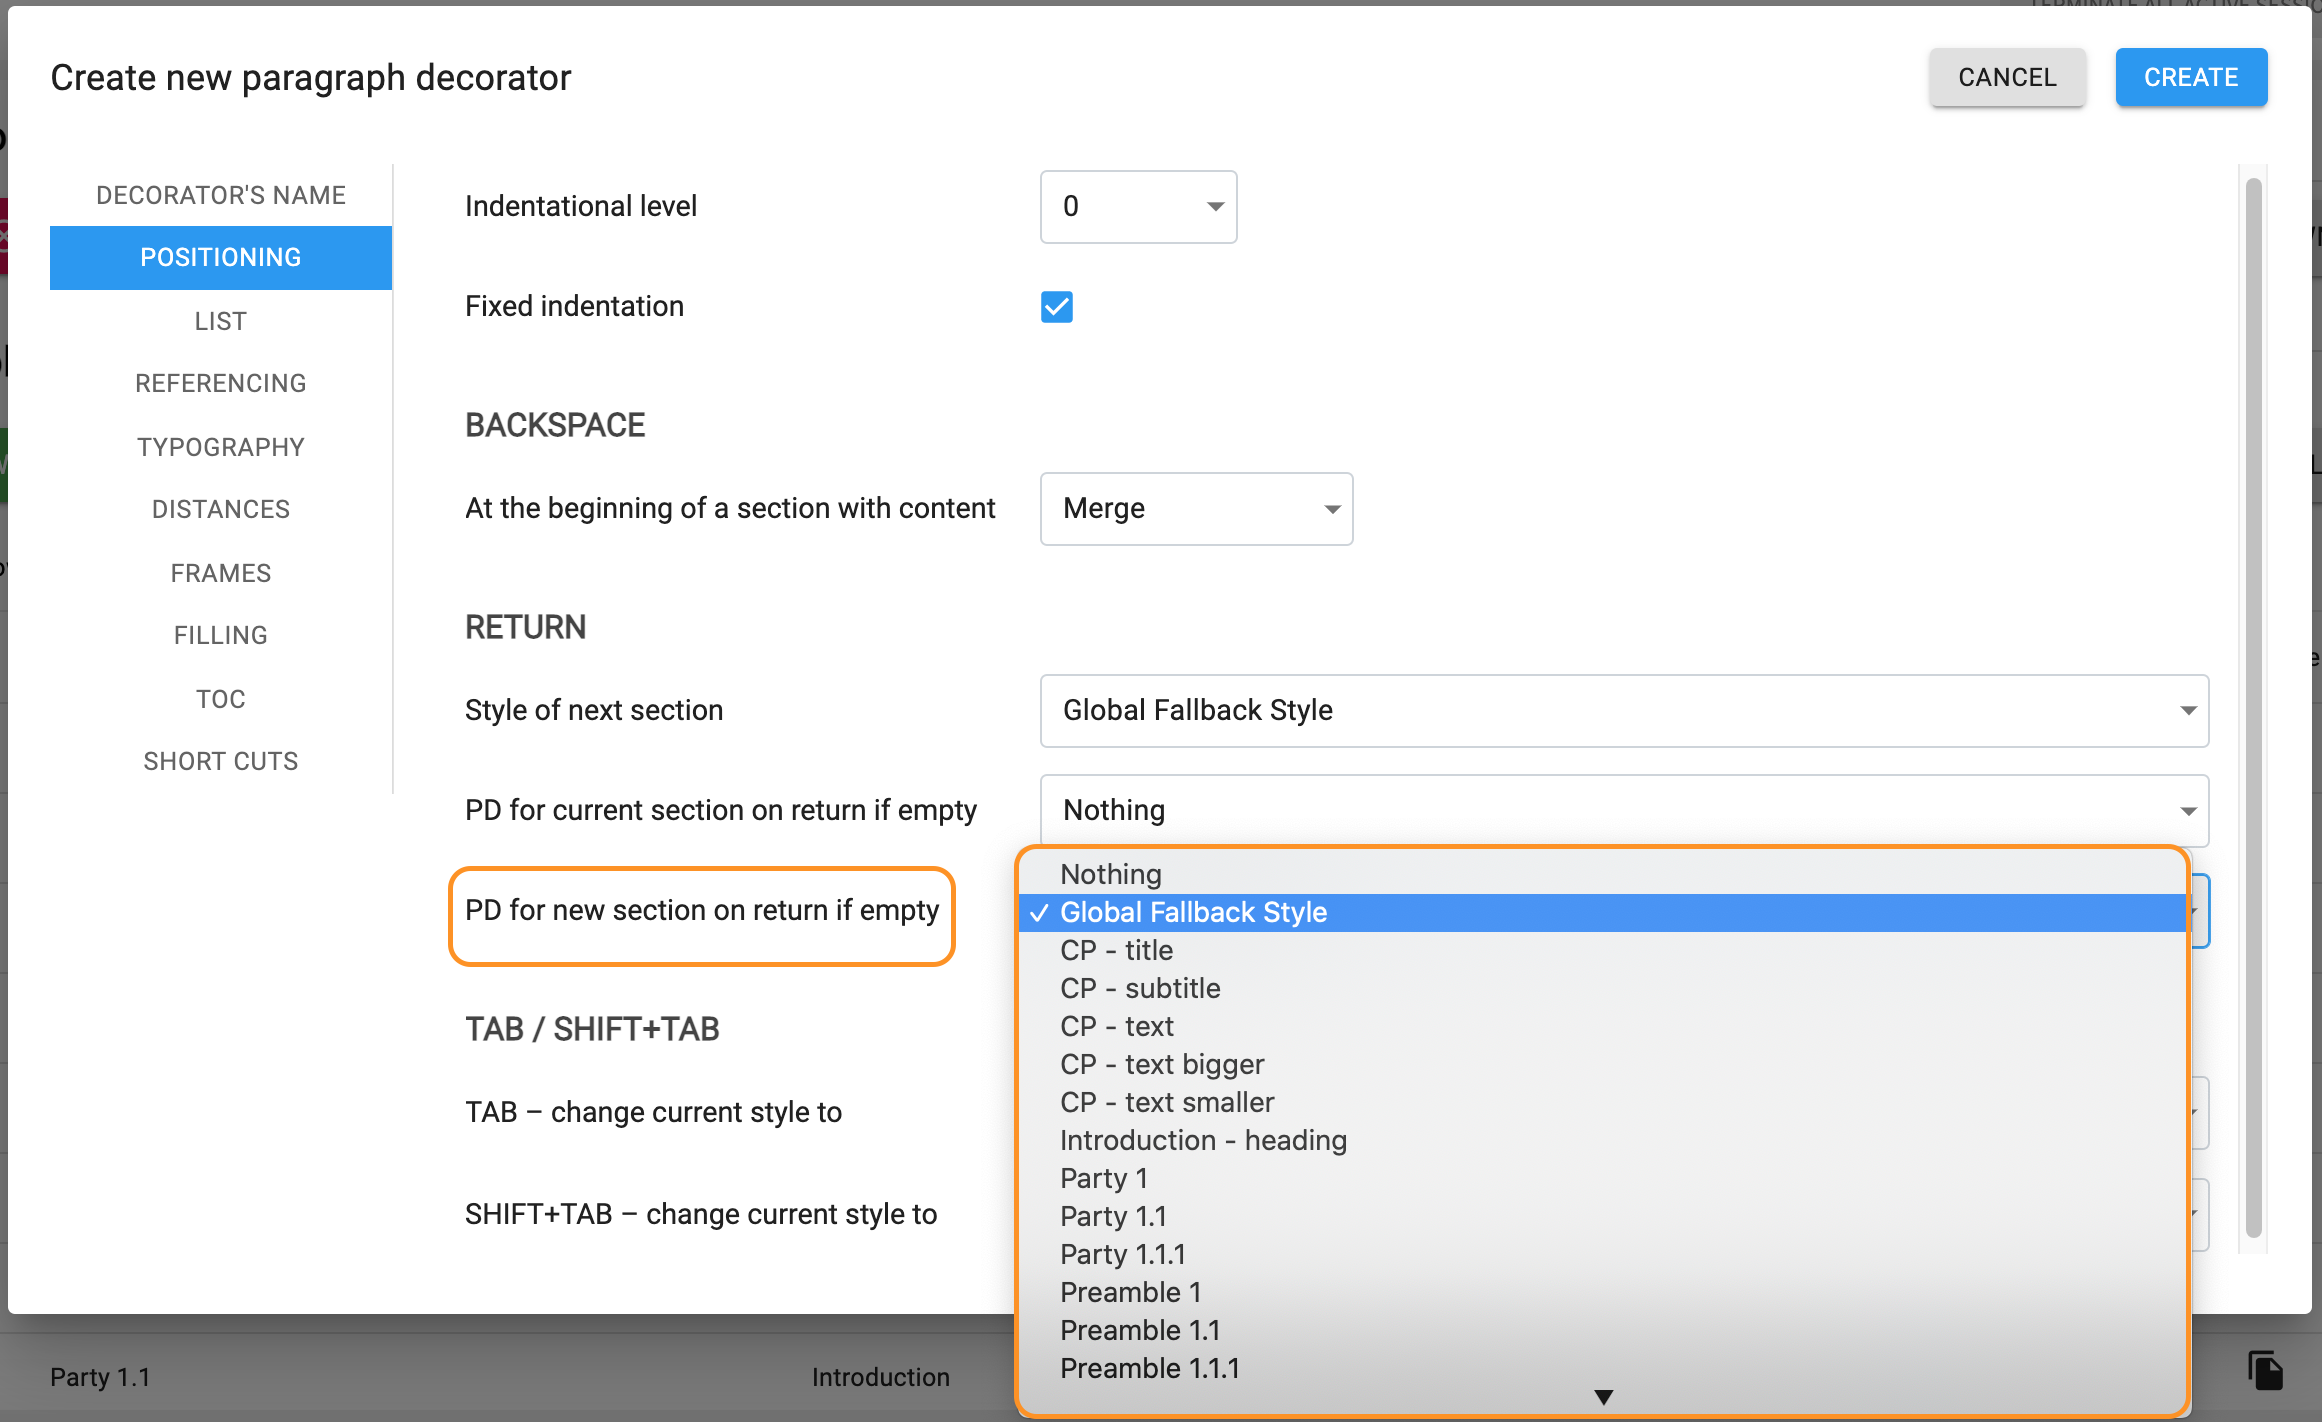
Options for PD for new component on return if empty highlighted
PD for a new component on return if empty
●Nothing (after pressing Return at the end of a component, the style of a new empty component will be “Text 1”)
●Global Fallback Style (after pressing Return at the end of a component, the style of a new empty component will be Global Fallback Style)
●Any other style available in the system (after pressing Return at the end of a component, the style of a new empty component will be the chosen style from the list of available styles)
TAB / SHIFT + TAB

Options for changes of current style on TAB highlighted
TAB - change current style to
●Nothing (after pressing TAB at the beginning of a component, the current style will not be changed)
●Any other style available in the system (after pressing TAB at the beginning of a component, the current style will be changed to the chosen style from the styles available in the system)

Options for changes of current style on SHIFT + TAB highlighted
SHIFT + TAB - change current style to
●Nothing (after pressing SHIFT + TAB at the beginning of a component, the current style will not be changed)
●Any other style available in the system (after pressing SHIFT + TAB at the beginning of a component, the current style will be changed to the chosen style from the styles available in the system)
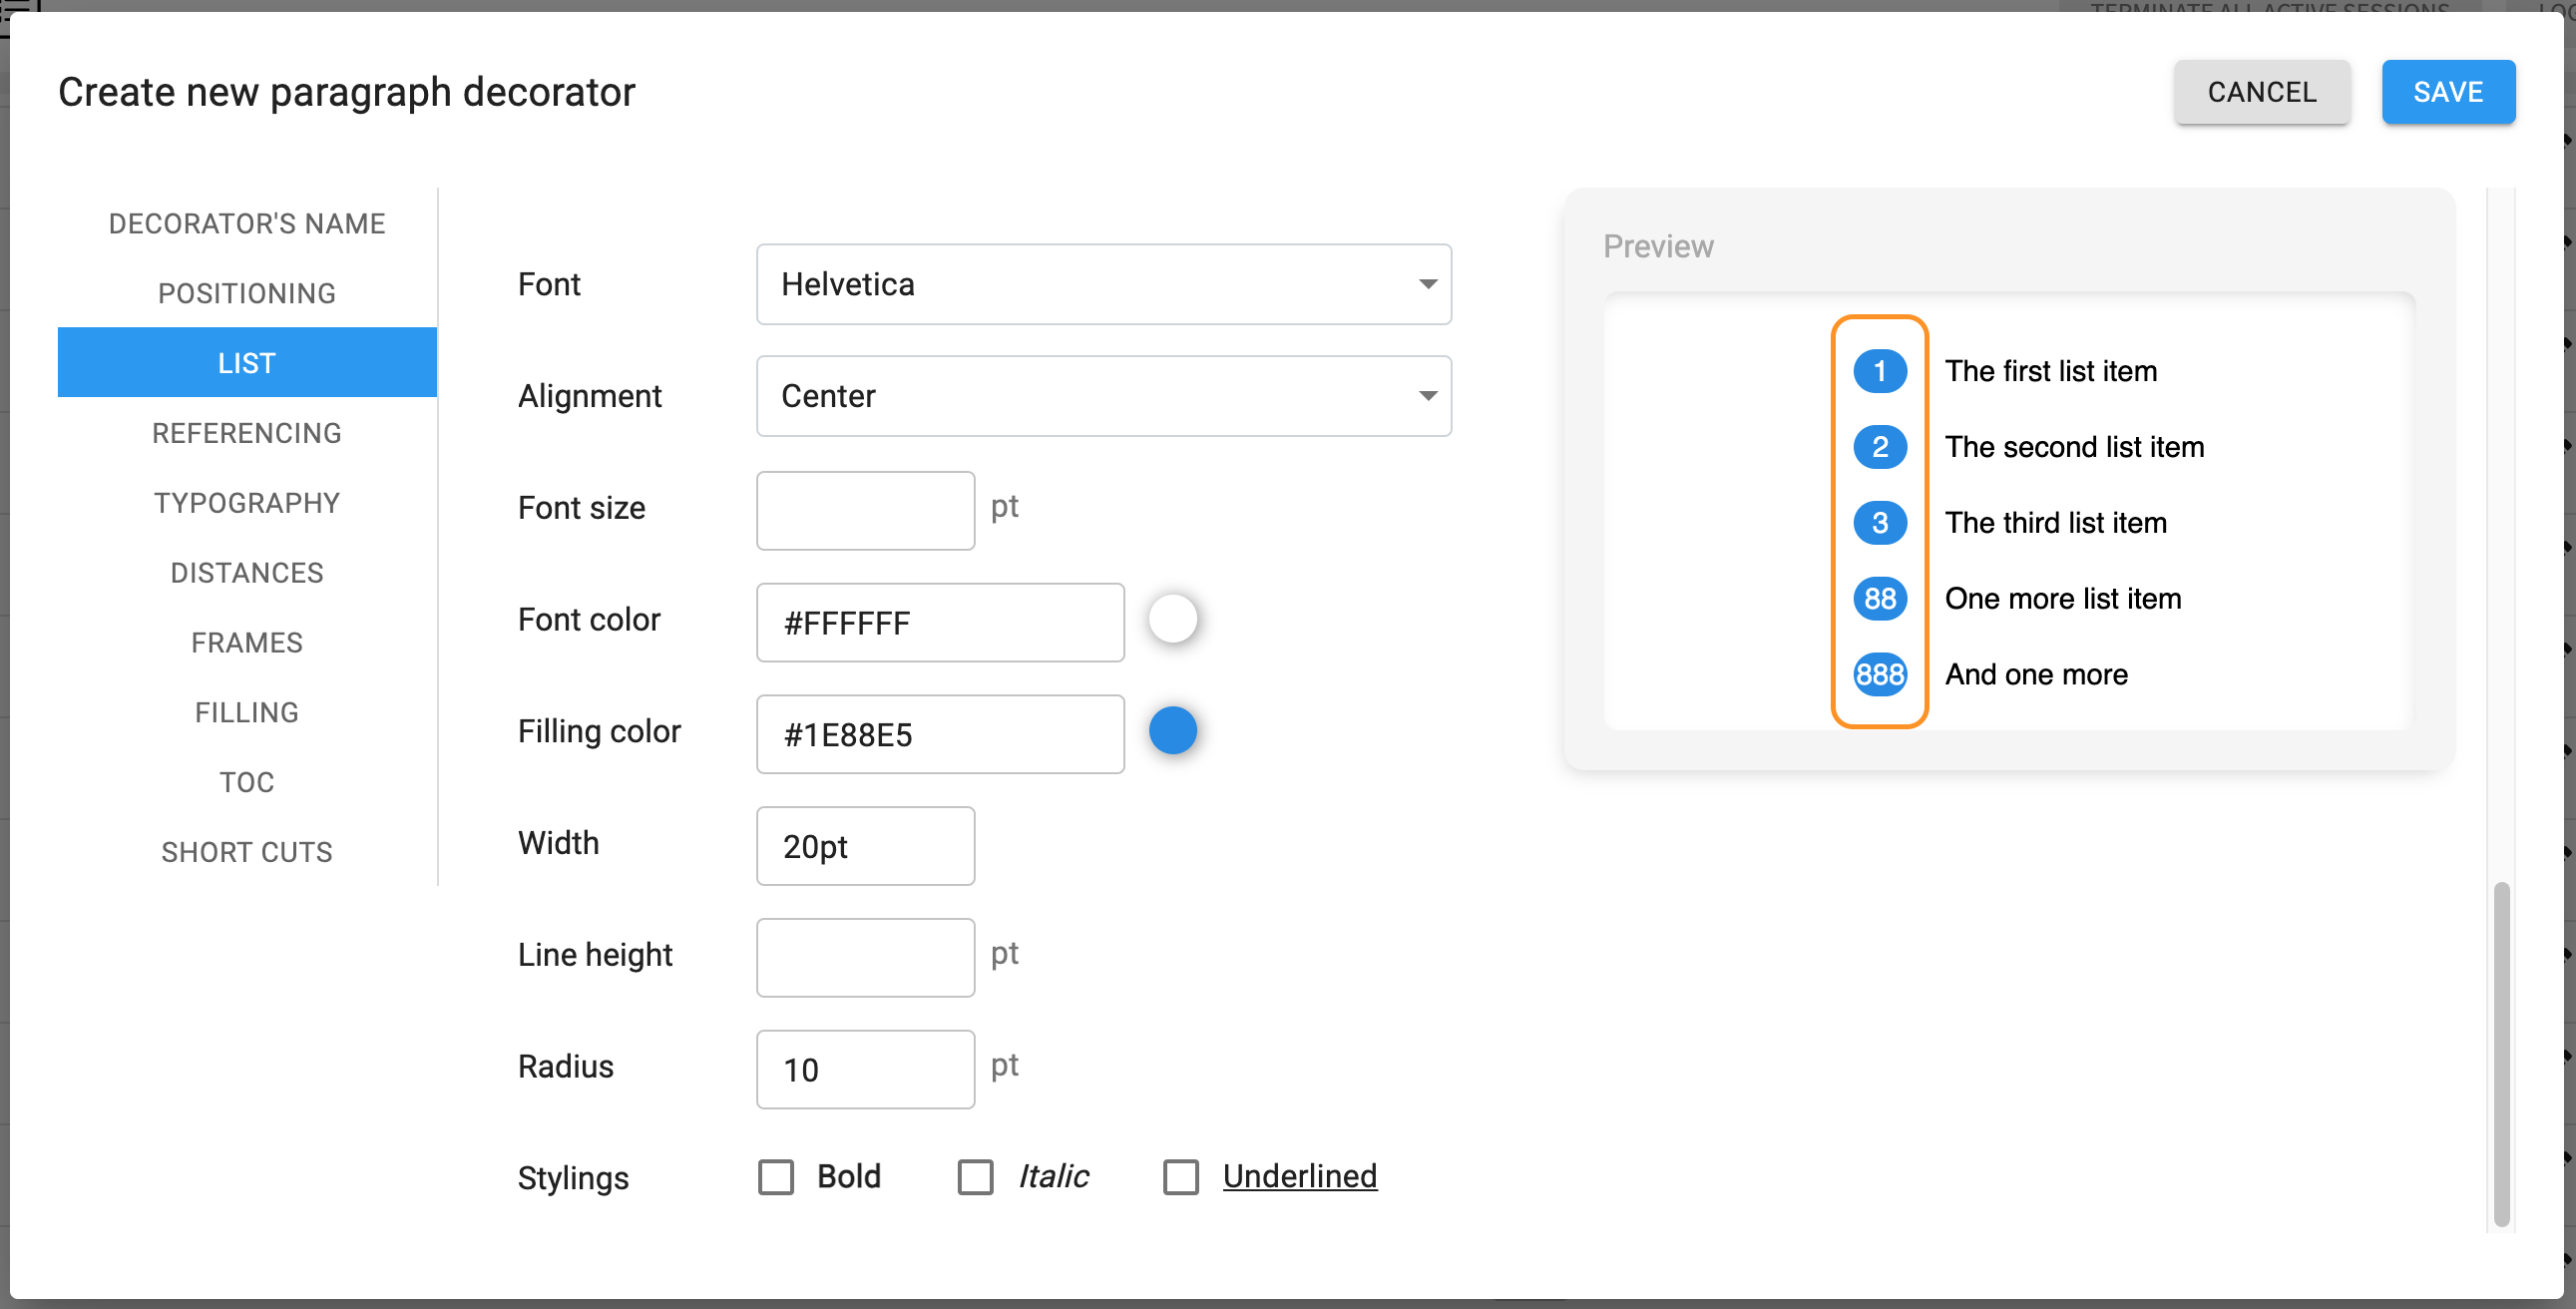
(c)List
If you do not want to create a style as a list, leave the field ‘List’ empty.
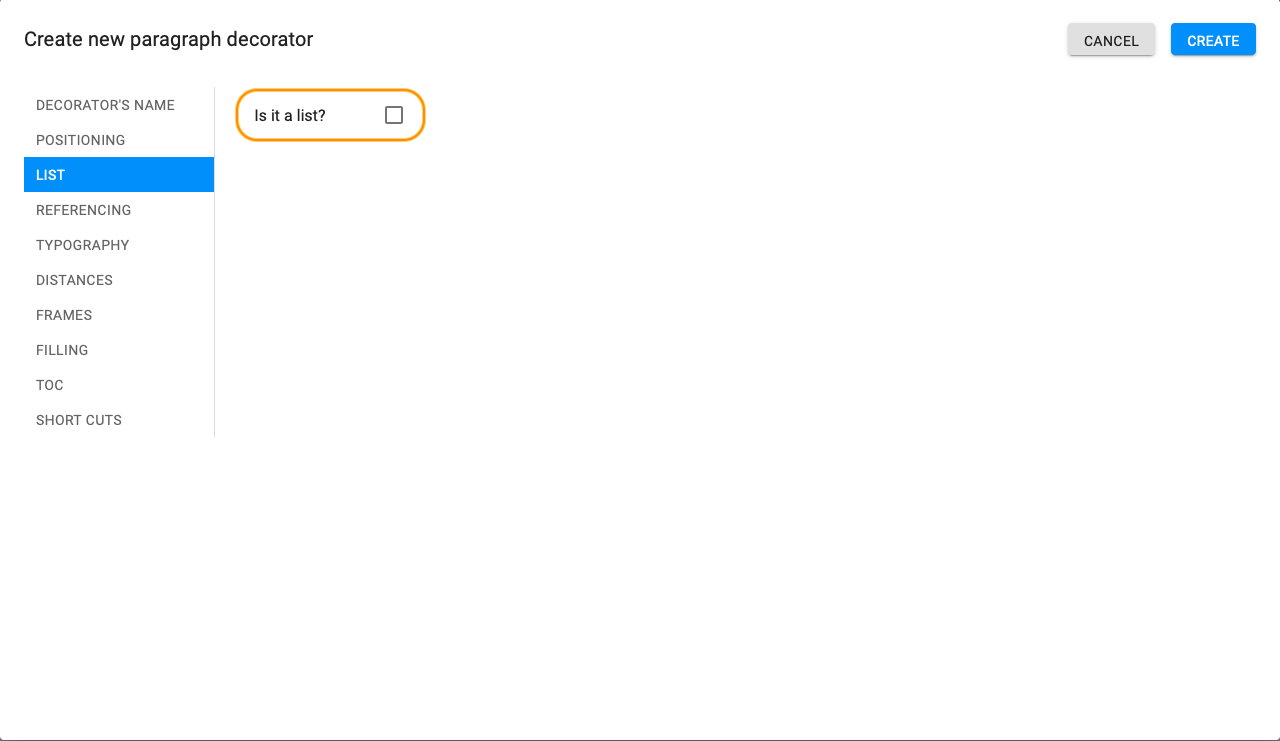
Tab "List" highlighted
If you need to set the list, tick this field and you will get such a window:
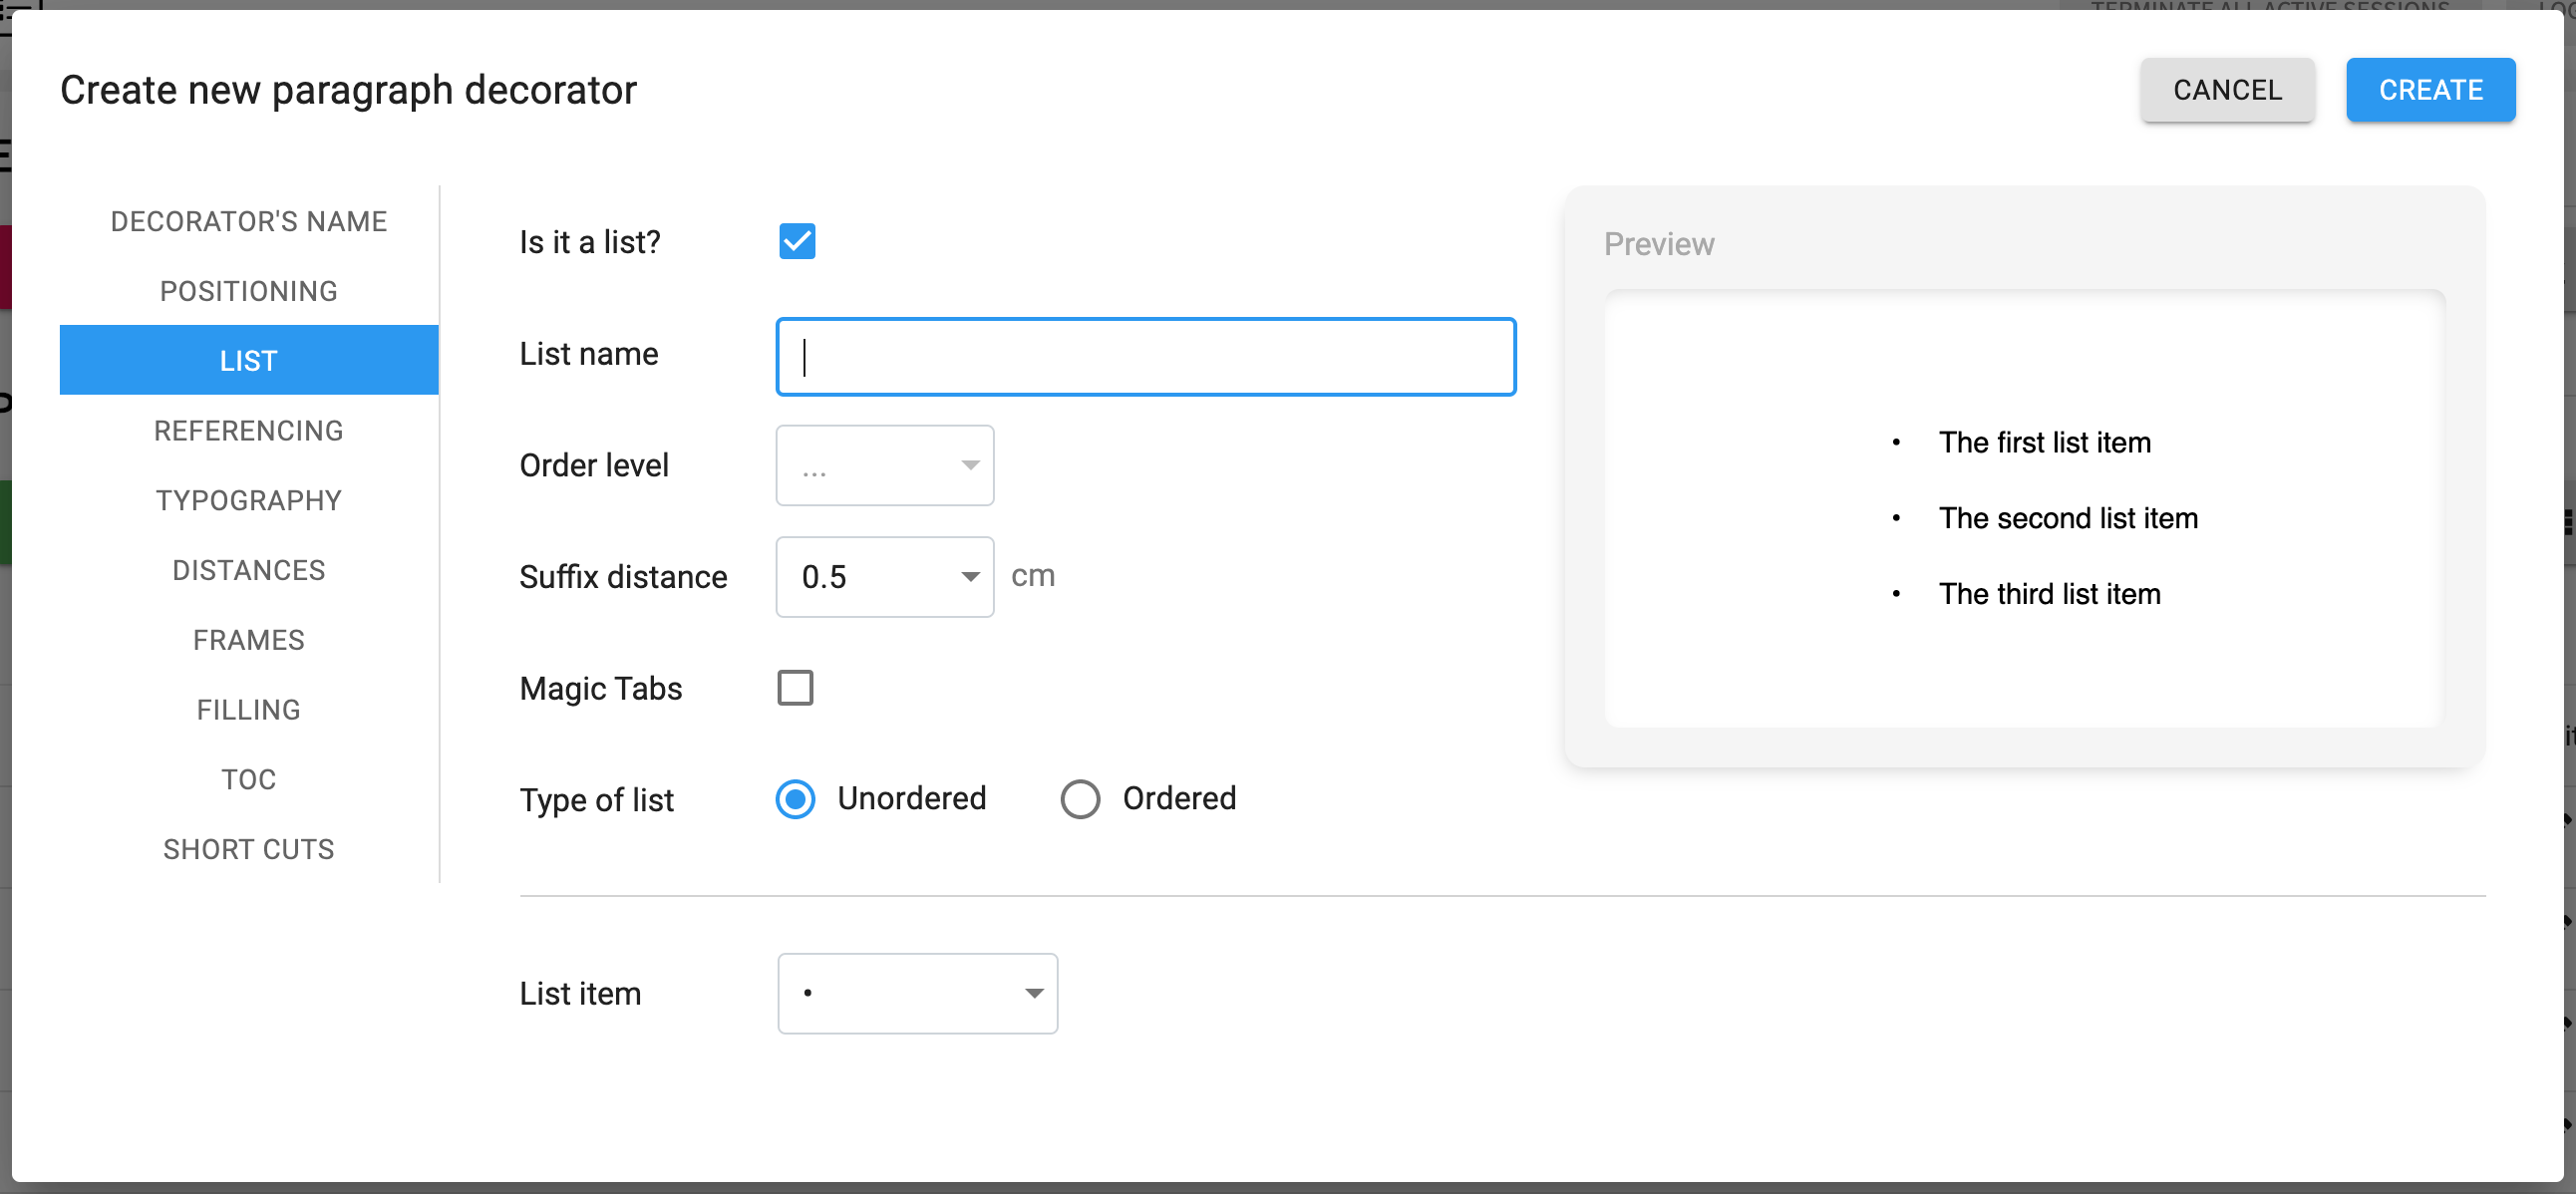
Setting the list in a new paragraph decorator
Details about type of the list you can see in the line ‘Type of list’ (Image 45) and decide whether you would like your list to be ordered or unordered.
(i)Unordered type
Firstly, we are going to find out how to set the unordered type of list.
If you set your list as unordered, that means, that the list will be displayed with special list items, instead of numbers. An appropriate list item you can also choose in settings.
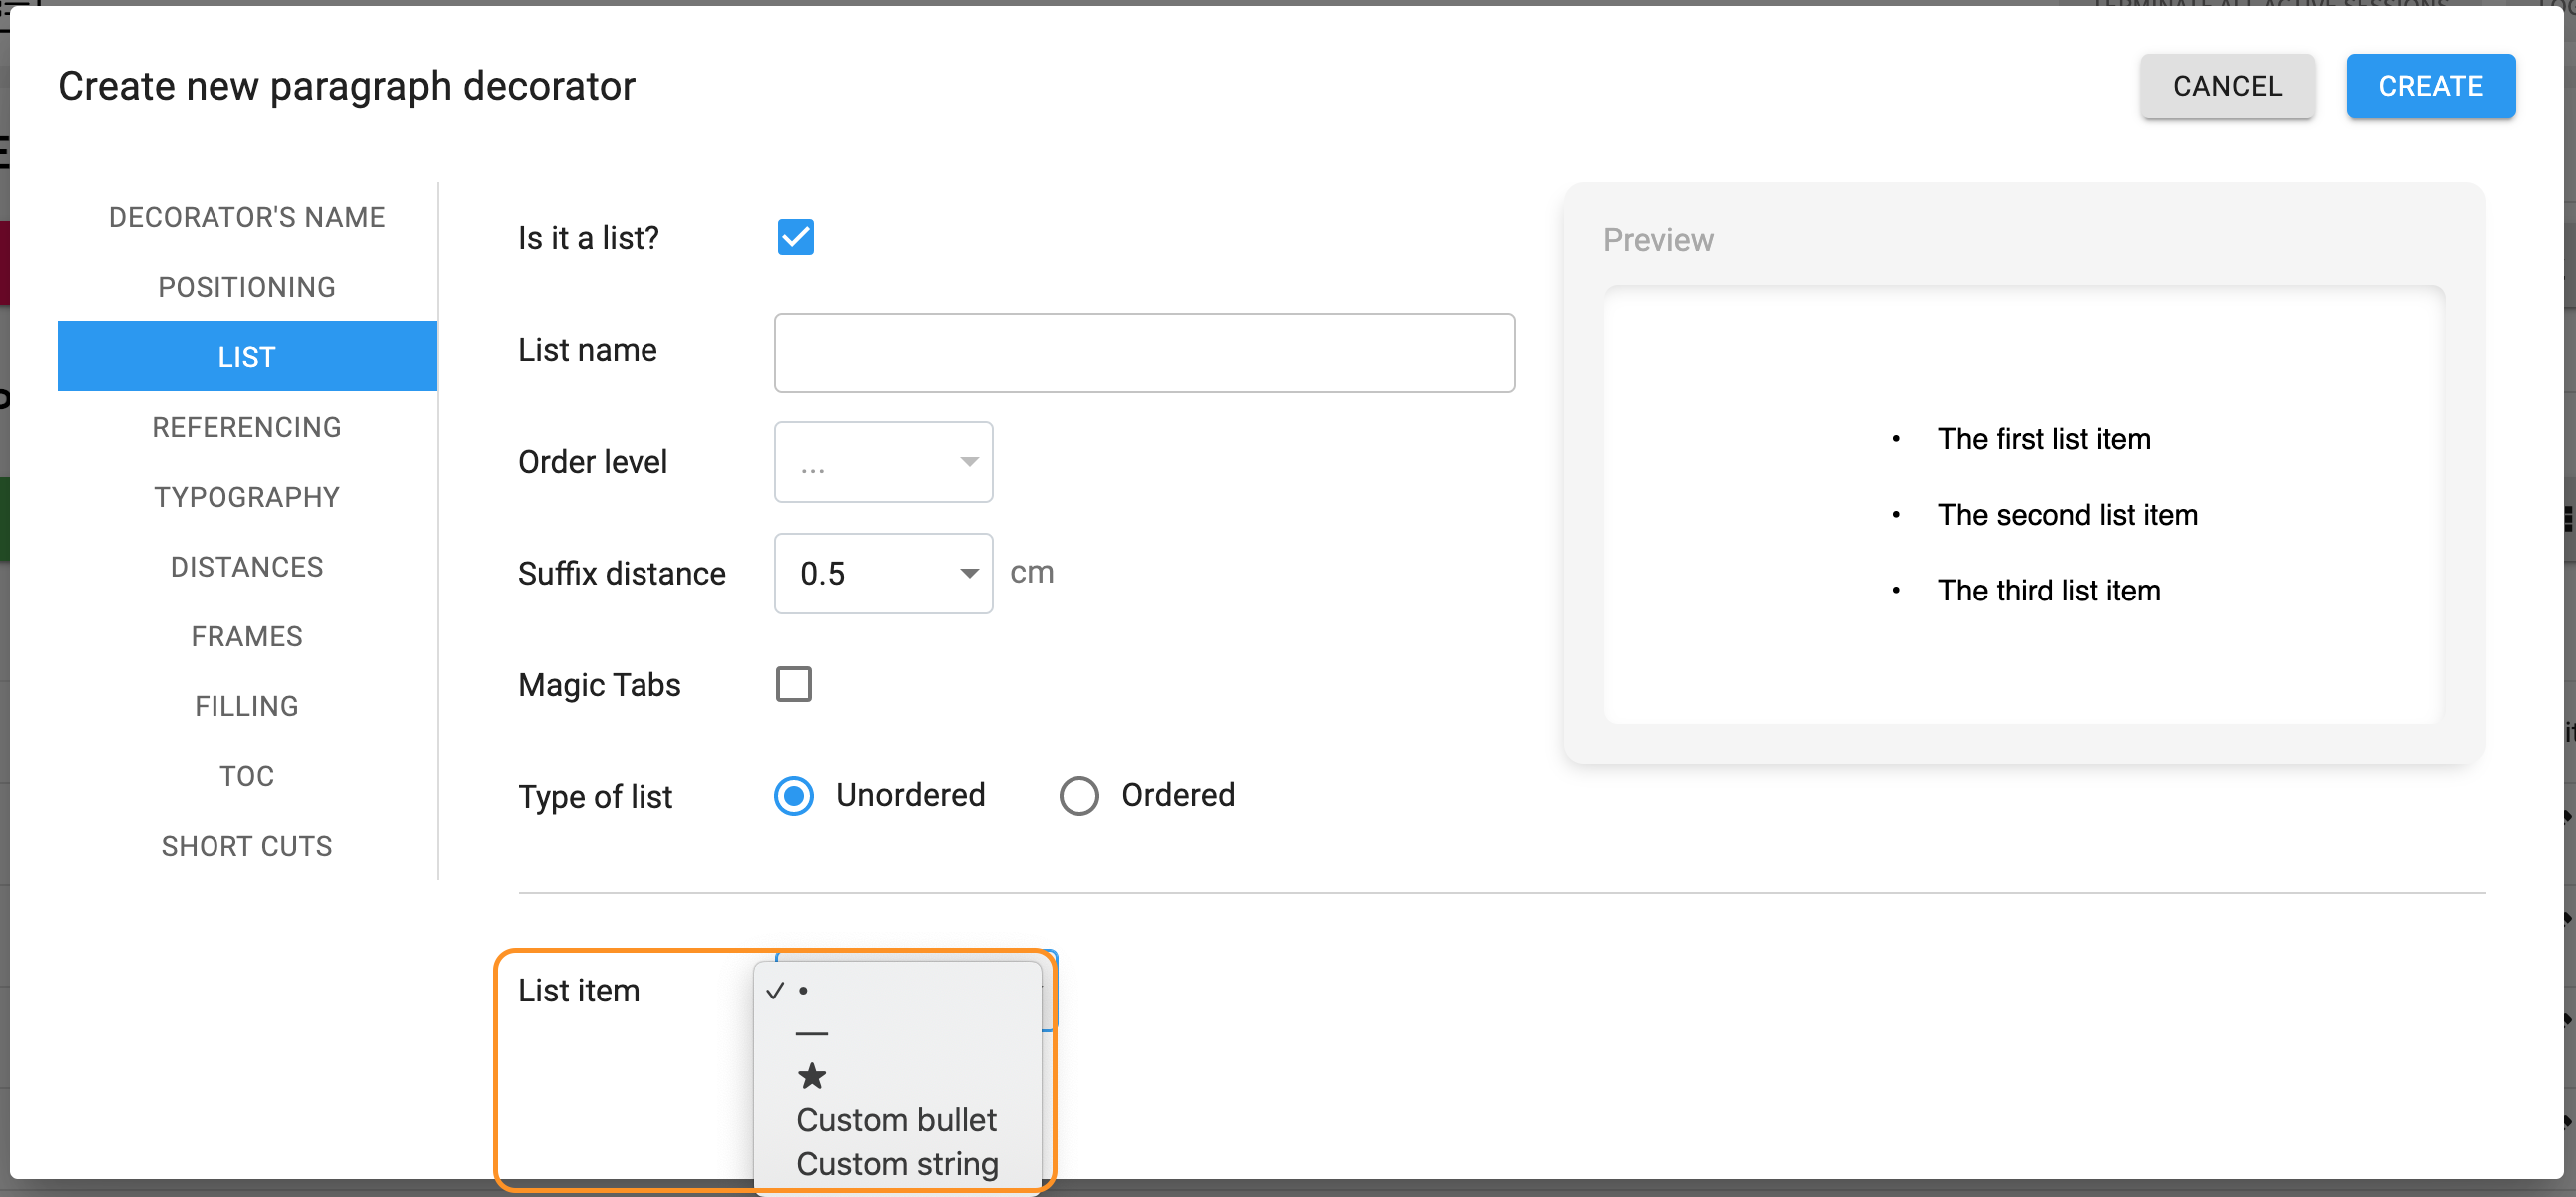
The choice of list items highlighted
After that set the suffix distance - the distance between the list item and text within a list line, and tick ‘Magic tabs’, if you want to set a distinct indent between the numbering and text in adjacent components.
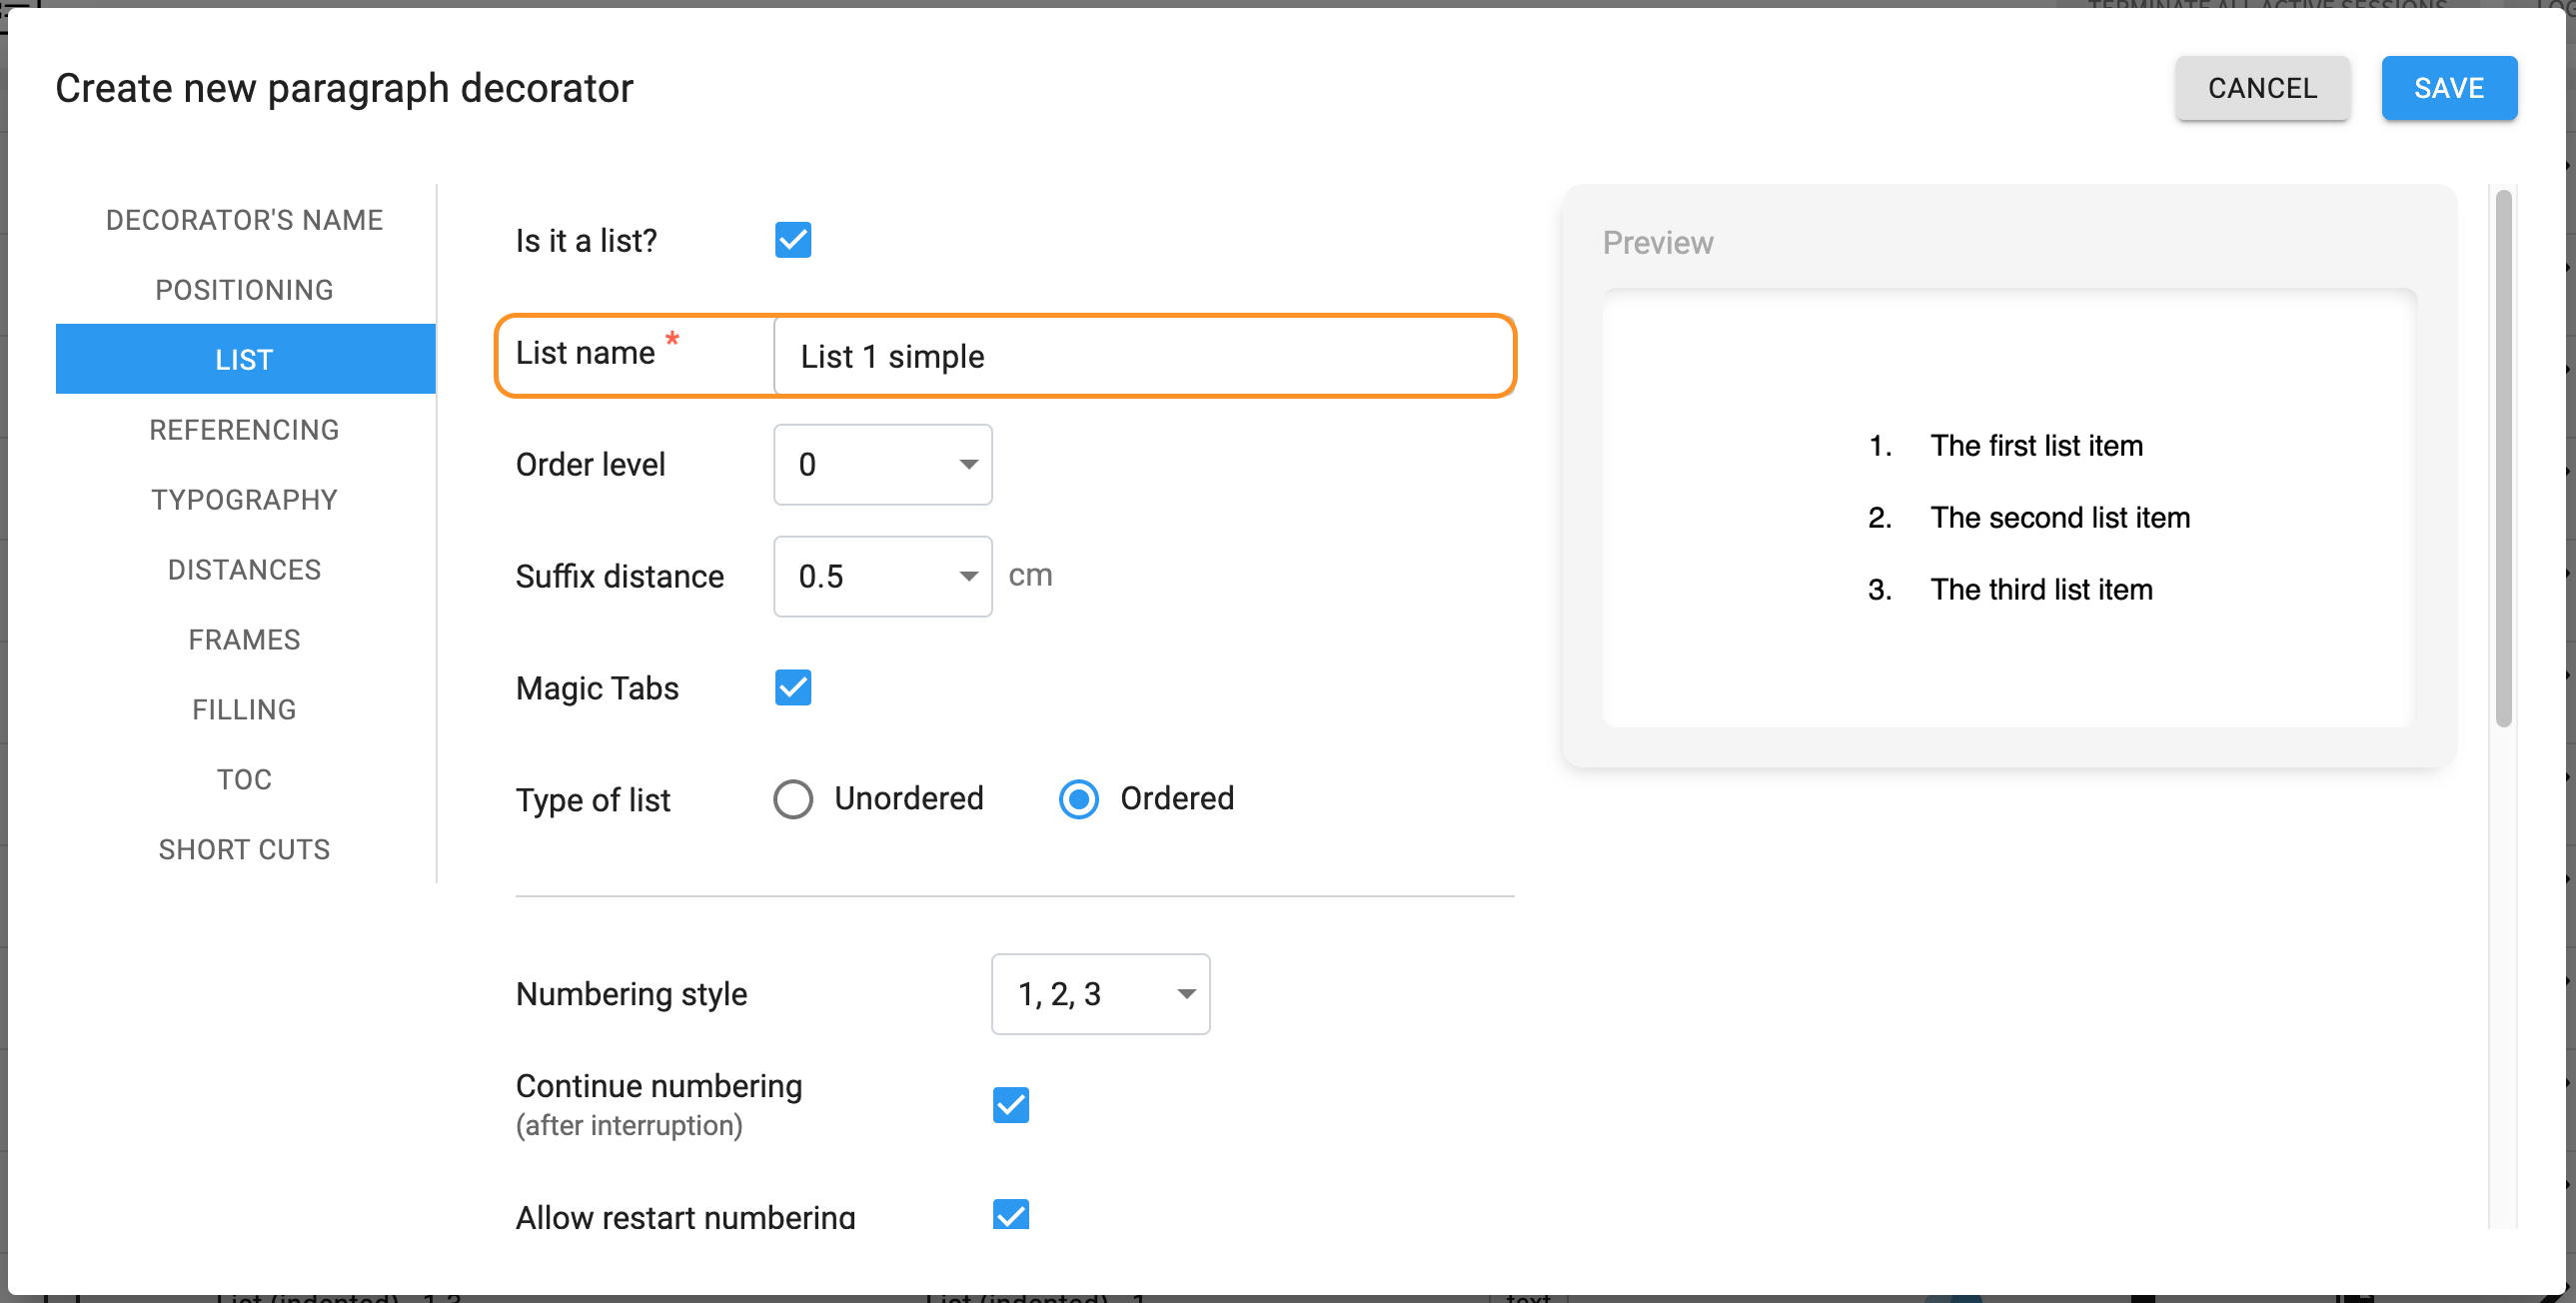
(ii)Ordered type
Now we are going to find out how to set the ordered list.

Creating ordered list
For this type of list you have to insert list name.
Note, that for certain lists to be connected into a single group, the same list name must be inserted for each list of this group.
The same list name for each list of one group highlighted
The ordered list is always the list with numbers. For this type you can set the order level (see Image 49) and ordered list pattern (this function appears as soon as you switch on the advanced list pattern settings, see Image 55).
Order level shows the level where the decorator is situated in a subparagraph.
Ordered list pattern is responsible for the outlook of the numbering of subparagraphs.
In case order level is switched on, you have to fill in ordered list pattern obligatory. If you set the order level as ‘1’, in ordered list pattern line you have to insert ‘0’ and ‘1’ with placeholders in a dot. Then in the editor you will receive the appropiate numbering of subheadings.

Order level '1' with filled ordered list pattern line highlighted
The next step is to choose appropriate numbering style.
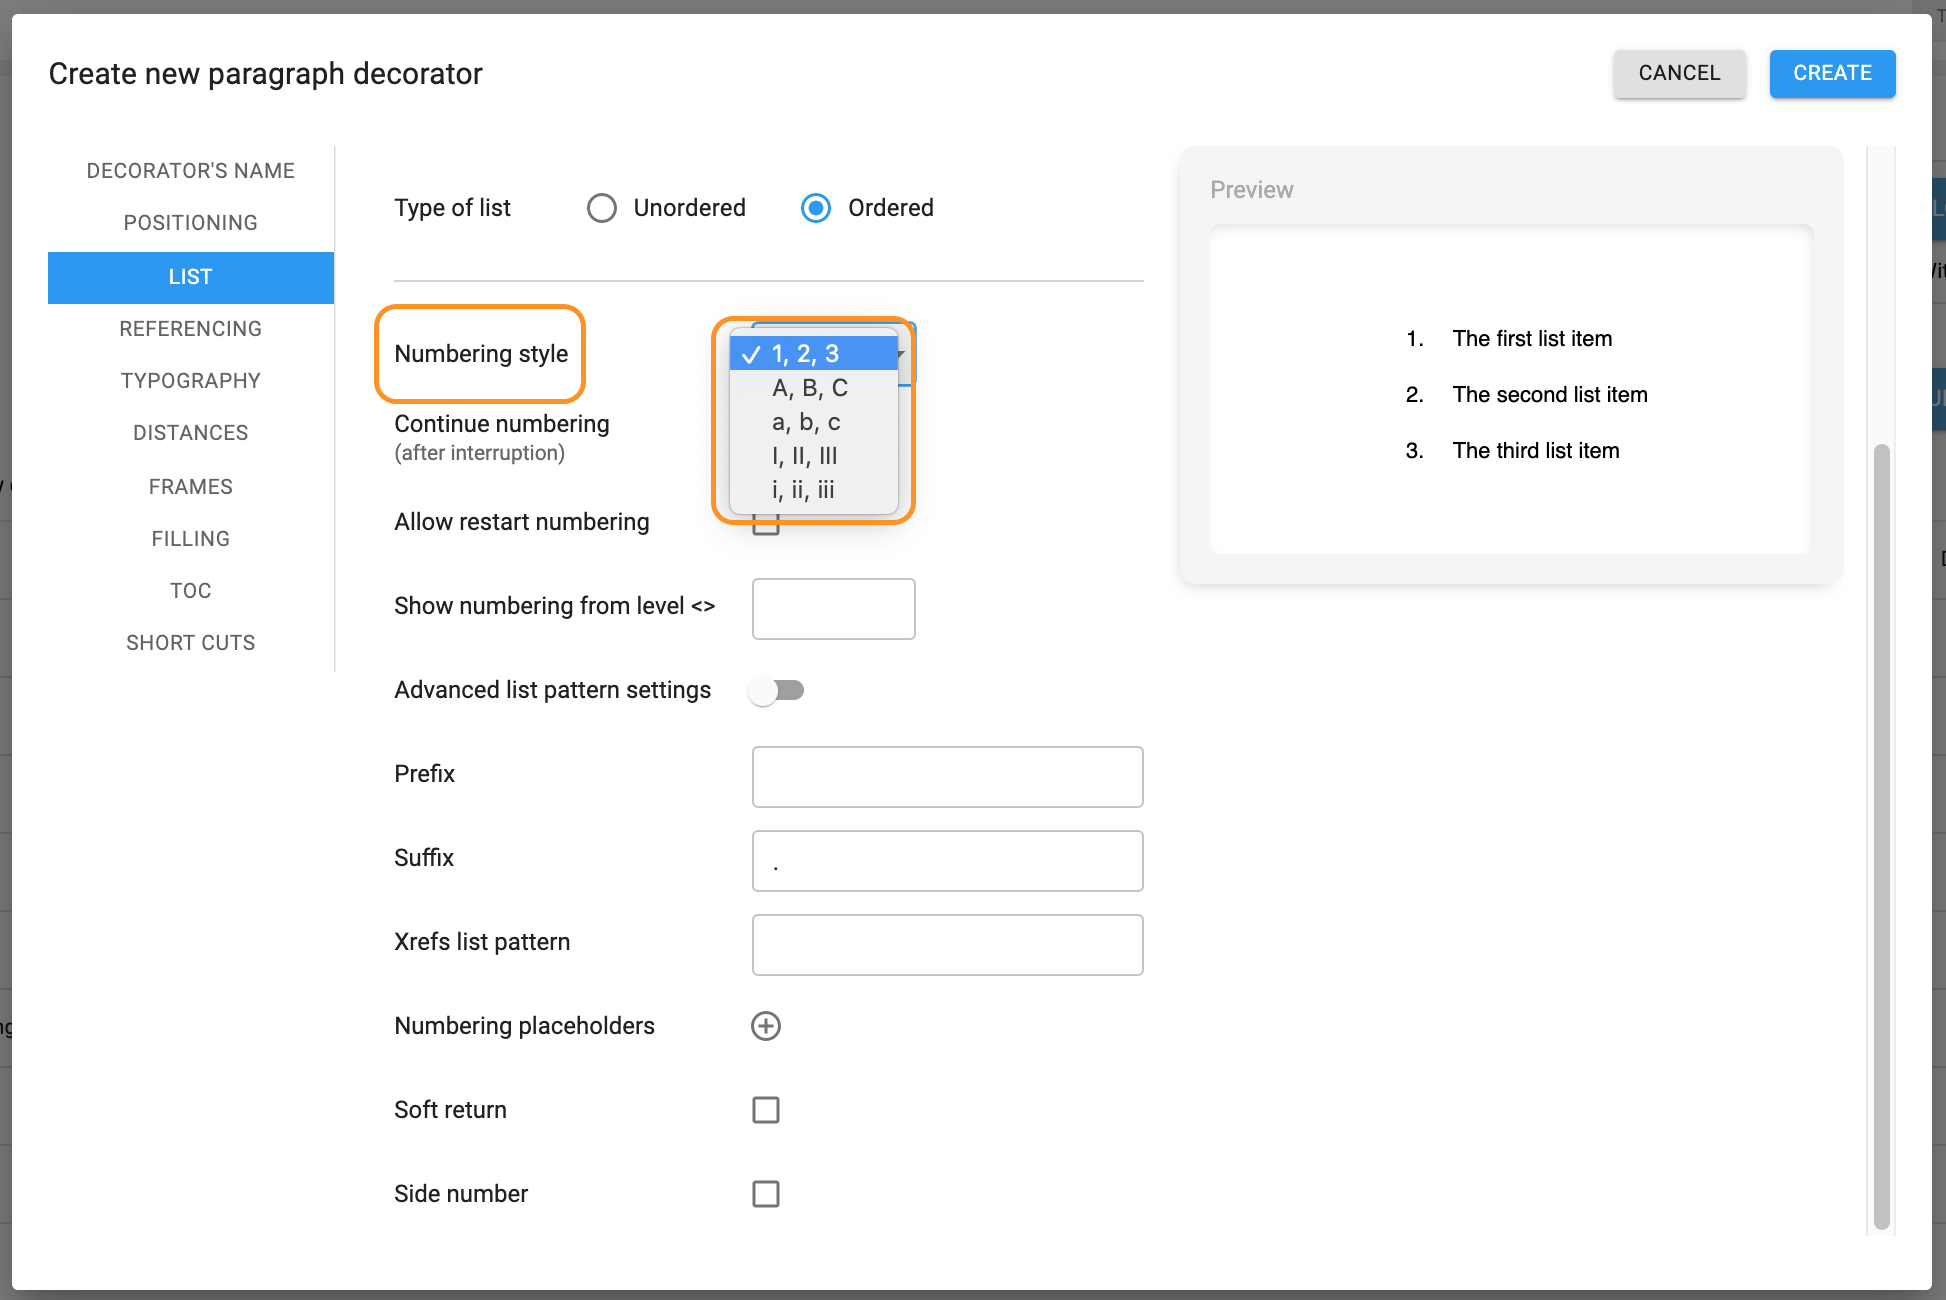
The choice of numbering styles highlighted
Here you have to choose the outlook of numbering style, decide whether you need to continue numbering after interruption and allow restart numbering - start numbering from the beginning after interruption.
You can also decide, if you want to show numbering of a subparagraph from another level. This means that in case you set the order level ‘2’, but you need it to be shown not with the numbering you set in the field ‘Numbering style’, you should insert the required level in the field ‘Show numbering from level’.
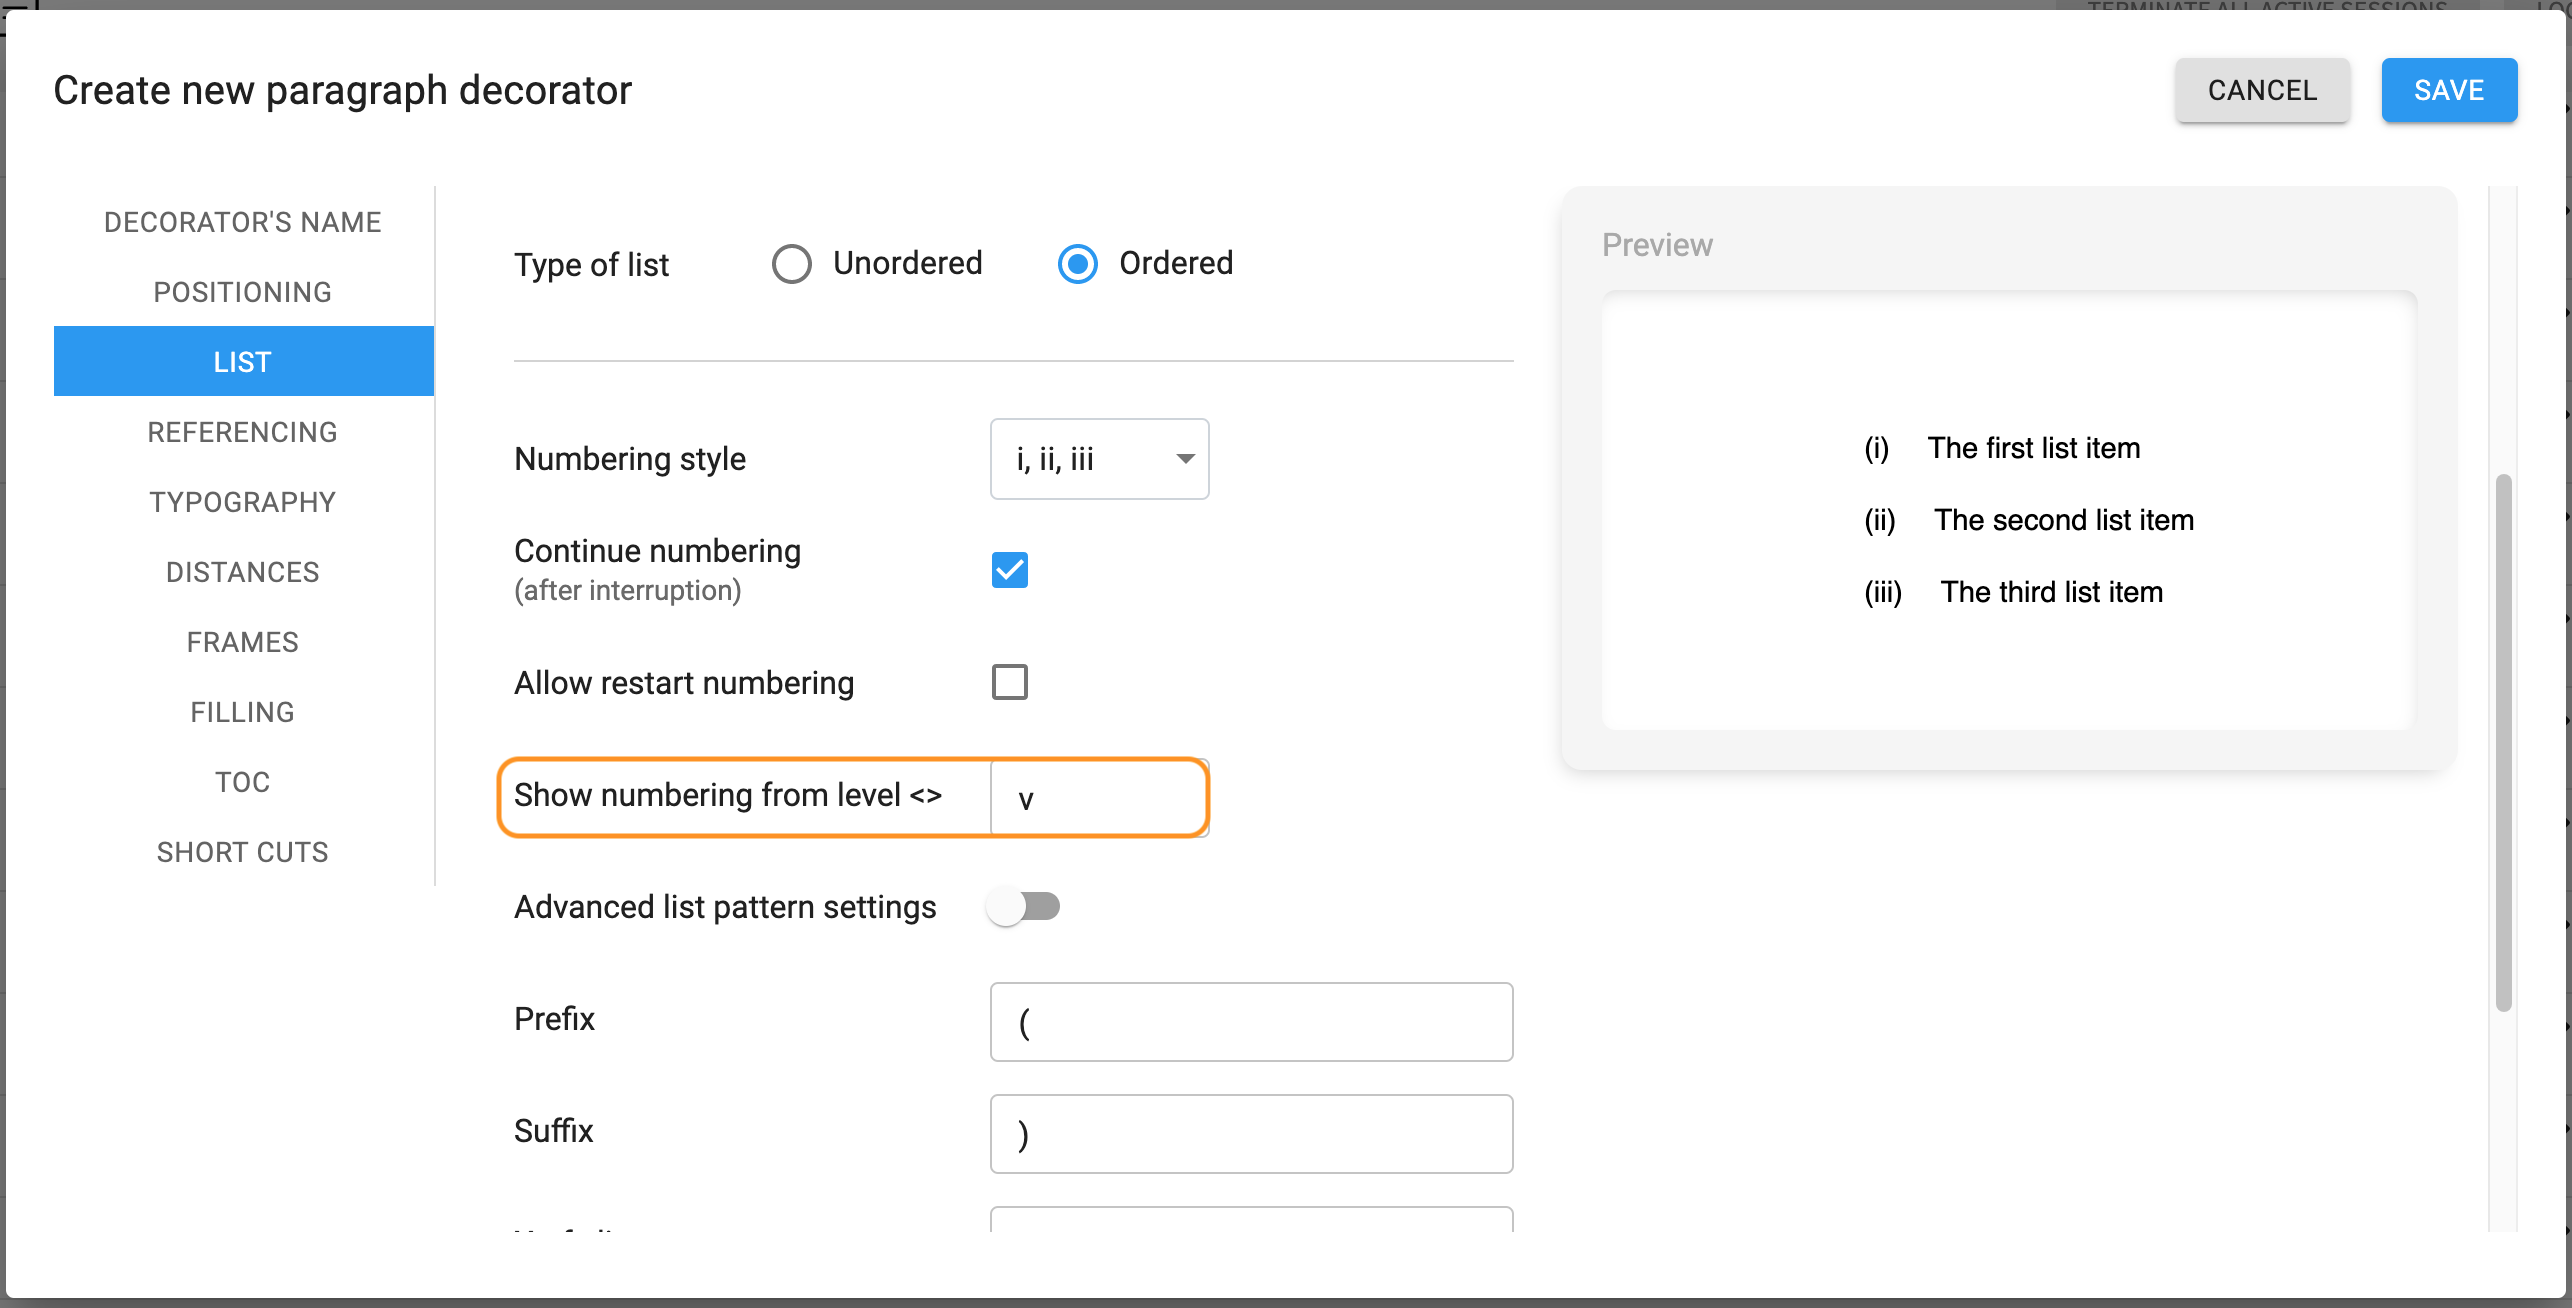
Show numbering from level highlighted
In the editor the third paragraph will be numbered not with “(i)” as in the preview, but with the indicated level “(v)”.
As soon as you start setting ordered list, the advanced list pattern settings are switched of. Then you see such settings as prefix and suffix.
Prefix is a symbol that is displayed before the numbering, suffix - after the numbering.
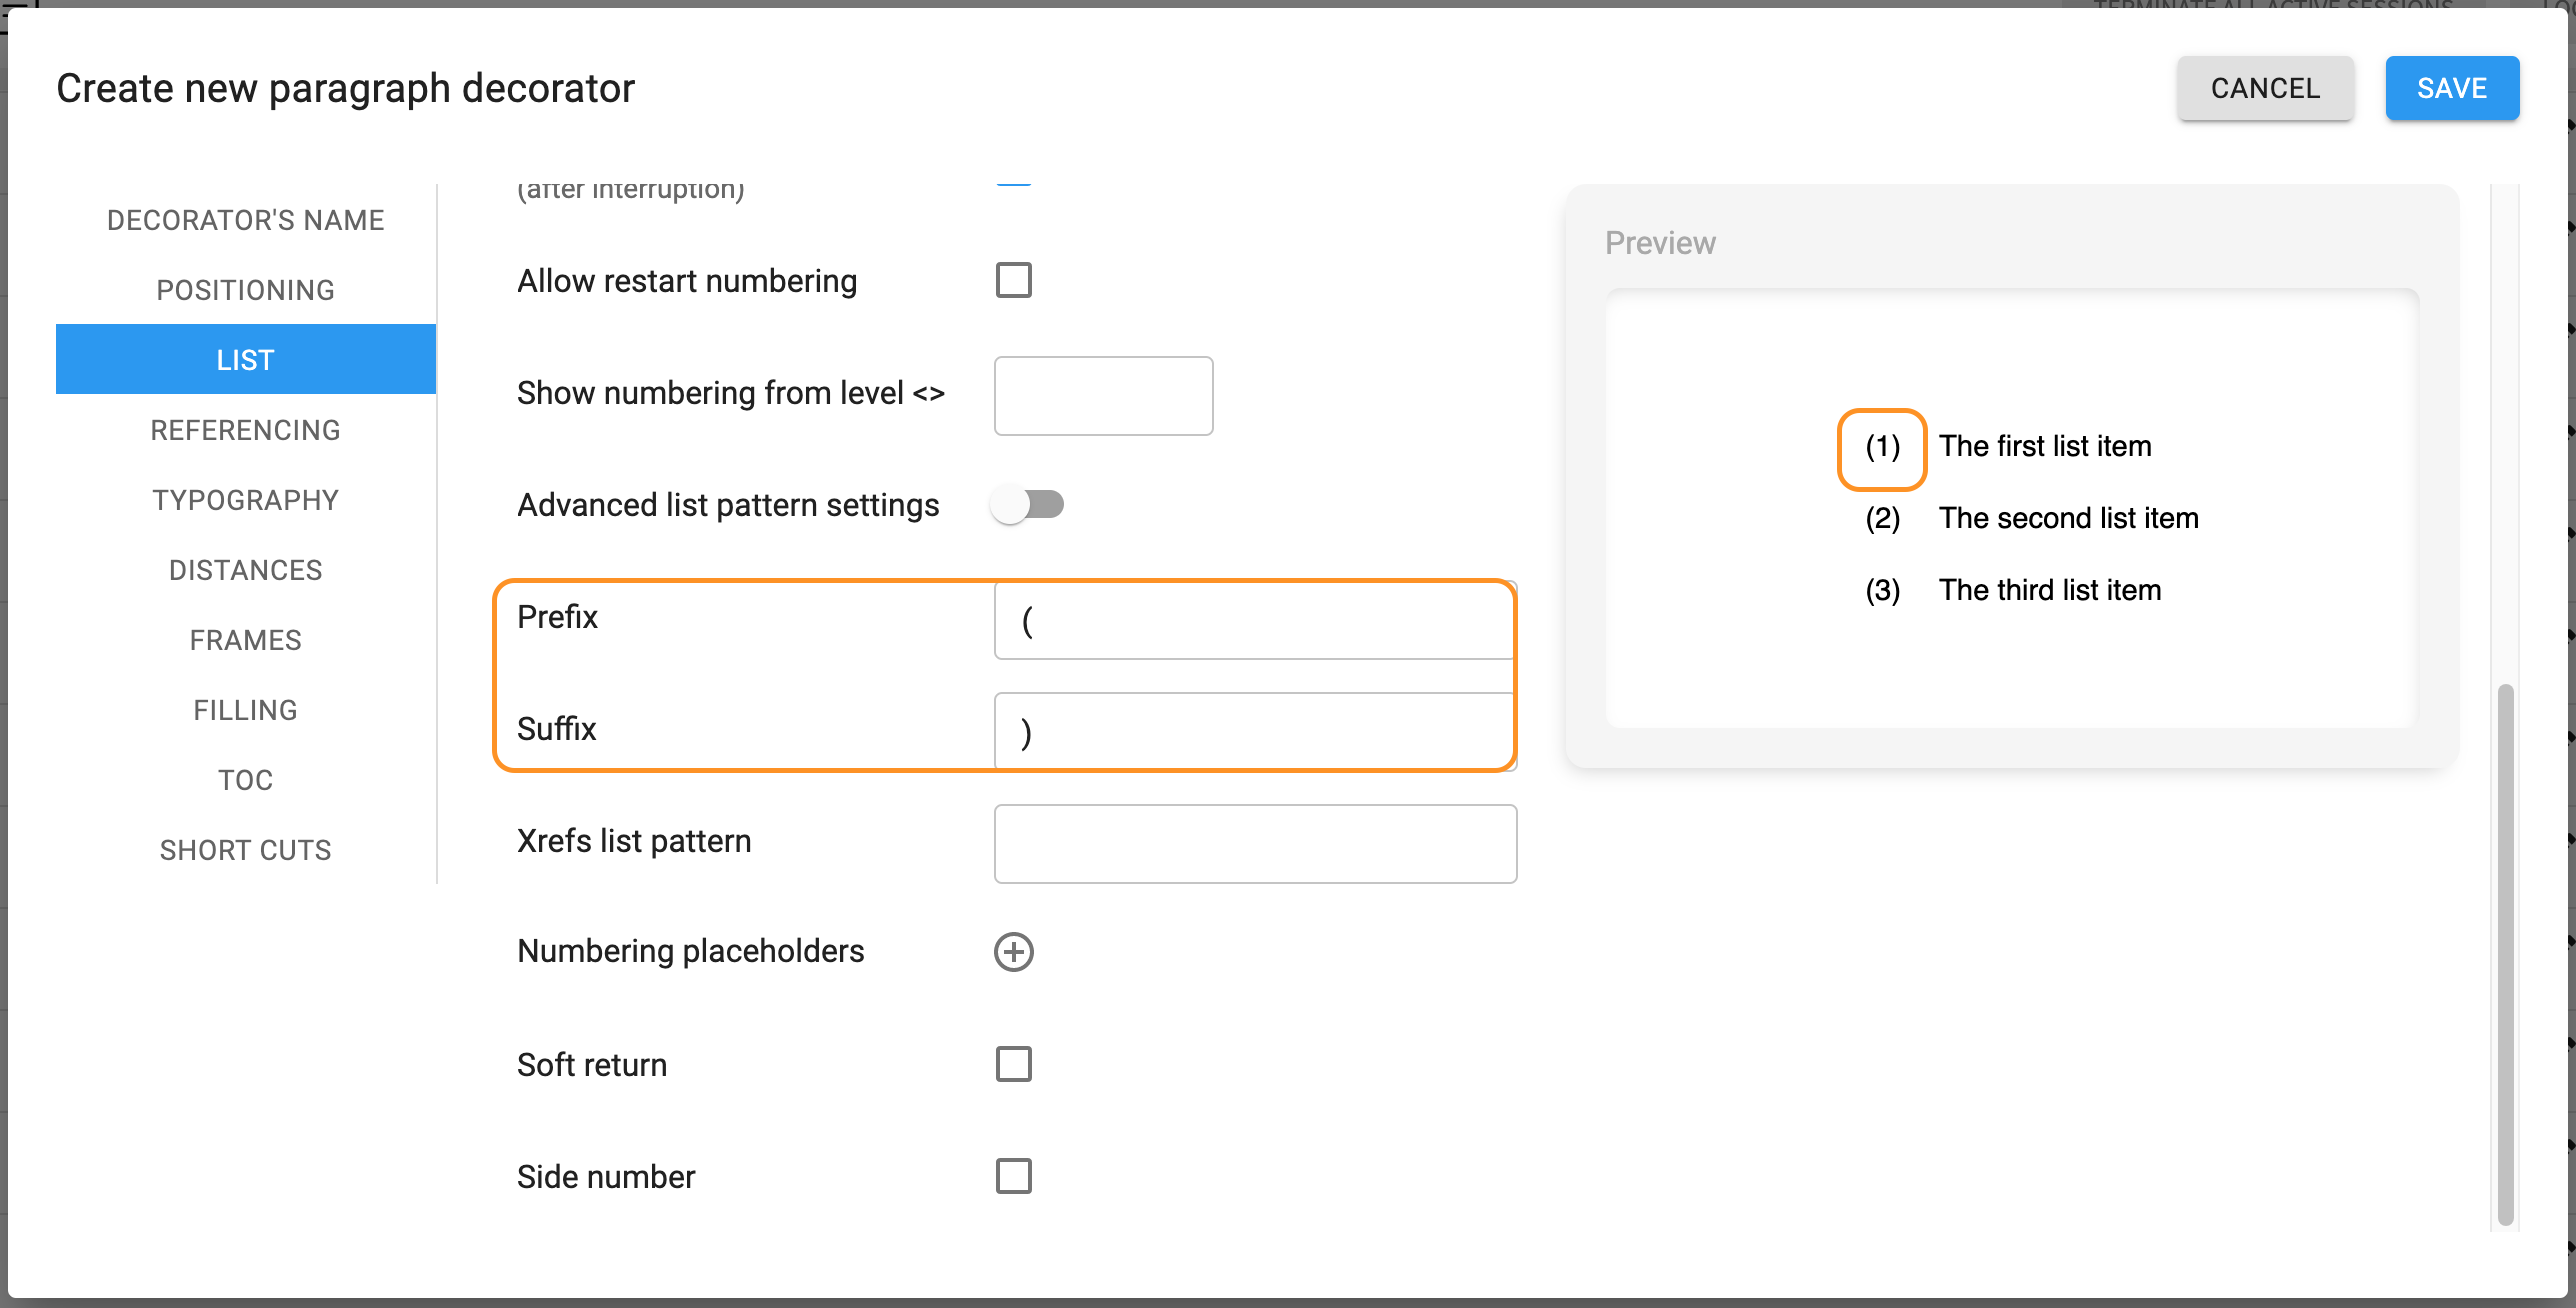
Prefix and suffix highlighted
Xref list pattern function indicates the levels of cross-references. For example, if you have three subparagraphs and you want to make a cross-reference to the third one, in the line ‘Xrefs list pattern’ you can set such an outlook of your cross-reference, where the numbering of previous subparagraphs will be displayed, too.

Xref list pattern highlighted
To set the described outlook of cross-references, you have to insert three levels with placeholders in a dot in the line ‘Xrefs list pattern’ (see Image 53). After that in the editor your cross-reference will look like this:
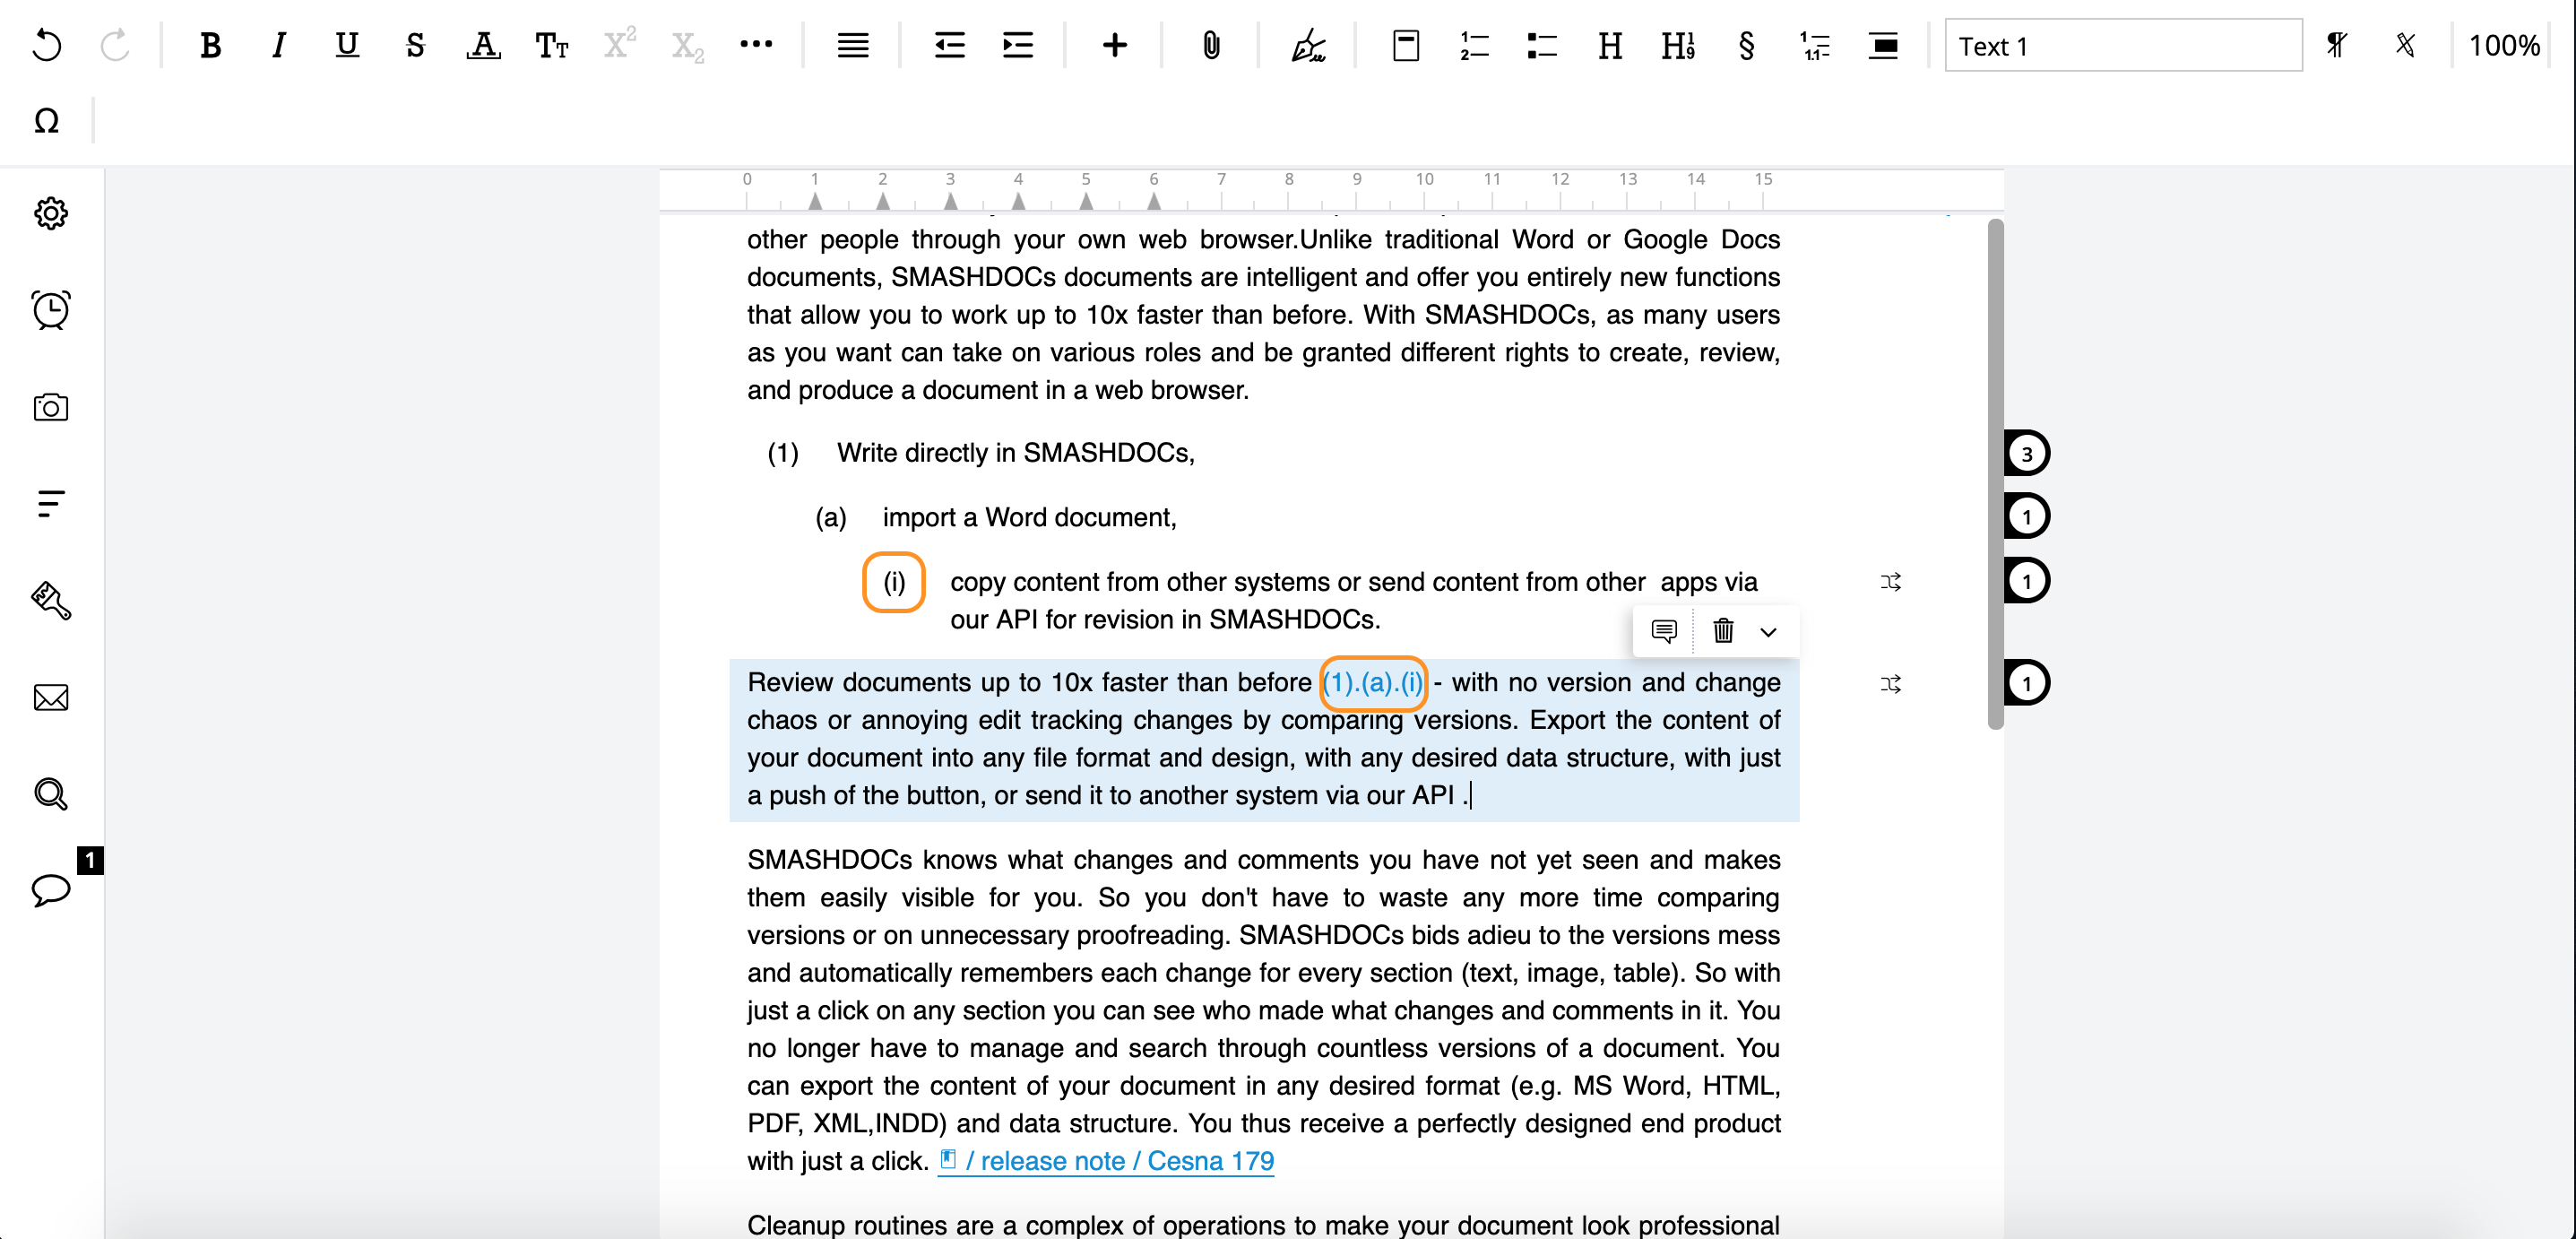
The outlook of xrefs in the editor highlighted
Here the cross-reference has been made to the third highlighted subparagraph, but the outlook of it is with two previous subparagraphs.
If you want to create prefixes and translate it to all supported languages, you need to activate advanced list pattern. Once you switch on advanced list pattern settings, the dialog window will transform like this:
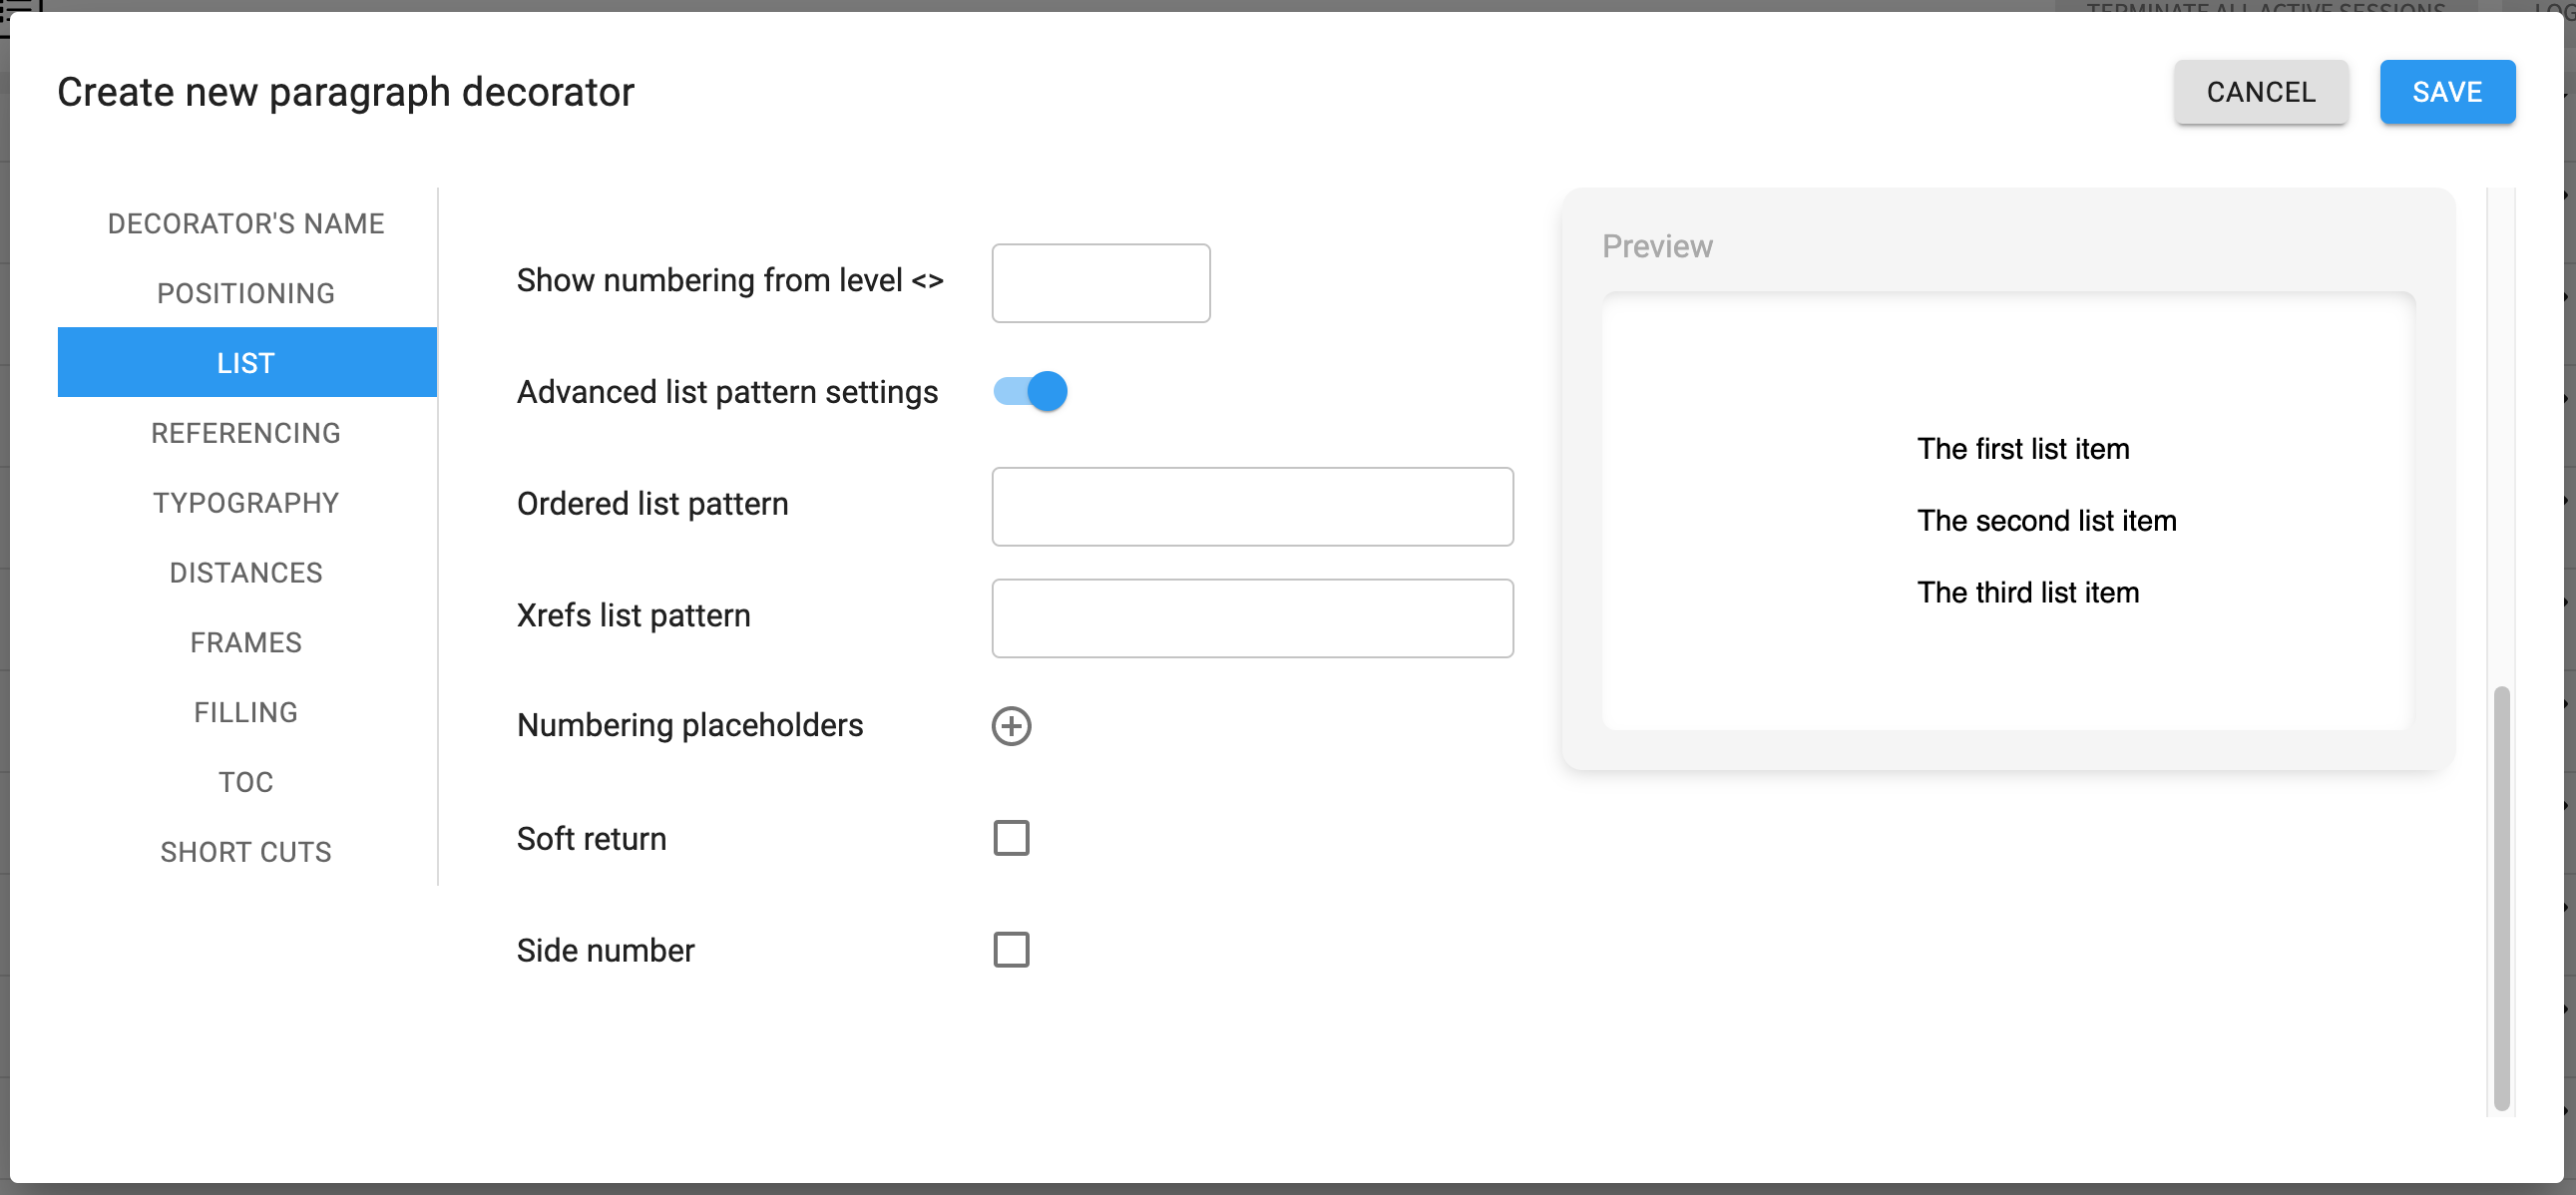
Advanced list pattern settings switched on
Ordered list pattern settings appear, where you have to insert a placeholder that will indicate a prefix. However, before that it is necessary to add a numbering placeholder and translate it to required languages. To do that click a button ‘Plus’ in the line ‘Numbering placeholders’.
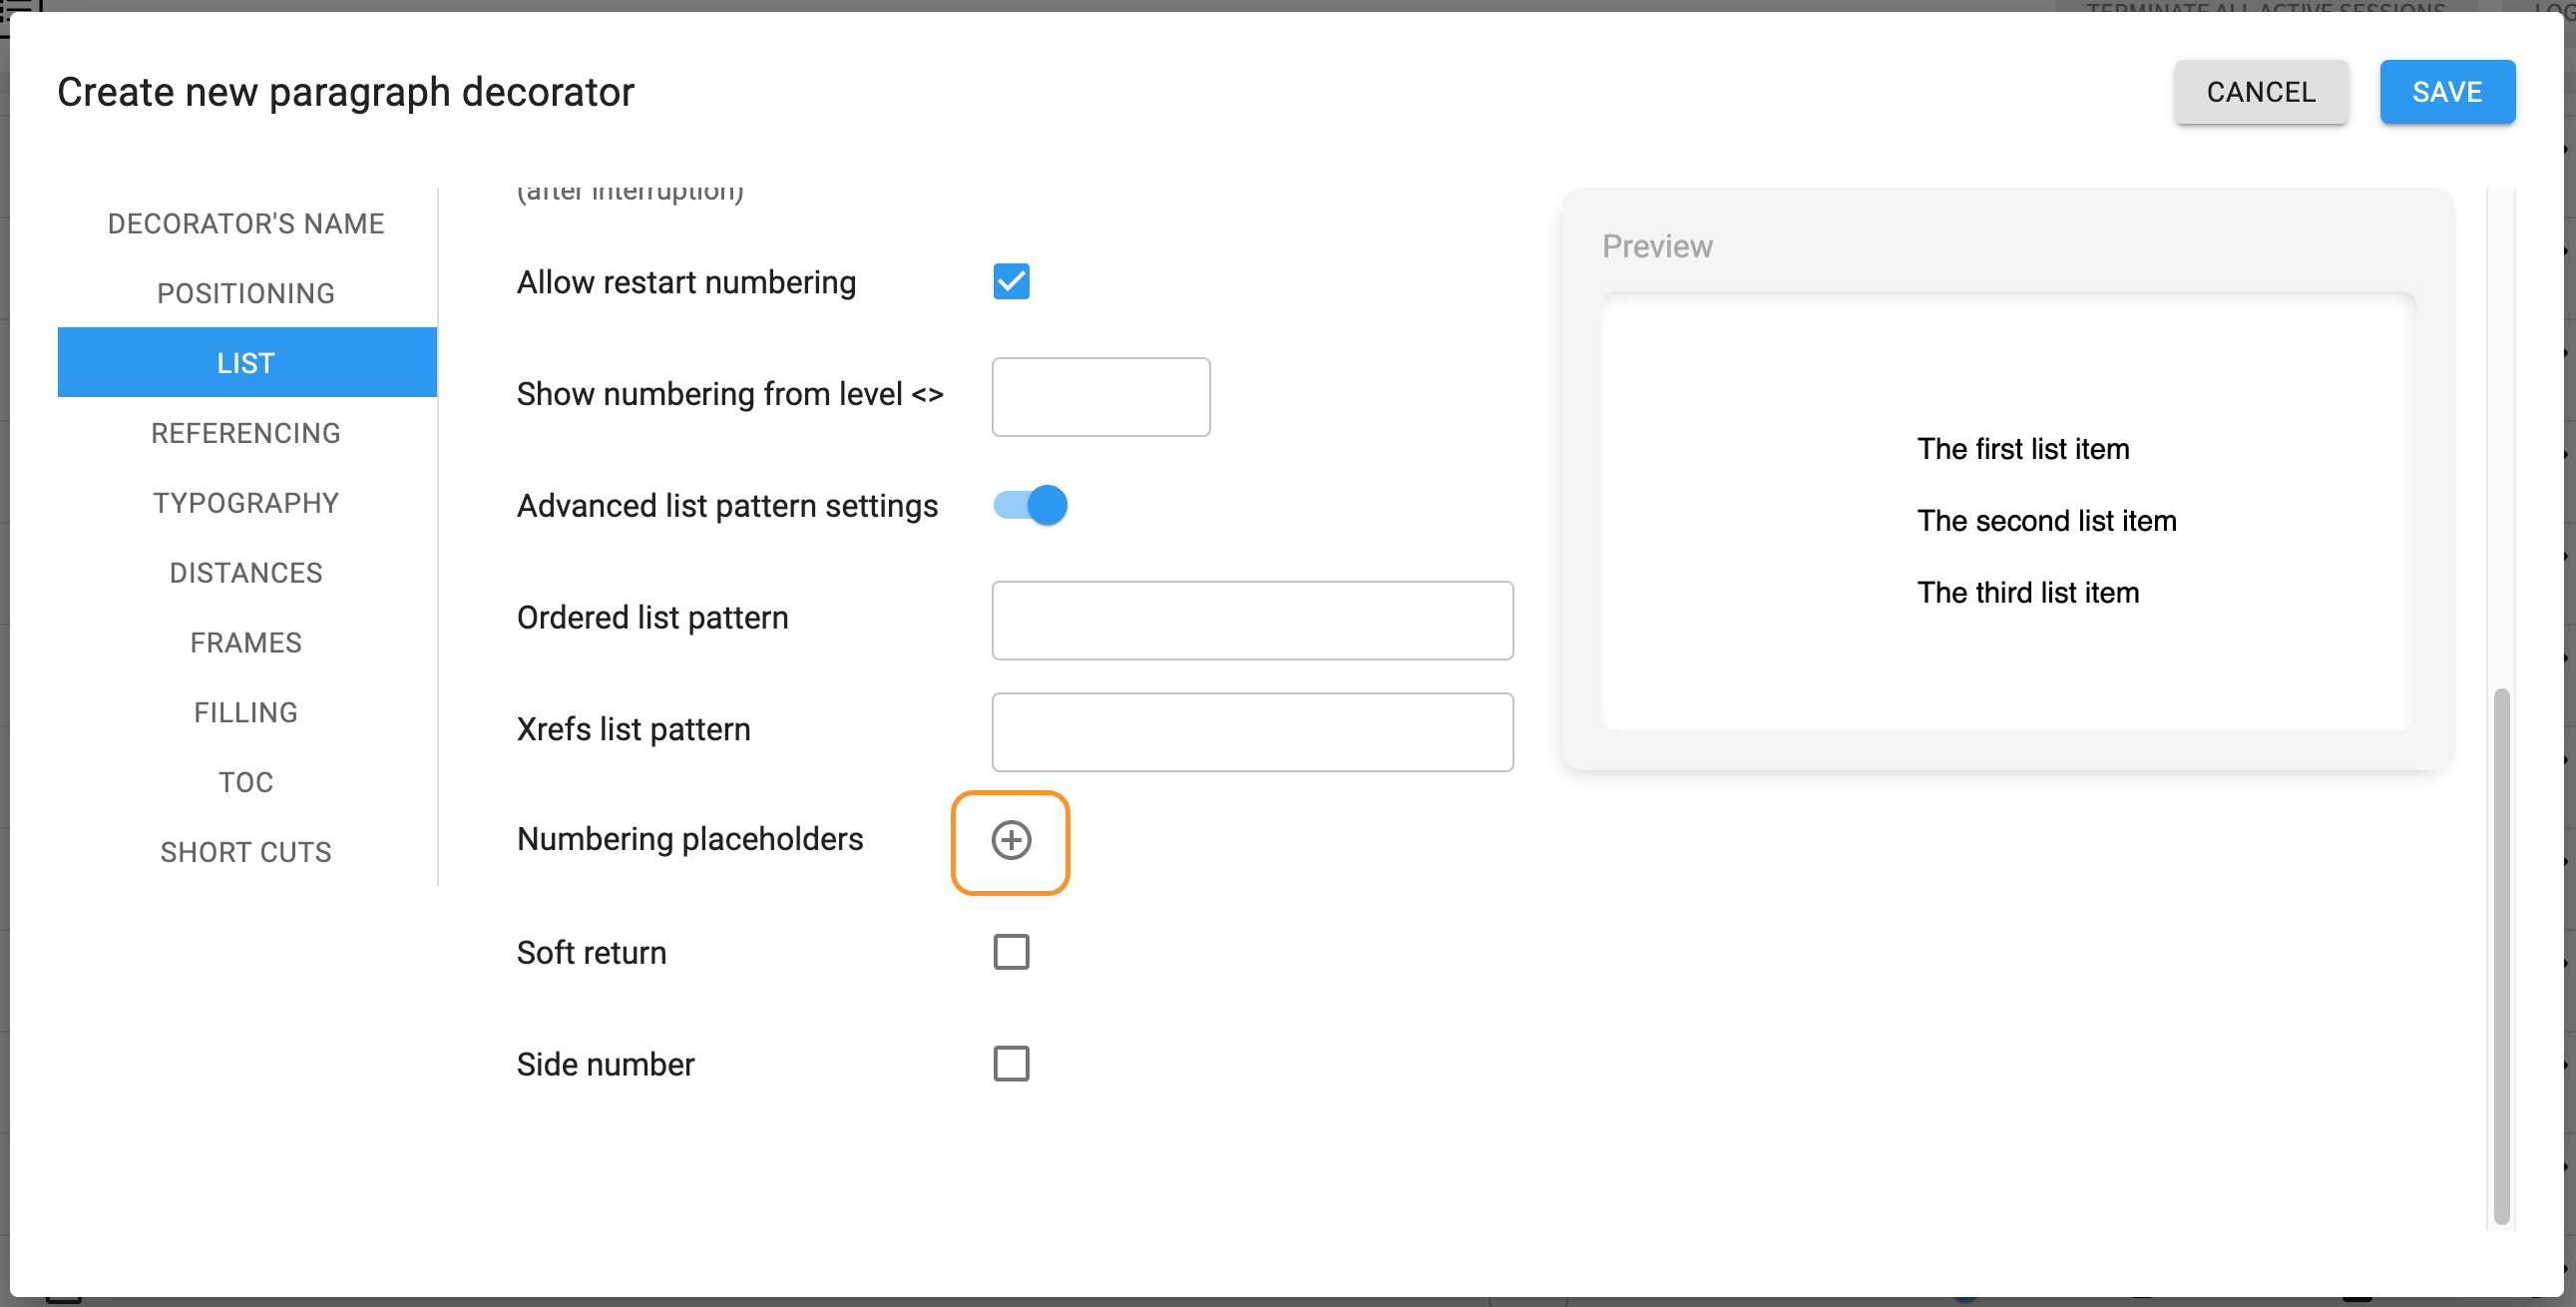
Adding numbering placeholders highlighted
Then you will see fields where you have to insert a key (in English obligatory) and translate this key to other languages.
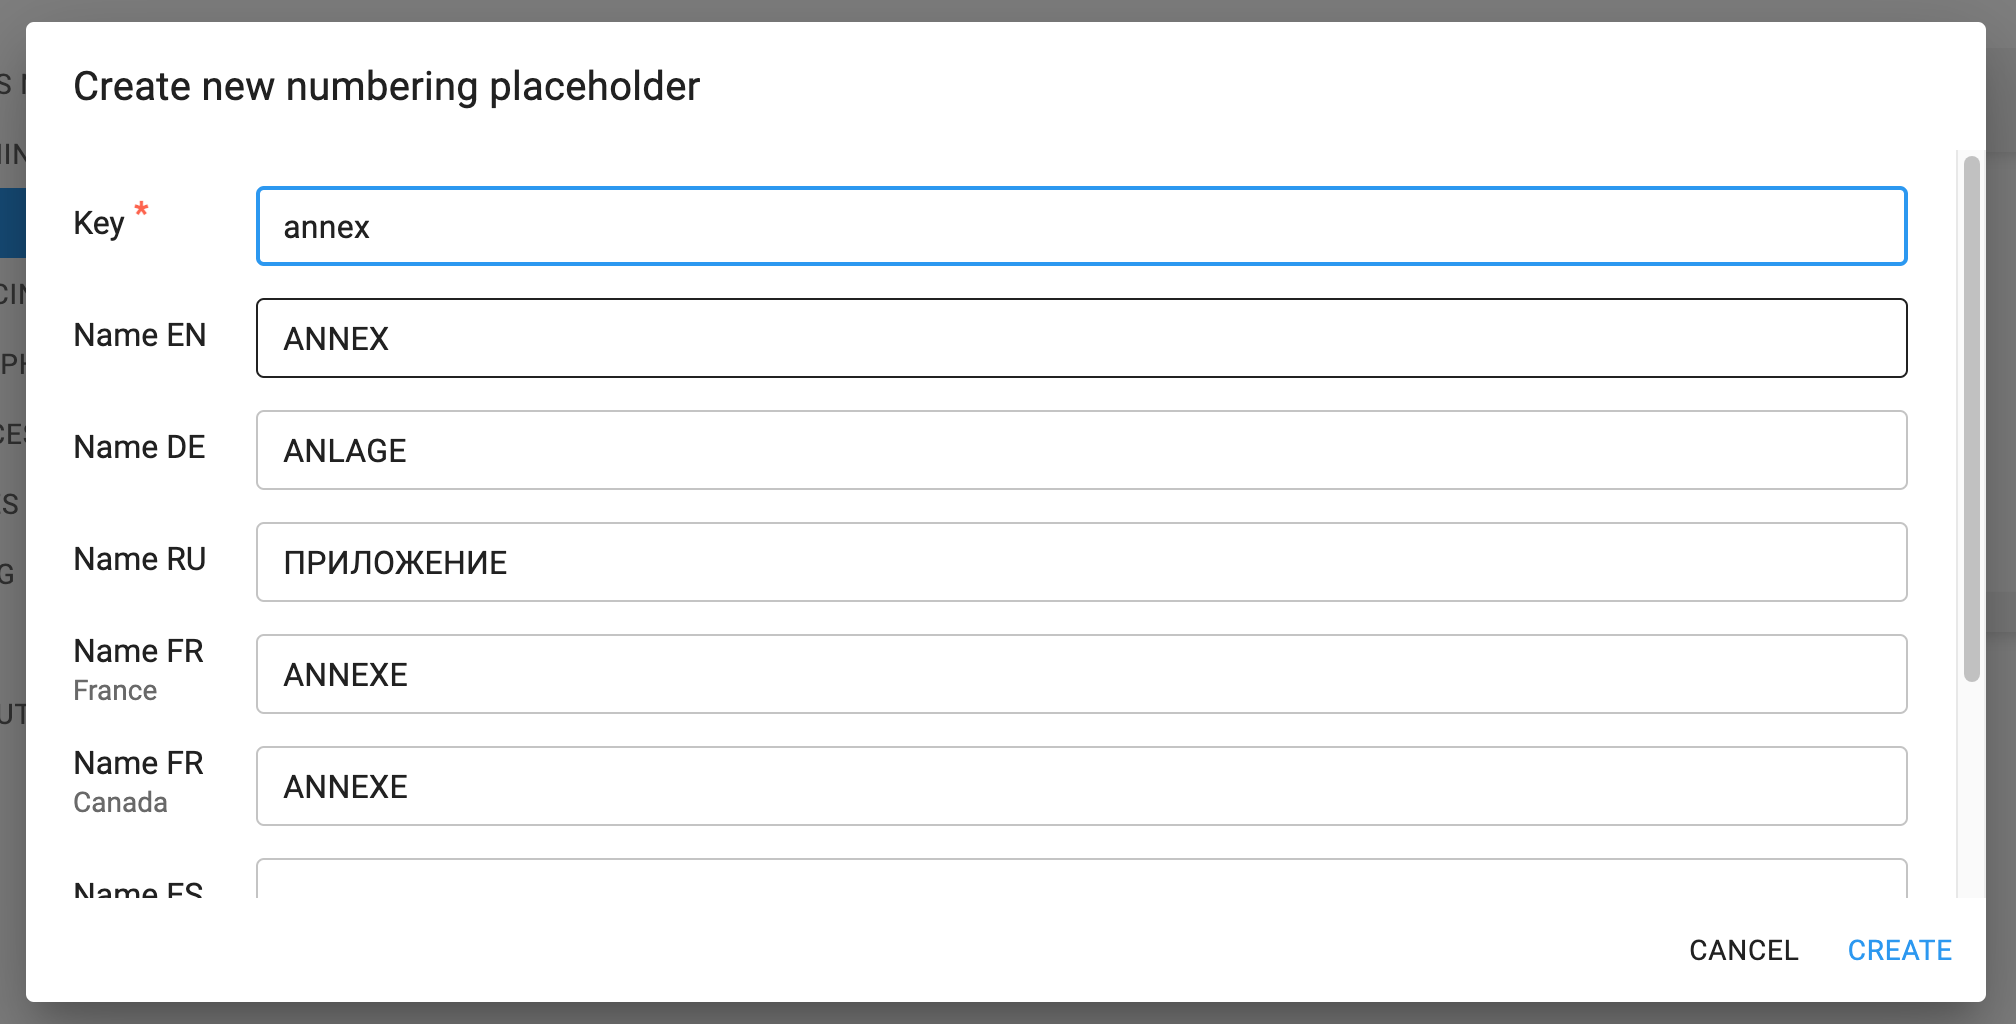
Translating a numbering placeholder
Click ‘Create’ and then you will be able to work with ordered list pattern settings. Into the ‘Ordered list pattern’ line you should insert the key that you have added before (see Image 57) and placeholder obligatory.
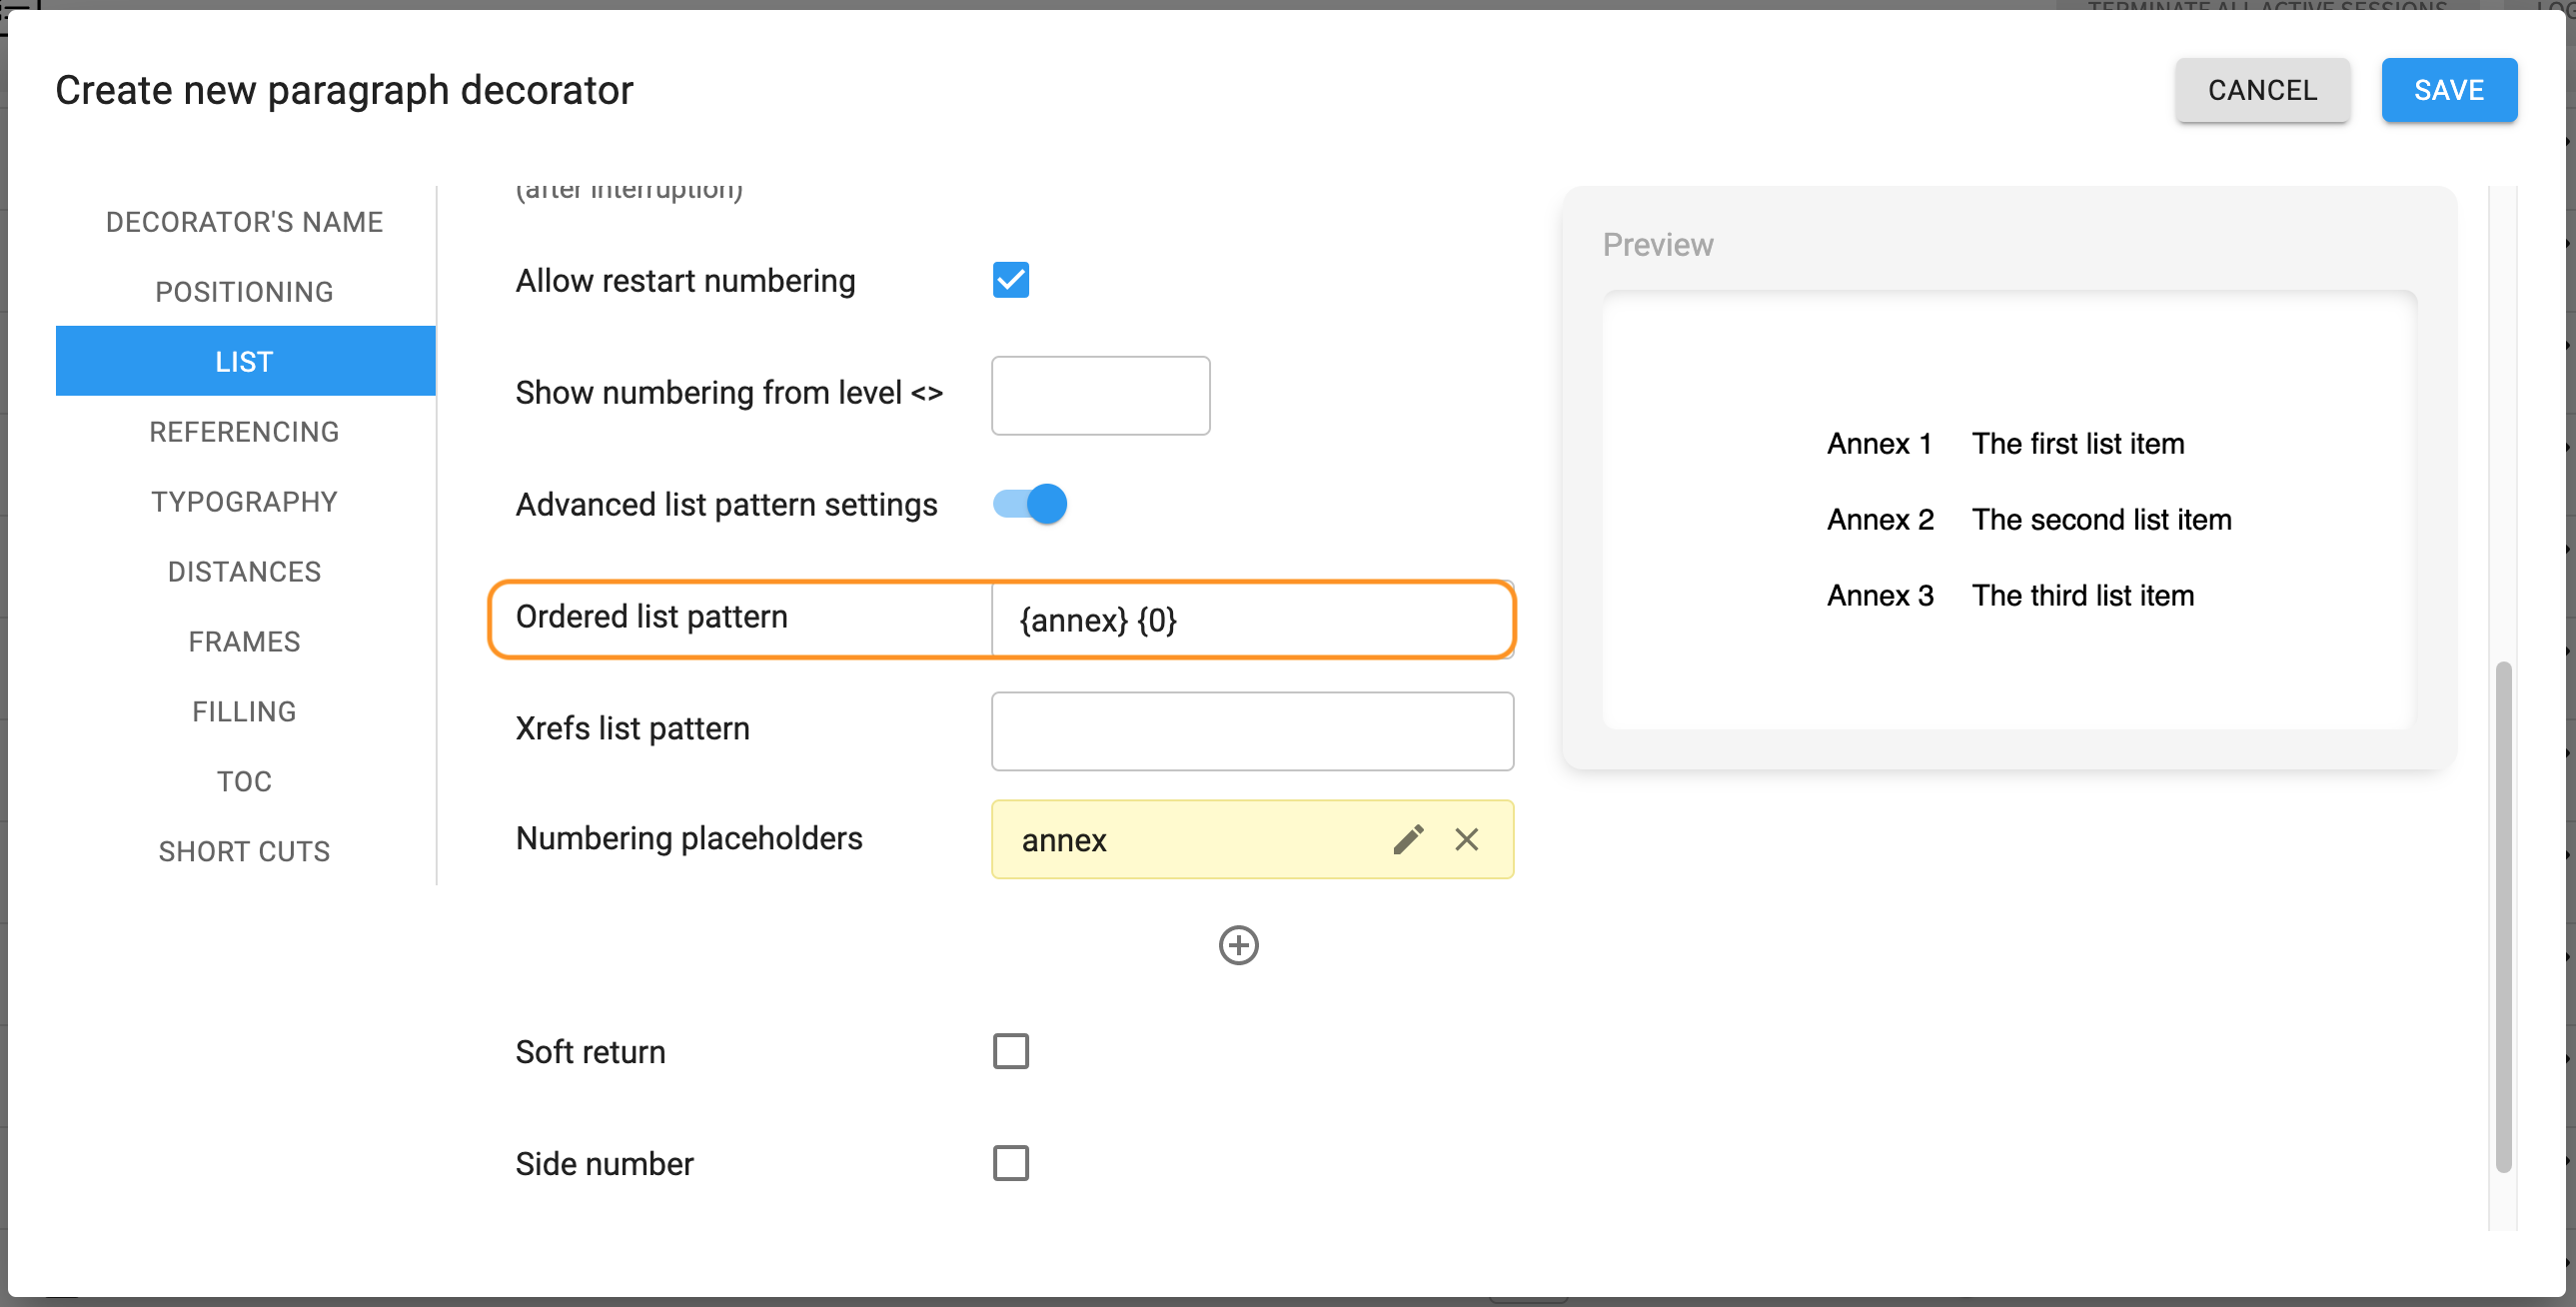
Inserting a placeholder of a prefix in the line 'Ordered list pattern' highlighted
Then decide whether you need to apply the function ‘Soft return’ in numbering. Also you can decide whether you want to convert the numbering into side number.
Side number settings highlighted
Once you tick “Side number”, you will see extra settings. There you will be able to choose font, alignment, font size, color, filling color, width, line height, radius and stylings of the side number. On the right side you will have a quick view of how your side numbers will look like in the editor.
(d)Referencing
Reference group - applying styles from the reference group to a text component, allows creating a cross-reference to such a component in the document
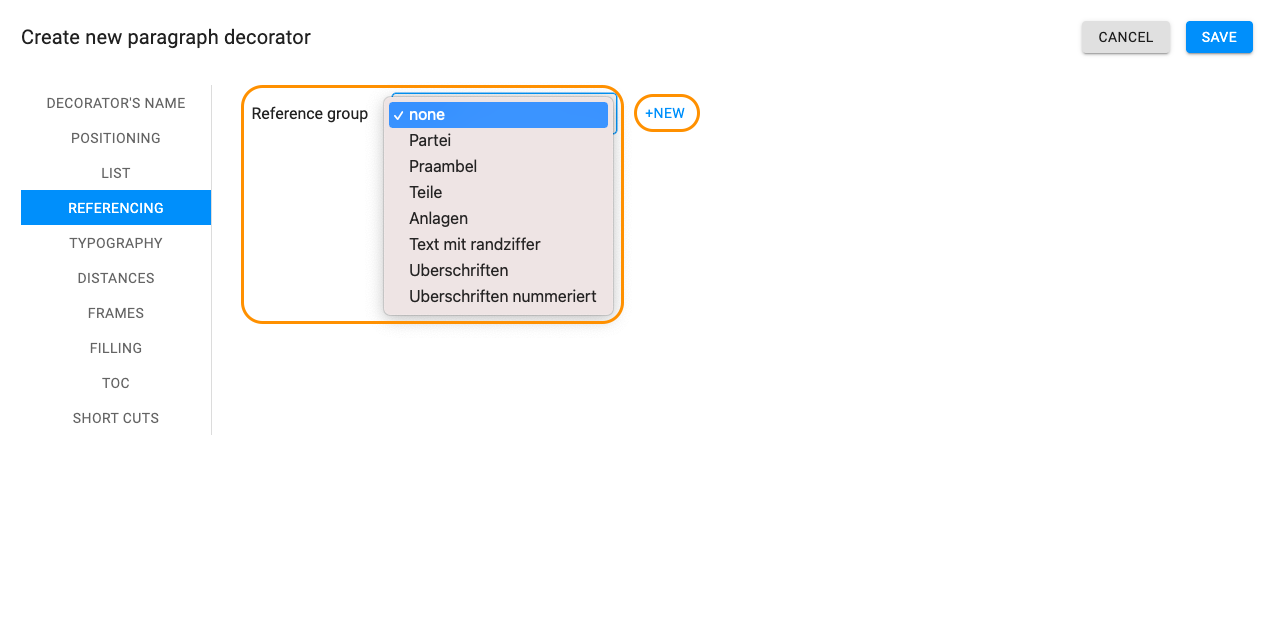
Tab "Referencing" and reference groups highlighted
●none - current style will not be in any reference group, thus cannot be used as a cross-reference
●one from the list of groups if there is any - your style will be assigned to the chosen group and may be chosen as a cross-reference
●new one - create a new referencing group and your style will be assigned to it
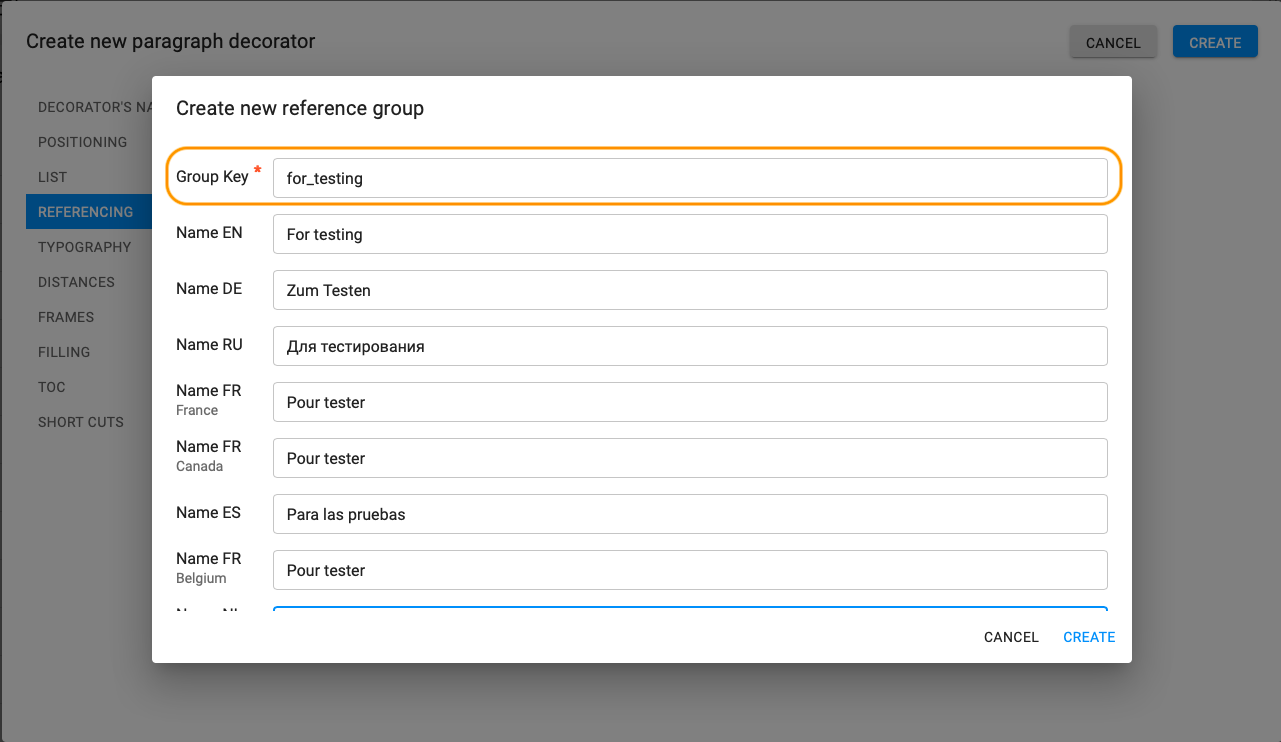
Group key of a new reference group highlighted
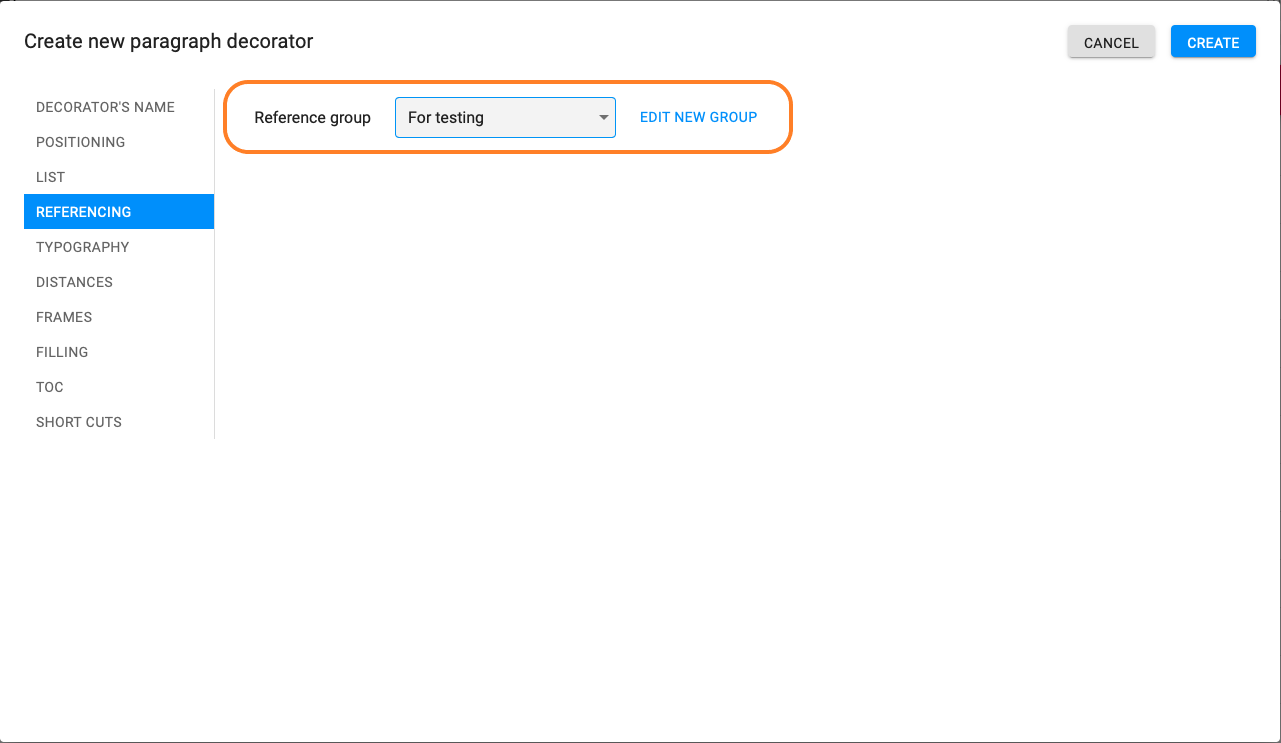
Newly created reference group "For testing" highlighted
(e)Typography
Font family - choose amongst available font families.
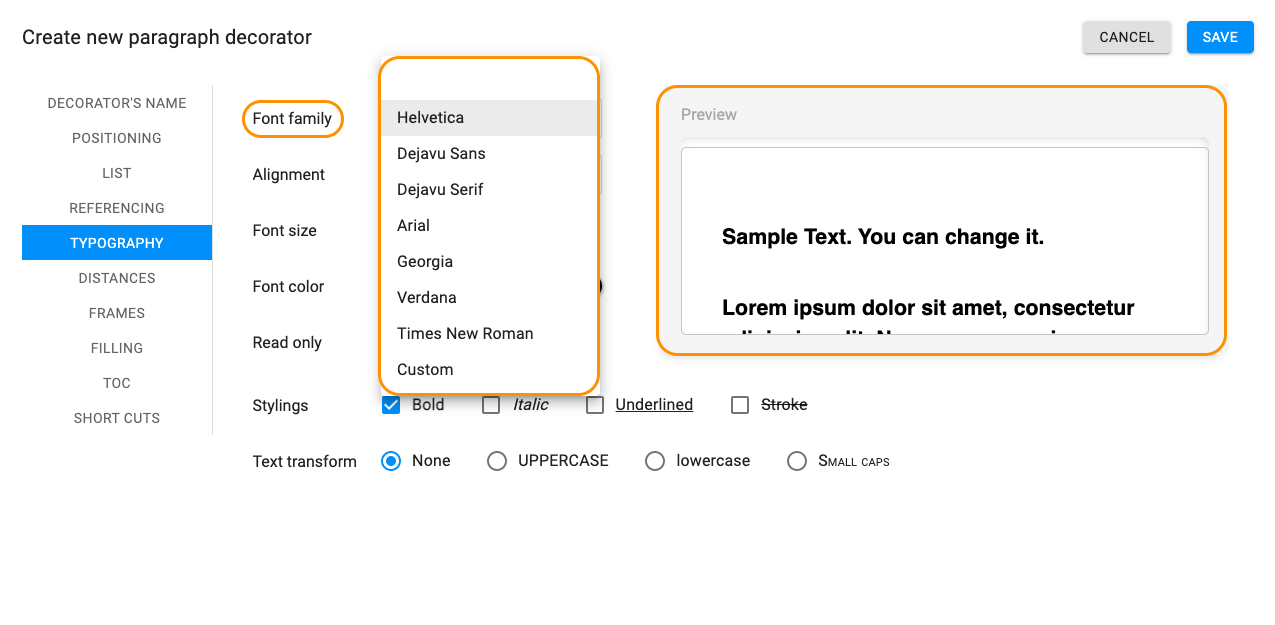
Font and available font families highlighted
Through the ‘Custom’ any font can be set.
Alignment - align your text left / center / right / justify
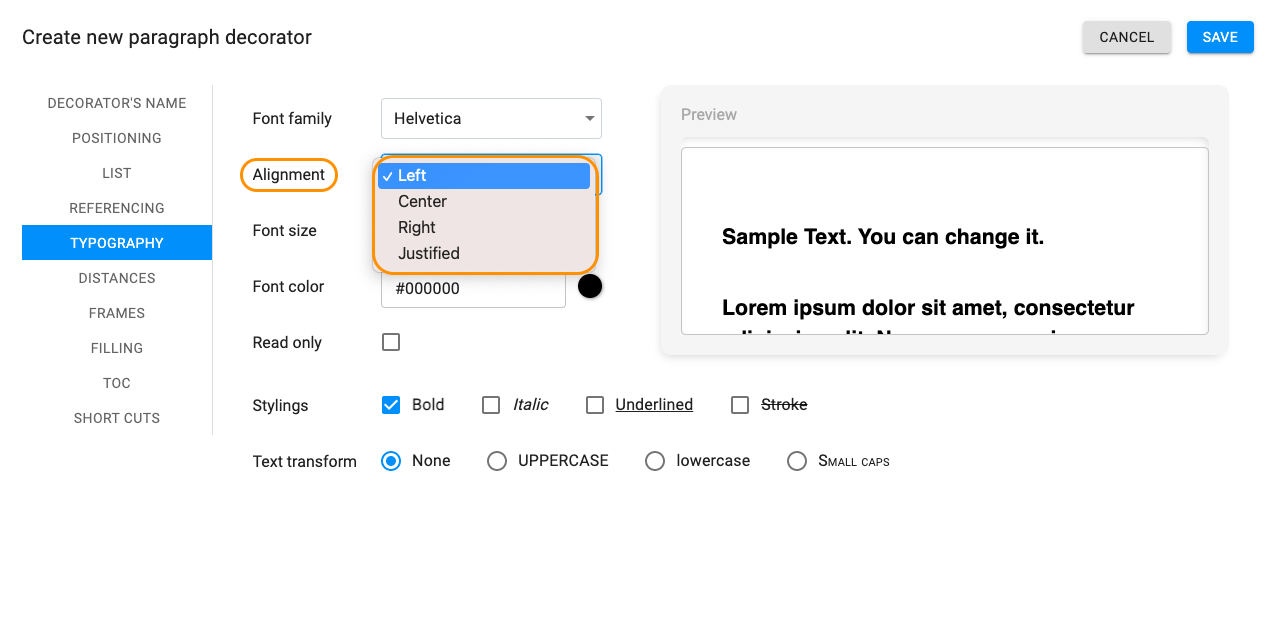
Alignment options highlighted
Font size - we use pt (points) as a measurement e.g. 11 inches in Word = 11 pt. in SMASHDOCs
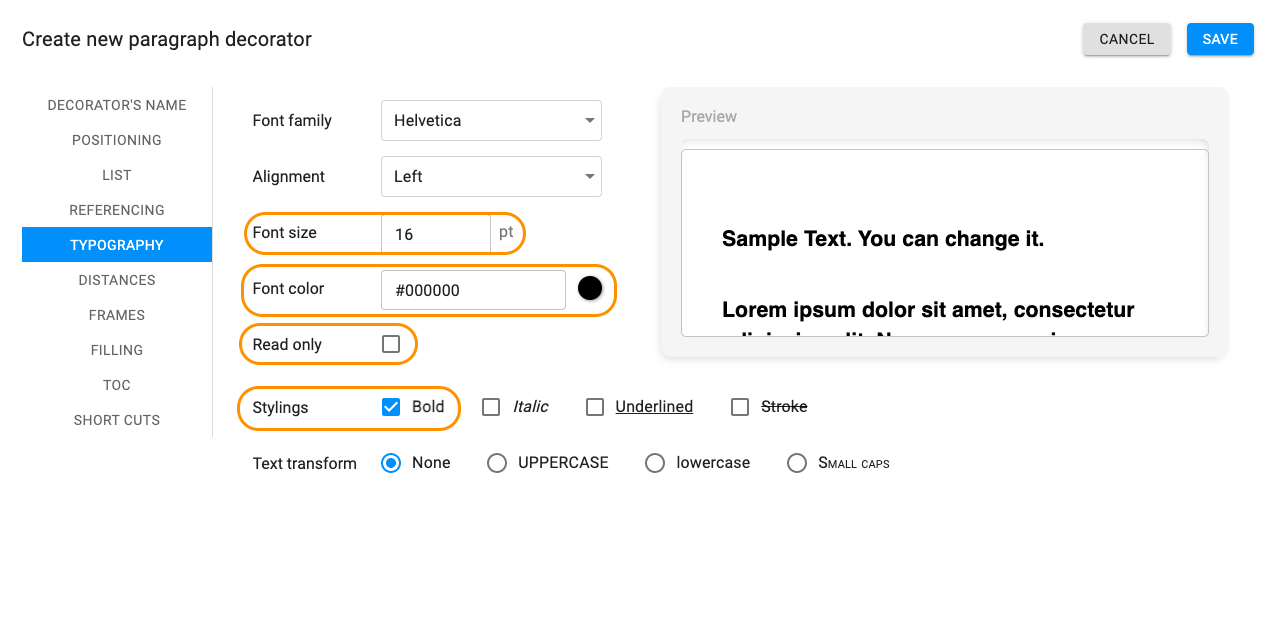
Font size, color, styling, read only option and a preview window highlighted
Font color - choose font color from the color pallet or insert a color code
●Read only - the style will not be editable and have a “Read only” status if activated
●Stylings - style your text bold / italic / underlined / stroke
●Preview - in the preview window made changes are displayed immediately
(f)Distances
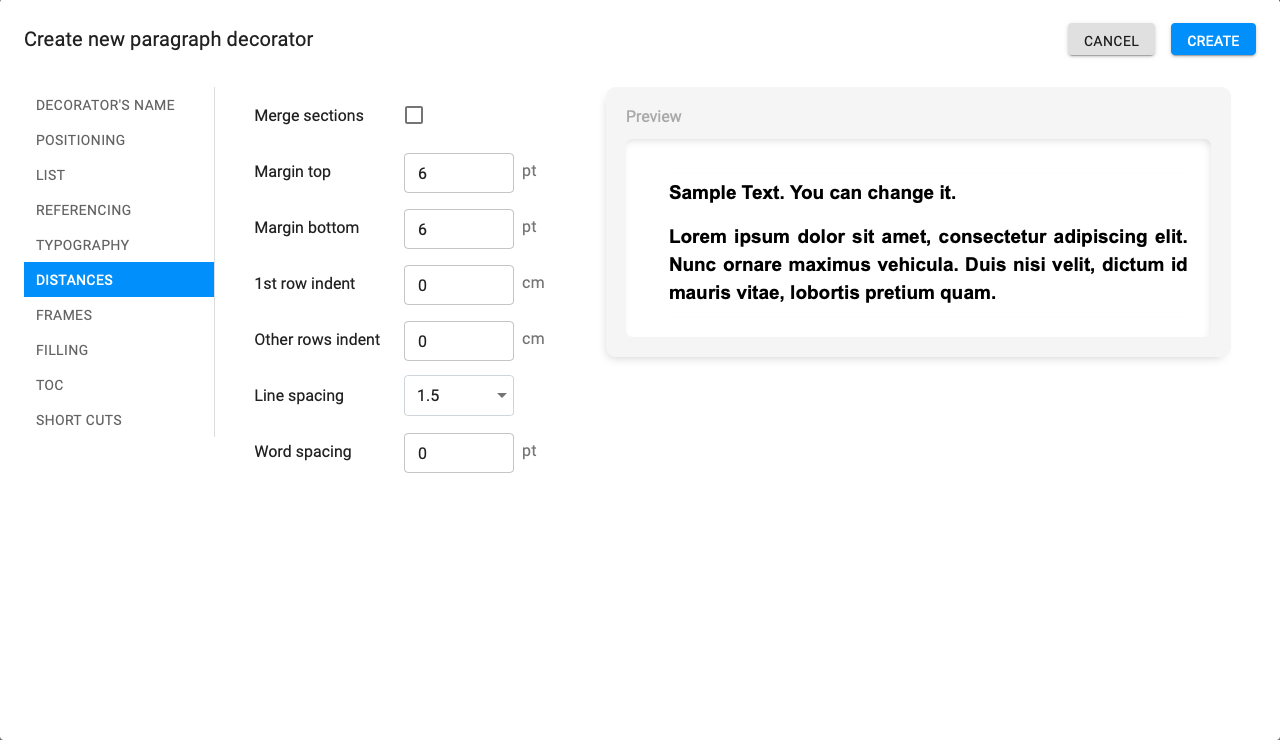
Tab "Distances" highlighted
●Merge components - if active, components will not be separated
●Margin top - distance between the lines in different styles from the top in pt
●Margin bottom - distance between the lines in different styles from the bottom in pt
●1st-row indent - indent of a first row in a component in cm
●Other rows indent - indent of others rows in a component in cm
●Line spacing - the distance between the lines within one particular style
●Word spacing - the distance between the words
Then we go to the tab “Frames”.
(g)Frames
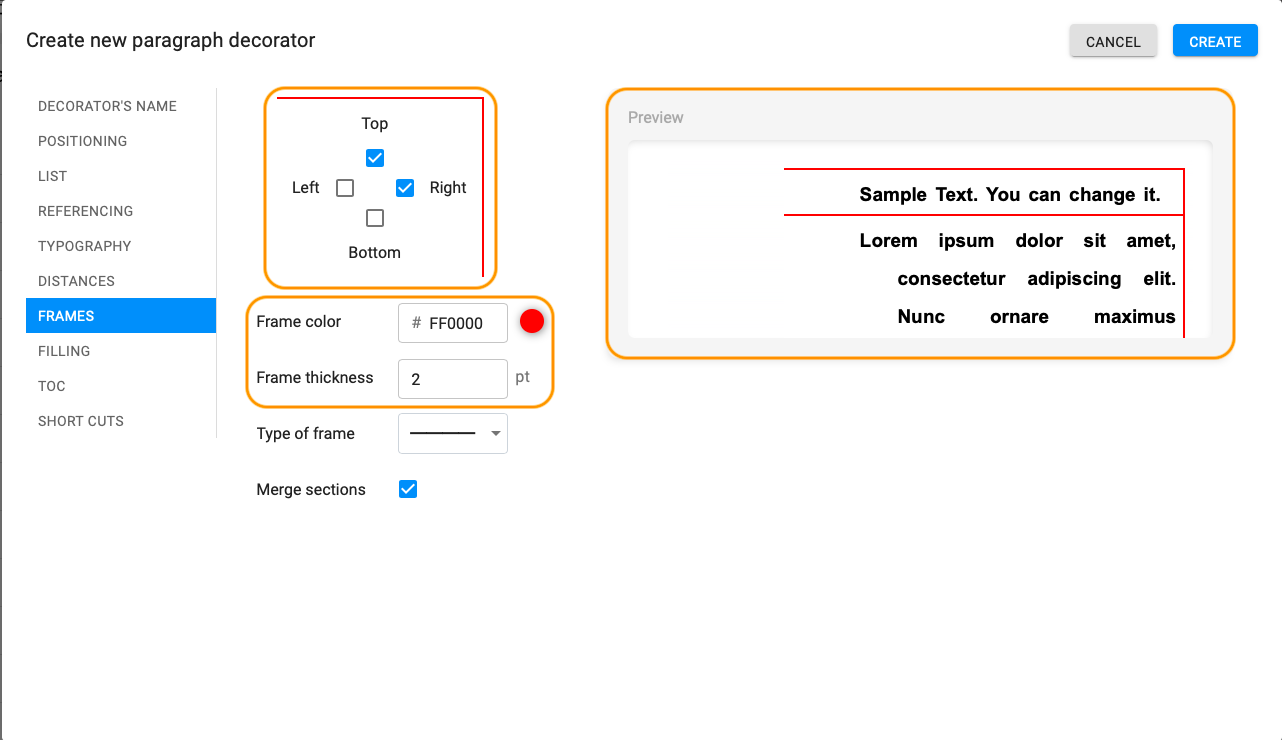
Frame settings and preview highlighted
●Top/bottom/left/right - adding a frame to one, some or all sides
●Frame color - choose a color from the color pallet or insert a color code
●Frame thickness - define frame thickness in pt
●Type of frame - define if the frame is a fine line, a dotted line, etc.
●Merge components - components with frames will not be separated
(h)Filling
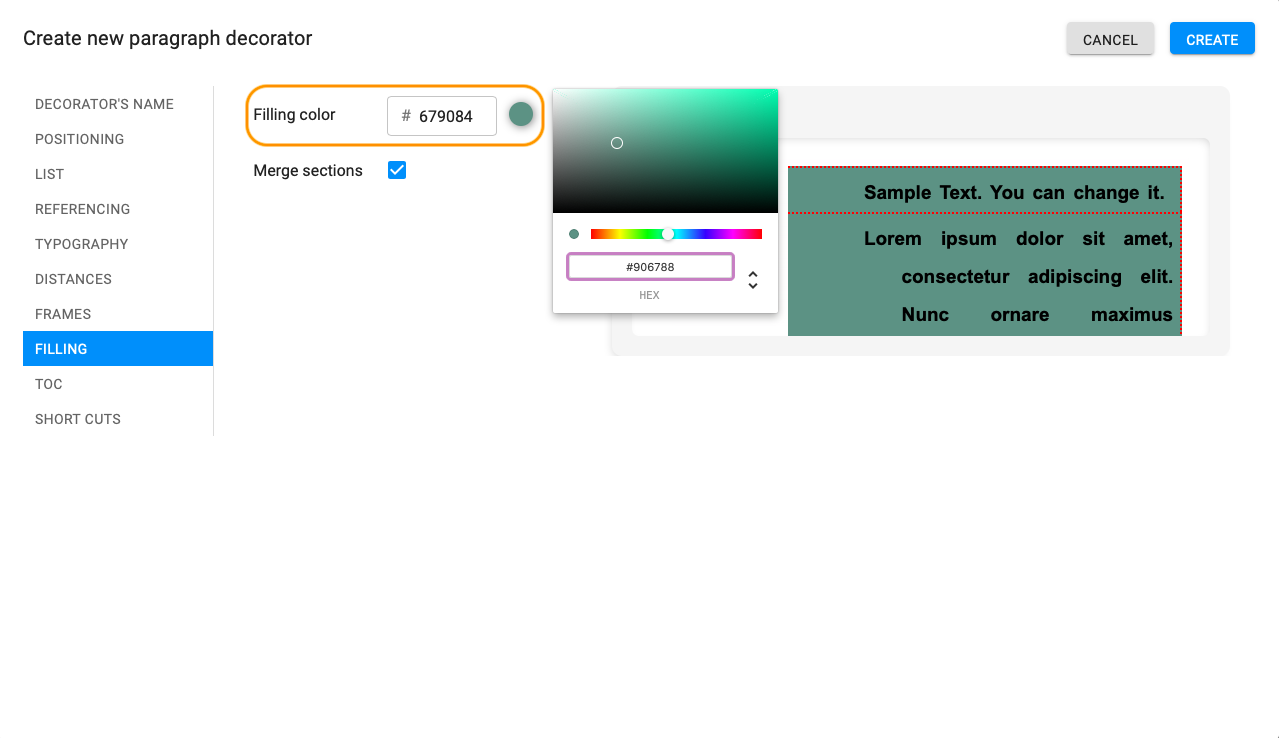
Filling color highlighted
●Filling color - choose a background color from the color pallet or insert a color code
●Merge components - components with defined filling color will not be separated
(i)TOC
Tab “ToC” - define the indentation level of your style in table of contents = directory
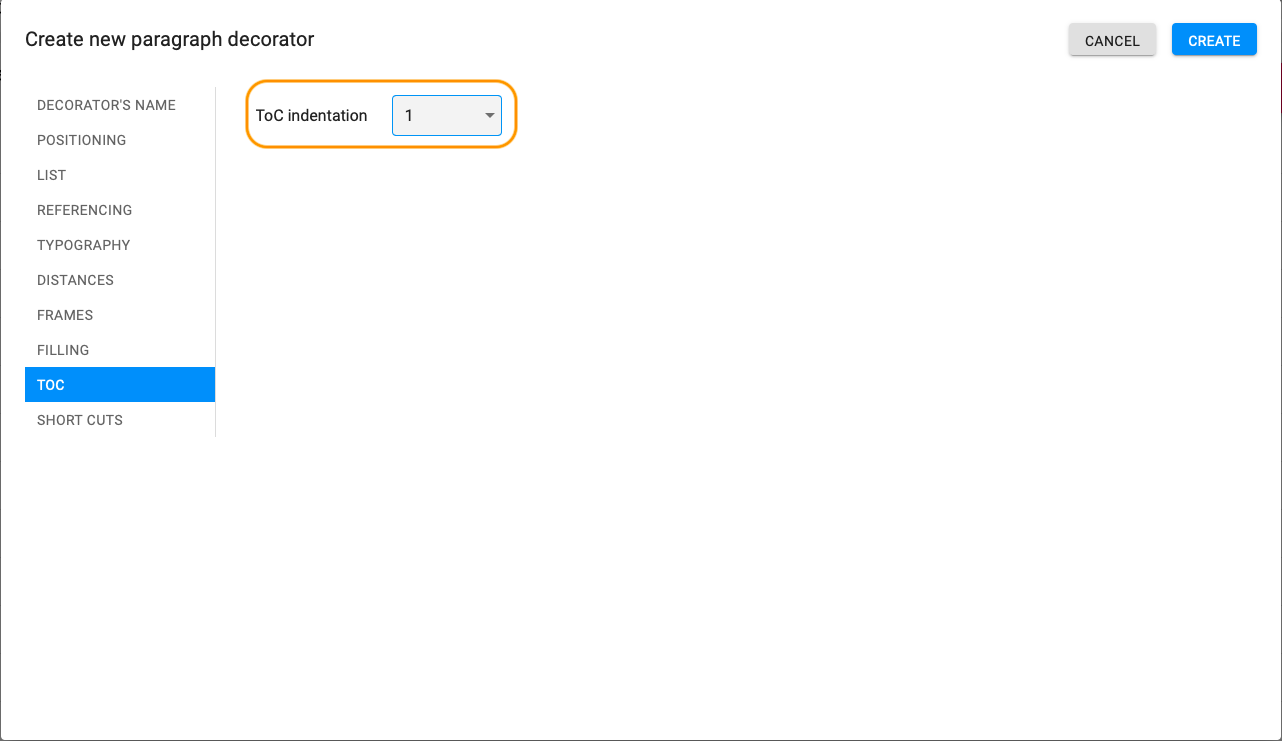
ToC indentation highlighted
Finally, we move to the tab “Short Cuts”.
(j)Short Cuts
You can define shortcuts both for Mac and Windows users. But please keep in mind that SMASHDOCs has some basic shortcuts - see them here https://service-description.smashdocs.net/shortcuts. Please choose a different shortcut for your custom style.
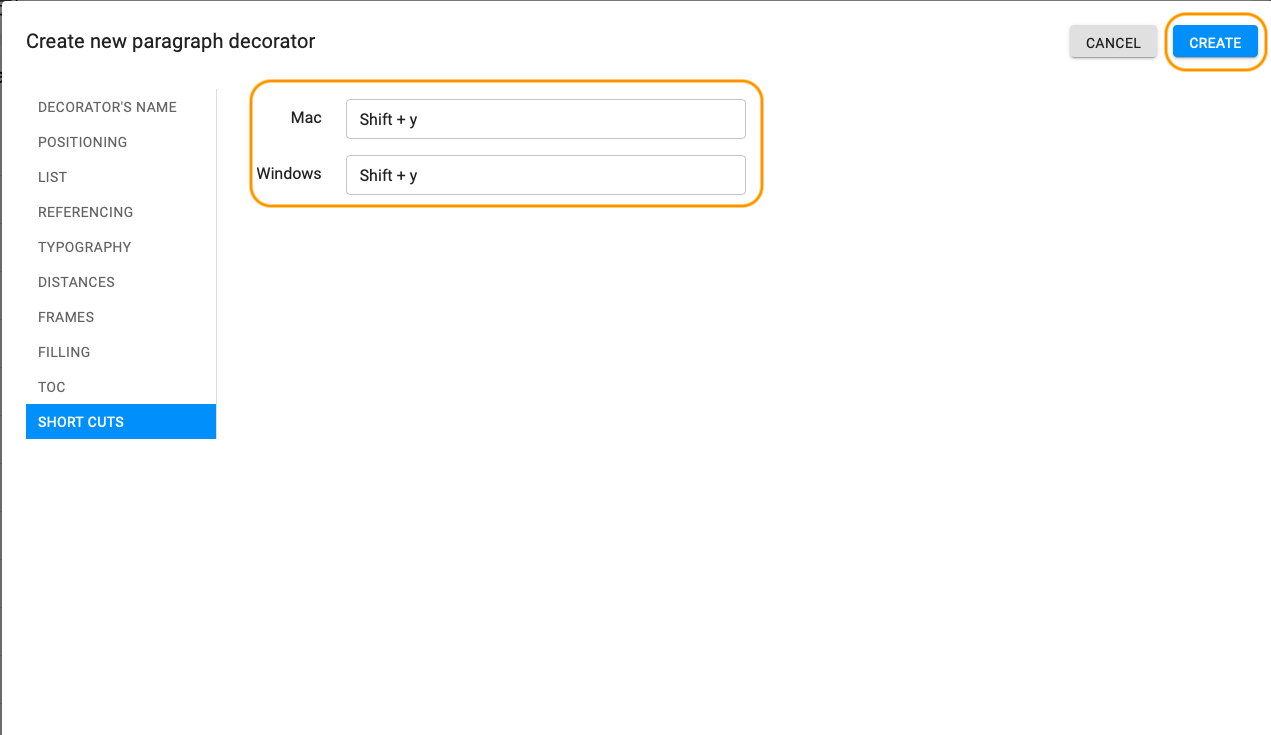
Set shortcuts for the style highlighted
After filling out the desired data and settings for your new style, PLEASE DO NOT FORGET TO PRESS ON “CREATE” BUTTON.
And here are our newly created group and style “For testing” in the global list of styles.
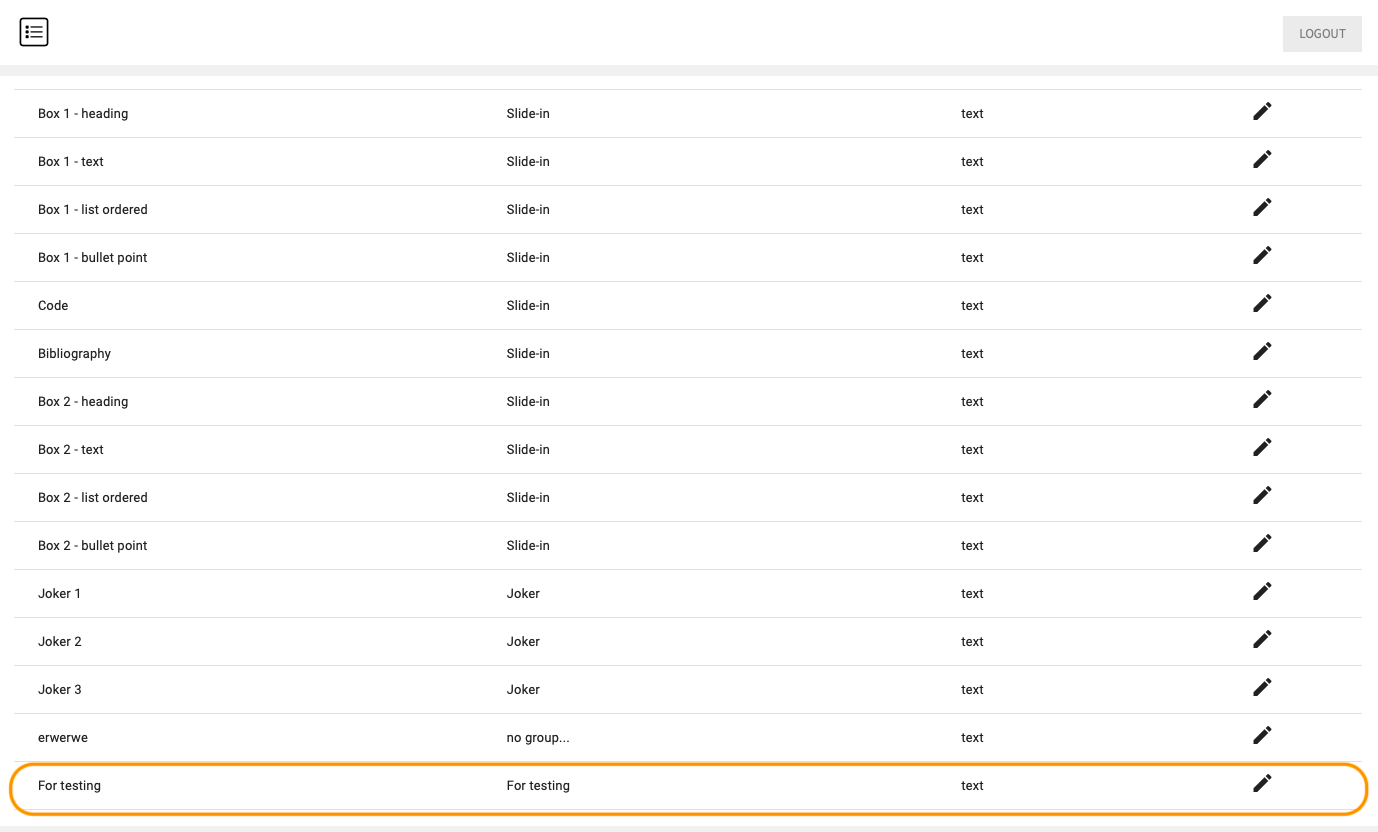
Group and style "For testing" highlighted in the list of styles in Admin UI
7XRef Groups
Cross-reference groups, in other words XRef groups, give a user the opportunity to search a target of cross-reference quickly during the process of adding XRef. Such groups of search can be easily created in the Admin page.
To create a new XRef group you should open XRef Group settings by clicking a corresponding icon in the left toolbar and click the green button “Add new”.
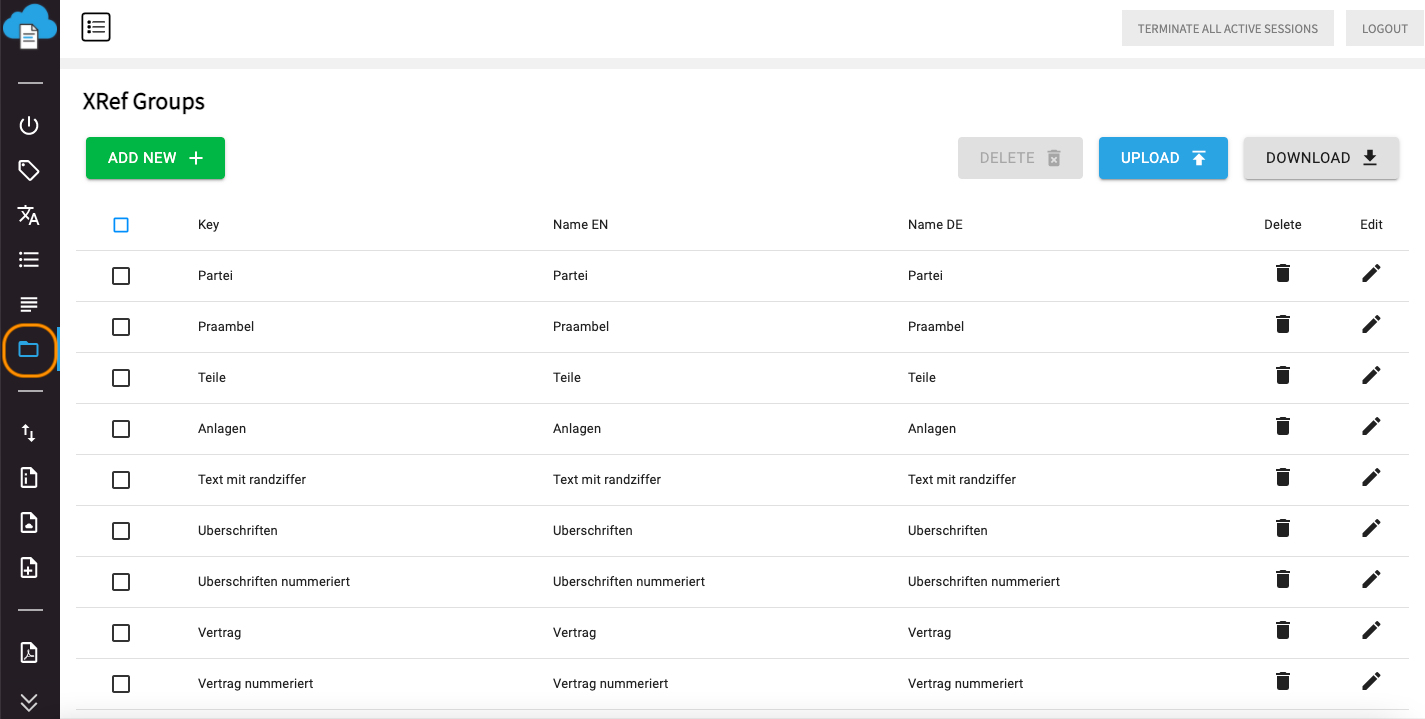
XRef Groups settings
After that fill in group key and name of the XRef group in all supported languages.

Xref groups creation
Click “Save” and the new group will be added to the list. Open your document in SMASHDOCs account and choose the function ‘Add cross-reference’. Then you will receive a dialog, in which different groups of possible targets of cross-references will be displayed.
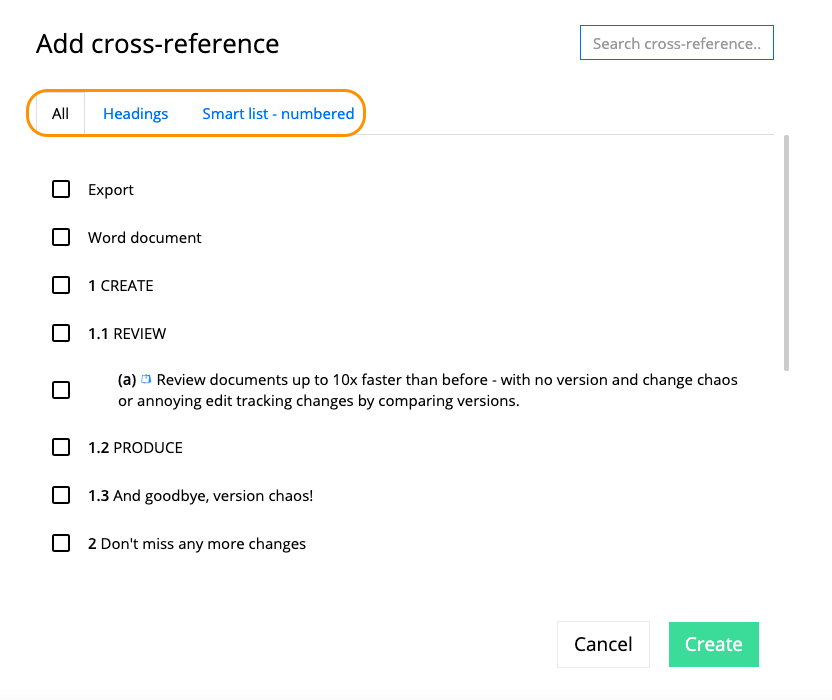
Groups of Xrefs in editor highlighted
Note: in order to have XRef-groups displayed, appropriate styles should be obligatory applied in the text of document.
You can also upload a .json file with XRef-groups by clicking a button ‘Upload’ (see Image 72) for these groups to be displayed in the list of the Admin page and be available to the usage in the editor, and download a .json file with the list of existing XRef-groups.
8Import Settings
Import Settings is a section of the Admin page in which you can decide how styles of an imported document will look like in SMASHDOCs editor. In SMASHDOCs during the import of Word-document there is a function to avoid manual mapping styles, which means that styles will be mapped by the system automatically. For the system to perform this mapping according to your needs, you have to set convertible styles in the Admin page.
For this, move to import settings by clicking an appropriate sign and you can find the details of Word-document importing.
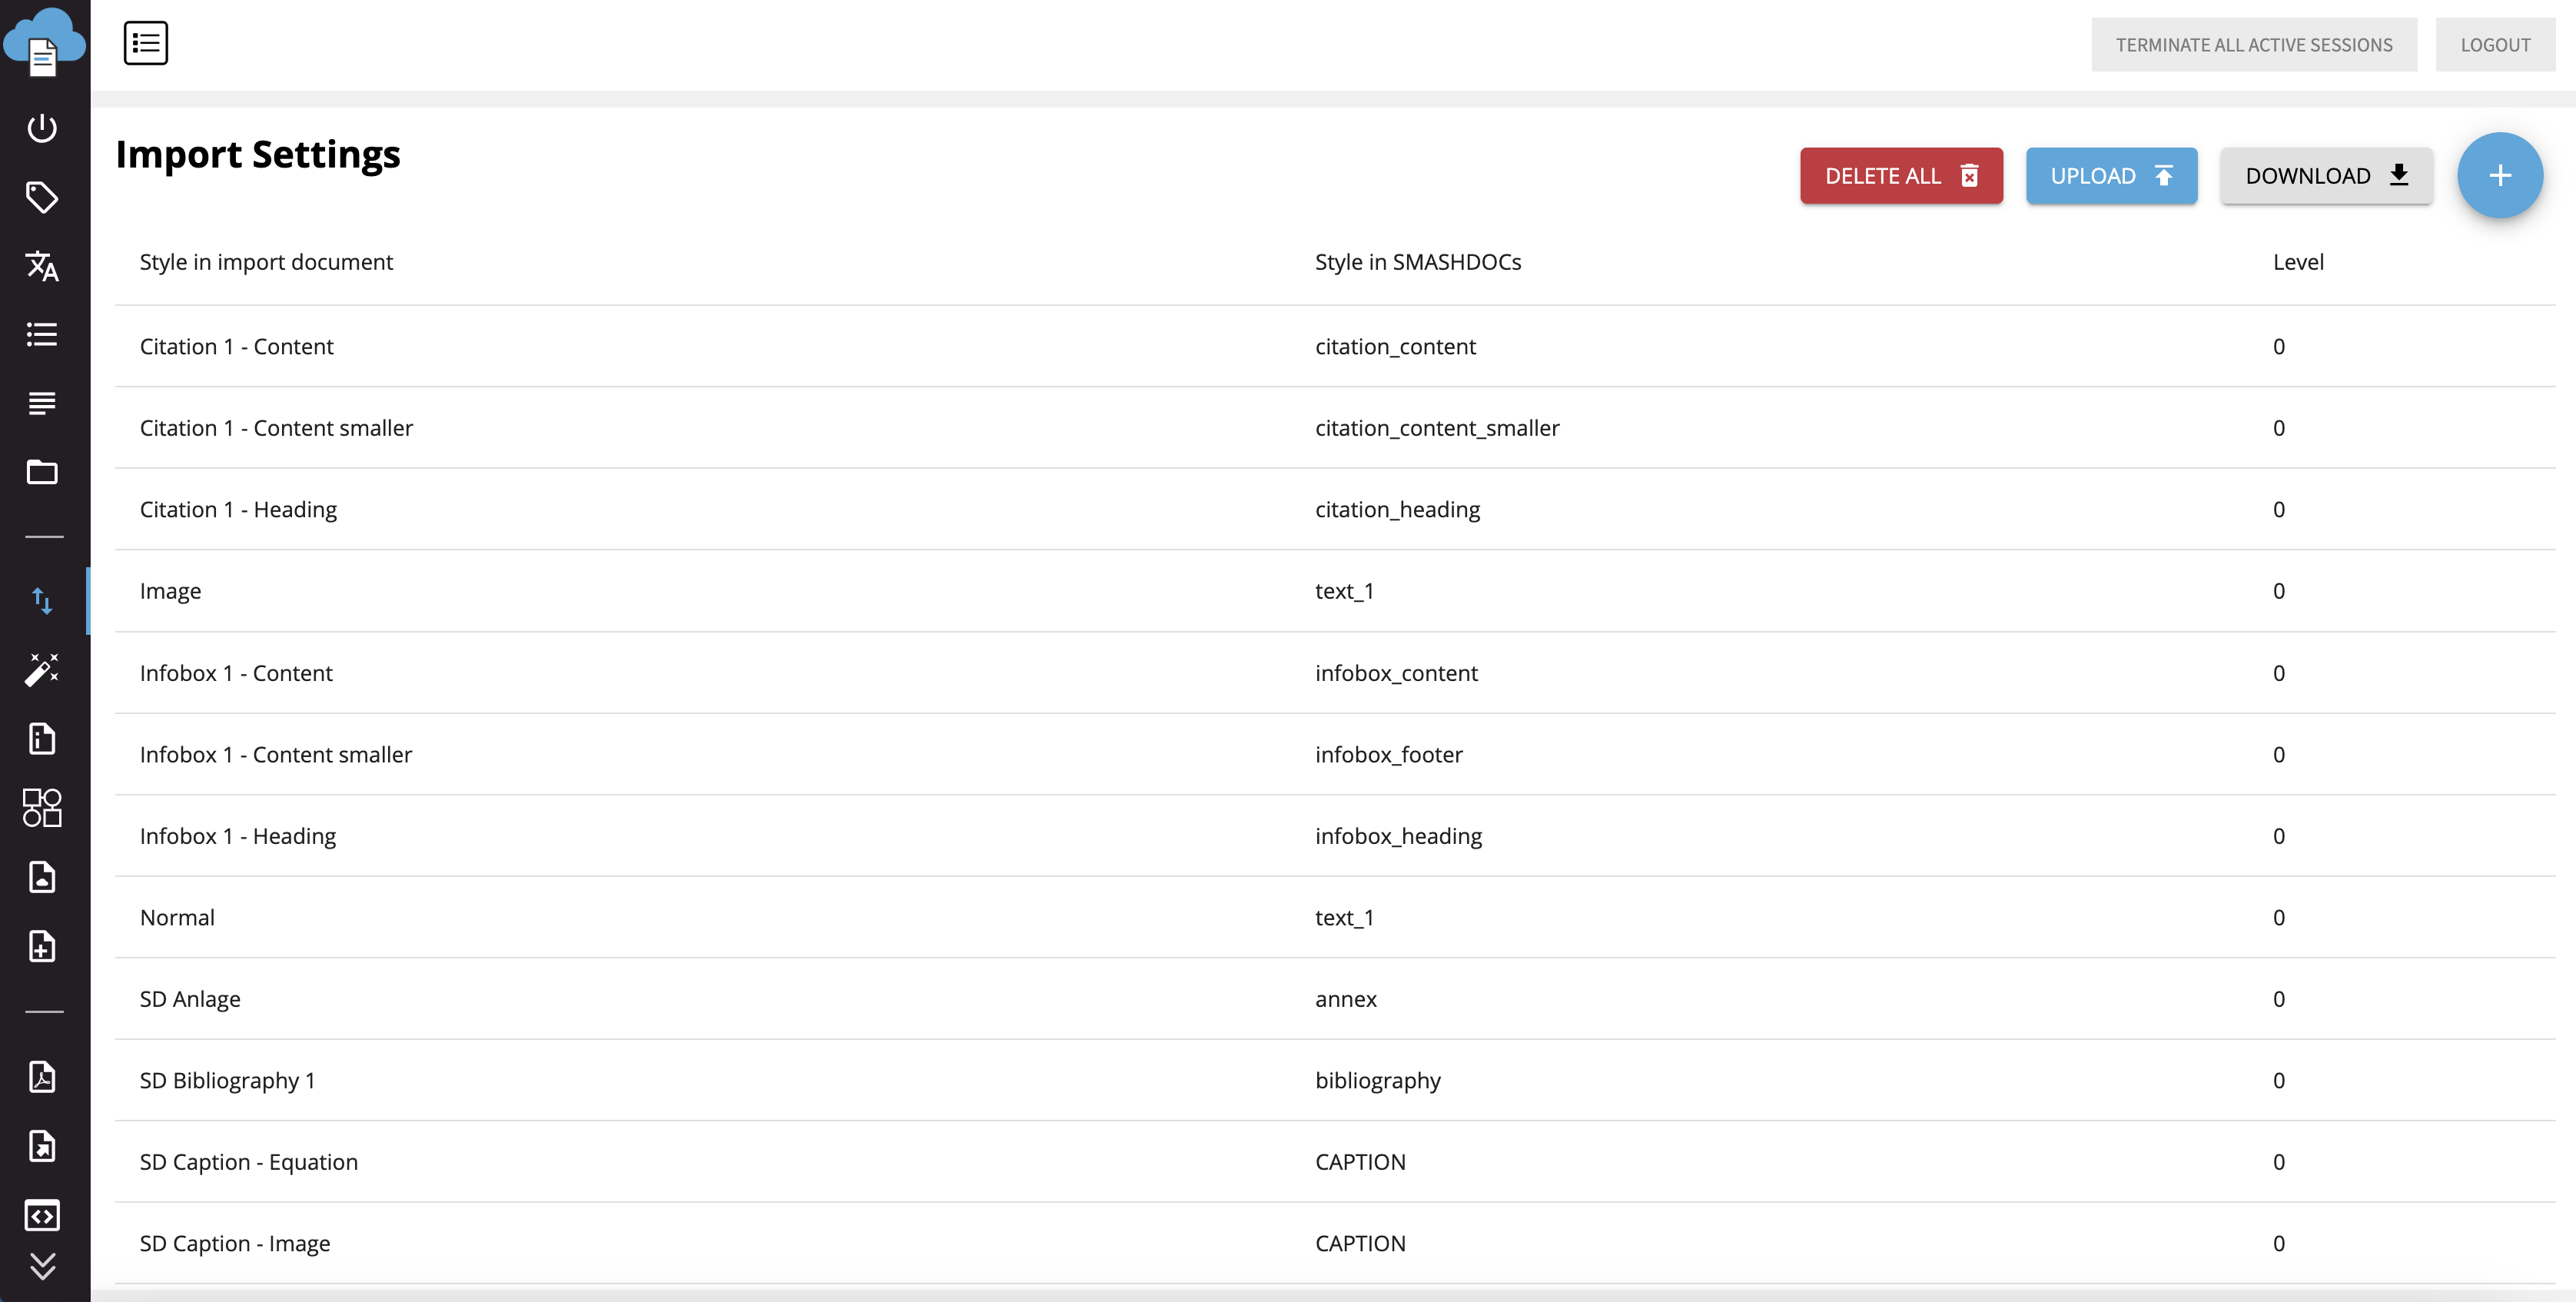
Import Settings
In the first column there is information about styles in Word-document that will be imported to SMASHDOCs, in the second column you can see styles, to which the styles from Word-document will be transformed after importing to SMASHDOCs system.
When you press a blue circle “Plus”, you can add a new document for import with particular styles and then select styles that you would like to apply for this document in SMASHDOCs editor.
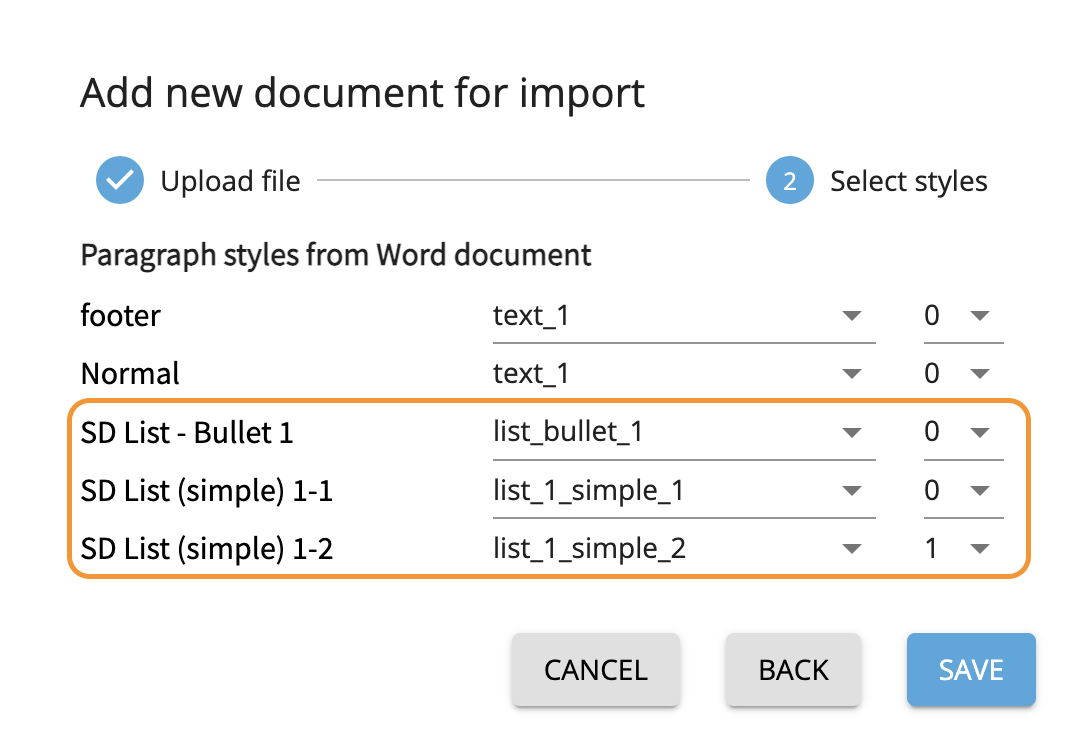
Add new document for import and select styles
Also, if there is such a necessity, you can add the level of these styles. You can set levels on the right side of each style (see Image 76).
After that click “Save” and new styles for importing a document will be added. Styles in SMASHDOCs account will be applied to the text in document during the importing Word-document to SMASHDOCs. For that leave the field “Manual mapping” empty.
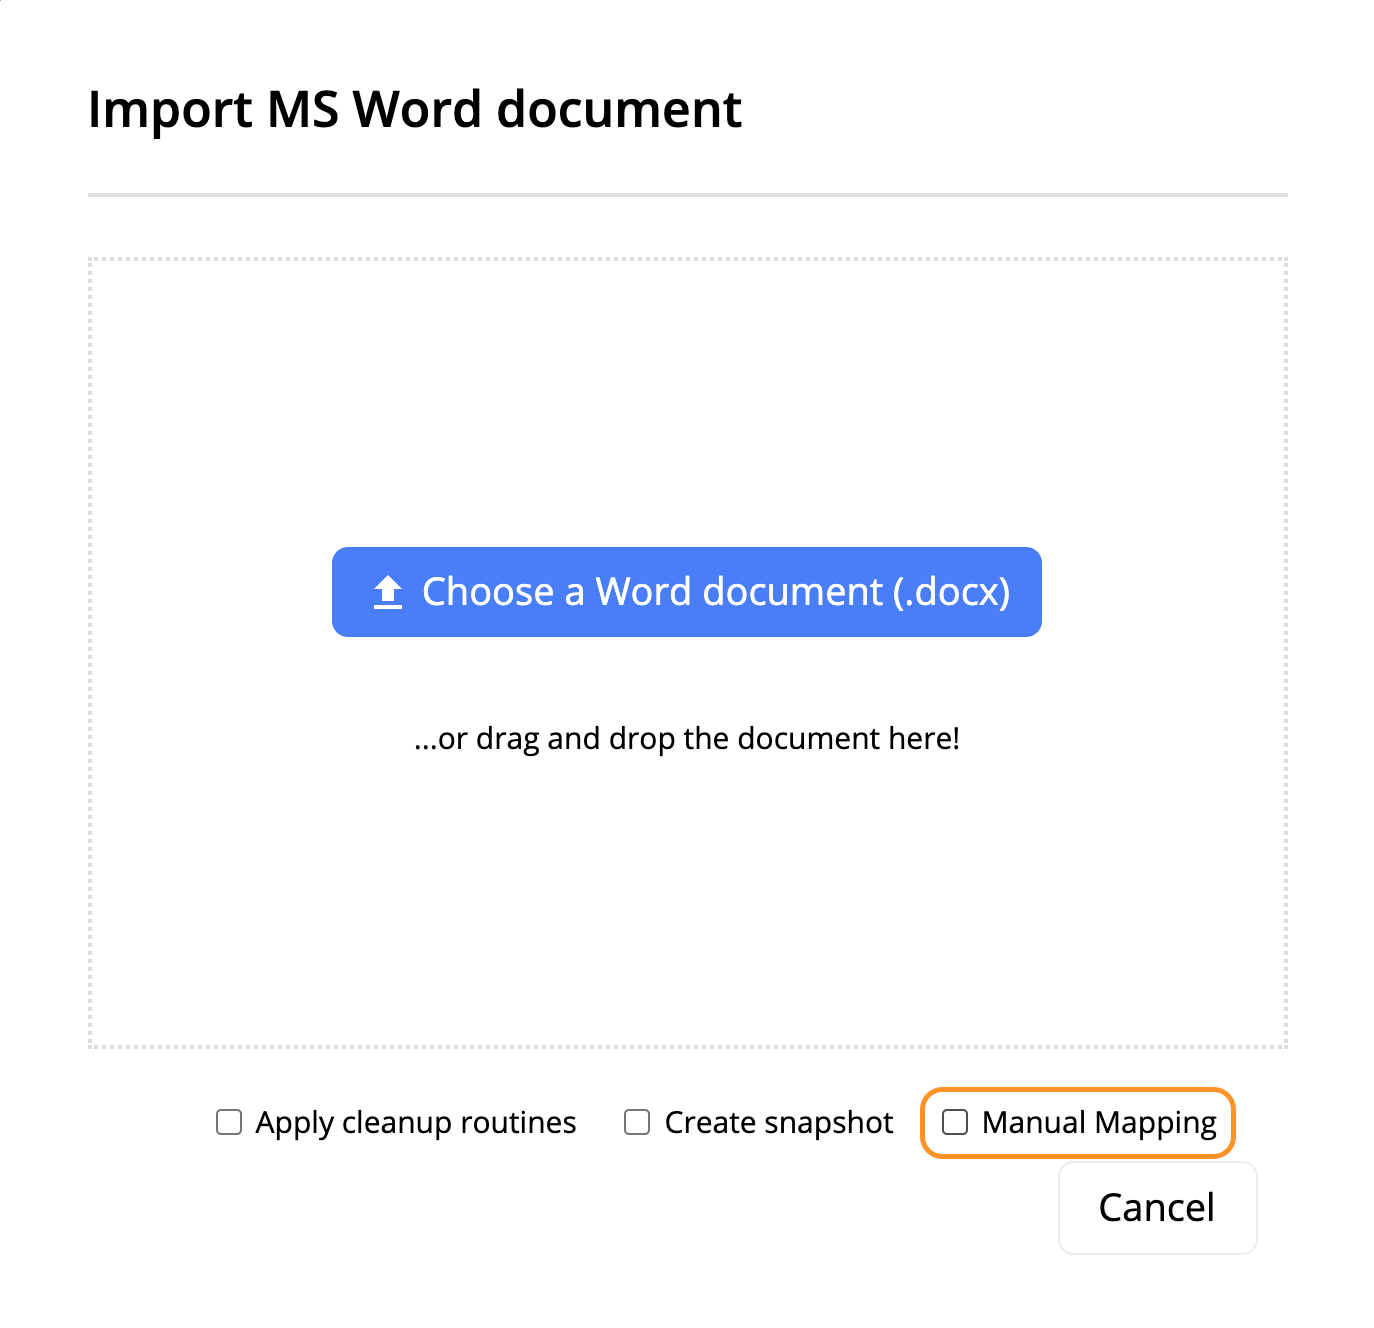
Import Word-document without manual mapping highlighted
Then the text will be opened with the same outlook as it has been created in MS Word.
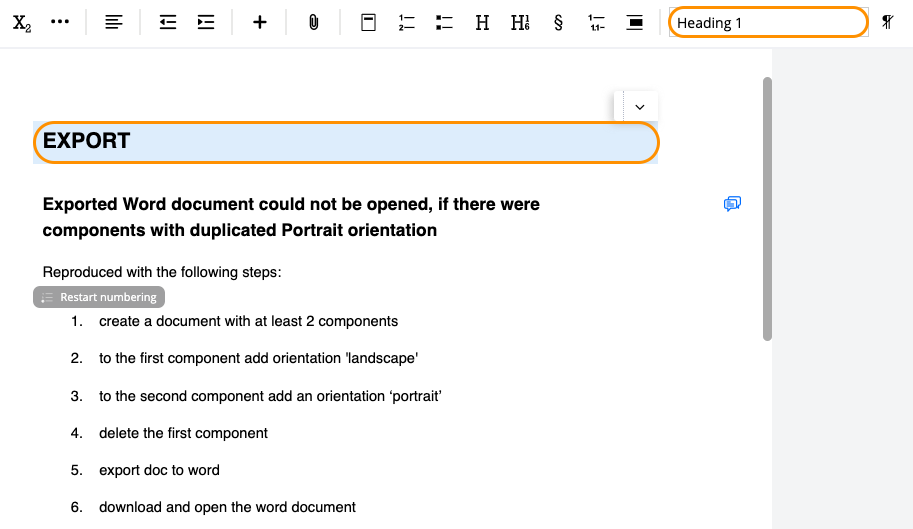
Heading 1 style after importing Word document to SMASHDOCs
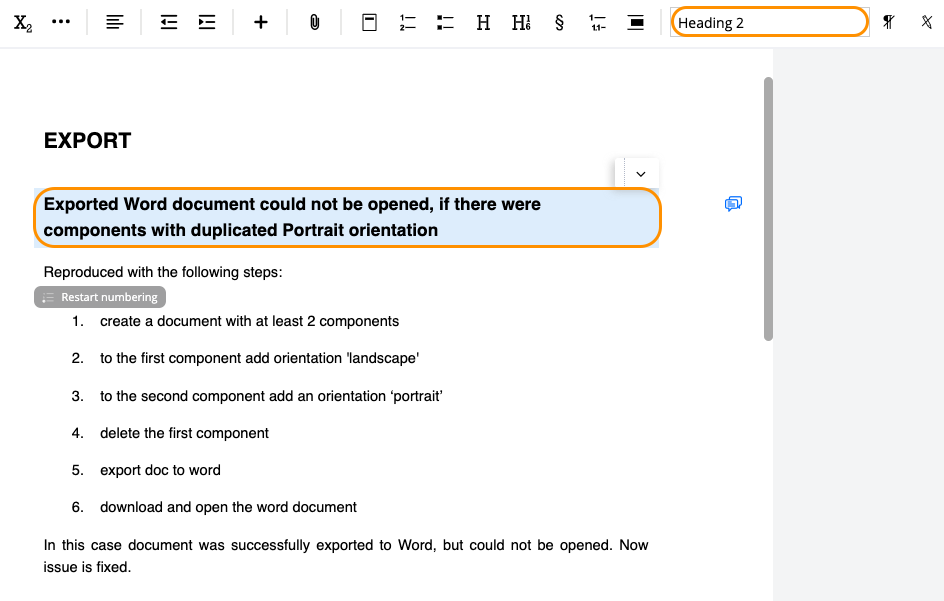
Heading 2 style after importing Word document to SMASHDOCs
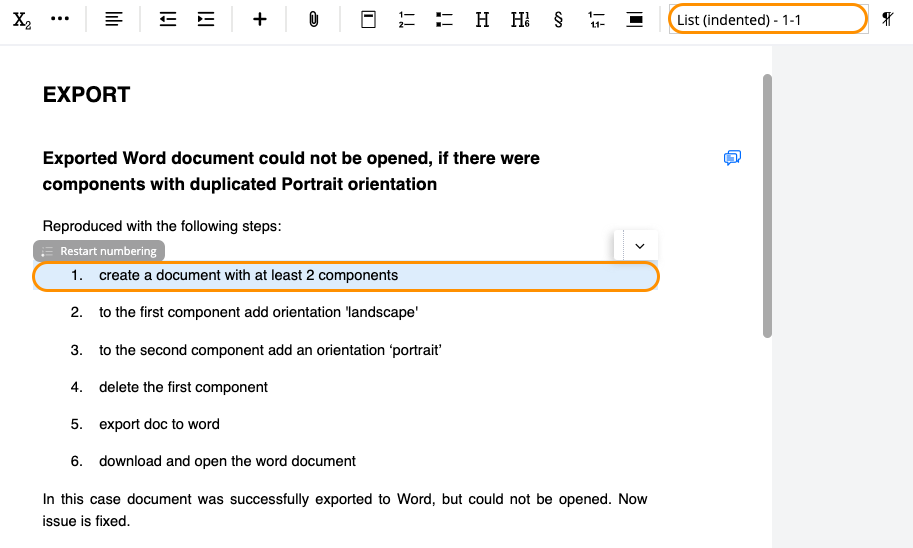
List (indented) - 1-1 after importing Word-document to SMASHDOCs
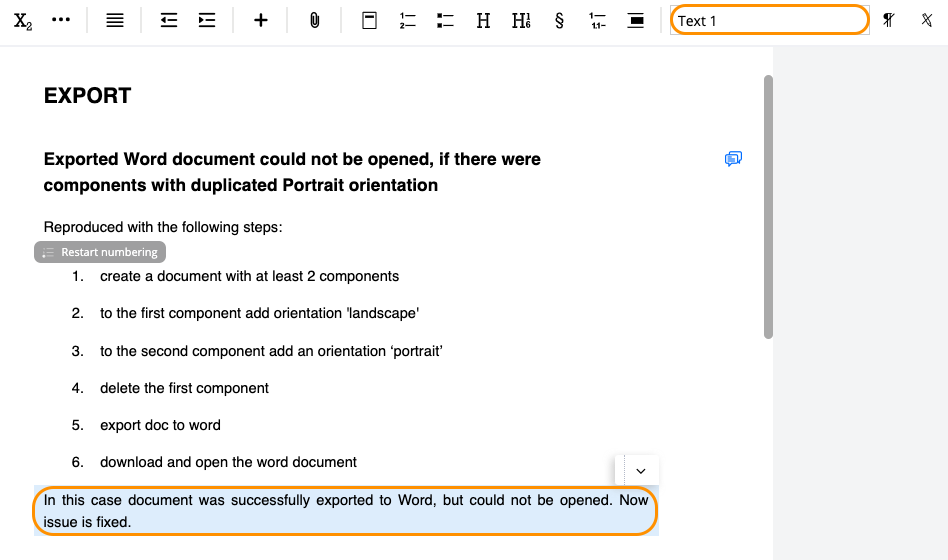
Text 1 after importing Word document to SMASHDOCs
You also have an opportunity to upload a .json file with import settings and download a .json file with the list of existing import settings by clicking corresponding buttons (see Image 75).
9Magic Import
In the tab "Magic Import" you can set the configuration for this import type.
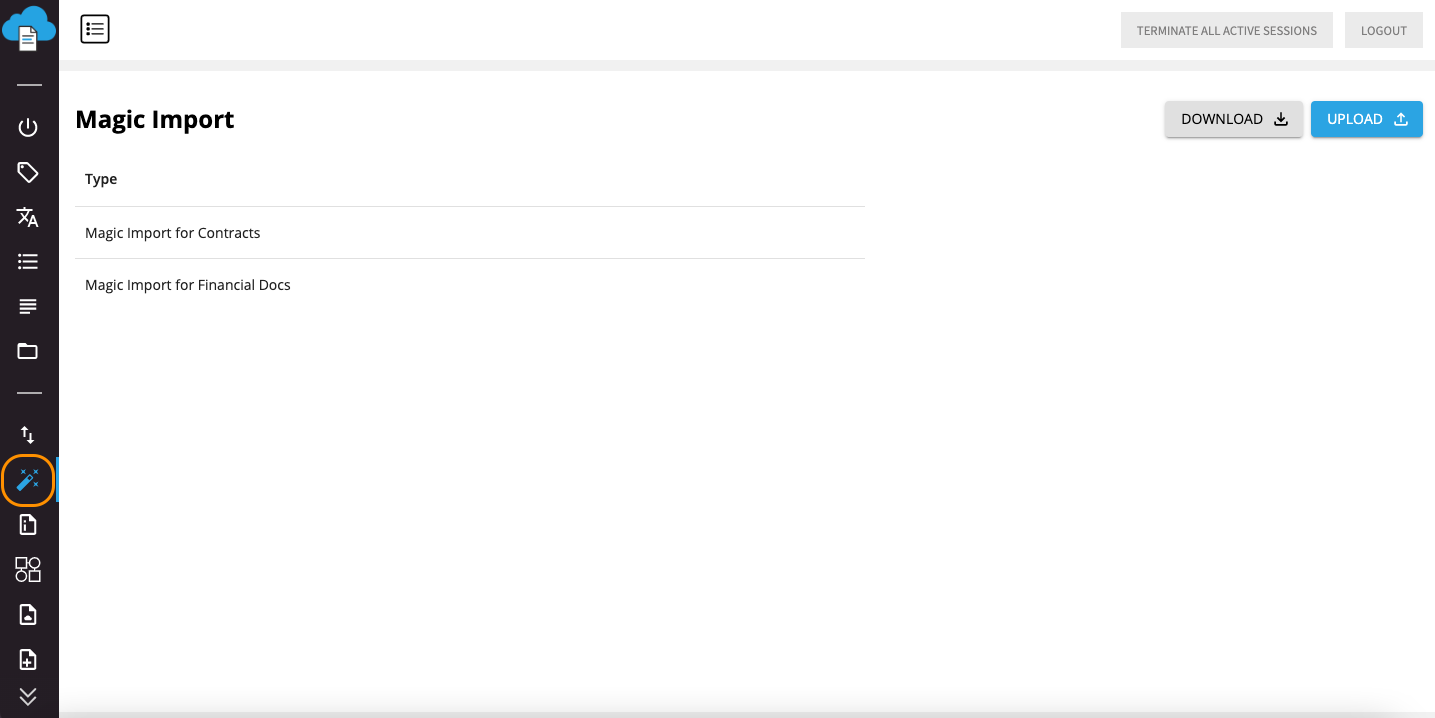
Tab "Magic Import"
For this click the button "Upload" in the right corner above and the modal window appears where you have to upload a JSON file with the required configuration.
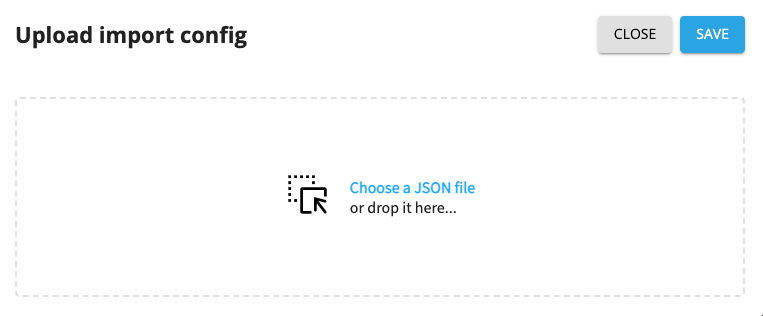
Uploading import configuration
After uploading, the configuration will be added to the list of magic import mapping types. You can open each configuration to check and/or edit mapping styles in each numbering logic.
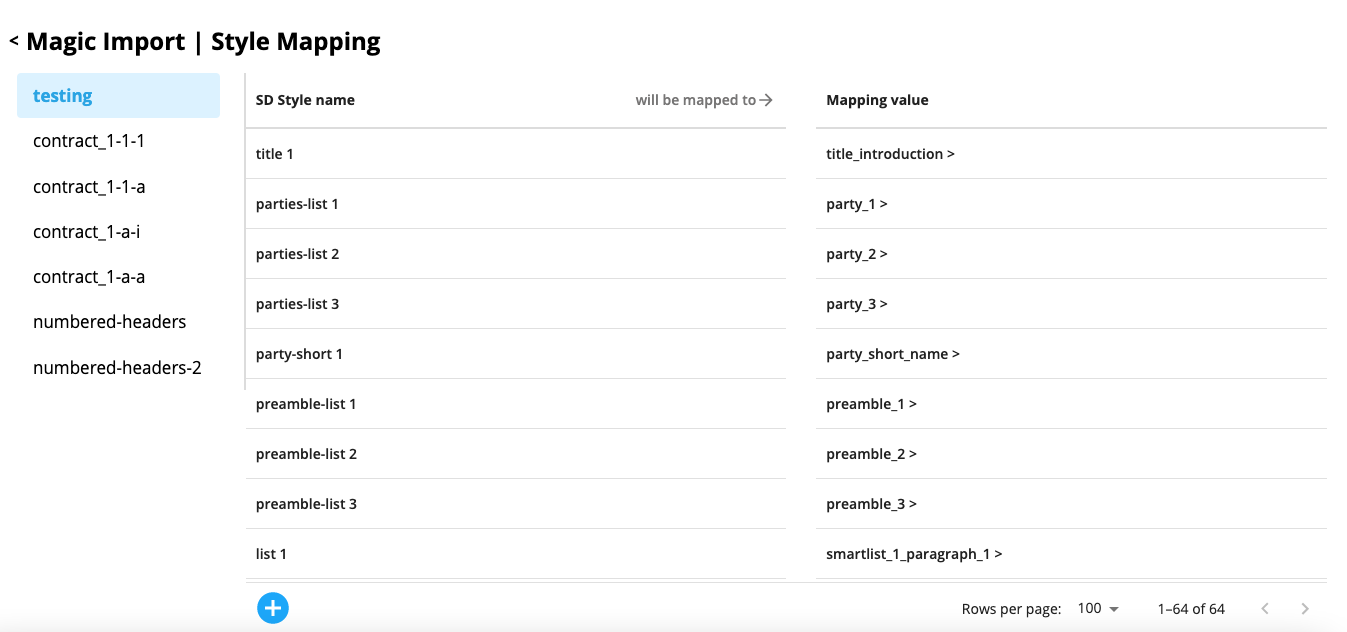
Styles for mapping in each numbering logic
Click a small blue "Plus" button below (see Image 84) to add a new mapping style to the list.
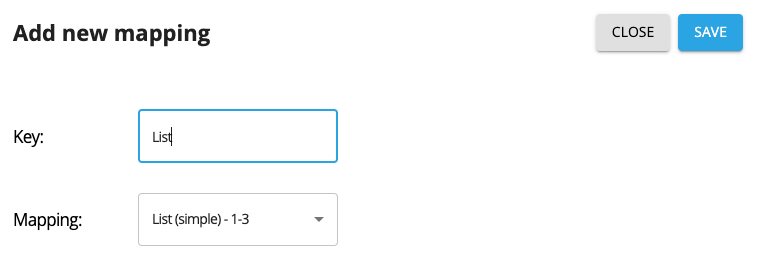
Adding new mapping
10Sample Documents settings
In these settings there is a list of initial documents, and you can edit, delete and download the document from this list.
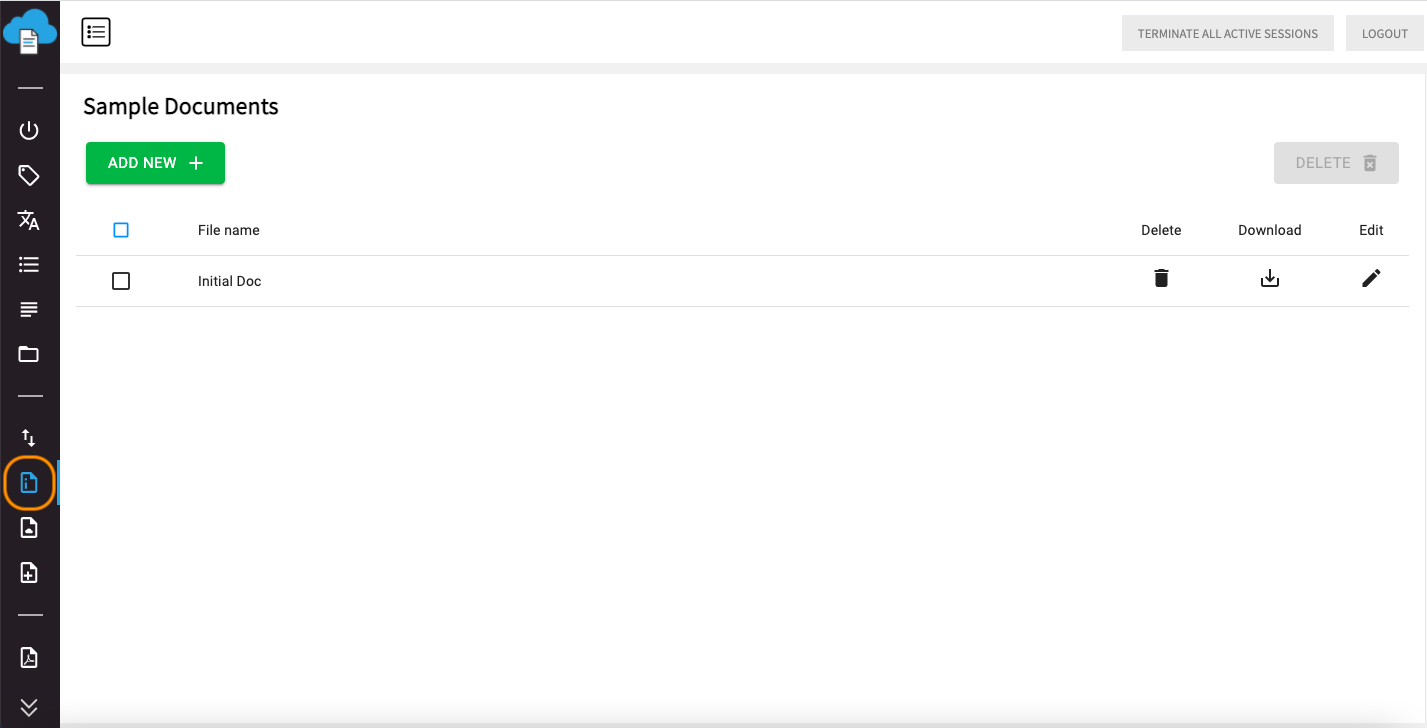
Sample Documents settings
To create an initial document, click “Add new”, then you will see a dialog, where you have to upload a document in .sdox format by dragging and dropping or by selecting it from your device and insert the name of the document.
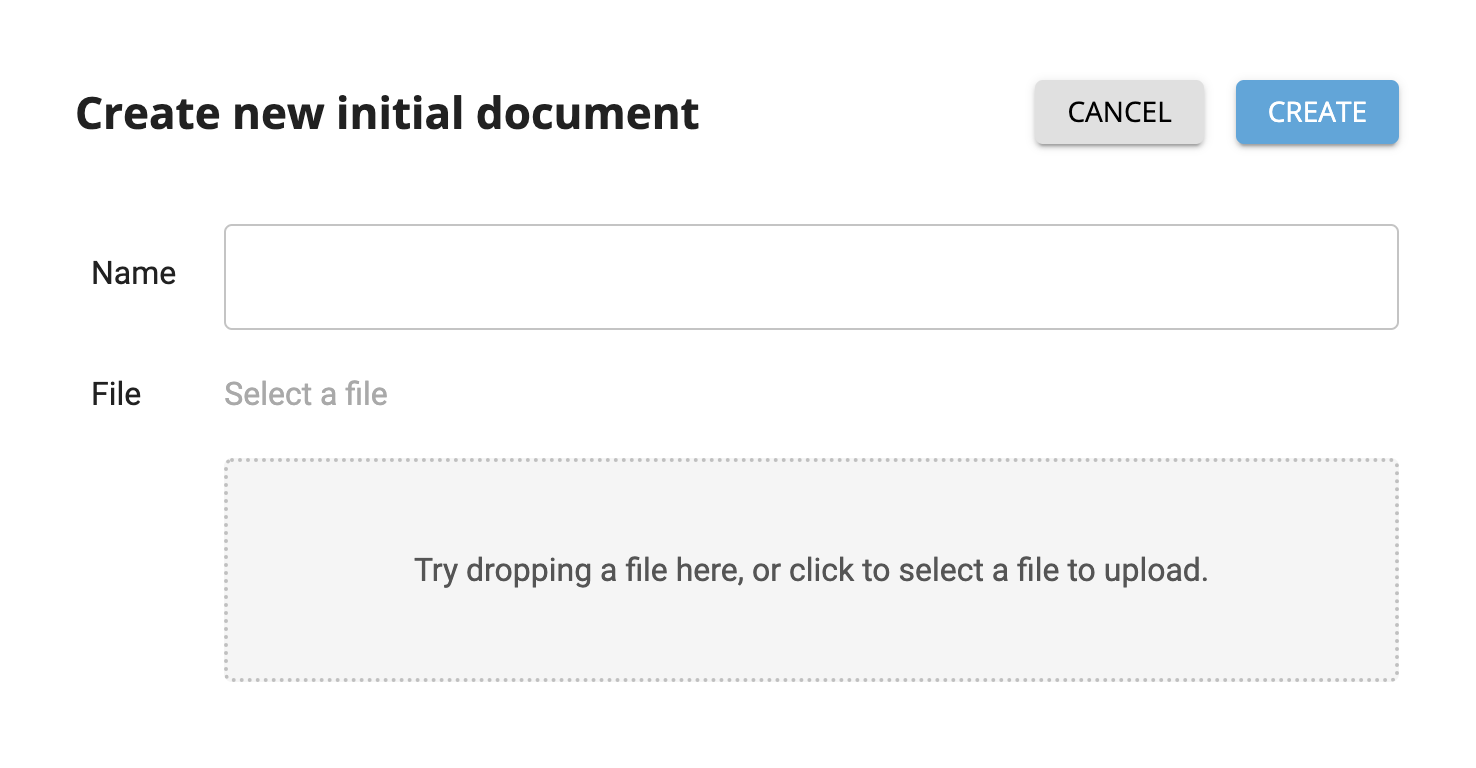
Creating new initial document
After you inserted all required details, click “Create” and your new initial document will be successfully added to the list. The created initial document will possess a proper template that you can use to create documents in SMASHDOCs editor. As soon as you log into your SMASHSDOCs account it will be the first document existing in the list of documents in your system.
11Workflows
Under the tab "Workflows" there are settings provided, with the help of which you can configure the outlook of exported PDF files.
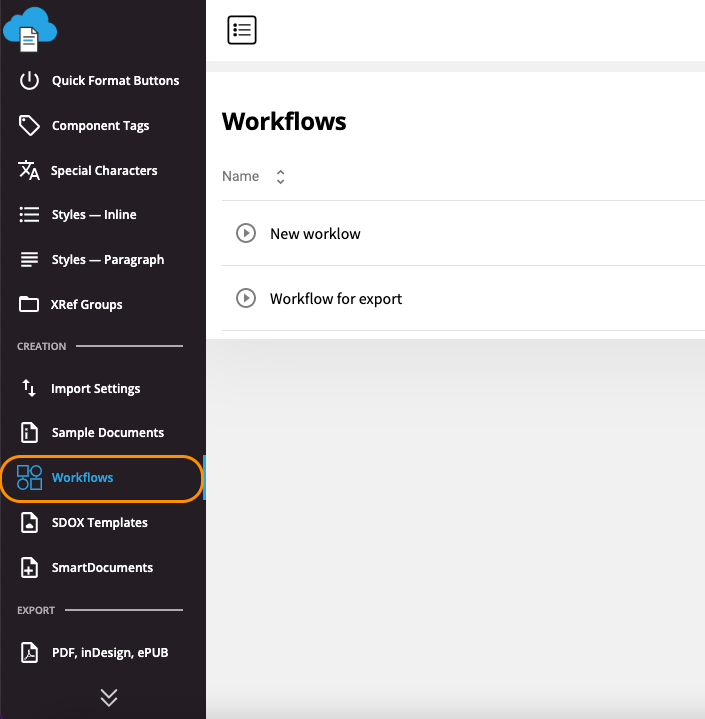
Tab "Workflows" in the Admin panel
As soon as you open this tab, you get two main options - "Create workflow" and "Add new themes".
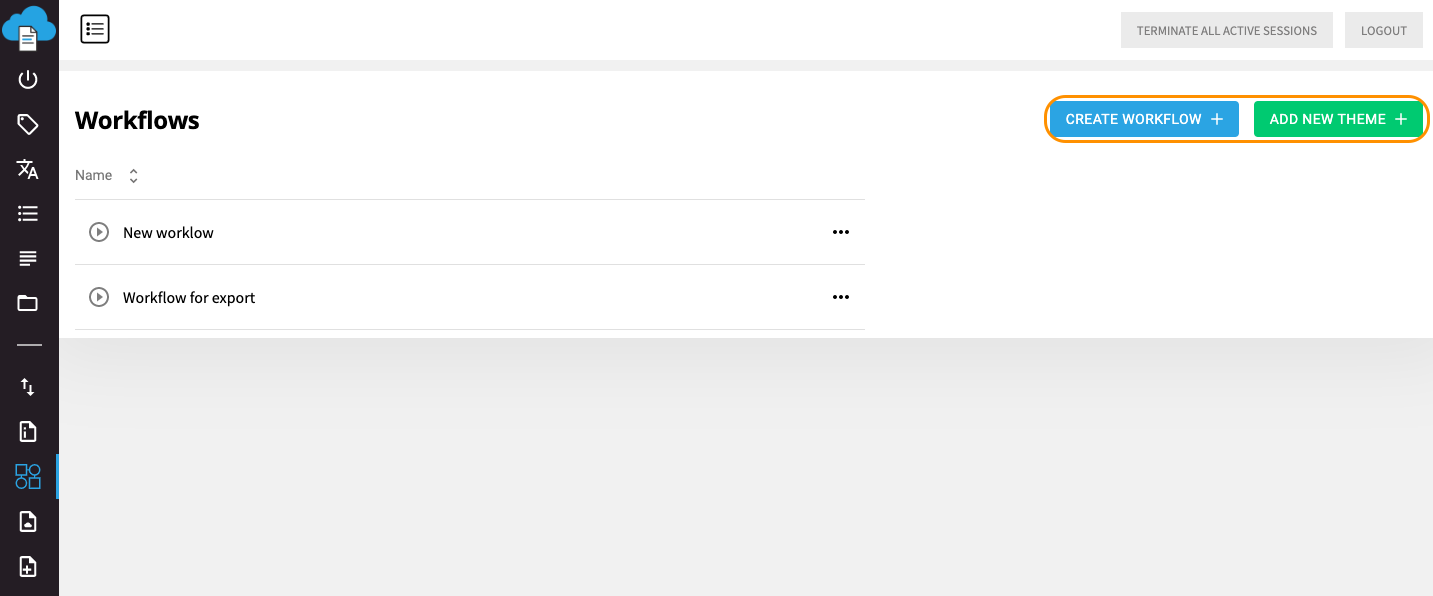
Buttons "Create workflow" and "Add new themes"
Click "Create workflow" and you'll get a dialog where you need to insert the name of new workflow in English - obligatory, in other languages - optionally.
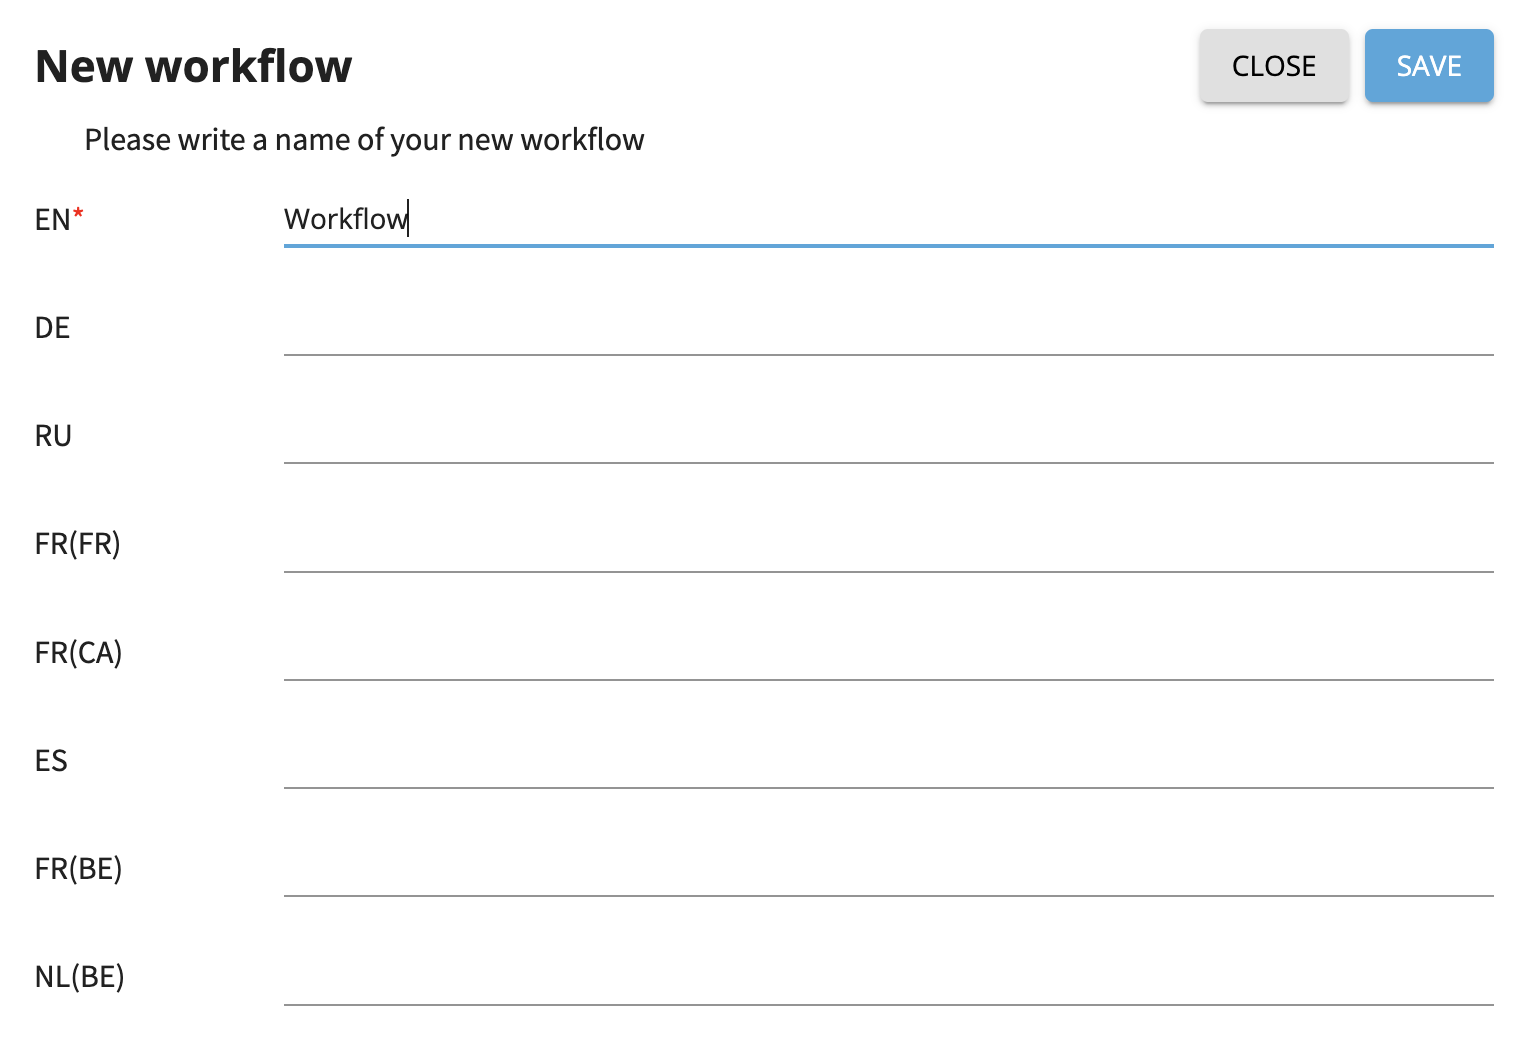
Inserting name of a new workflow
After the name is inserted, do not forget to click "Save".
Click "Add new theme" and a modal window appears where you have to select a workflow, where a new theme will be placed, and insert name of a theme.
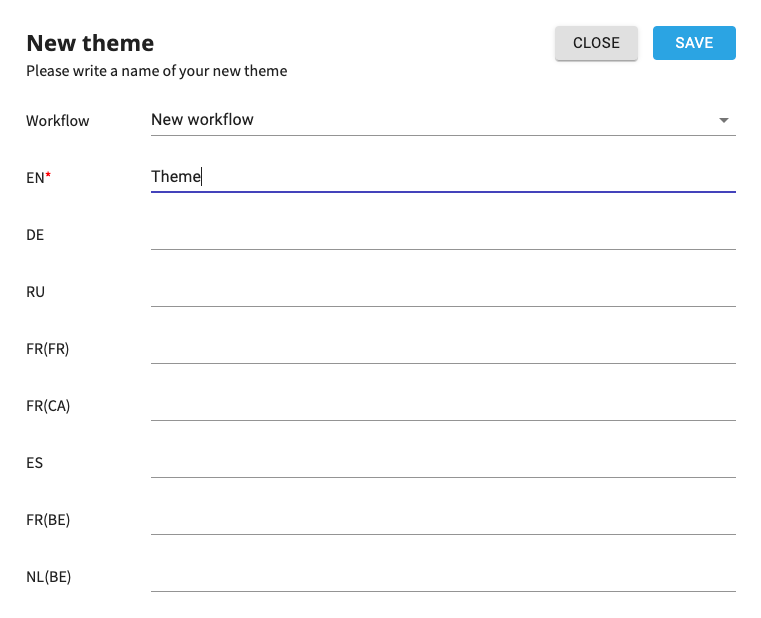
Creating a new theme
If there is at least one theme in the workflow, we can spread the workflow to get the theme list. In case there are no themes in workflow yet, spread button is inactive.
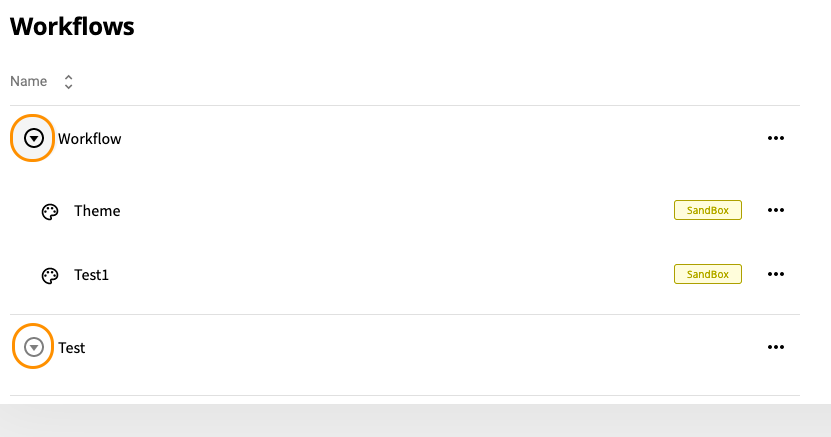
Buttons to spread workflow
In front of each workflow there are three dots, under which two additional options can be found - to edit and to delete workflow.
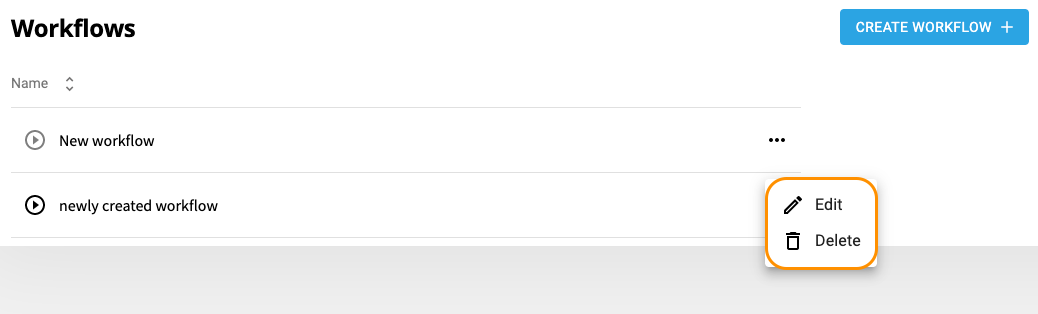
Edit and delete workflow
Under three dots in front of each theme there are four additional options:
●Edit
●Delete
●Replicate
●Publish to Live / Change to Sandbox
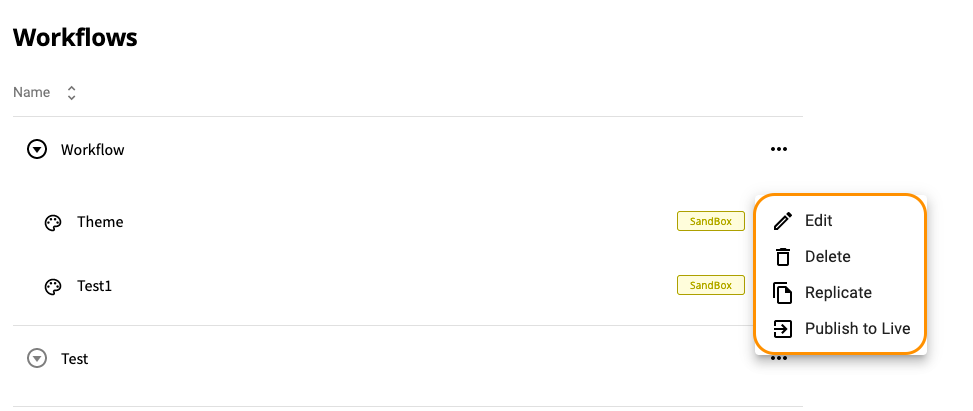
Additional options to themes
Click "Edit" and there will appear the following points to be edited:
●Names
●General settings
●ParStyles (paragraph styles)
●DirectoryStyles
●Container
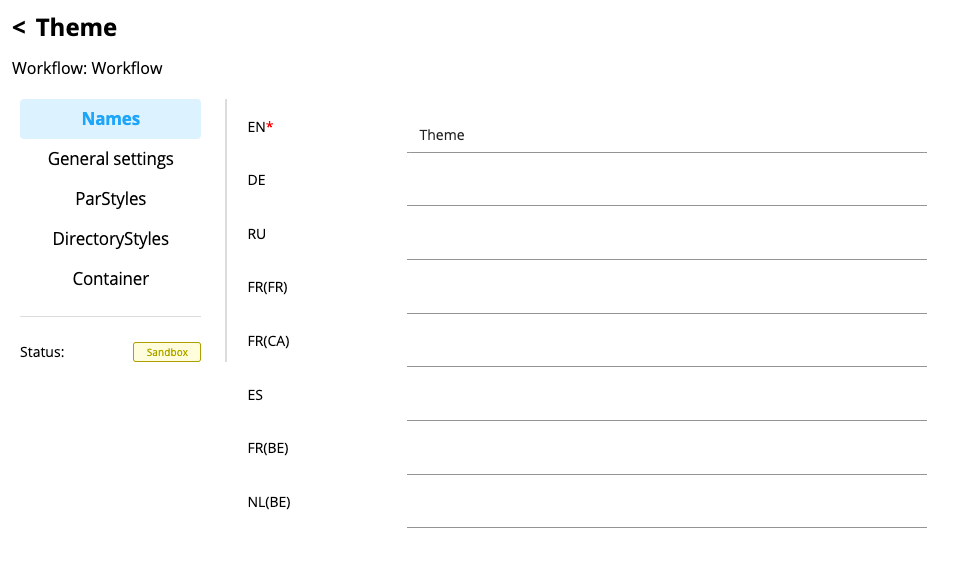
Editing themes
In the part "General settings" you can edit the following points:
●Margins
●Top
●Right (outer)
●Bottom
●Left (outer)
●Indentation levels
●Level1 - Level6
●Others
●Page orientation
●Portrait
●Landscape
●Page height
●Page width
●Double page
●Yes
●No
●Font size
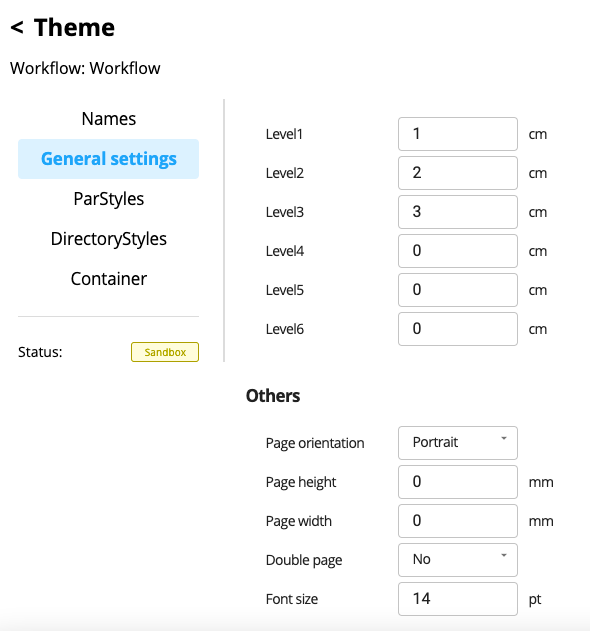
General settings
In the part "Paragraph Styles" you can add, edit and remove paragraph styles.

Paragraph Styles
To add paragraph styles click blue plus-button, tick required styles that need to be added and click "Save".
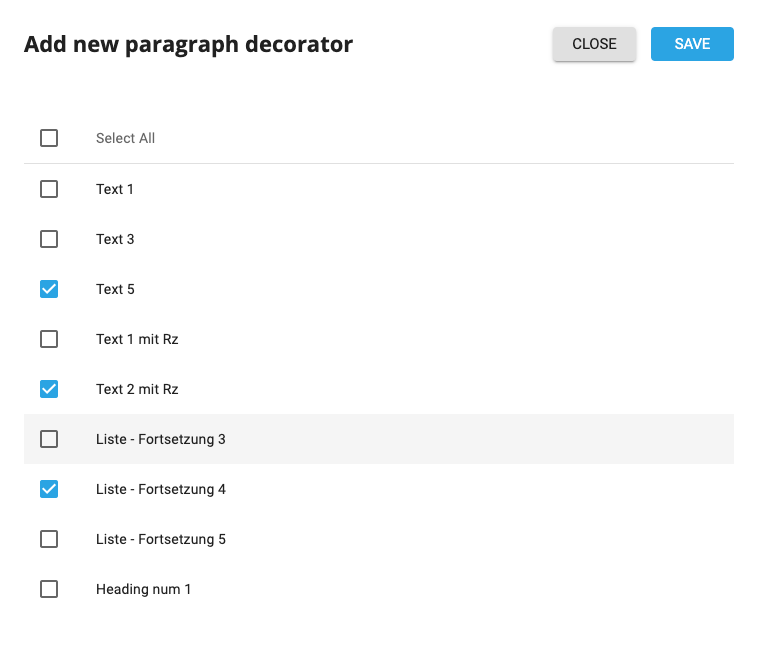
Adding new paragraph styles
Note: in the suggested list of paragraph decorators there are all styles that are configured in the system; the list can be scrolled to the last style. Those styles that have already been added to the theme, will be not displayed in the suggested list anymore.
The following points can be edited in paragraph styles:
●ToC Level
●Font Size
●Font Color
●Frame Color Top
●Frame Color Right
●Frame Color Bottom
●Frame Color Left
●Line Space
●Frame Thickness Top
●Frame Thickness Right
●Frame Thickness Bottom
●Frame Thickness Left
●Hyphenation
●Bold
●Italic
●Underlined
●Strike-through
●Alignment
●Left
●Centered
●Right
●Do not separate lines
●Do not separate from next element
●Margin Bottom for Same Previous Paragraph
●Margin Top for Same Previous Paragraph
To remove paragraph styles from the theme tick a checkbox on the left side of corresponding style and click "Delete".

Deleting paragraph styles
The part "Directory Styles" is quite similar as "Paragraph Styles" and the processes of adding, editing and deleting styles are the same.

Directory Styles
The only difference is the number of points to be edited:
●ToC Level
●Font Size
●Font Color
●Line Space
●Hyphenation
●Bold
●Italic
●Underlined
●Strike-through
●Alignment
●Left
●Centered
●Right
●Do not separate lines
●Do not separate from next element
●Margin Bottom for Same Previous Paragraph
●Margin Top for Same Previous Paragraph
In the part "Container" containers can be added, edited, replicated and removed.
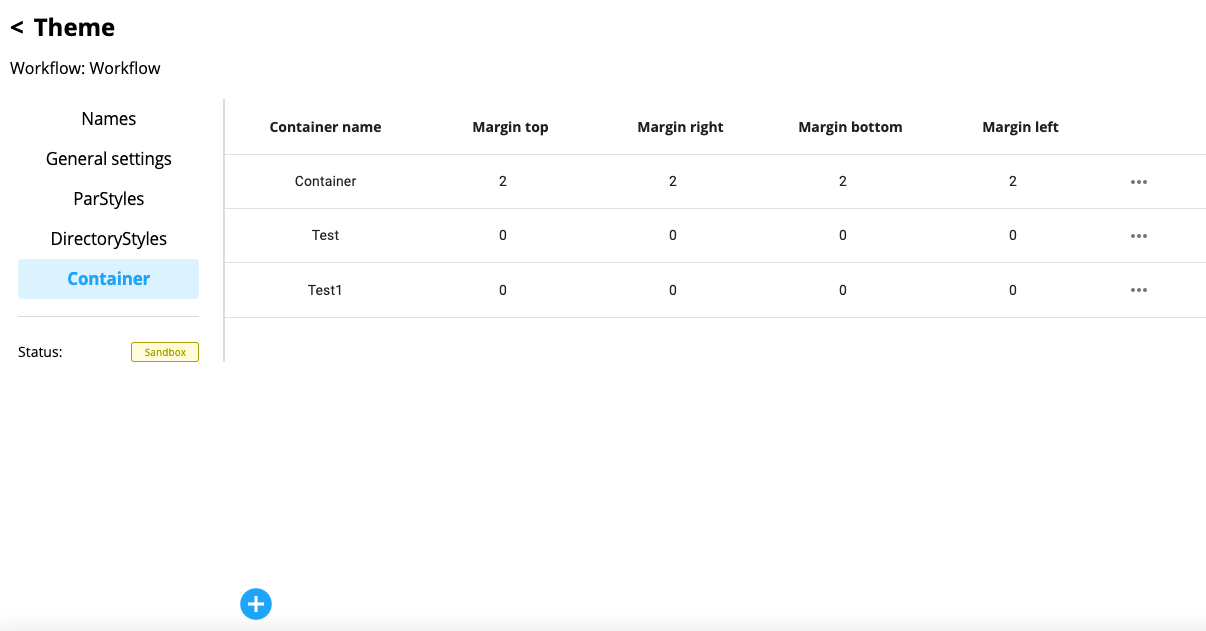
Container
When you add a container, you have to insert the name of it and click "Save".
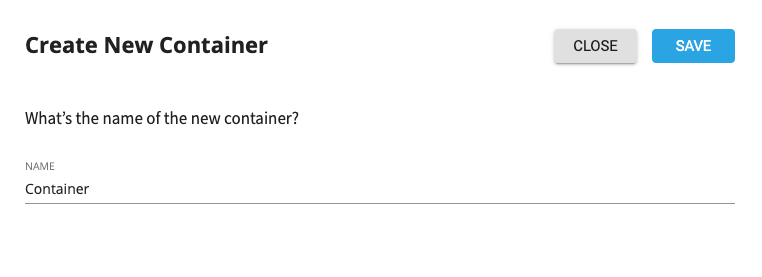
Insering name of container
Under three dots in front of each container you'll find the options "Replicate" and "Delete".
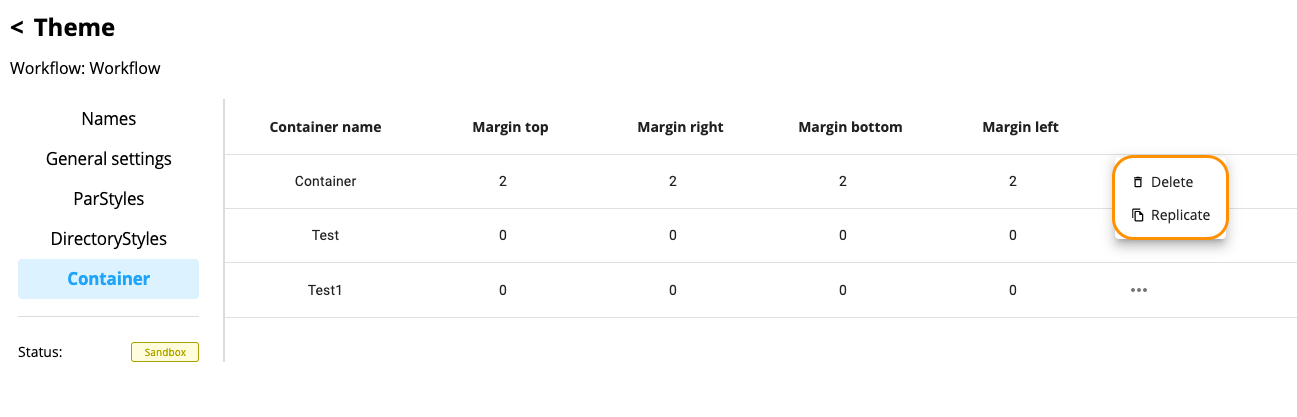
Options "Replicate" and "Delete"
While replicating a container you should insert the name of a container again and click "Replicate".
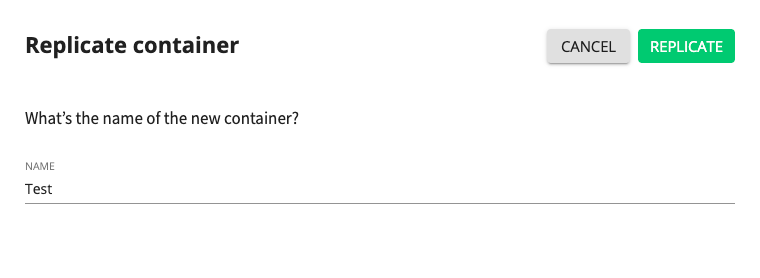
Replicating container
12SDOX Templates
In SDOX templates settings you have opportunity to create a new SDOX template, edit, replicate, download the template in .sdox format to upload it into SMASHDOCs editor and delete needless templates. To pass to SDOX-templates settings you should click a corresponding icon in the left toolbar. To add a new template click a green button "Add new template" in the upper right corner.
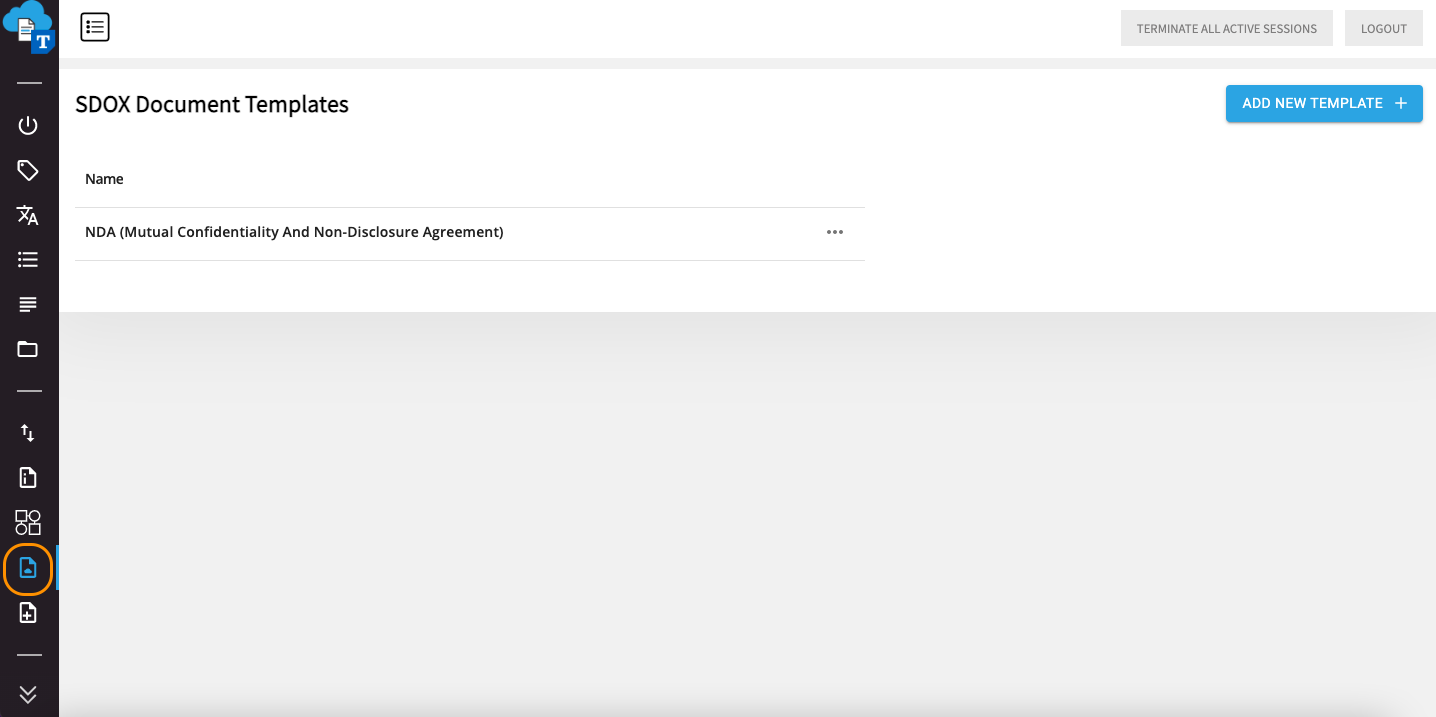
Icon for SDOX Templates settings is highlighted
After clicking the button “Add new template” you will get a modal window where you have to upload an SDOX file with a required SDOX template and insert template name.
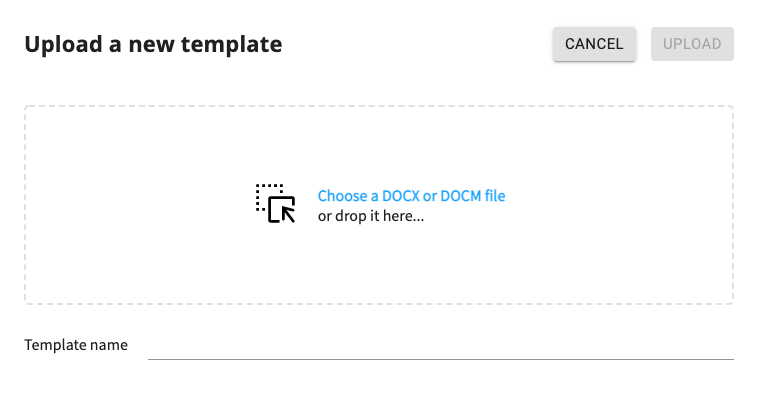
Uploading a new SDOX template
After the file has been chosen and template name has been inserted, click "Upload" and template settings will open.
Template settings to edit
The following points must be set in a template:
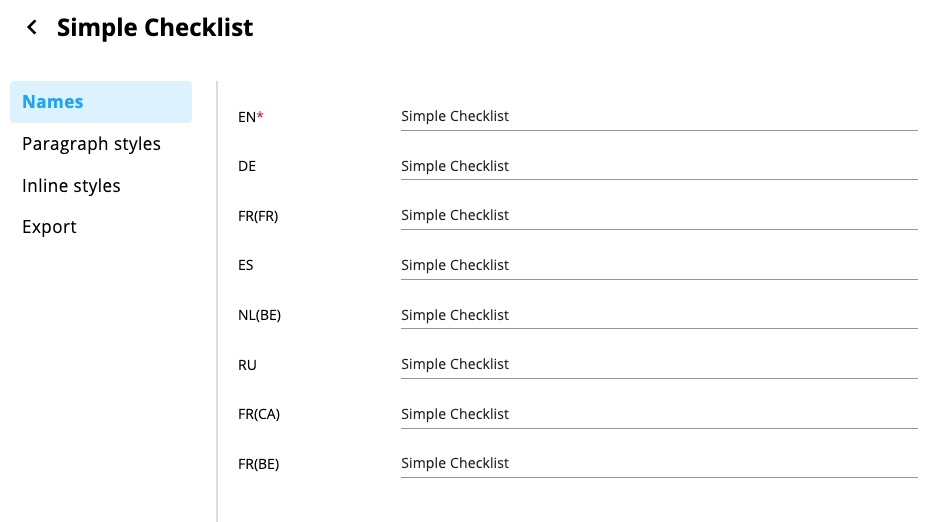
●Name of a template in all supported languages;
●Paragraph styles;
●Inline styles;
●Export.
Paragraph and inline styles are the set of applicable styles to the text that is created in SMASHDOCs account. All styles that are marked with a checkmark in a particular SDOX template will be available in the editor with this template.
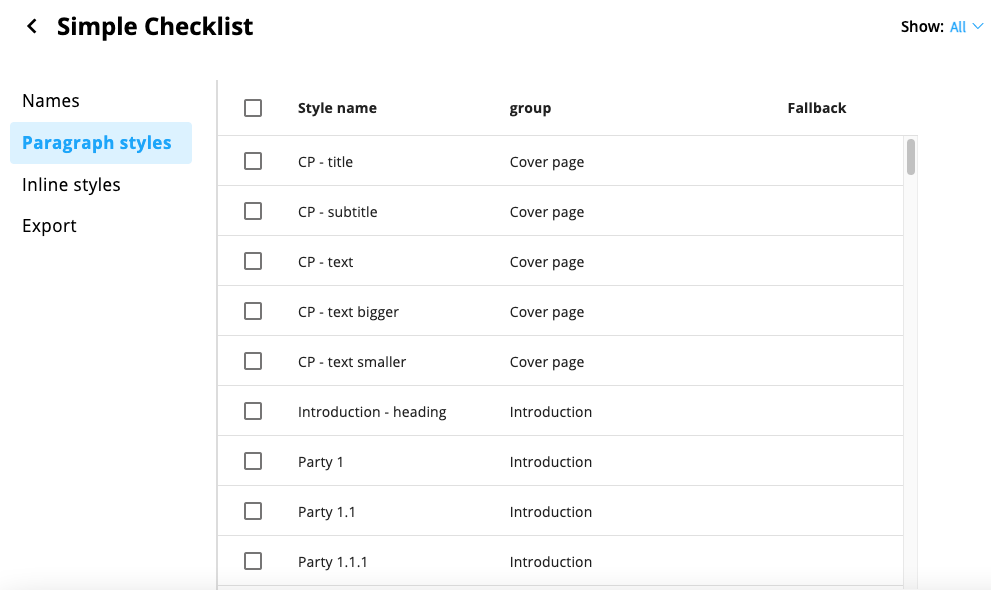
The list of paragraph styles in an SDOX template
In the upper right corner (see Image 108) there is an option to select, whether you want all styles to be displayed, or only active/inactive ones.
Below there are arrow buttons for switching to the next list of rows with paragraph styles.
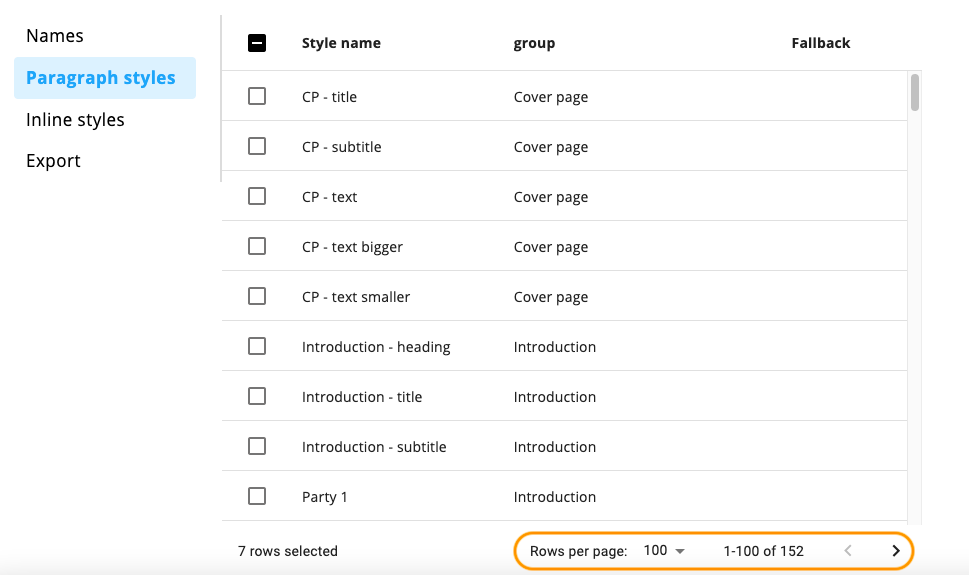
Arrow button for switching rows with paragraph styles
In settings for paragraph and inline styles it is also possible to search for a style. Corresponding field for inserting a style is in the upper right corner.
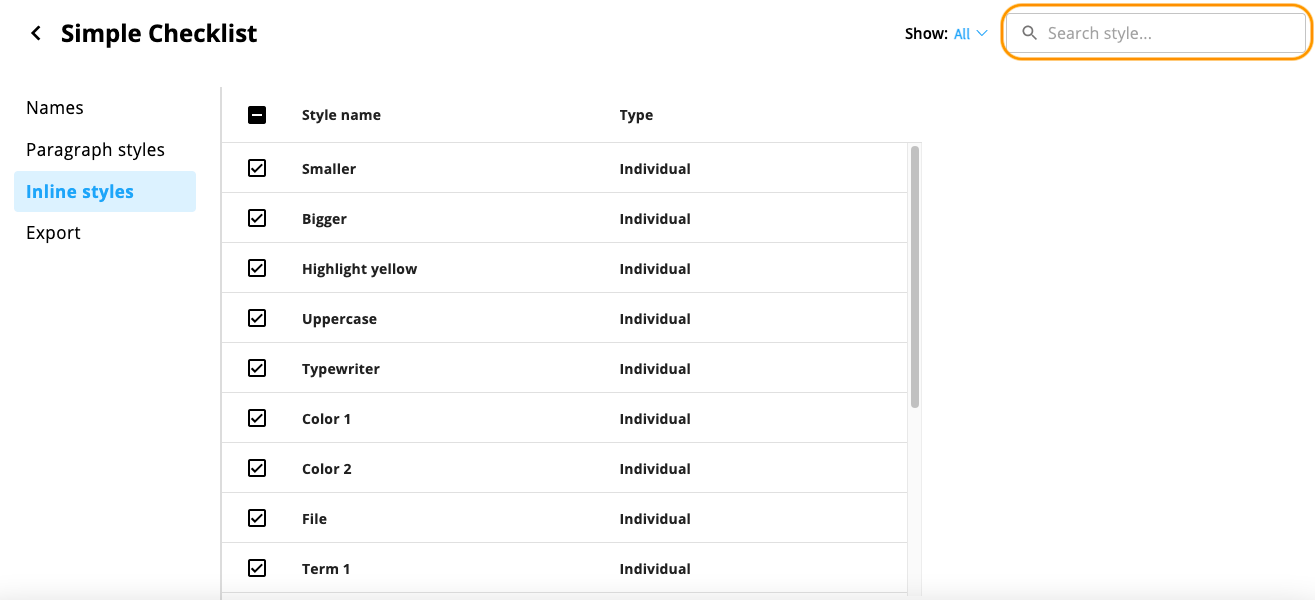
Field for searching style
In export settings you can activate or deactivate the possibility to export document created on the basis of a particular SDOX template to any formats and any configured layouts. Those points that are ticked with a checkmark are available.
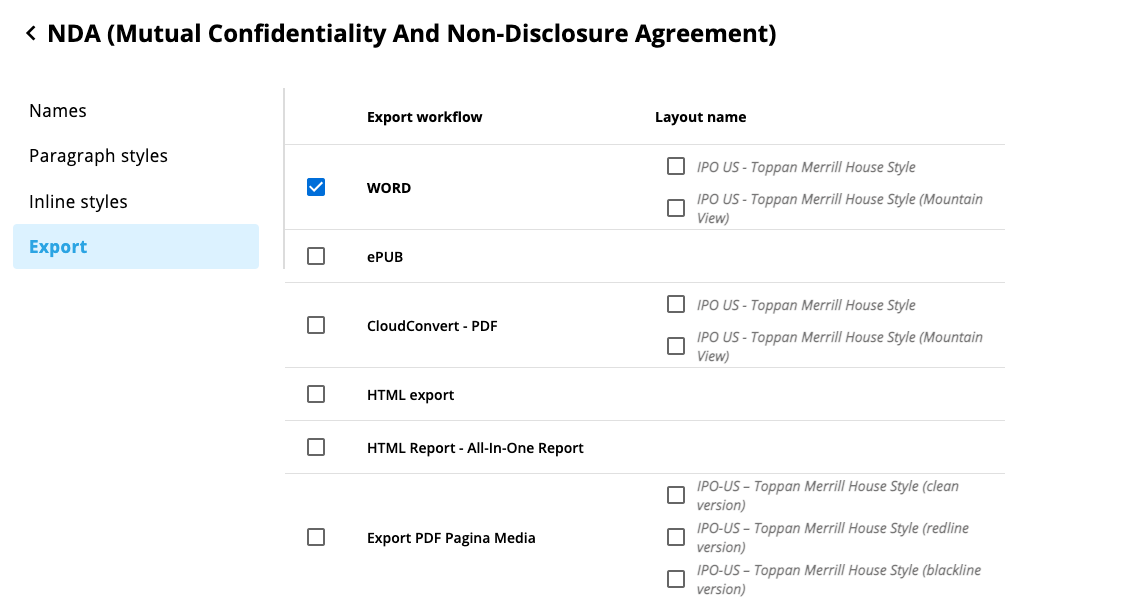
Export settings in SDOX templates
As soon as you have finished setting all necessary points, the template will appear in the list of templates and will be ready for downloading and using it in the editor.
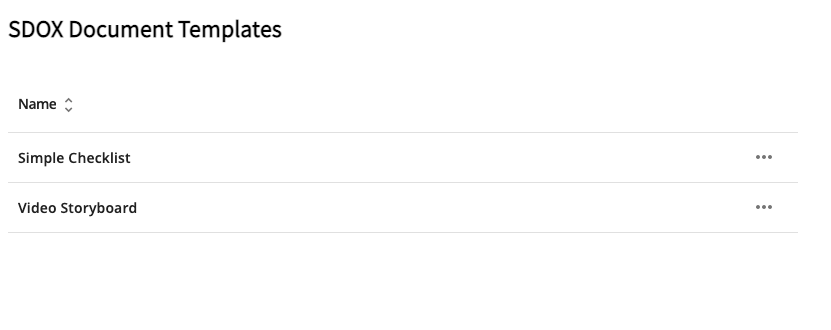
The list of SDOX document templates
In case you haven't marked any fields in settings "Paragraph styles" and "Inline styles", the template will be indicated as unfinished and won't be available for downloading.
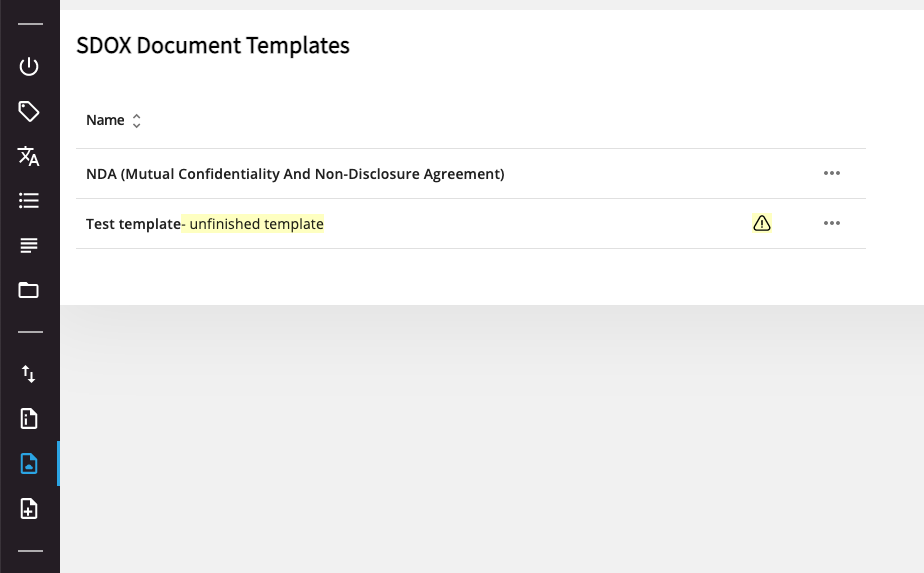
Unfinished SDOX template
To finish it, click three dots in front of the template, choose "Edit" and tick paragraph and inline styles in it. Everything will be saved automatically and afterwards you can download the template.
After downloading the template go to your SMASHDOCs account and upload SDOX file with the template. As soon as you do this, you will be able to notice all default styles that were previously added to this SDOX template as Default PD and PD Subset in the Admin page.
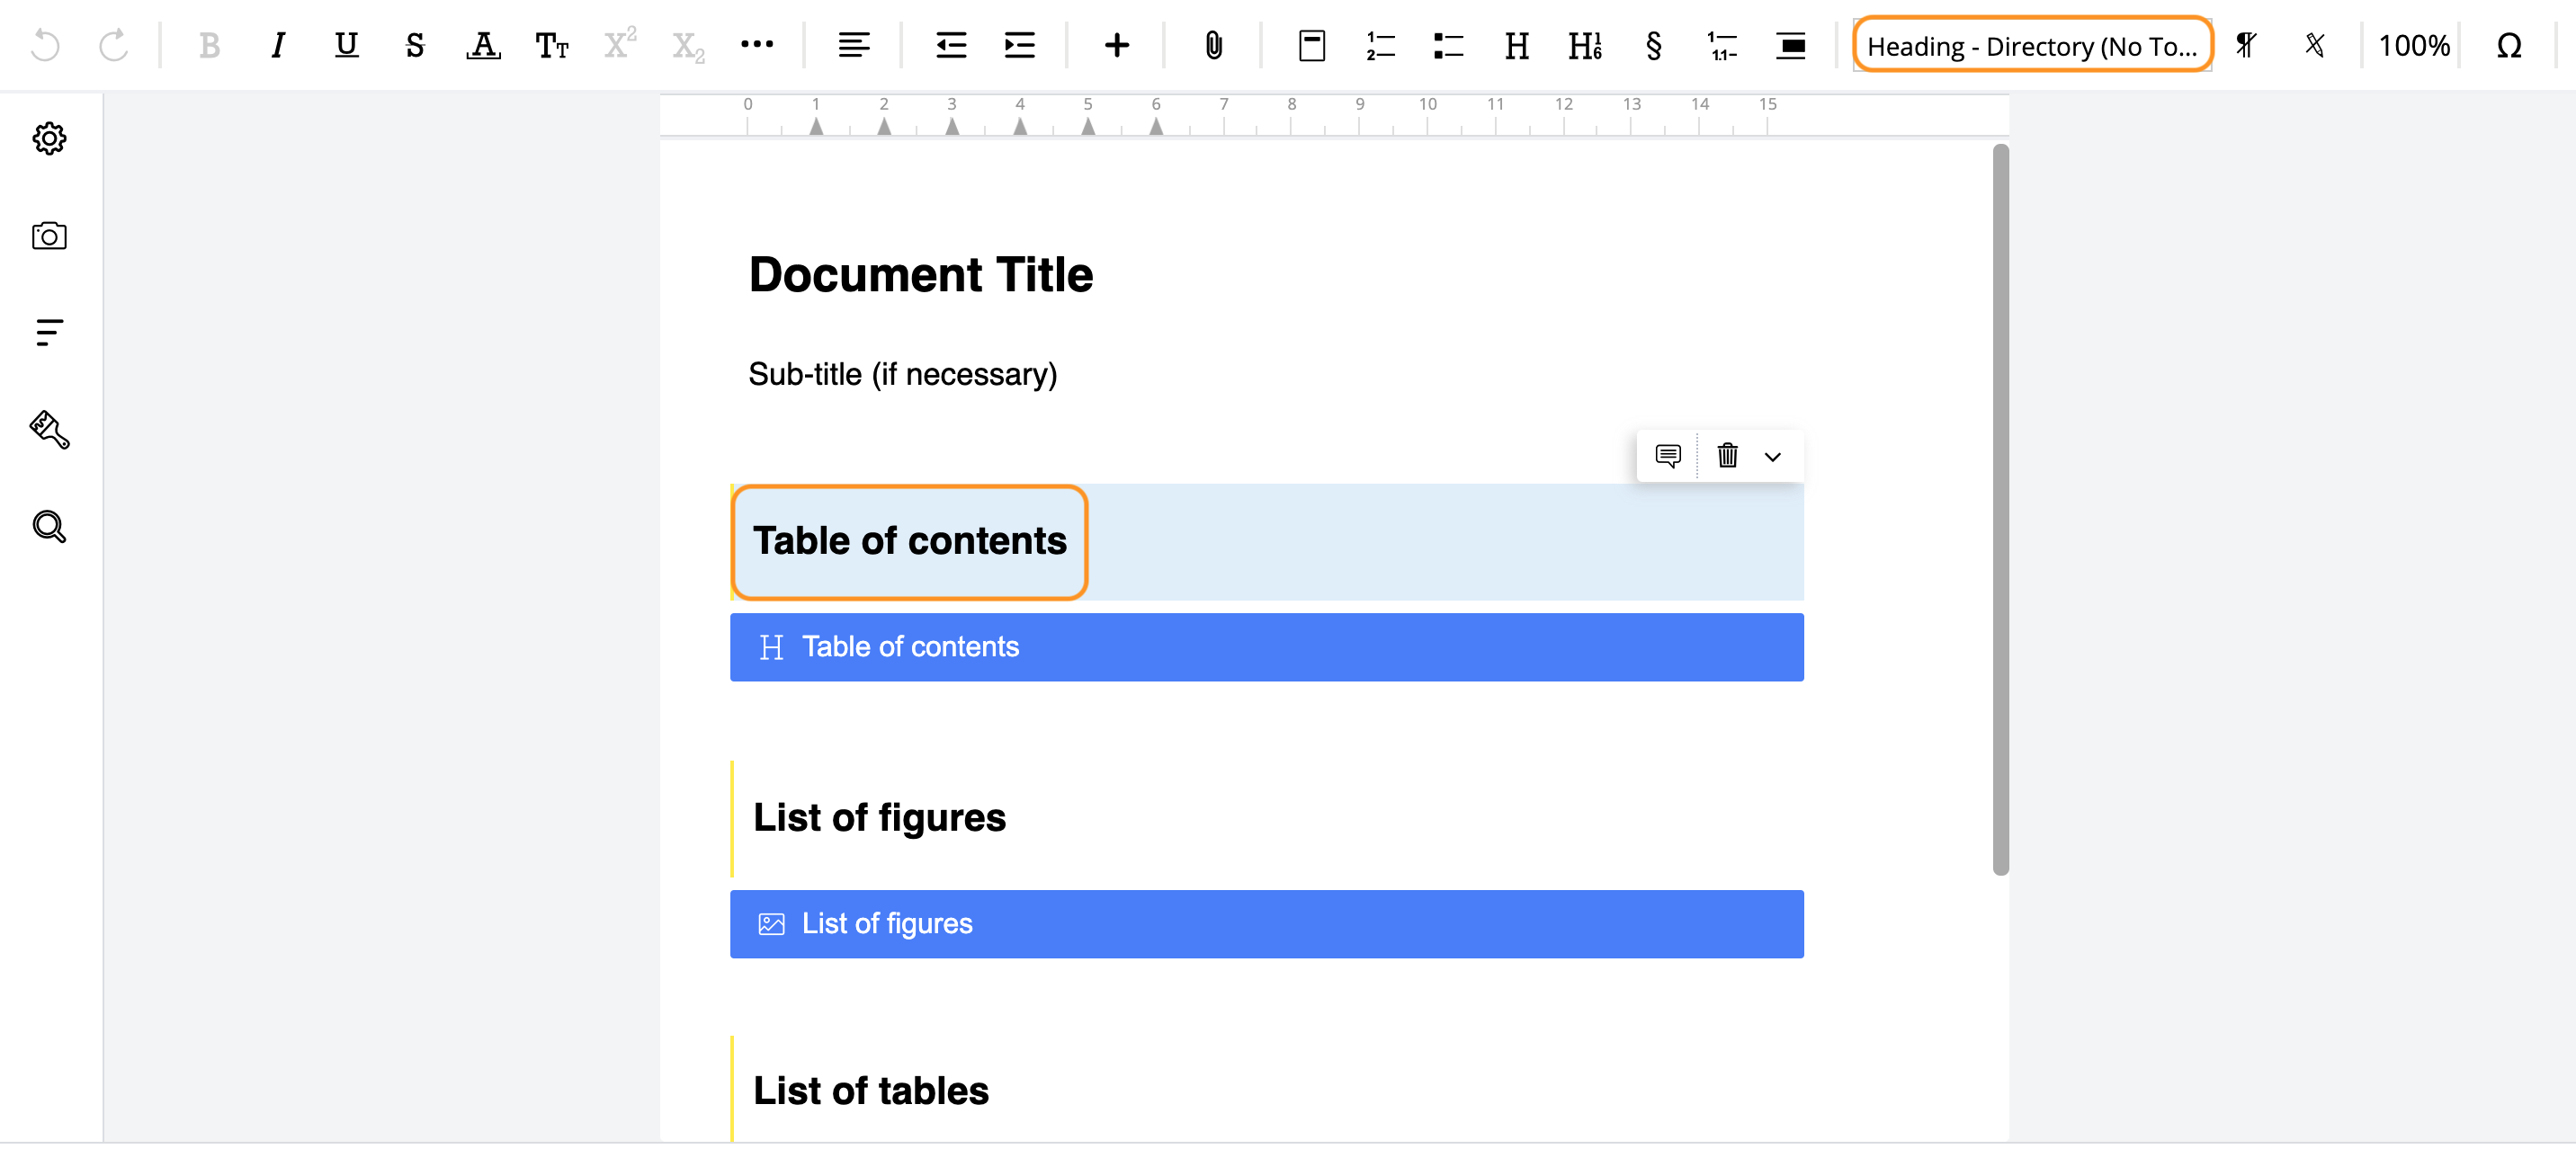
The result of newly added sdox template - Heading - Directory (No ToC)
The result of newly added sdox template - Text 1
After you checked all default styles in your SDOX template you are able to insert text in a document you need to work with and all titles, subtitles, lists and text will have an outlook of default patterns of this particular template.
13SmartDocuments templates
If you need to work with contracts, SmartDocuments templates allow you to fill in the required information inside a document simultaneously by answering questions in the form of interview in SmartDocuments templates without having a need to find the gaps where such a piece of information is needed.
The important thing here, however, is that SmartDocuments Interview is a separate functionality, which is not included in a standard set of procedures of document creation. To add this functionality to your system, you should contact our SMASHDOCs administration and after we enable it on your SMASHDOCs system, you will be able to set it in the Admin page and work with it in your account after switching on this function in features settings in a section ‘Projects’.
Switching on SmartDocuments function in Features settings
As soon as you have received SmartDocument Interview functionality, on the Admin page you will see a corresponding icon that indicates SmartDocument templates settings. Here you can create a new template, edit or delete it.
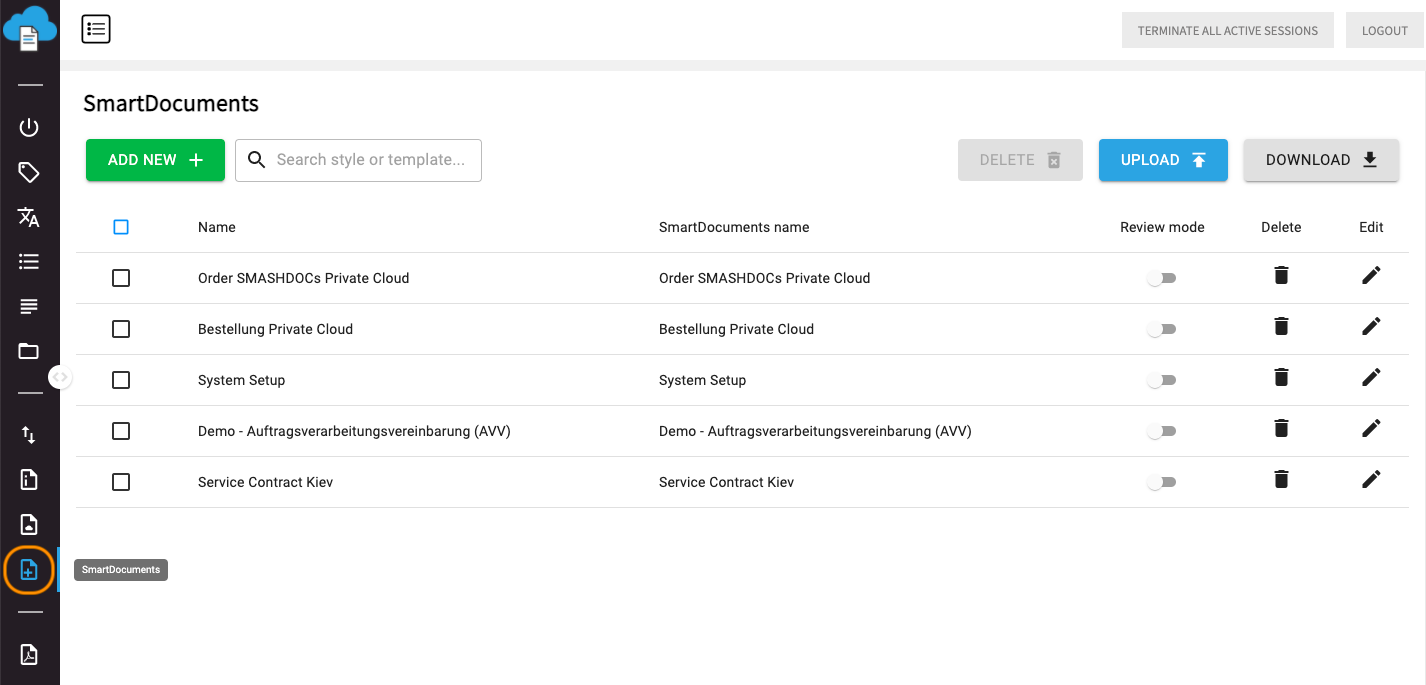
SmartDocuments
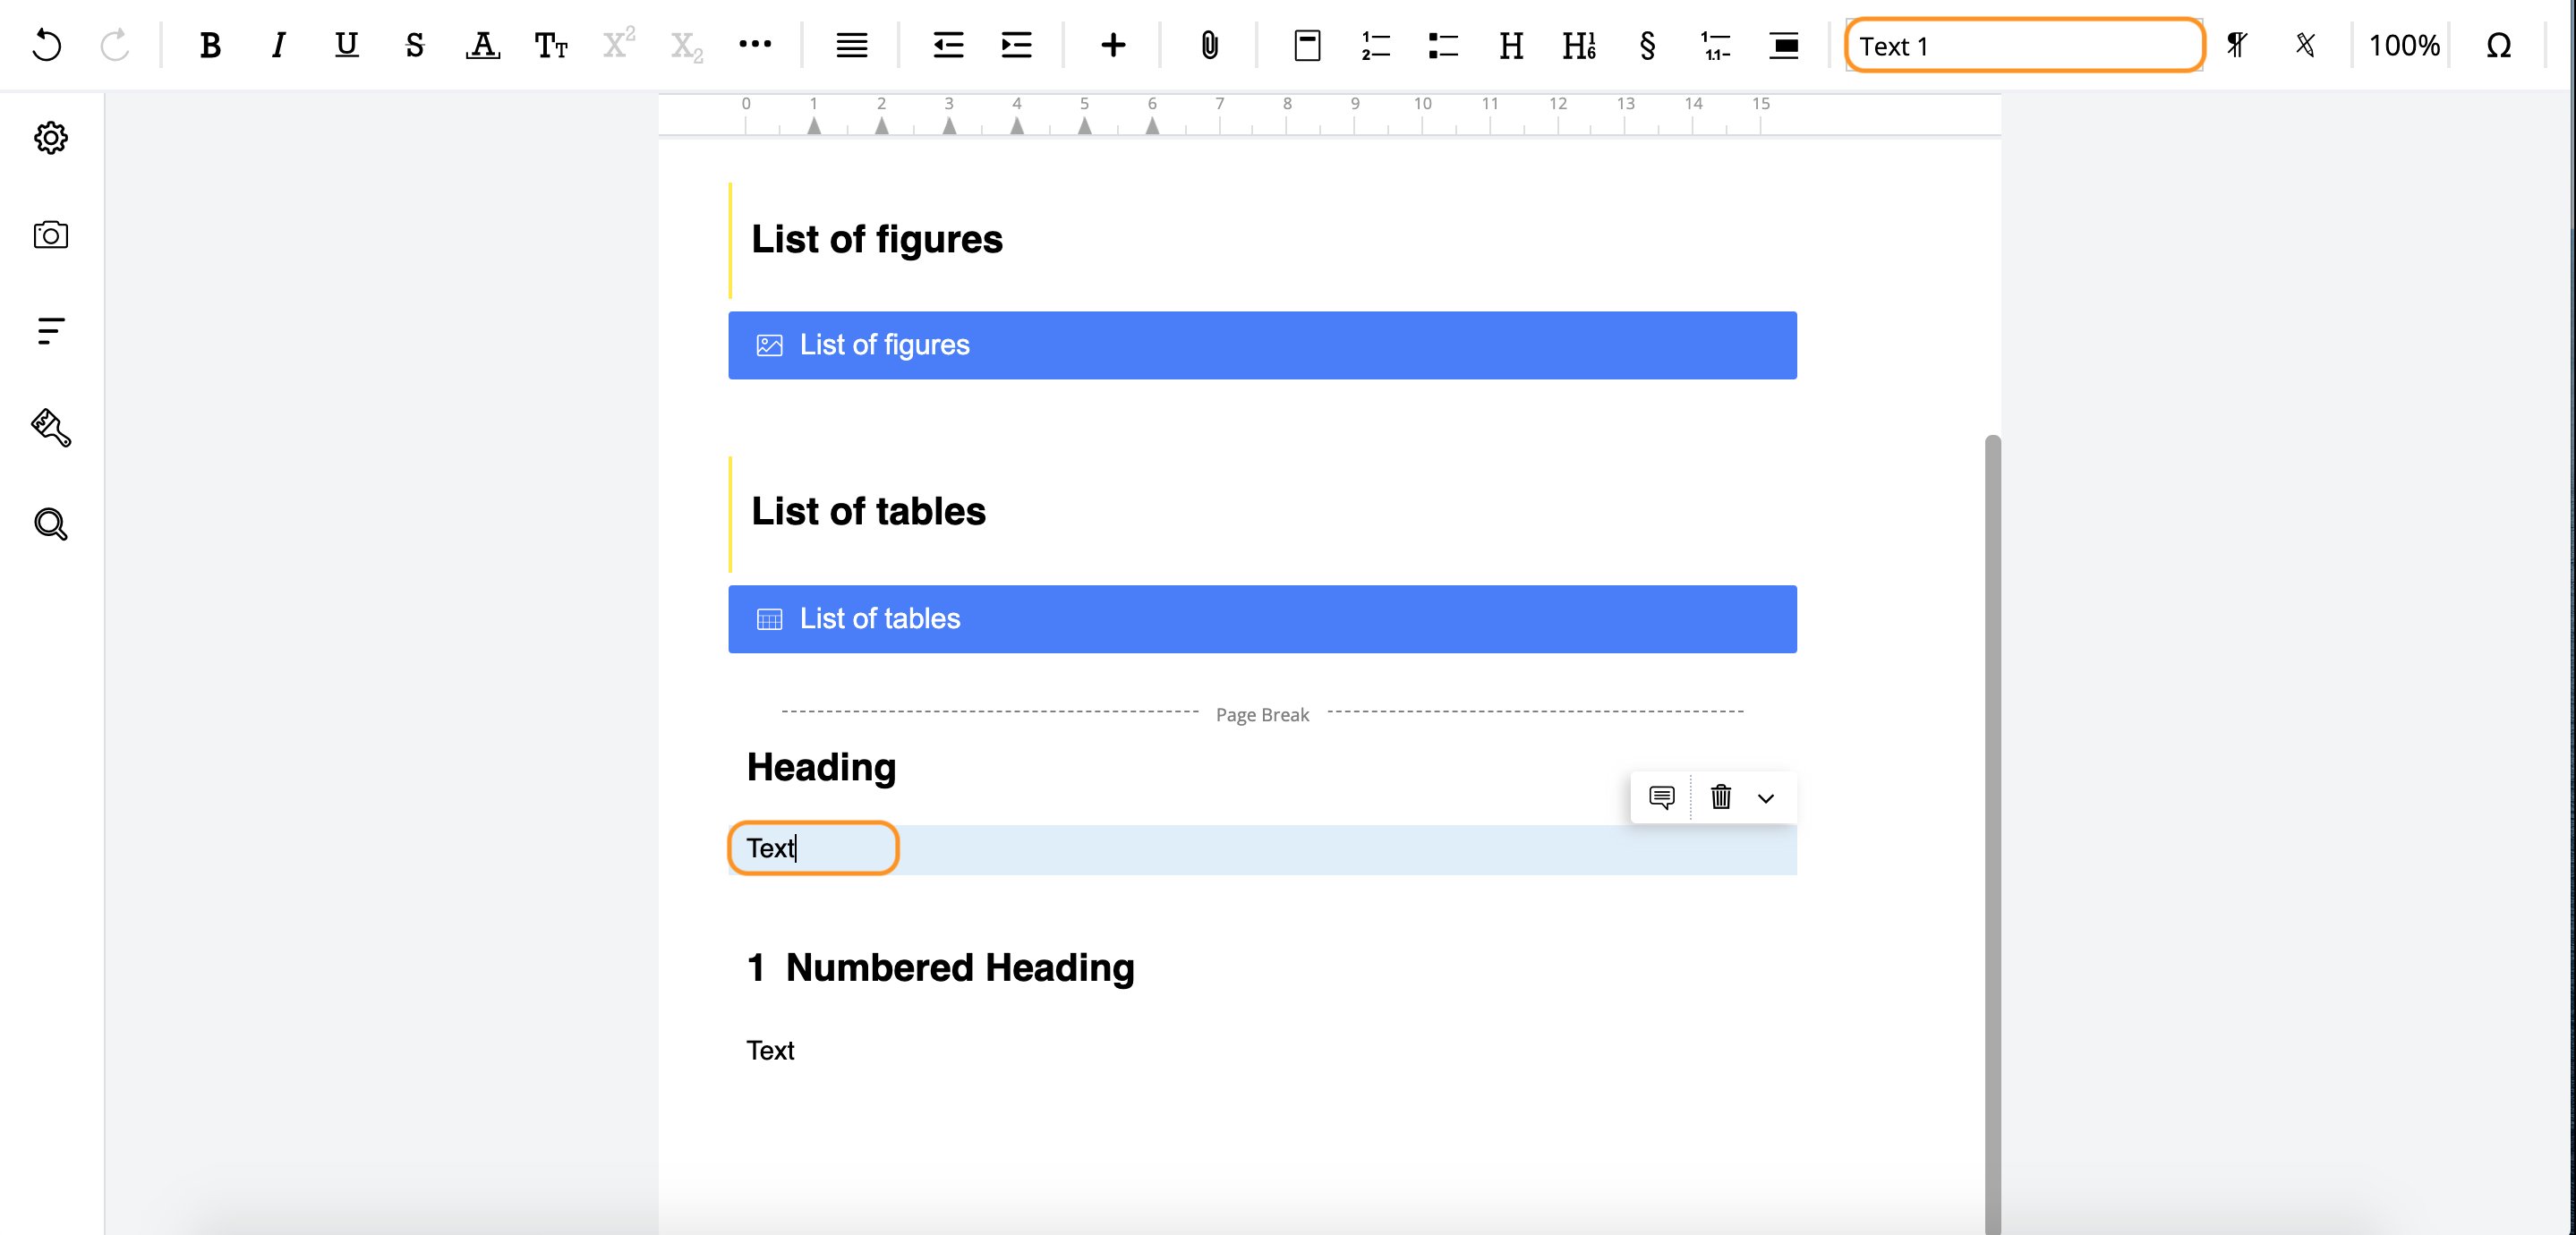
To create a template click a green button “Add new” and the modal window will appear, where you have to add proper information about the template - name and SD name, as well as to decide, whether you would like to add this in review mode.
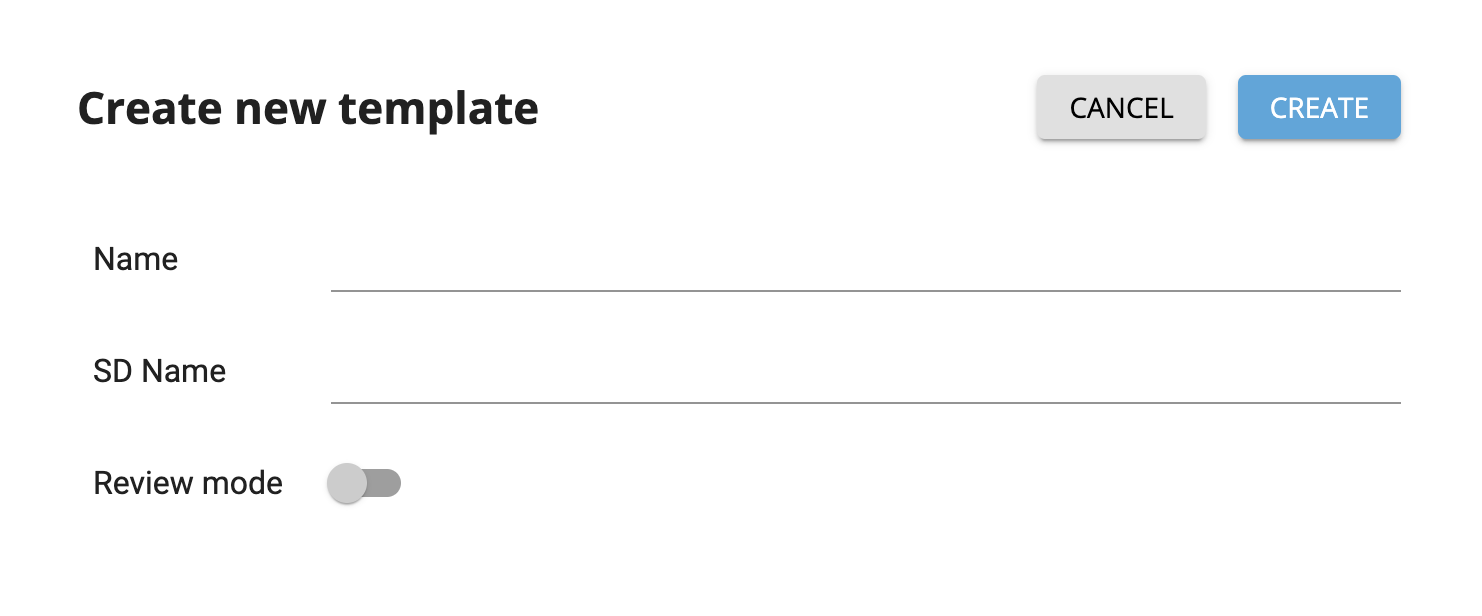
Information about a new SmartDocuments template
Apart from that, you can upload a .json file with added SmartDocuments templates by clicking the button ‘Upload’ (see Image 117).
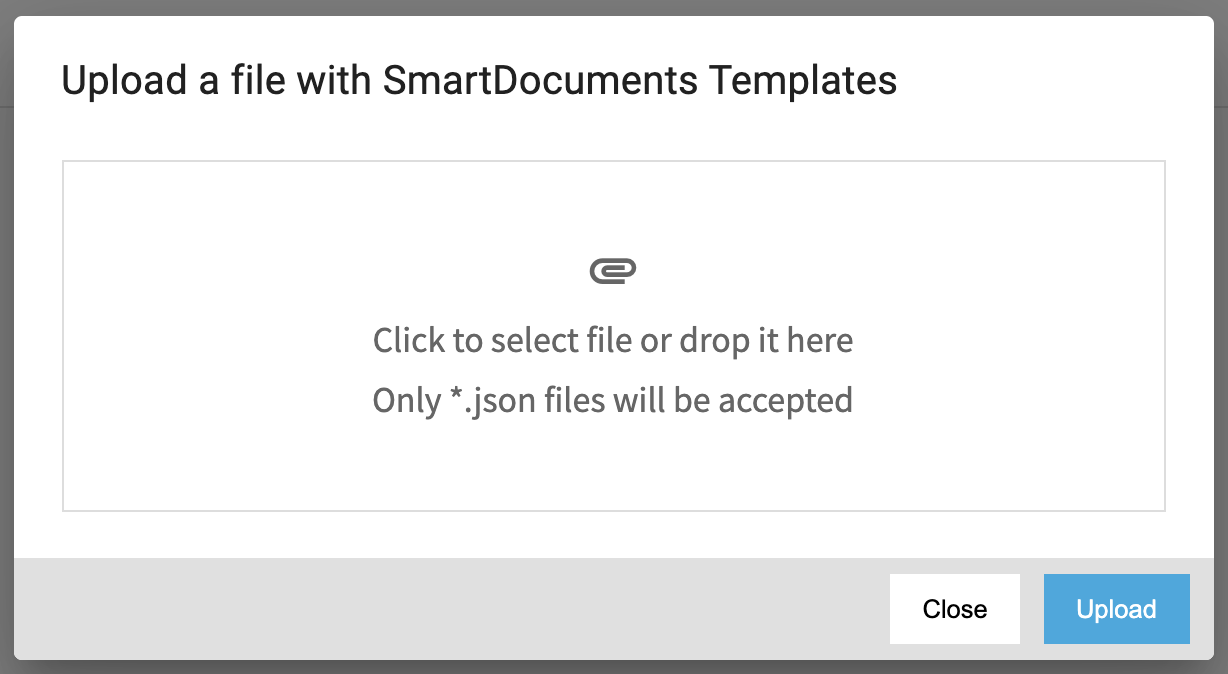
Uploading a file with SmartDocuments templates
After creation or uploading new templates will be added to the list. In the Admin page you may use the option “Search style or template” (see Image 117) to find a required template quickly. You can also download a .json file with the list of all exisiting SmartDocuments templates by clicking a button ‘Download’ (see Image 117).
In your SMASHDOCs account the set of created templates will be displayed after you click “Create document” in this way:
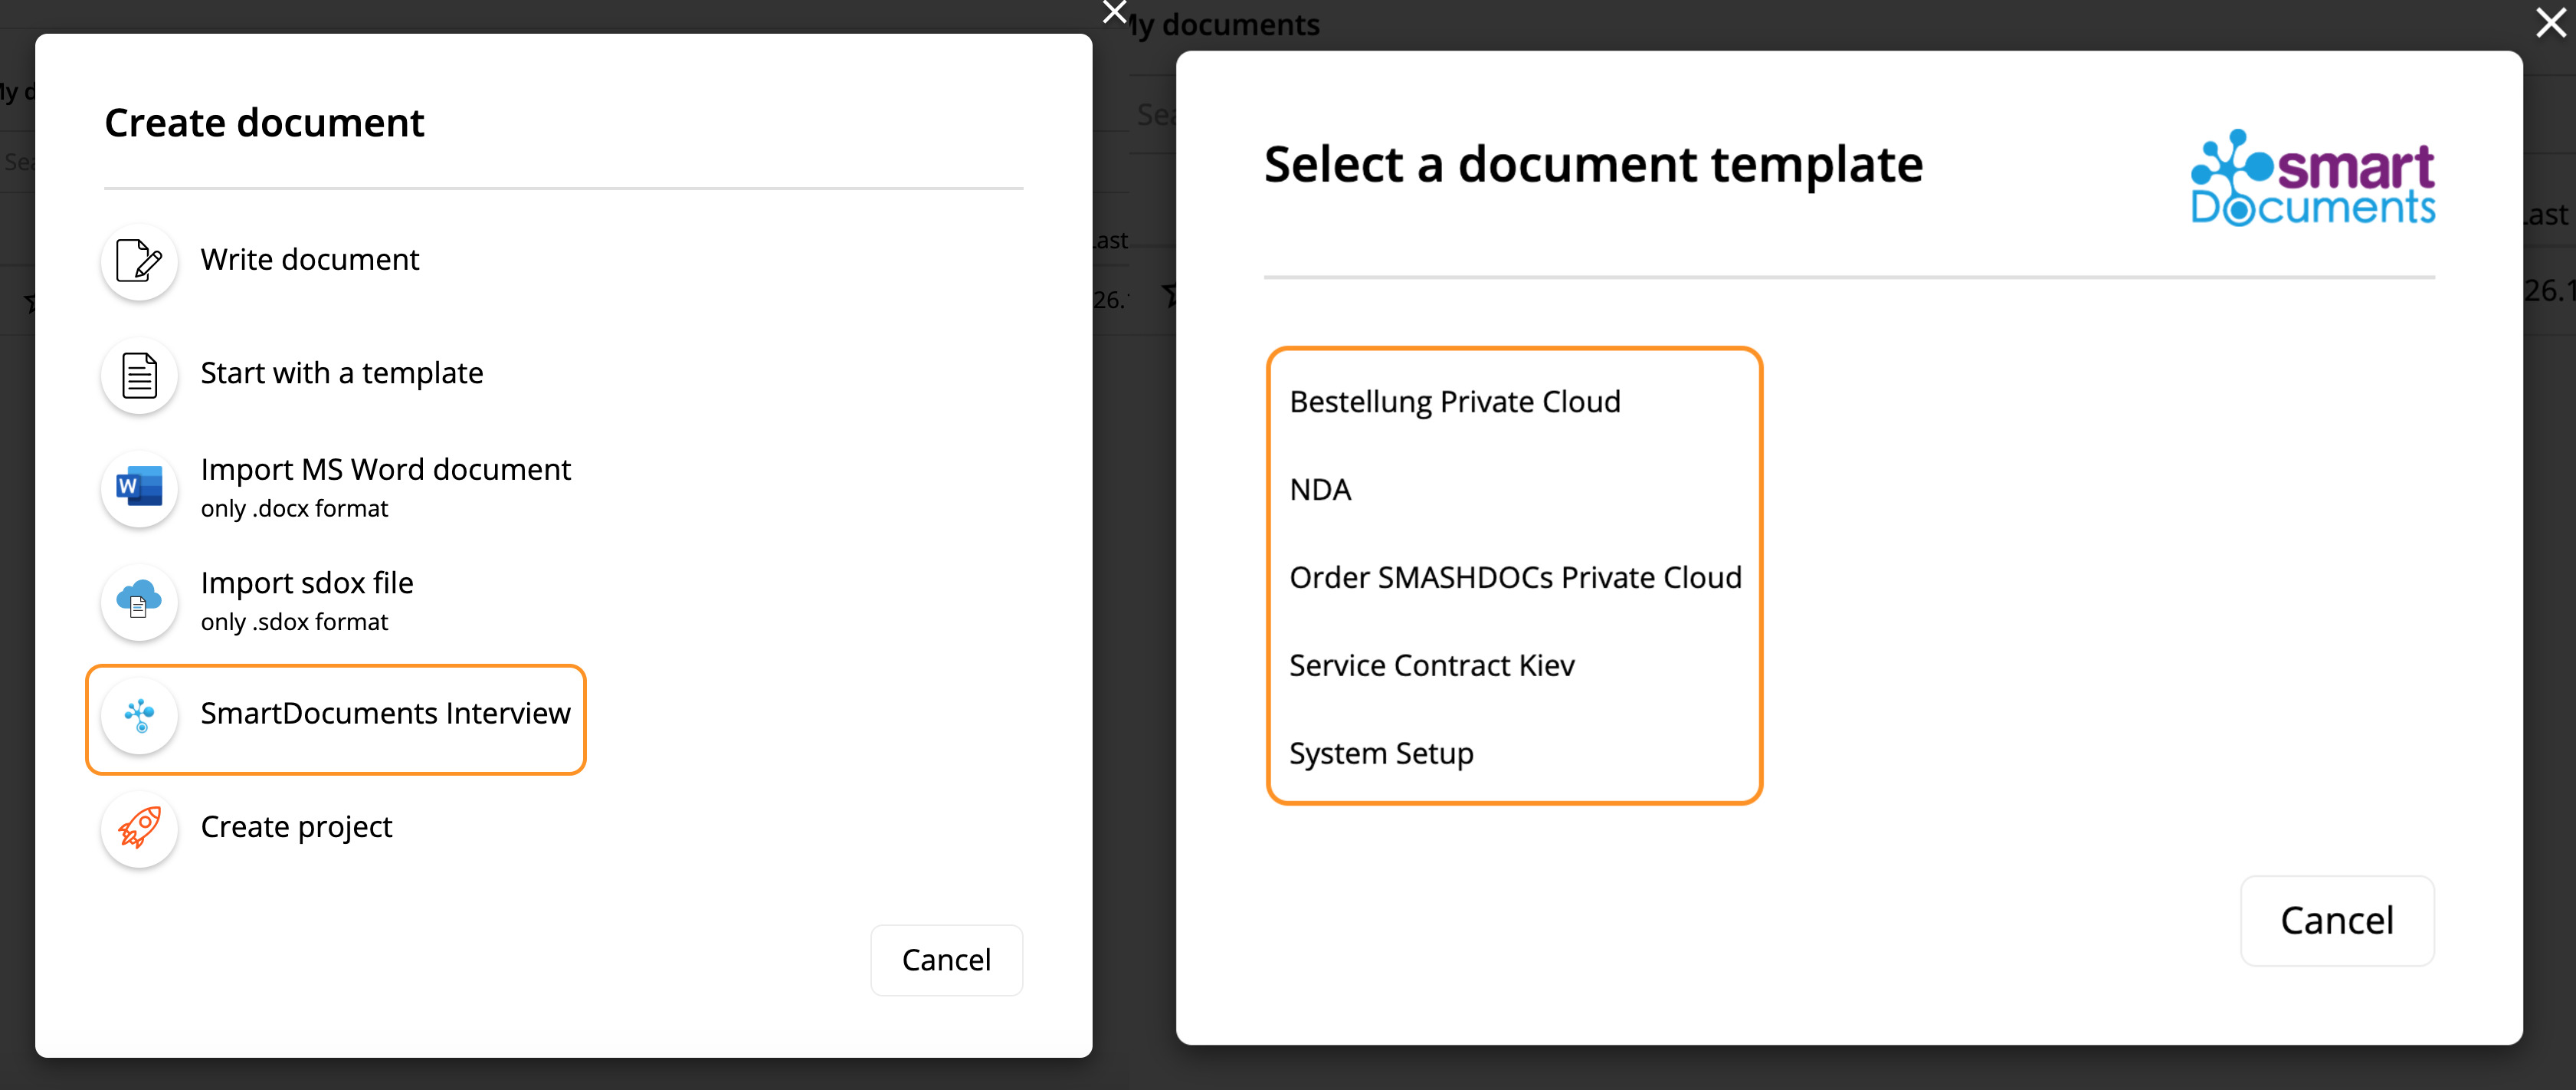
SmartDocuments Interview templates in editor highlighted
Then you choose the desired template and proceed with it.
14Export Templates
In the tab ‘Export Templates’ you can set different templates for exporting documents in such formats: InDesign, PDF, ePUB.
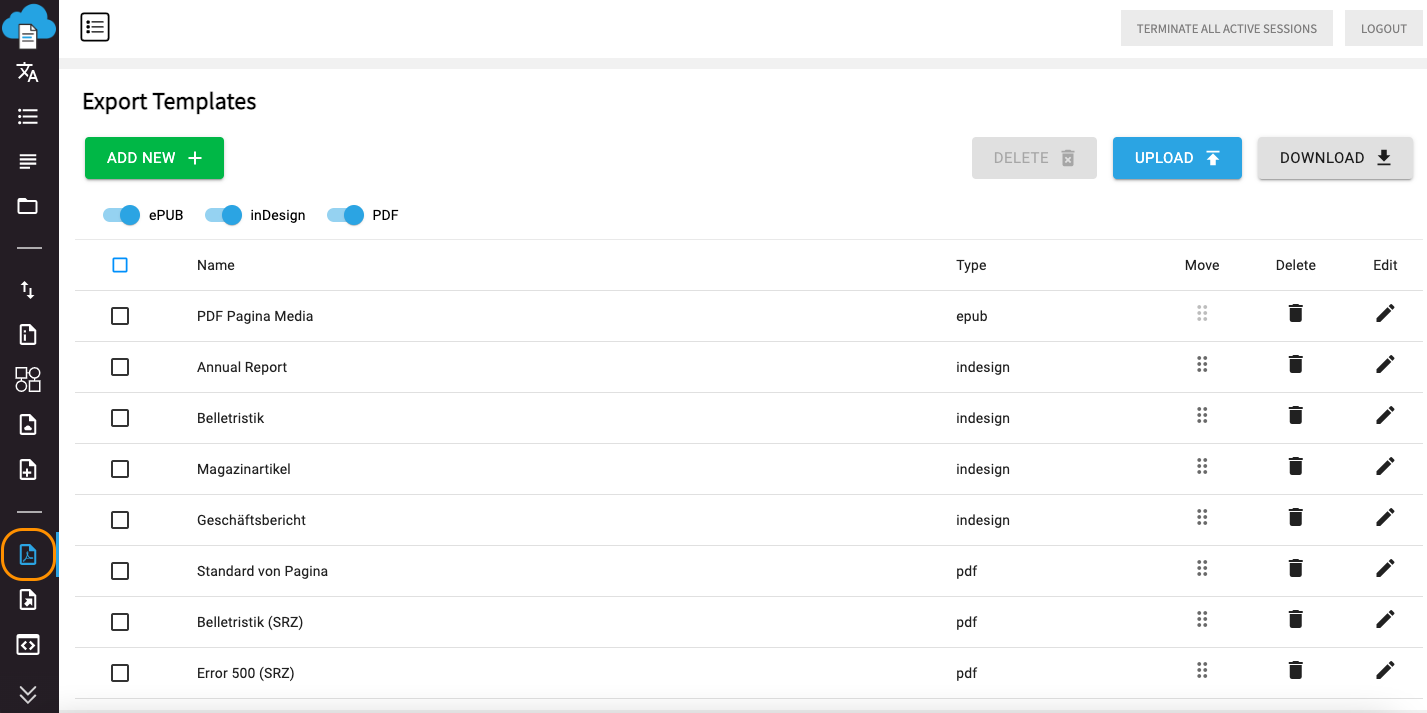
Export Templates tab highlighted
First of all, it’s worth mentioning that in order to add templates to the system you can download needed templates from the AdminUI page of the other system in .json-format by clicking a button ‘Download’ and upload them to your system by clicking ‘Upload’ (see Image 121). After uploading .json file with templates, the list of these templates will appear on your AdminUI page. You can download all templates or several of them.
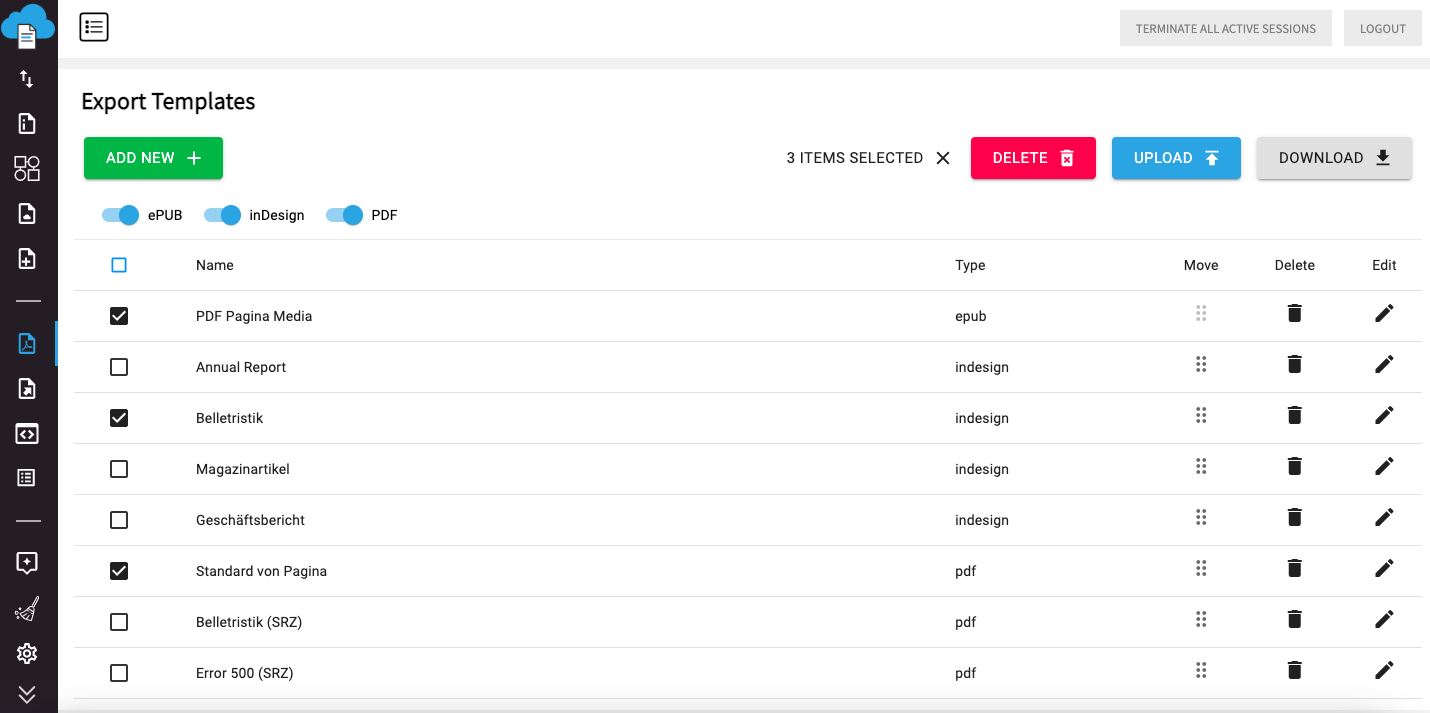
Selecting several templates
You can perform the following options with already existing export templates in the list:
●Edit;
●Delete;
●Move.
You can move templates to other places in the list, so that all templates will be placed in the alphabetical order.
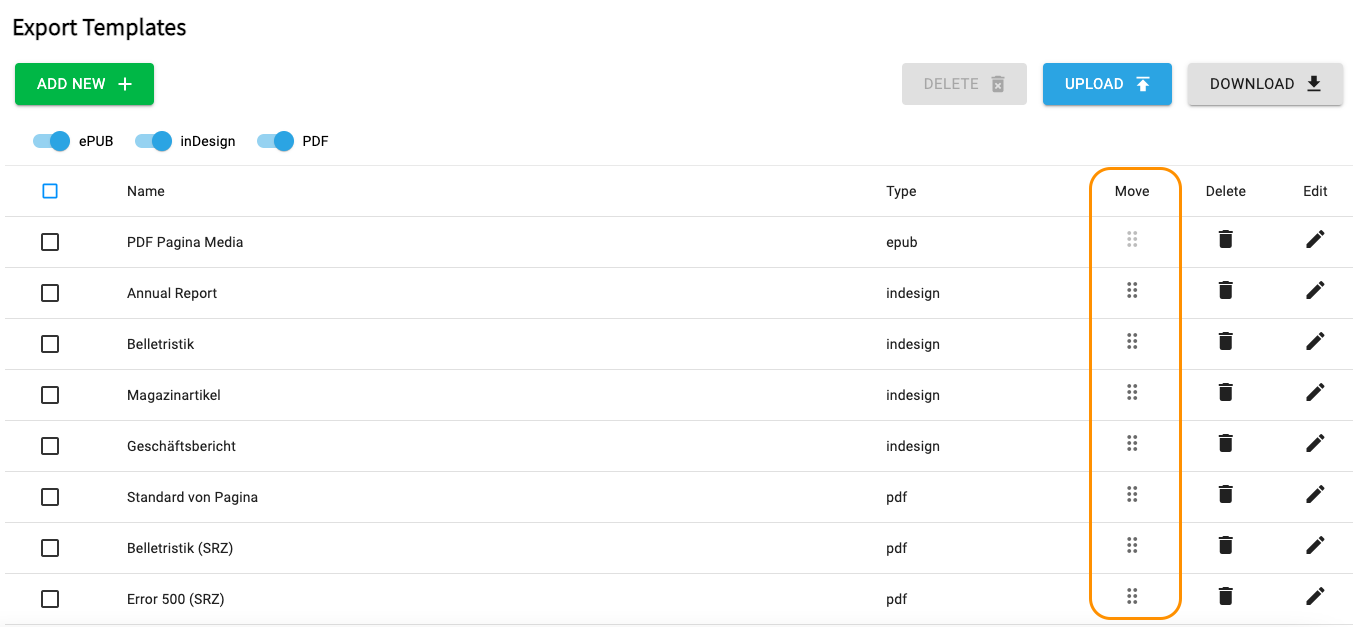
Buttons to move export templates
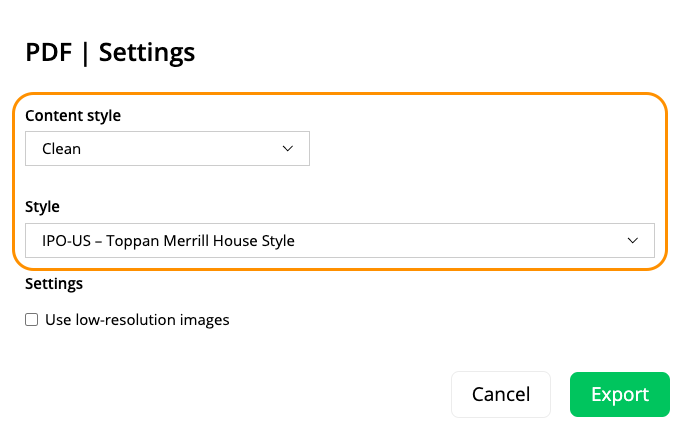
To create a new export template click ‘Add new’ and the dialog window appears, where you have to insert required information concerning the template you add.
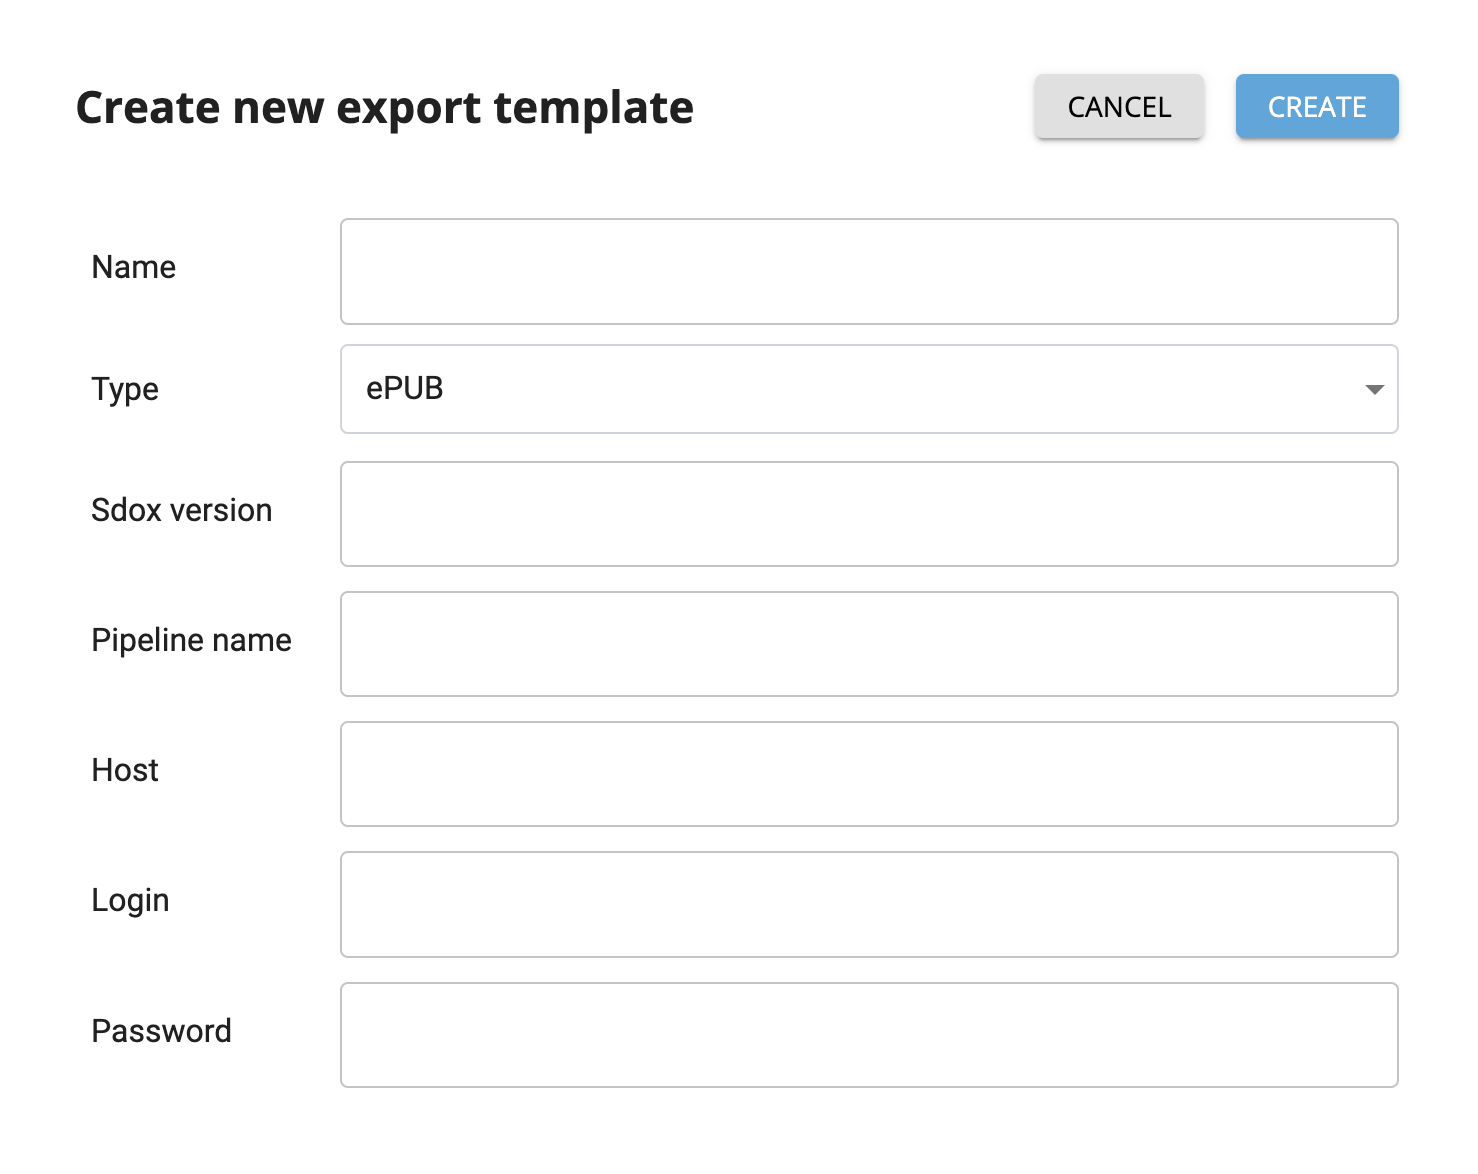
Inserting details about a new export template
Here you should insert such credentials, as name of the template, its type (PDF, ePUB or InDesign), pipeline name of the template, host, login and password. Field for version of your SMASHDOCs system is optional. You have to insert this information only if the version of your system is old and it works only with outdated templates.
Creating new export template
After you have inserted everything, click ‘Save’ and the template will appear in the list of templates.
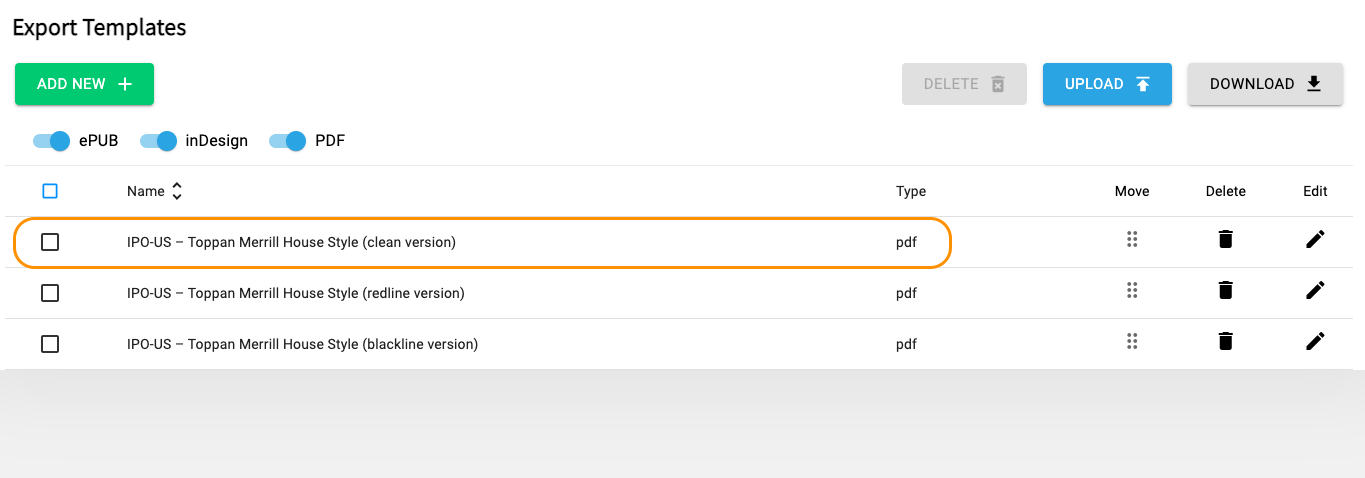
New export template highlighted
In the editor you will find all created export templates during the exporting a document in a corresponding format.
Created InDesign export templates displayed in the editor
Choose one and your exported document will have an outlook of a selected template.
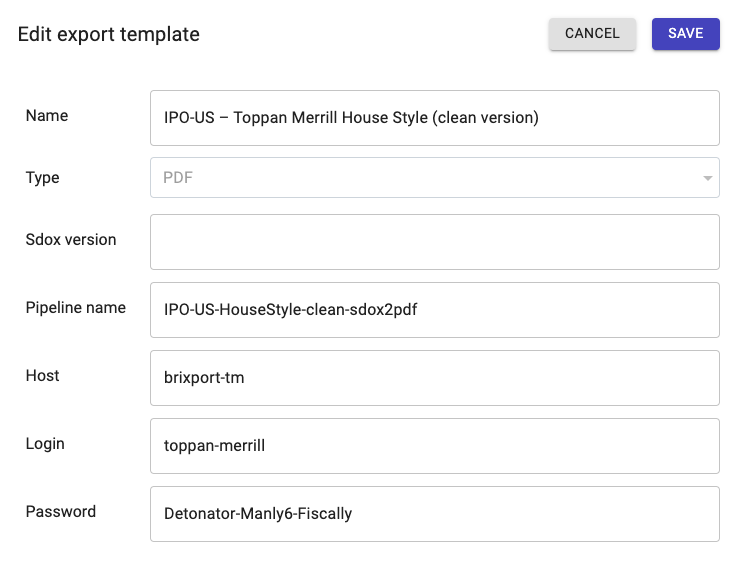
You can also edit or delete previously added templates, switch off any of three available templates, in case you do not need them to be shown in the list of templates.
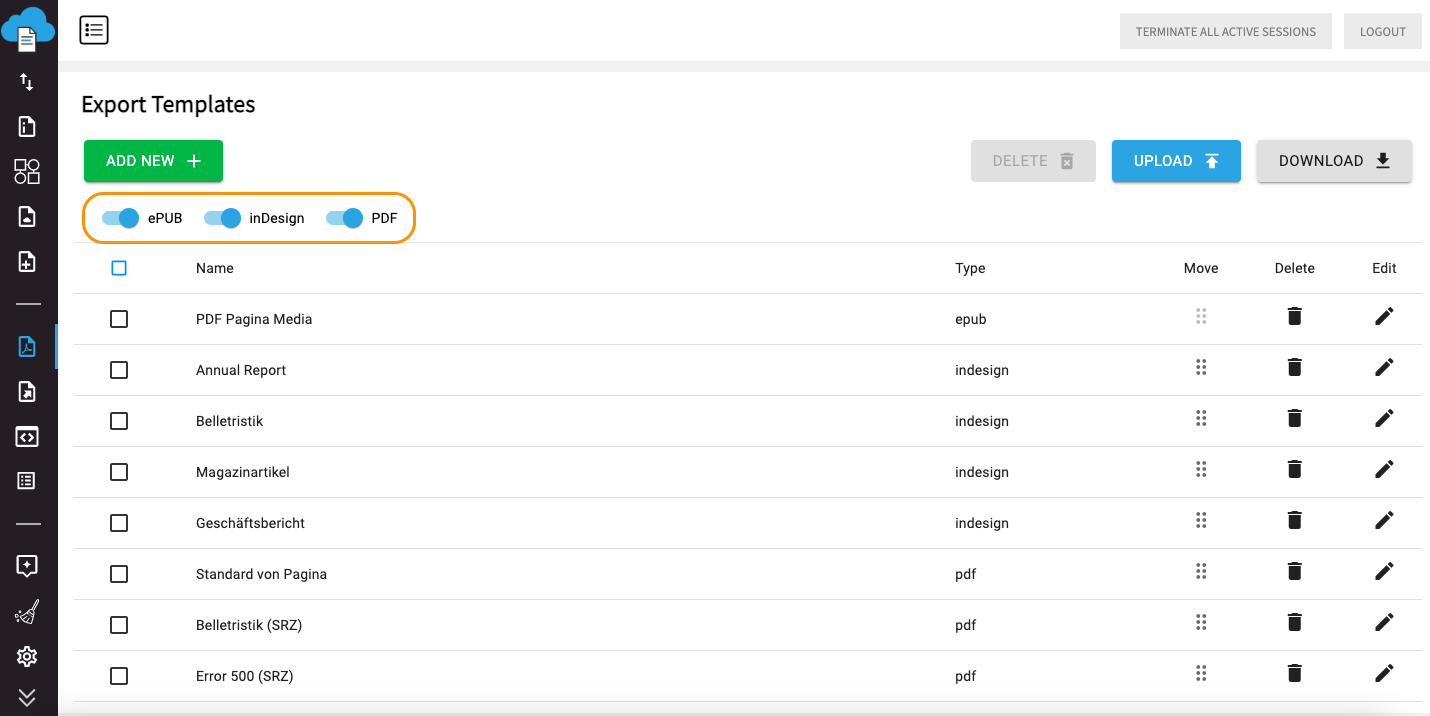
Switch on/off, edit and delete export templates
There is a special button clicking which you can sort template names in the alphabetical order and vice versa.
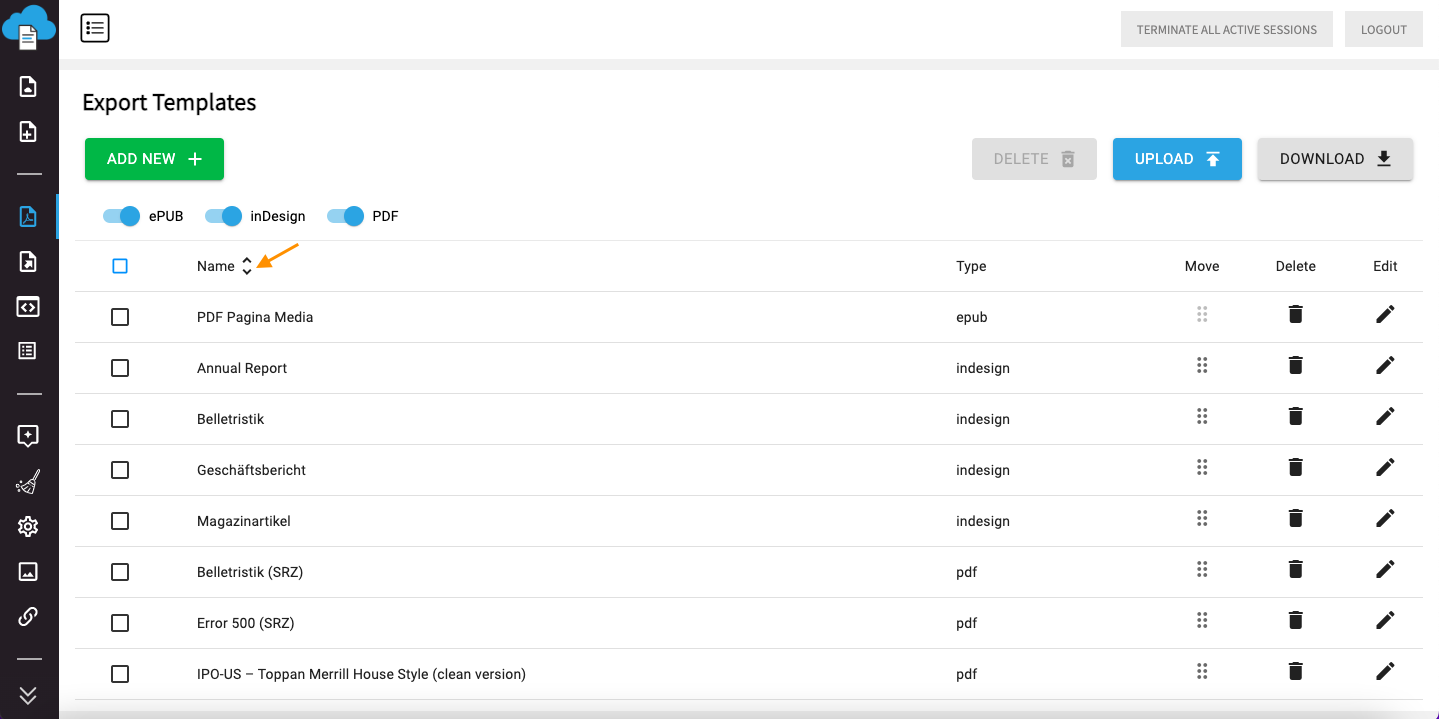
Button to sort export templates by names
The first click on the button will adjust the list of export templates in the alphabetical order. One more click will undo the logic of previously set order.
15Word Templates
By clicking the corresponding icon on the left toolbar you will open word templates settings, where you can create new word templates, in which you will be able to export your documents into MS Word format. Also, there you can edit already existing templates, duplicate, download and delete them.
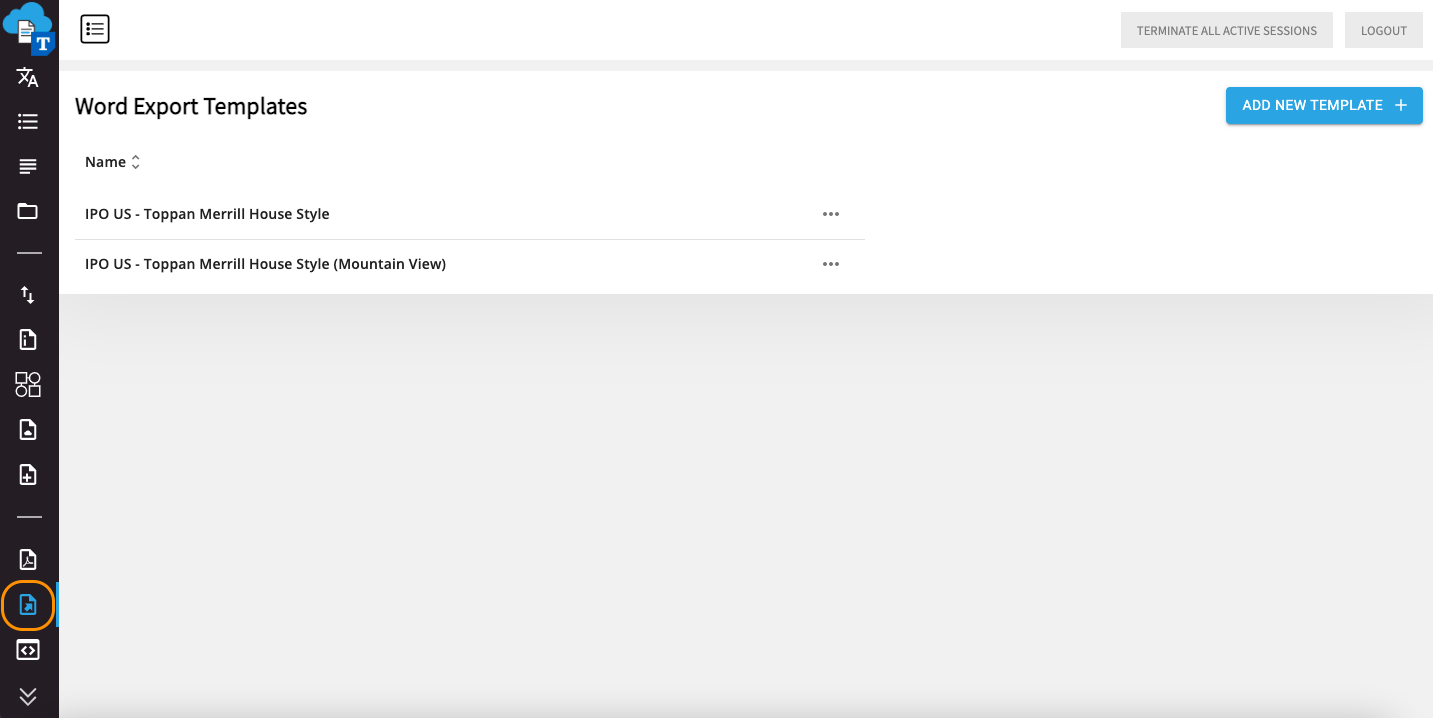
Icon for Word Templates settings is highlighted
In each Word template you must set styles which correspond to particular styles in the SMASHDOCs system. Apart from that, ten placeholders must be obligatory added to the Word file with a template for SMASHDOCs system to accept all styles from the template. The required templates look like this:
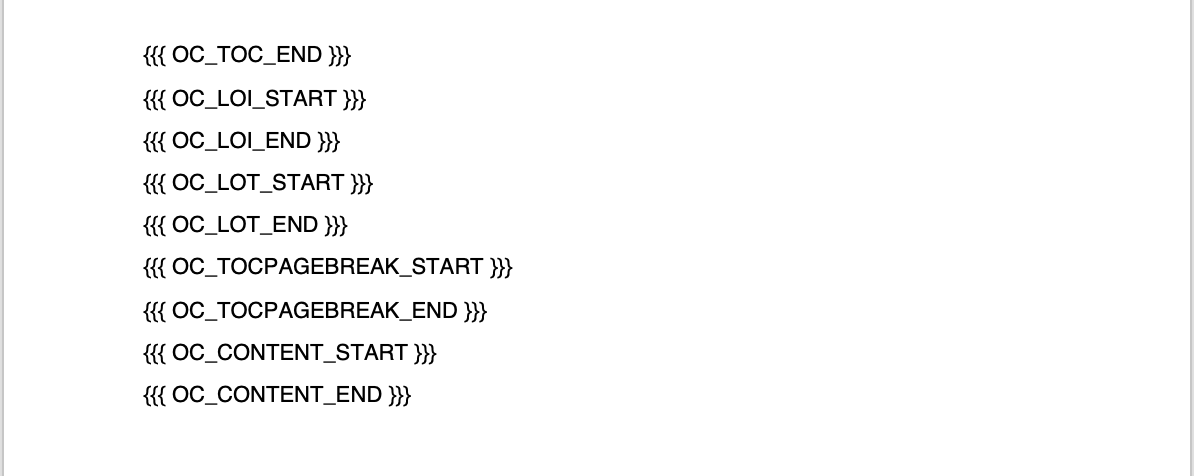
Ten placeholders to be added into Word template
After you have created the Word file with a template, proceed with new Word template creation in the Admin page by clicking a button "Add new template" in the right corner above the page (see Image 130). You will receive a modal window, where you have to upload your file in DOCX or DOCM format with an appropriate template by dragging and dropping or selecting a file from your device. Then insert template name.
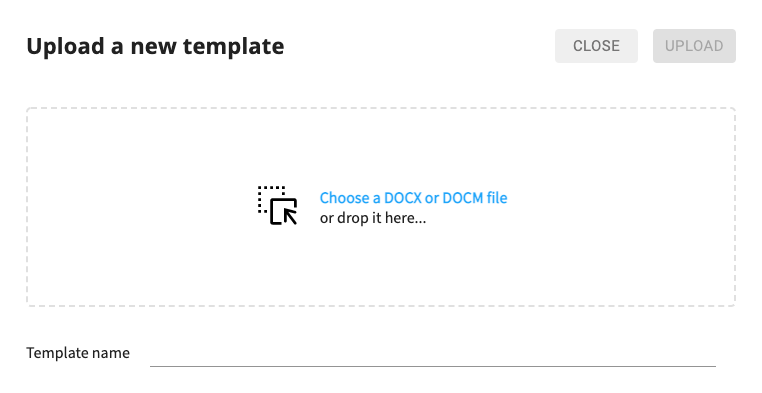
New Word template creation and template name is highlighted
Then click “Upload” and your Word template will be added to the list of templates.
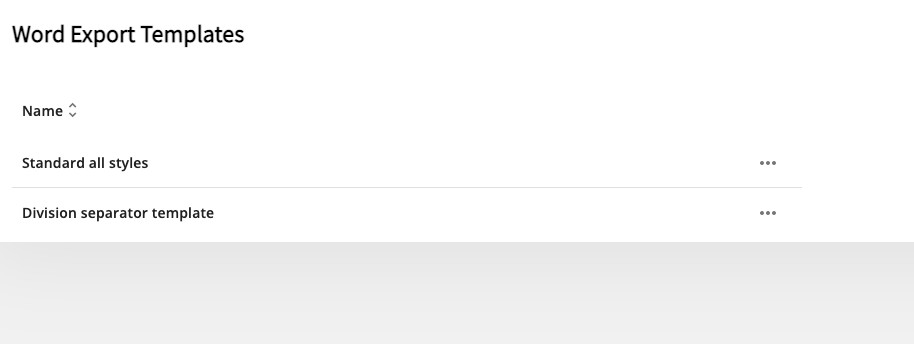
Added Word templates in the list
In front of each template there are three dots (see Image 133) under which additional options are hidden, that can be applied towards Word templates: edit, delete, download, replicate.
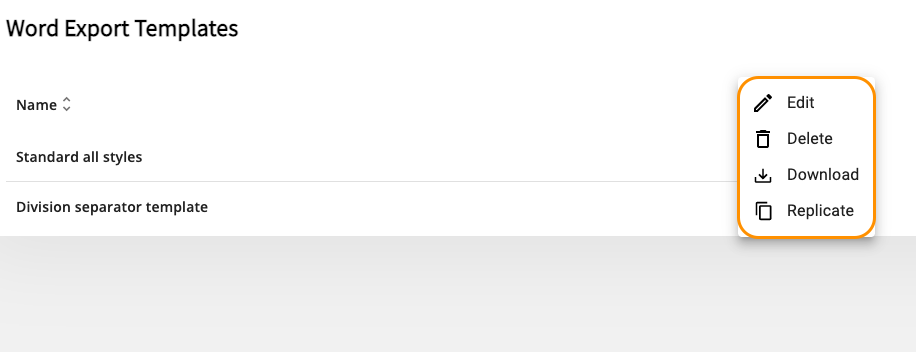
Additional options applicable to Word templates
Click "Edit" and the page for editing will open, that contains the following parts:
●Name;
●Paragraph styles;
●Inline styles;
●Link styles;
●Grid.
Page for editing templates
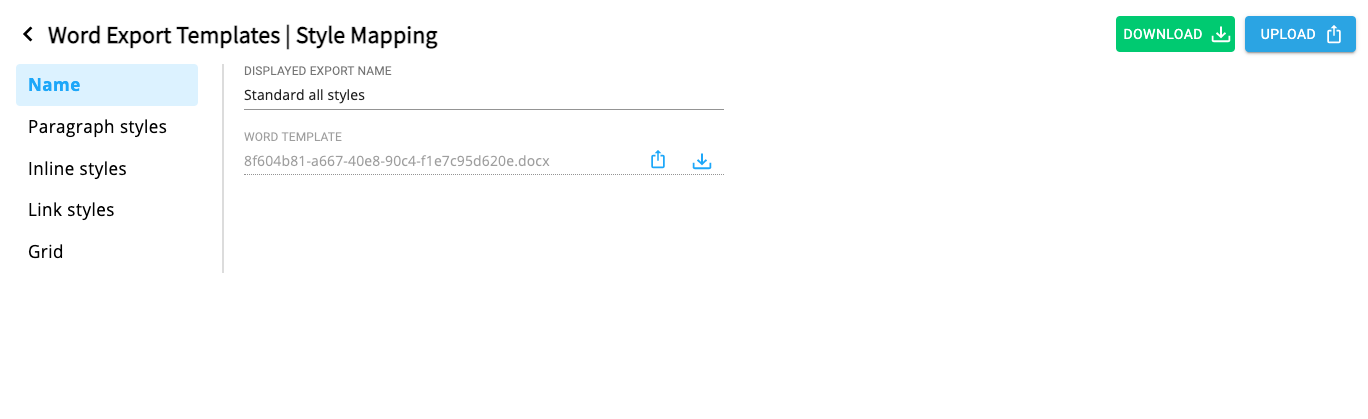
On this page you can find and edit the displayed export name and upload or download Word template in the tab "Name".
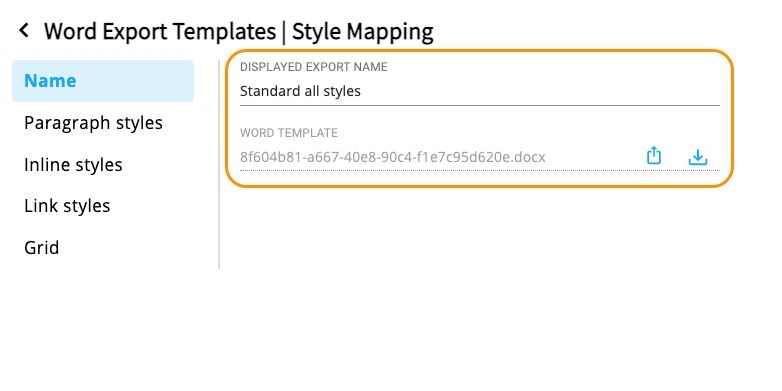
Displayed export name and buttons for uploading/downloading Word template
Uploading and downloading templates is also possible by clicking corresponding buttons in the upper right corner on the page (see Image 135).
In parts "Paragraph styles", "Inline styles" and "Link styles" SMASHDOCs styles are displayed that will be mapped during the export to corresponding styles in Word.
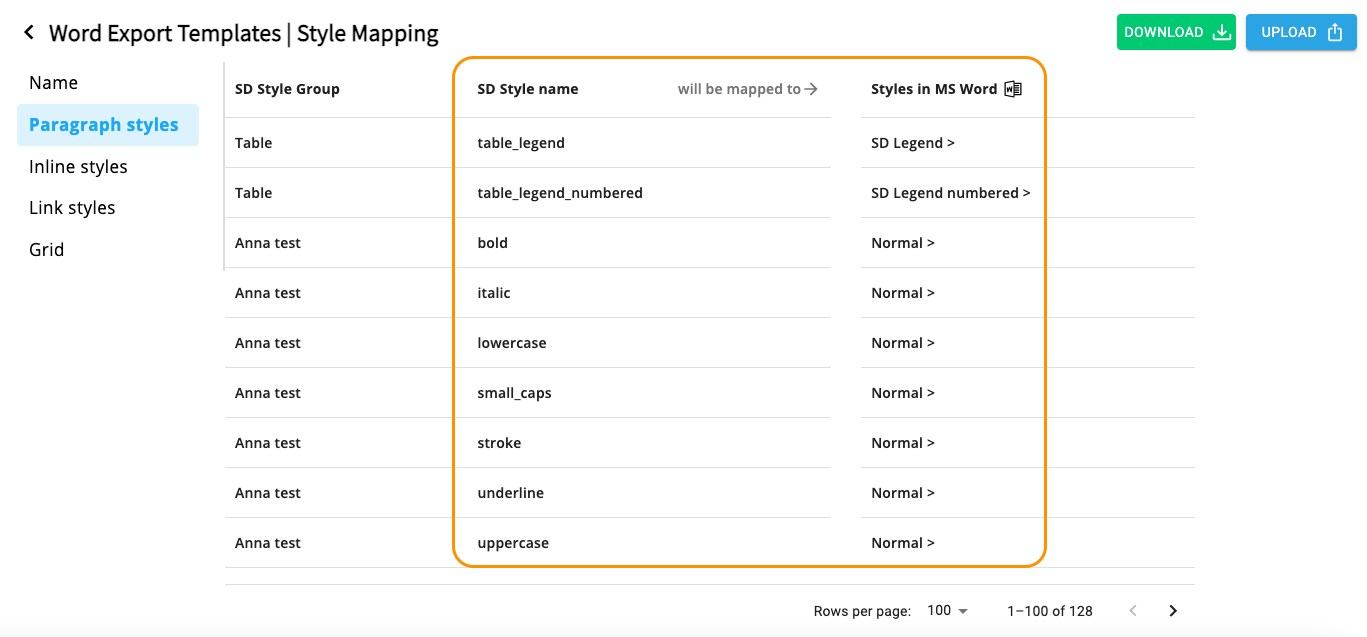
Process of mapping styles from SMASHDOCs to Word displayed
You can edit styles for Word mapping. For that click on a corresponding style in the column "Styles in MS Word" and the modal window appears where you'll have to search for a needed style and select it for changing.
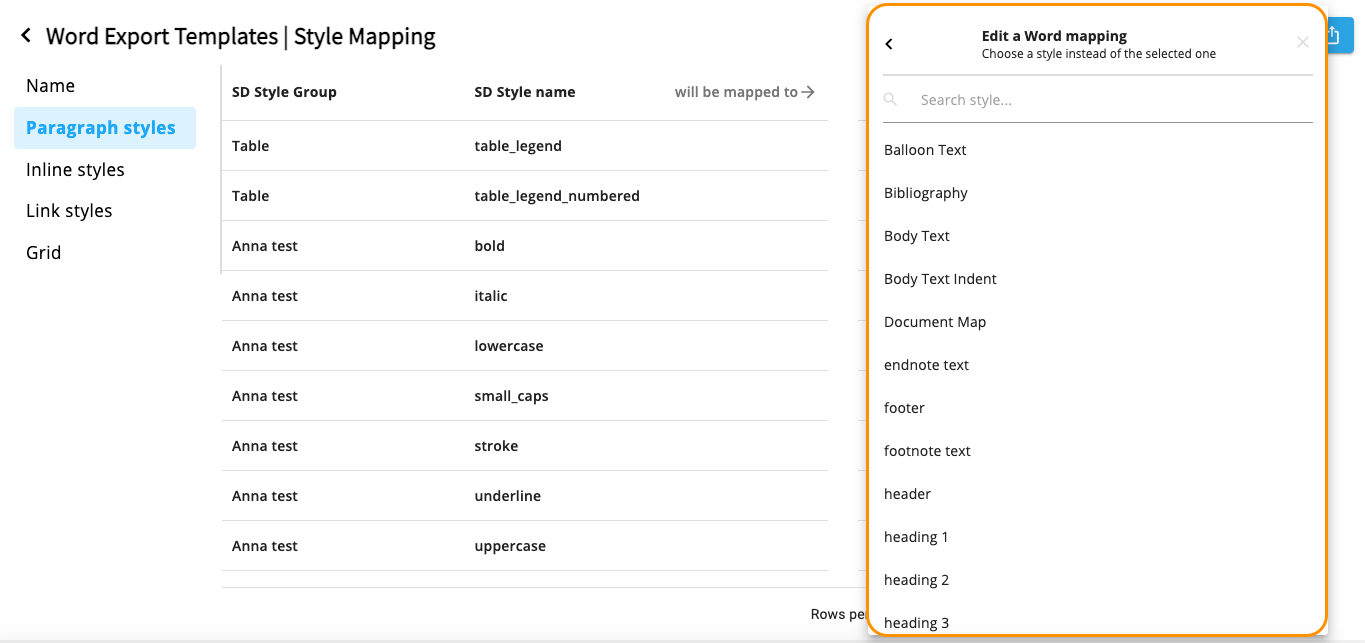
Dialog window for editing Word mapping
In case a Word style has not been selected, it will be marked in the list with a notification.
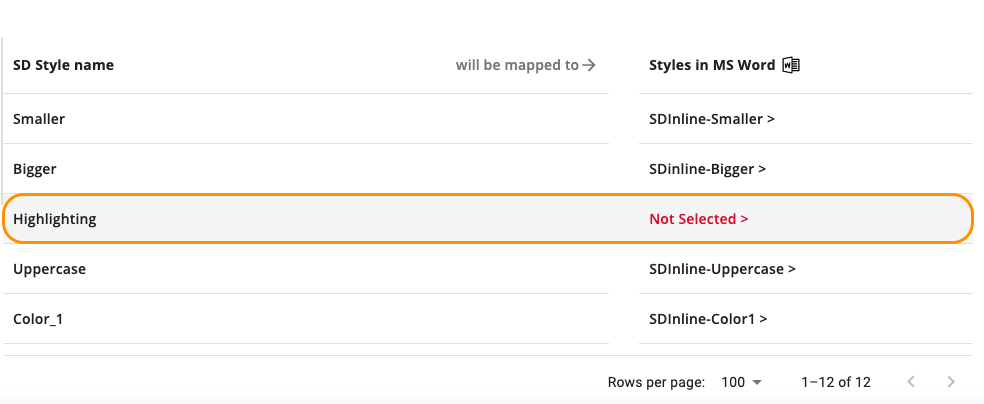
Not selected Word style
Below the list of styles there are buttons displayed by clicking which the page will turn to the next portion of styles.
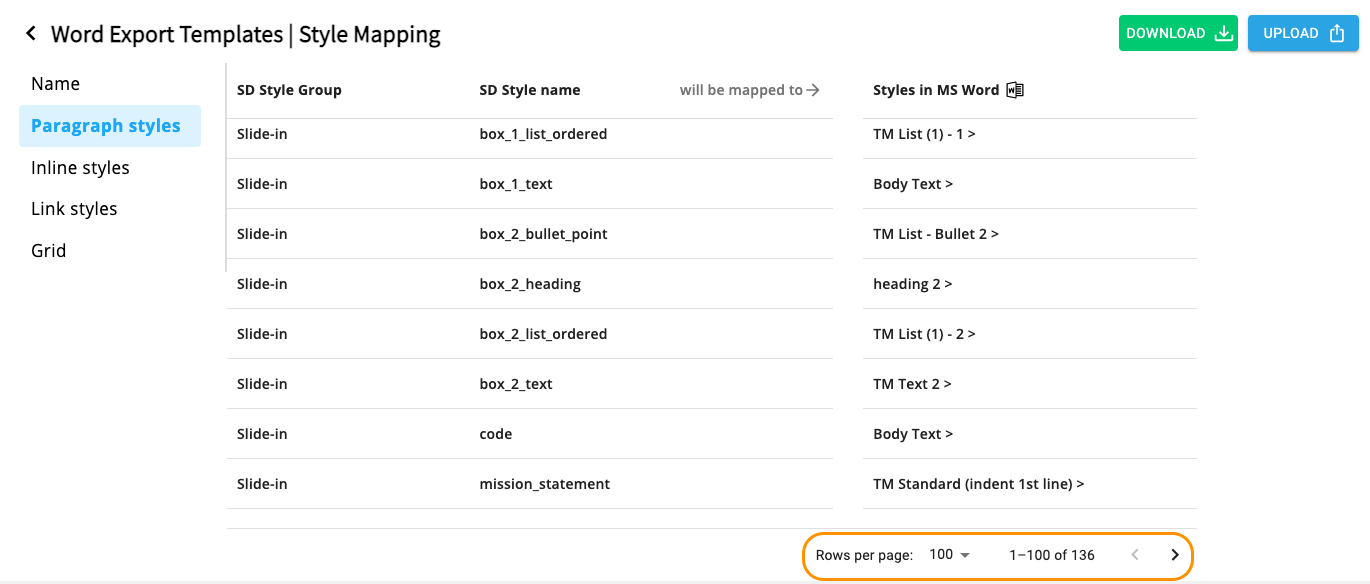
Arrow buttons to turn the page with styles
You can also edit grid levels manually. For that select a level and insert the required number there.
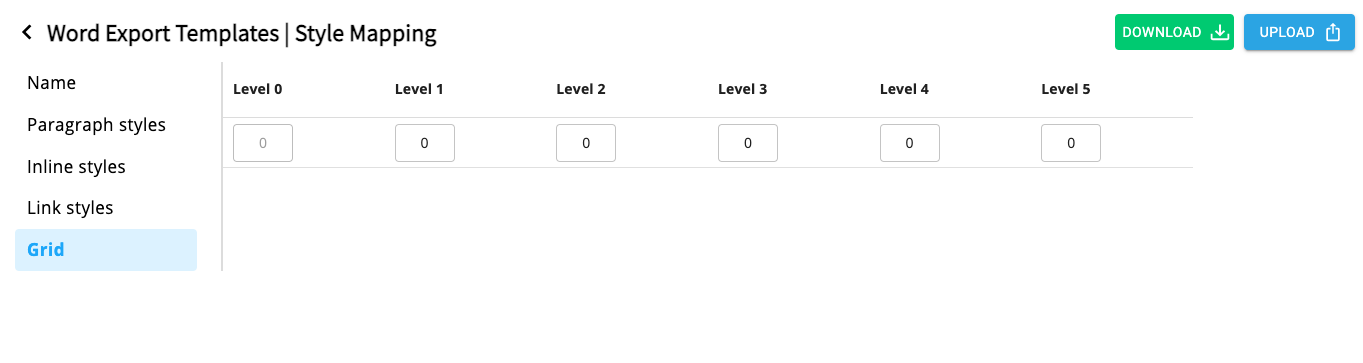
Grid settings
Note: you cannot leave those fields empty, the minimal number that can be inserted is 0.
The list of templates can be sorted by template names with a click on corresponding arrow buttons.
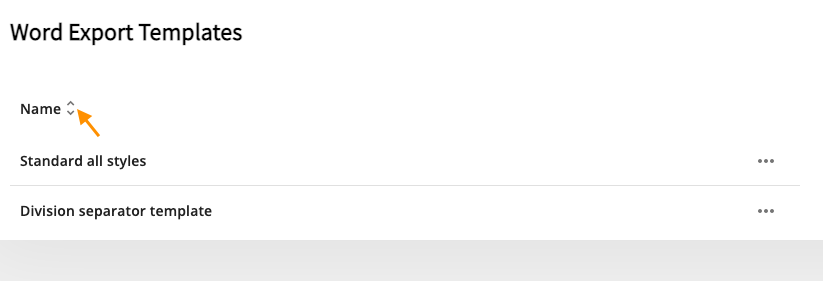
Buttons to sort the list by template names
To check whether the new template has been added to the SMASHDOCs system, go to your SMASHDOCs account on this system, open a document and choose the function “Export” in MS Word format. Then you will get a dialog where you can choose required template and there will be the newly created template.

The added template is highlighted
16ParsX Mapping
The ability to export documents as Pars XML file is a separate component, which is not included in the standard set of exporting procedures. To get this function you should contact our SMASHDOCs administration and after we enable it on your SMASHDOCs system, you will be able to upload ParsX mapping file in .xml format only to the Admin page.
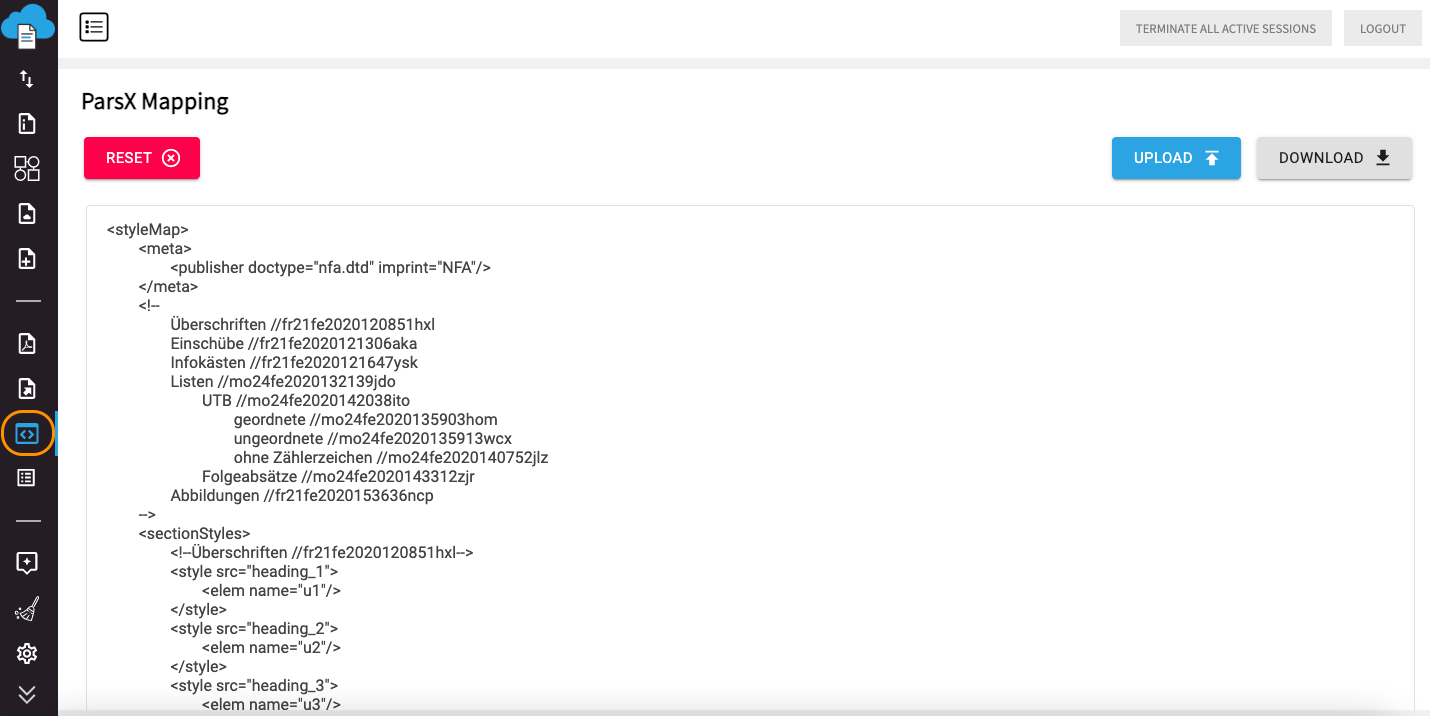
ParsX Mapping settings
After you upload the file, go to features settings, find a section “Export” and switch on the function “Pagina - XML”. After that you will be able to export documents from SMASHDOCs as Pars XML files with determinate mapping.
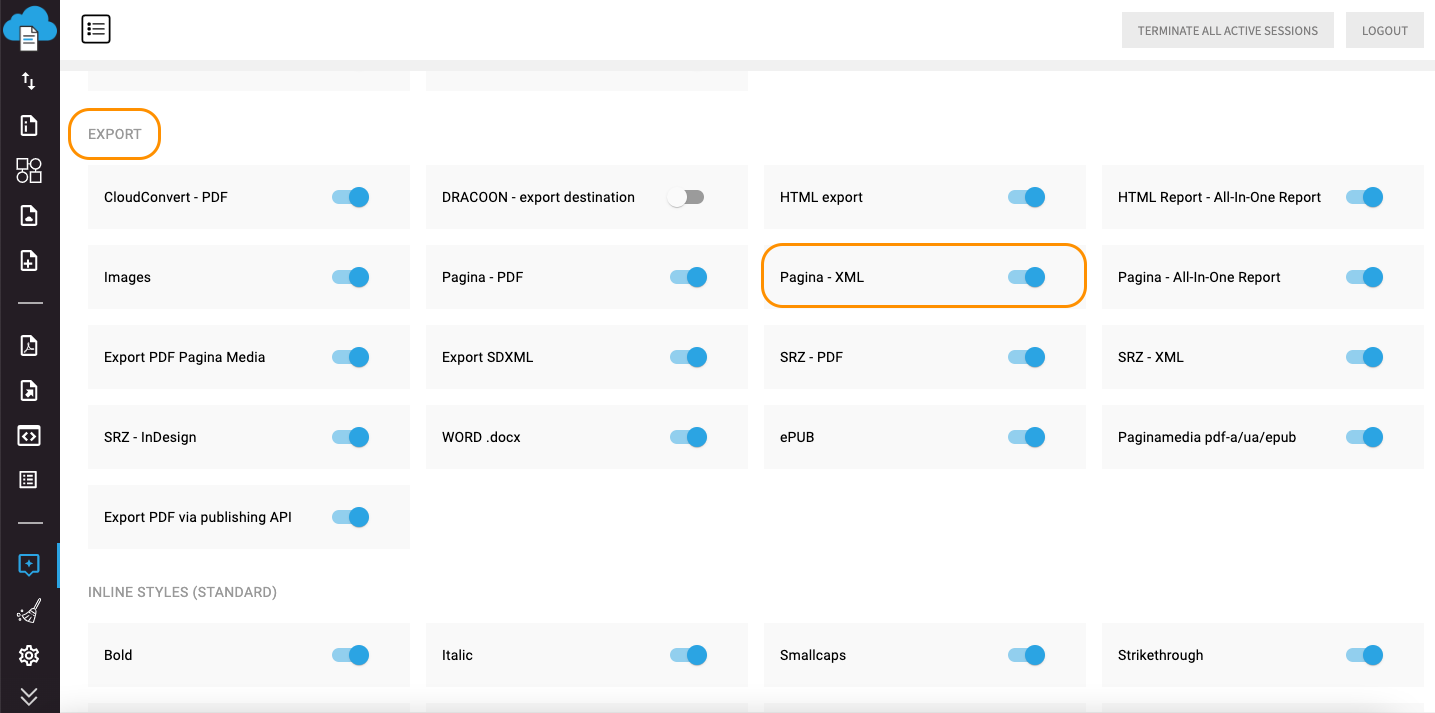
The function "Pagina - XML" in features settings is highlighted
You can also download uploaded files with set mapping in .xml format and delete mapping with the button ‘Reset’ (see Image 144). To add new mapping, you should upload an .xml file to the Admin page again.
17Hyphenation Dictionary
In settings under the tab "Hyphenation Dictionary" you can upload a file with a list of words, for which particular rules of division into syllables is applied. It is useful for correct display of the text after exporting documents. However, these settings are available for export in PDF (SRZ) format only.
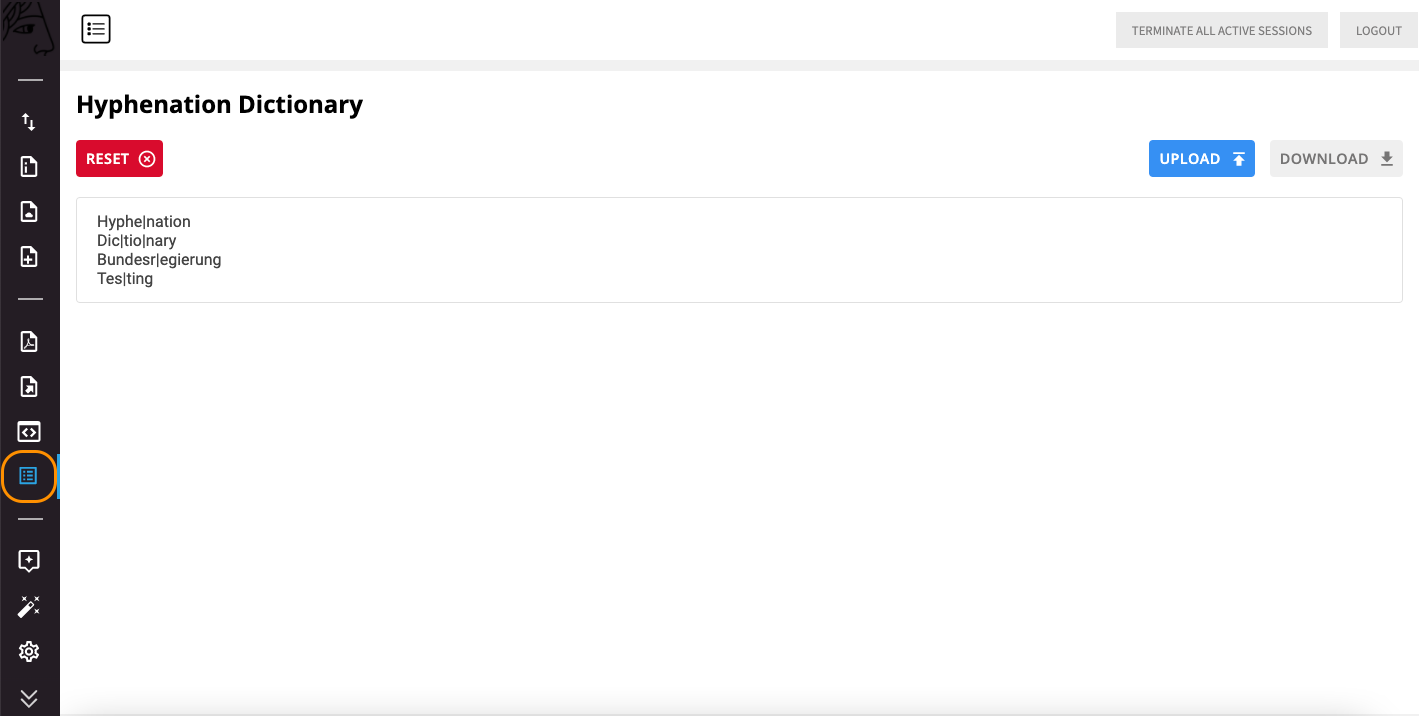
The tab "Hyphenation Dictionary" highlighted
Having opened the tab "Hyphenation Dictionary", you can see three buttons - "Upload", "Download" and "Reset". To upload the file with the list of words you should click the button "Upload". You can upload files only in TXT-format by selecting from the device or by drag&drop.
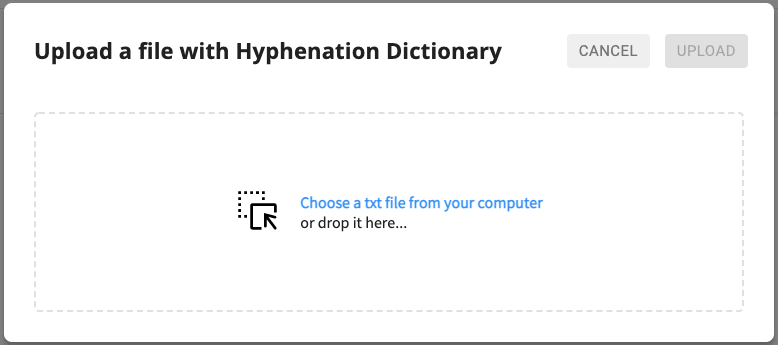
Uploading a TXT-file with hyphenation dictionary
In case there are duplicate words in the file, regardless of the position of the separator, an error "Multiple entries found for: (the first example of a duplicate)" will be displayed and such a file will be impossible to upload.
After the file has been successfully uploaded, the list of words will appear in the tab and each word will be displayed as divided into syllables with a straight line (see Image 146), which determines the options for transferring words to a new line in the exported document.
The button "Download" allows to get a JSON-file with the existing hyphenation dictionary in AdminUI. Once you click the button "Reset", hyphenation dictionary will be removed from the Admin page.
18Division separators
Under the tab "Division separators" there are certain options with the help of which you can configure division separators in your system.
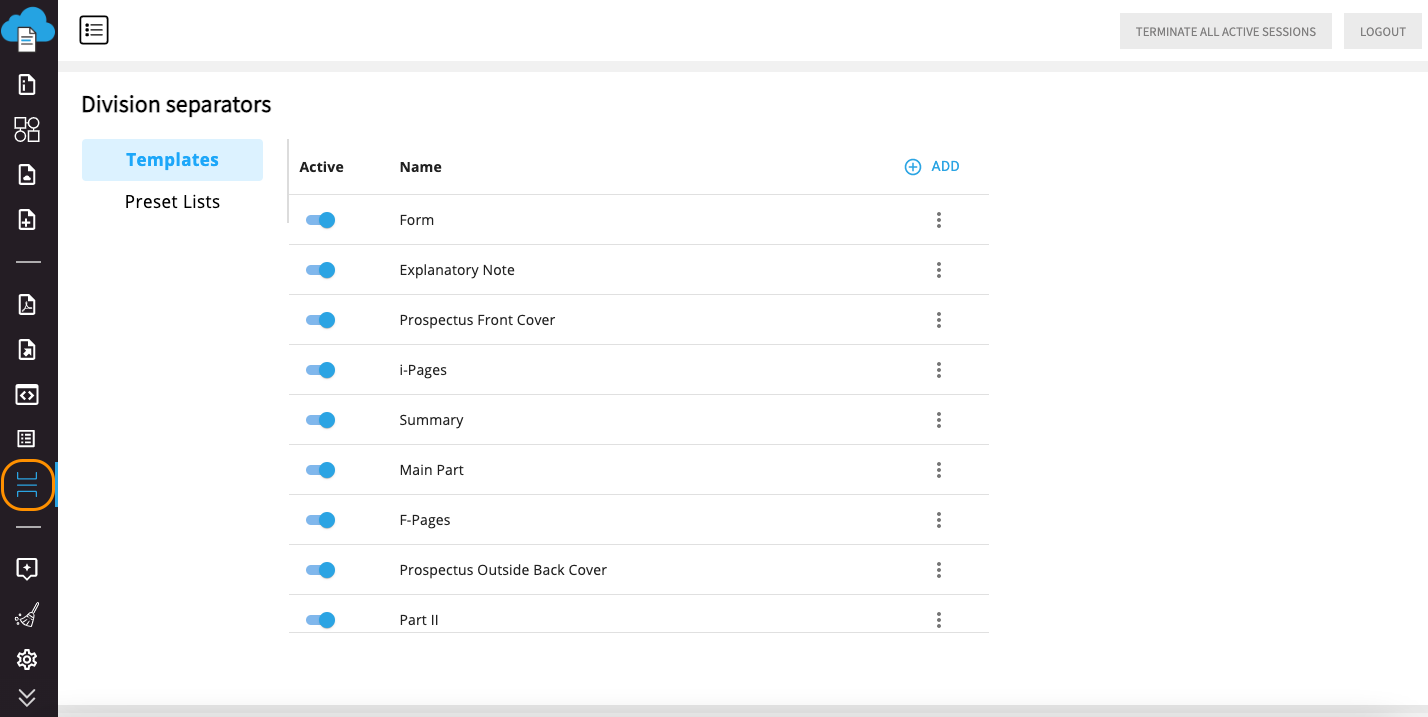
Tab "Division separators"
There are two parts of the division separators configuration process:
●Setting templates;
●Setting preset lists.
In the tab "Templates" there are different toggles that can be activated/deactivated depending on the requirements, which division separators should be available in the system. Thus, in case you need a division separator from the suggested points in the list, activate the toggle in front of it. If you do not need this separator - deactivate the toggle.
If you need to create a new template for division separators to the list, click the button "Add" on the right side of the list.
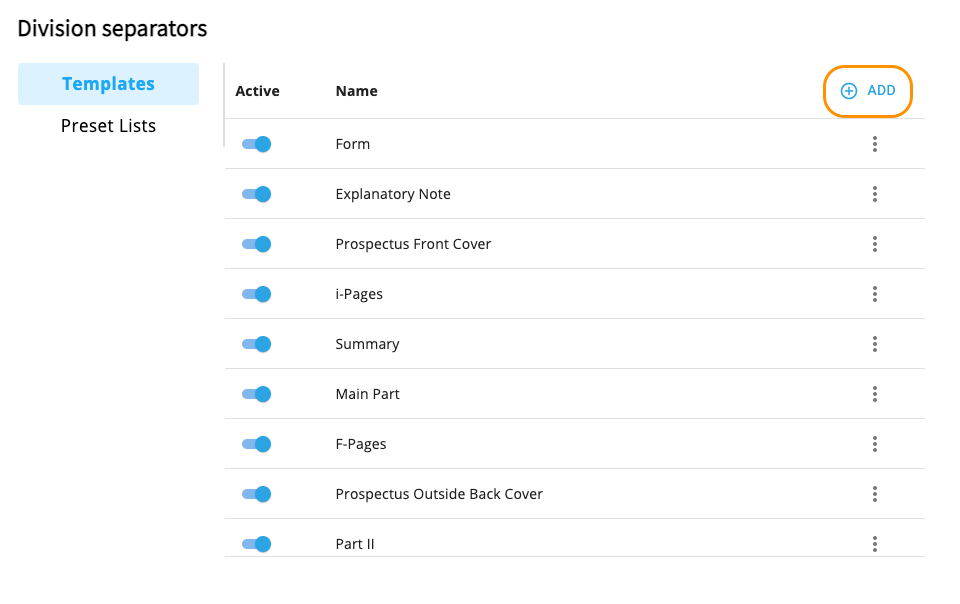
Button "Add" to create a new template for division separators
Then a dialog window appears where you have to configure the required properties of the created division separator. Like while creating individual division separator in the editor, the mentioned properties are the following:
●Name;
●ID;
●Toggle "Active" - if switched on, this separator will appear among the suggested points in preset list;
●Setting page numbering:
●Prefix;
●Format;
●Suffix;
●Selection "Restart or continue numbering";
●Alignment.
Also, you'll get the preview of the configured page numbering on the right side of a dialog.
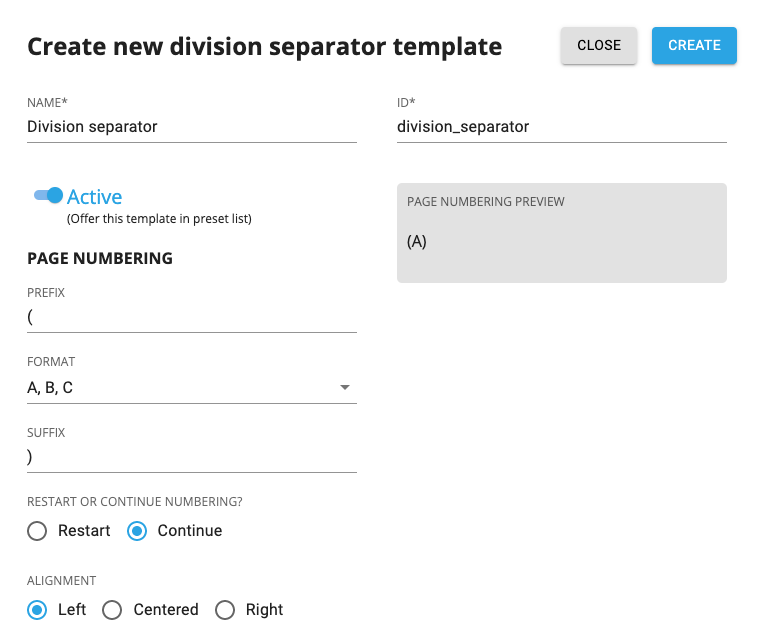
Modal dialog to create new division separator template
In the field "ID" you should duplicate the template name that has been inserted in the field "Name", but the input there is allowed only with small letters, capital letters, numbers and underscore; underscore symbol must be inserted after each word.
As soon as all properties are set, click "Create" in the upper right corner and the division separator template will appear in the list and become available in the editor, during adding division separators to the document. To interrupt the creation process, click "Close" (see Image 150).
You can also edit and delete existing division separator templates in the list. To edit a template click on three dots and select "Edit".
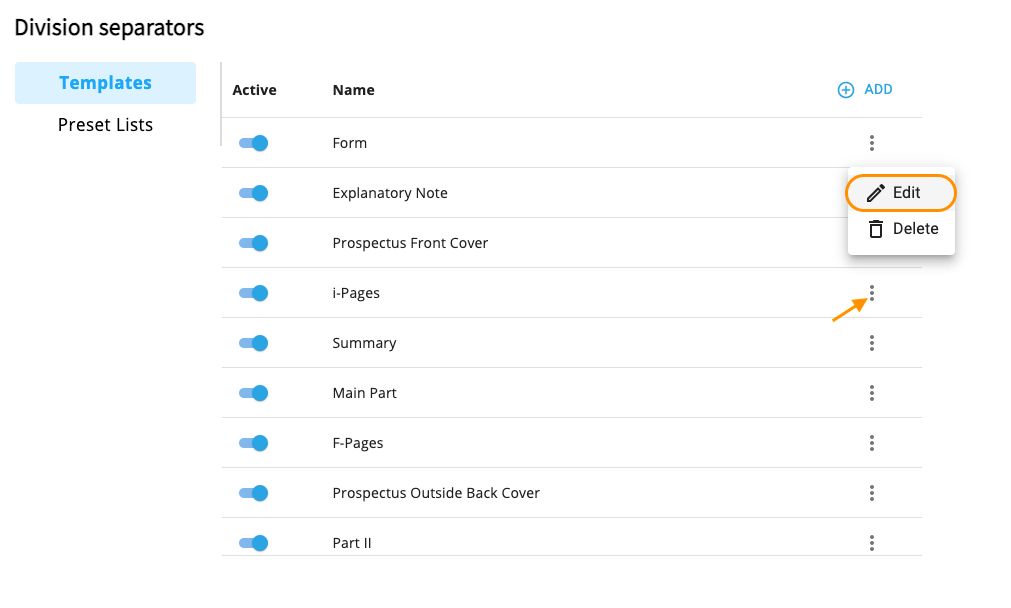
Option to edit division separator templates
After making changes in settings, don't forget to click "Save".
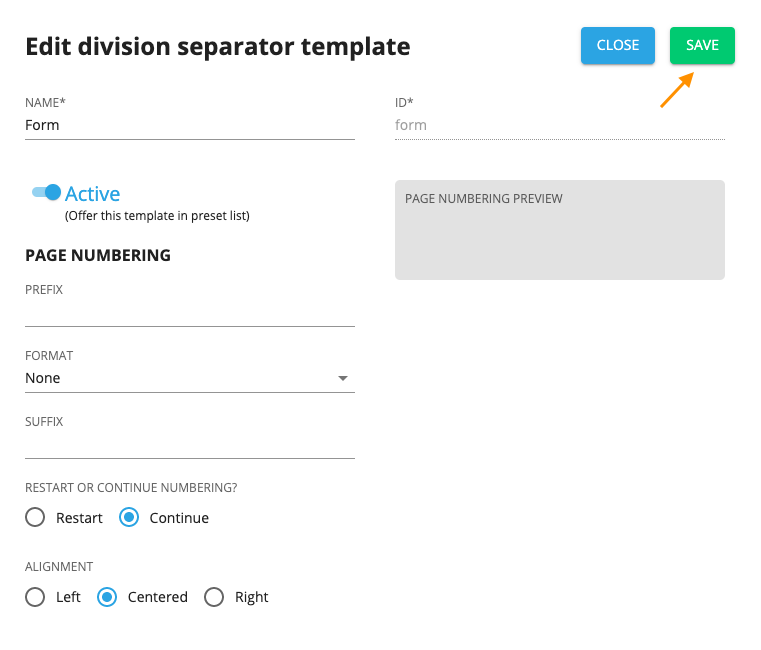
Saving changes while editing a division separator template
To remove a division separator template click three dots in front of a required template and select "Delete" there.
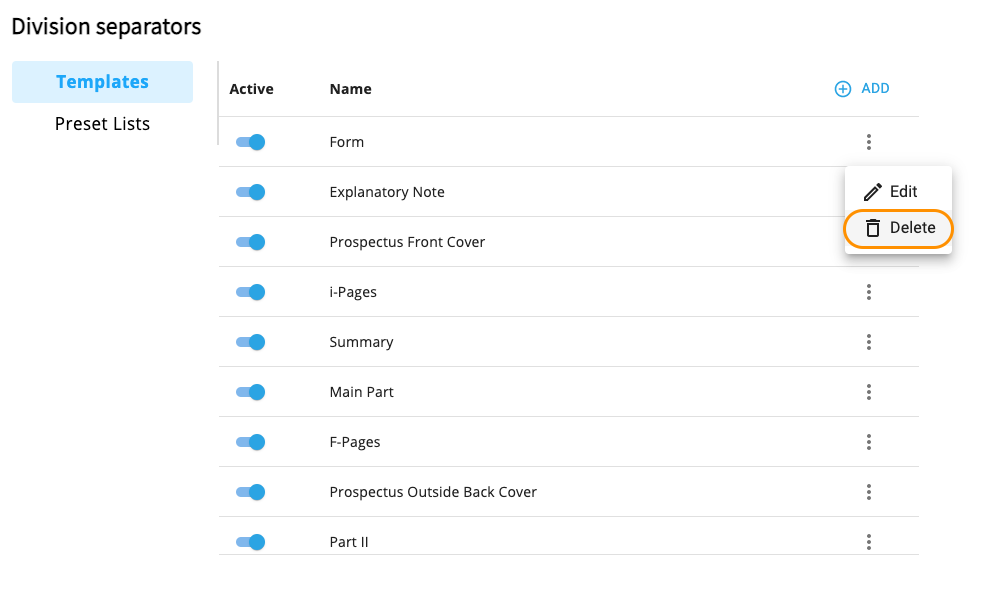
Option to delete a template
In the tab "Preset lists" you can activate/deactivate toggles in front of suggested preset lists. You can also add new preset lists and edit already existing ones.
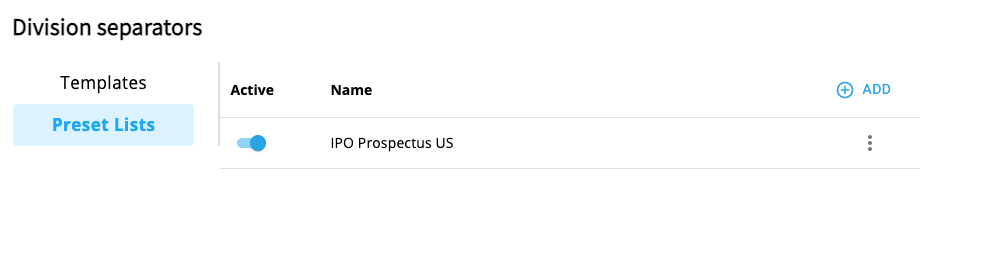
Tab "Preset lists"
To create a new preset list, click "Add" on the right side of the page.
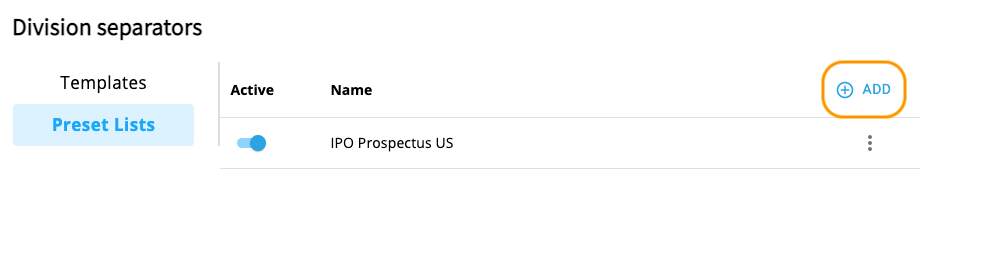
Option to add new preset list
In the opened modal dialog afterwards you should perform the following actions:
●insert name and ID of a preset list;
●define whether the preset list should be active;
●drag and drop to the column "Preset list" division separators from the field "Templates in the system", for these division separator templates to appear under the created preset list in the editor. Note: this action is optional, you can also leave the column "Preset list" empty.
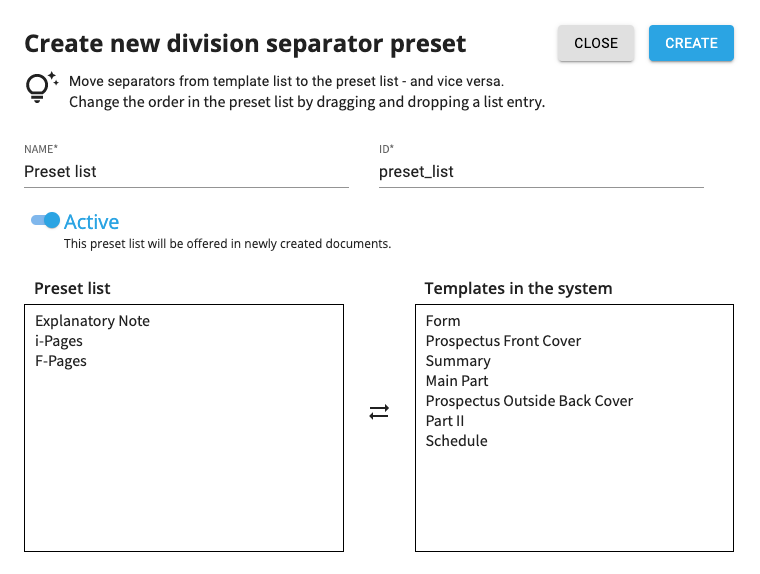
Field for creating new division separator preset
Click "Create" to save settings and complete the creation process, click "Close" to discard the process.
To edit existing preset lists, click on three dots and choose "Edit".
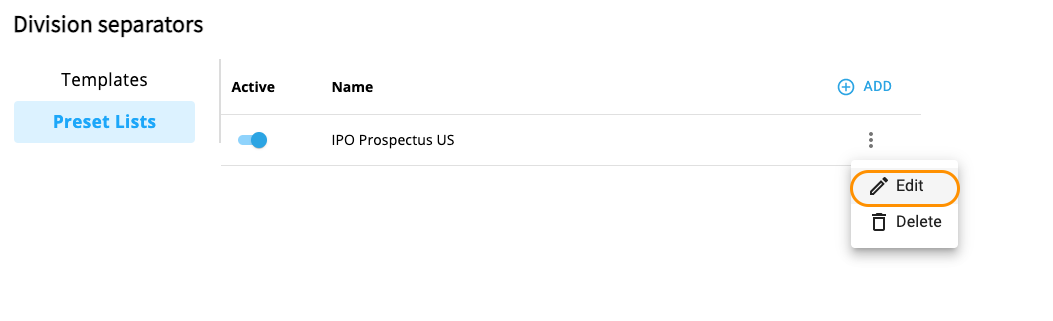
Option to edit preset lists
In case you need to remove a preset list, in the opened dropdown select the option "Delete".
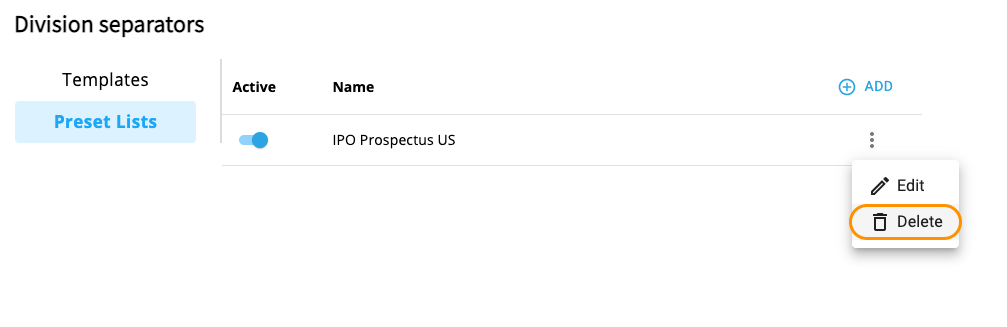
The option to delete preset lists
NB: it is impossible to delete division separator template that has already been added to a preset list. Also, it is impossible to delete a preset list that is already used in a document. In this case you can just deactivate templates and preset lists by switching off respective toggles.
All configured preset lists and division separators you can find then in the editor while adding a division separator in the document.
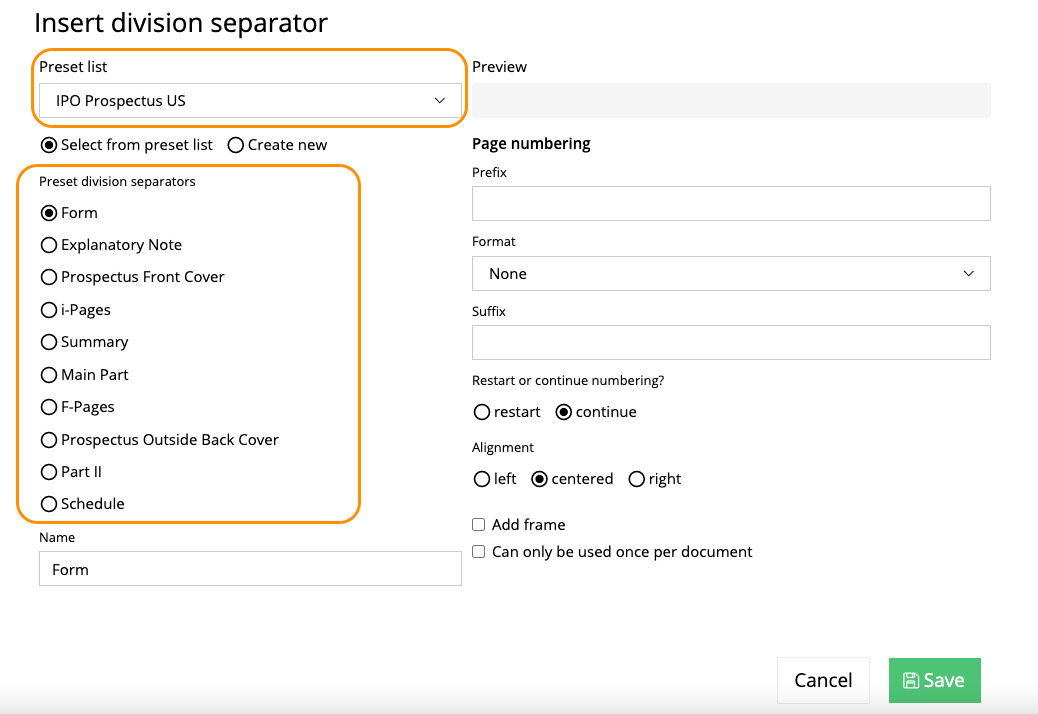
Division separators and preset lists in the editor
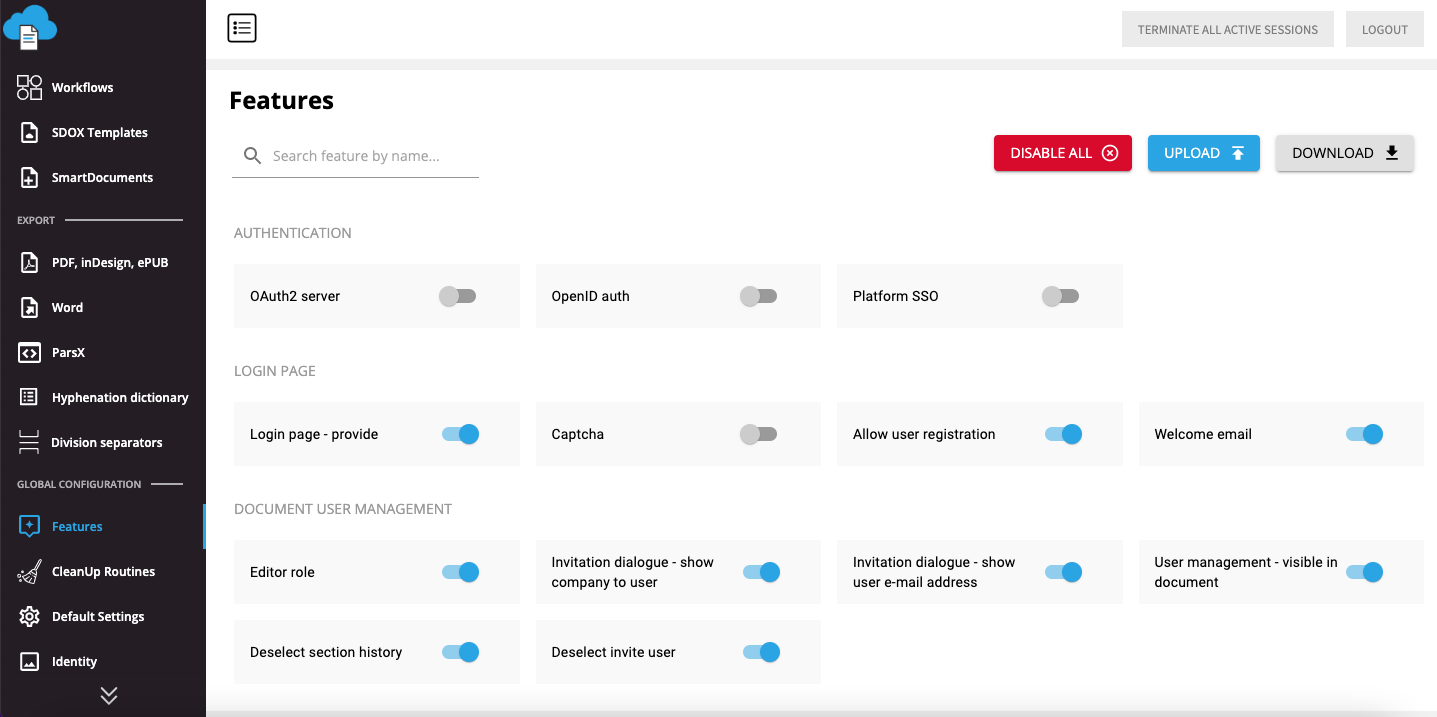
19Features
All features are combined into thematically logical groups, so it is quite simple to turn on or off the needed functionality for the particular system. The feature-groups include:
AUTHENTIFICATION
●OAuth2 server - for Smartgroups integration
●OpenID auth - for Microsoft Teams integration, possibility to enter SMASHDOCs system with MS login credentials
●Platform SSO
LOGIN PAGE
●Login page - provide - for MS Teams integration - if you turn it off, you will not see the default form for email and password in the login page
●Captcha - computer test for user identify
●Allow user registration - possibility to create account in the system
●Welcome email - welcome letter that you receive after registration in the system
DOCUMENT USER MANAGEMENT
●Editor role - to active/deactivate Suggest role in the document
●Invitation dialogue - show company to user - to show company name to a user while inviting them to a document
●Invitationdialogue - show user e-mail address - to show email address to users while inviting them to a document
●User management - visible in document - to activate/deactivate user management
●Deselect section history - to deactivate history of components
●Deselect invite user - to deactivate the option to invite users to documents
DOCUMENT CREATION
●Allow document creation for external users - to allow/forbid external users to create a document. If the feature is deactivated, external user will not see a “Plus"-icon in the document list, so it will be impossible for this user to create documents.
●Control ability to duplicate a document per user - to activate/deactivate rights for making duplicates of documents
●Import - MS Word. docx - to activate/deactivate possibility to import documents from MS Word .docx
●Create new blank document - possibility to create a new document in SMASHDOCs system
●Import - MS Word .docx + recognize transkript - during Word-import there is the functionality that recognises “Transcript” style (when the font “Courier New” in Word is applied). If this feature is deactivated, the font “Courier new” will not be recognized, thus will be transformed to the default font in the system.
●Import - SDOX - to activate/deactivate possibility to import SDOX file
●Create document from SDOX template - possibility to work with SDOX template
●Magic import - possibility to import Word document with automatic numbering recognition
●Magic import IPO - if activated, the import option "Magic Word Import for US IPO Prospectuses" is available in the editor
●Convert captions weblinks href to simple text - if activated, weblinks in image and table captions during Word import is converted to simple text
EDITOR IN GENERAL
●Component link - to copy component link in the document
●Inline styles - navigation - to activate/deactivate navigation through inline styles
●Document metadata - edit - to activate/deactivate possibility to edit document metadata
●Move segments - to move component to another place
●Allow share to review - when feature is disabled, the buttons “Share” and “Track changes” are not displayed in a draft document.
EDITOR TABLES
●Table column sorting - sorting сells in the column according to the alphabetic order
●Table width = 100% only - the view of the table, all tables will be 100%
●Excel 365 connected tables - if activated, users have opportunity to set the connection of Excel with SMASHDOCs and then add an Excel table to the editor
●SpreadJS formula tables - enables the option to add data table in the document
●Excel roundtrip per table - enables exporting one financial table as an Excel file
●Excel roundtrip for all tables - enables exporting all financial tables in the document as the Excel file
●Layout table - if this toggle is off and "SpreadJS formula tables" toggle is on, all tables are opened in SpreadJS editor
EDITOR TOP TOOLBAR
●Alignment - possibility to do another alignment for a style, different from PD
●Indent outdent - possibility to move tables, images, styles etc.
EXPORT
Possibility to export documents in the following formats:
●CloudConvert - PDF
●HTML export
●HTML Report - All-In-One Report
●Images
●Pagina - XML
●Export PDF Pagina Media
●Export SDXML
●SRZ - PDF
●SRZ - XML
●SRZ - InDesign
●WORD .docx
●EPUB
●Paginamedia PDF-/A/UA/EPUB
●Export PDF via publishing API
INLINE STYLES (STANDARD)
Activate/deactivate standard inline styles:
●Bold
●Italic
●Smallcaps
●Strikethrough
●Underlined
●Subscript
●Superscript
●Transcript
MODULES & INLINE OBJECTS
●Announcement - possibility to make an announcement in the document
●Bibliography - feature for literature management, when you can add references to different literature sources
●Document comparison - this feature is used for making a comparison of two and more documents
●Dashboard homepage - planning due dates for working with documents
●Equations - to activate/deactivate possibility to create a formula
●Index - to activate/deactivate possibility to make an index
●Inline files - to create an inline file
●Inline images - to create an inline image
●Inline checkbox - possibility to use a checkbox in the document
●Projects - to merge documents in one
●Roundtrip - to merge documents during comparison
●Side notes - to make a sidenote
●Signaturit - possibility to sign the document
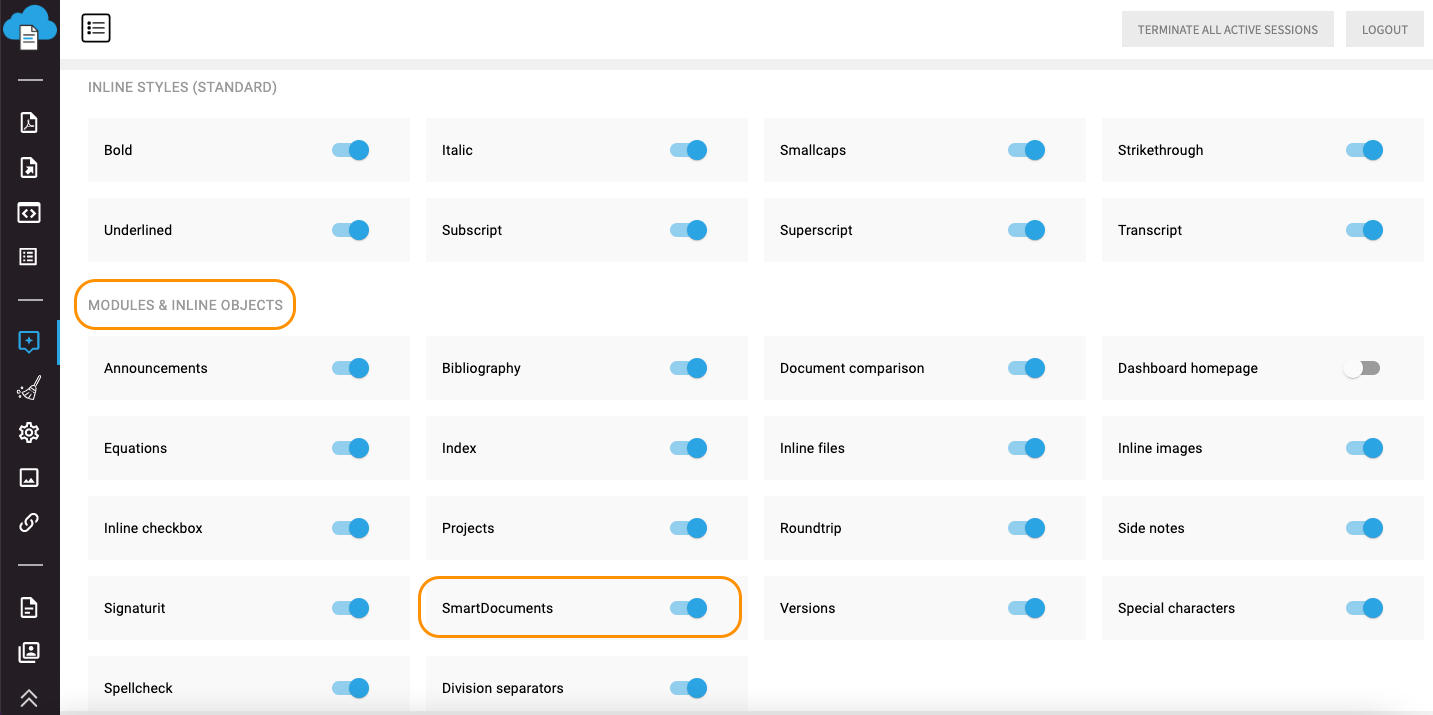
●SmartDocuments - to activate/deactivate creating an interview
●Versions - possibility to create a version and then to make a comparison
●Special characters - to activate/deactivate special characters in the system (note: special characters must be configured in the other tab - Special Characters)
●Spellcheck - to activate/deactivate spellchecker
●Division separators - to activate/deactivate the option to insert division separators in a document
SYSTEM LIMITATIONS
●Users per doc limit - limitation on the amount of users in a single document
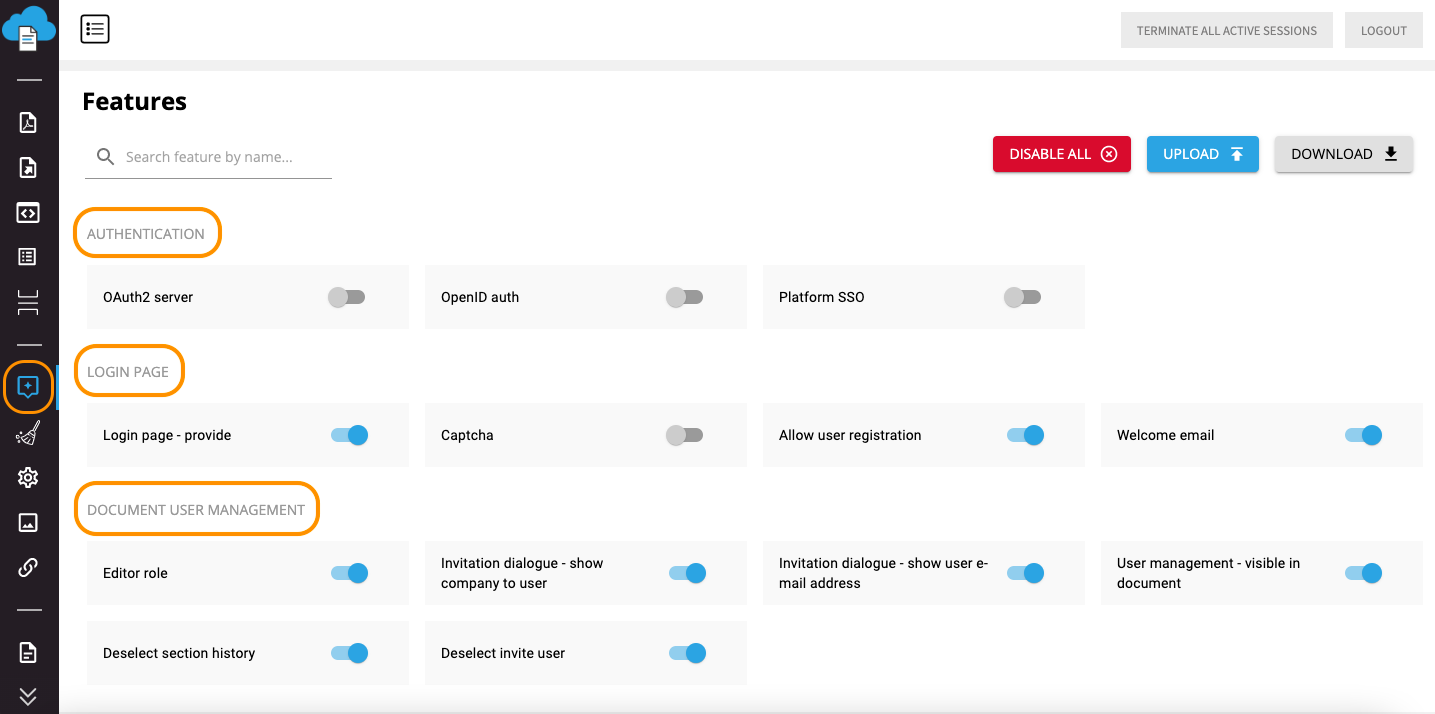
Features combined into thematic groups
19.1Search feature by name
If you happen to know the feature or at least the function’s purpose, for instance, export, you can search it by its name.
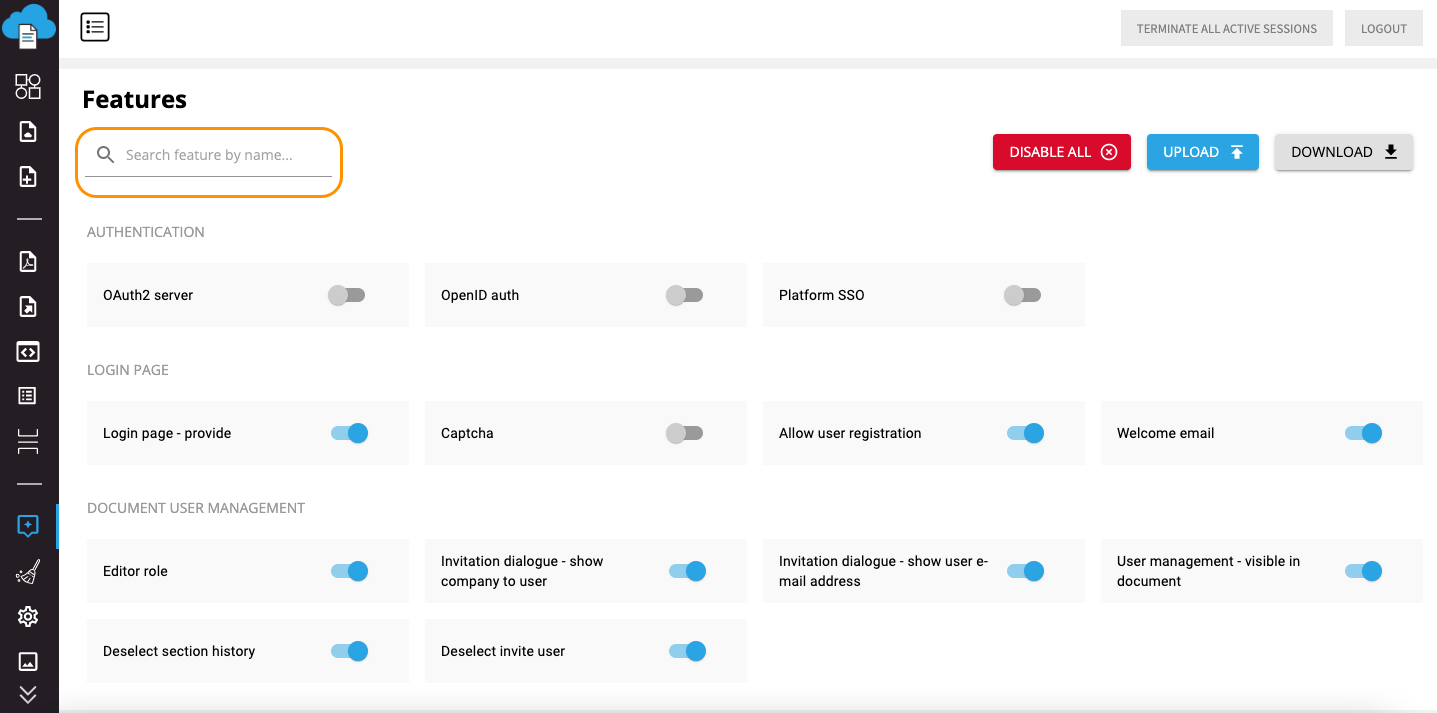
Search feature by name highlighted
19.2Bulk-options
With a set of bulk-options you can:
●disable all features on the system
●upload a JSON file with features to the current system, if you want to add new features
●download the list of features as a JSON file from the current system to get entire information, which features are enabled and disabled.
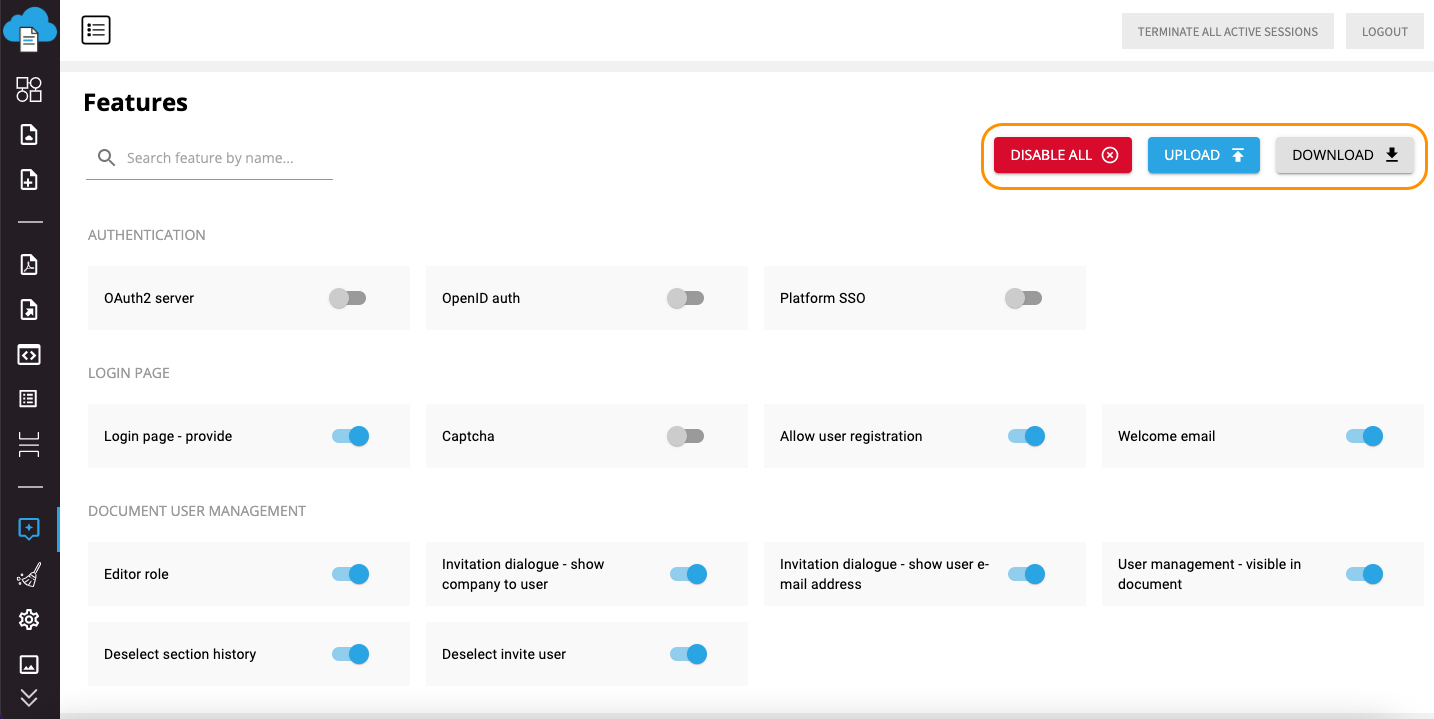
Bulk-options for disabling, uploading and download of features set highlighted
In the next chapters there will be necessary information, how to manage documents and all other features on your SMASHDOCs system.
20CleanUp Routines
In the tab “CleanUp Routines” in the AdminUI page you can set all necessary cleanup routines for the system.

CleanUp Routines tab
There you are able to upload a .json-file with cleanup routines that should be activated in the system, download the list of available cleanup routines in .json-format, delete all routines, including default routines. It is possible to upload or download new routines one by one or all routines together in a single file. If there are already routines in the Admin page and you upload new routines under other keys, the old routines will be also saved. In case you want to upload new routines under the same keys, the old routines will remain and new ones will not be added. All set or uploaded cleanup routines in the AdminUI page will then function both in the editor and during the import.
Note: if you delete all routines in AdminUI page, no option “Cleanup routines” will be shown in the editor and there will be no permission for cleanup routines during inviting a new user.
There is also a toggle “Code edit mode”. If you activate this, it will be possible to edit and upload cleanup routines in text-format.
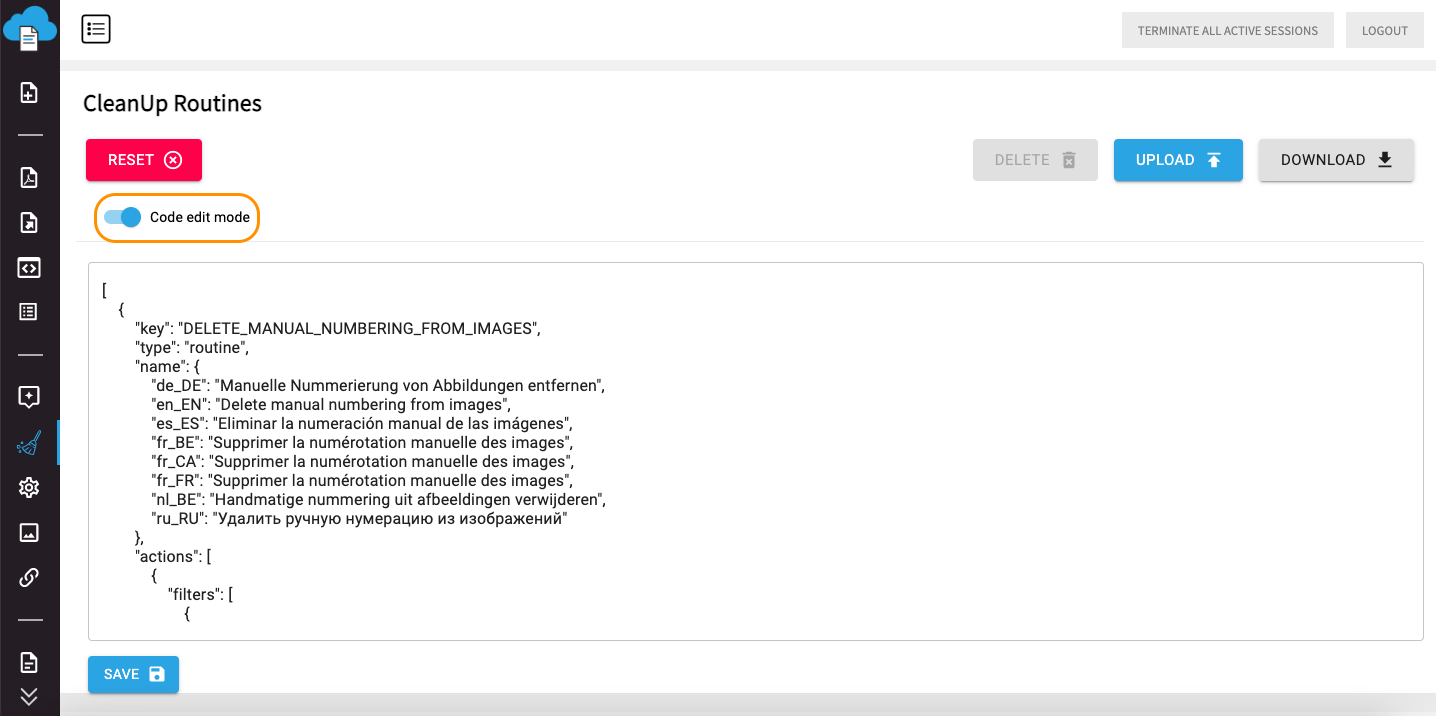
Code edit mode activated
If you click the button “Reset”, all routines will be deleted and reset to default four routines:
●Remove all blank lines
●Delete unnecessary spaces
●Remove landscape
●Remove portrait
21Default Settings
In the list of default settings there are such points, as default paragraph decorator, conversation type, scope and field, user language, style, empty line. As soon as you decide which default settings are going to be applied in your system, they will be automatically available in the system, when you start working with a document in your SMASHDOCs account. Apart from that, you can upload a .json file with necessary default settings for them to be automatically applied on the system.
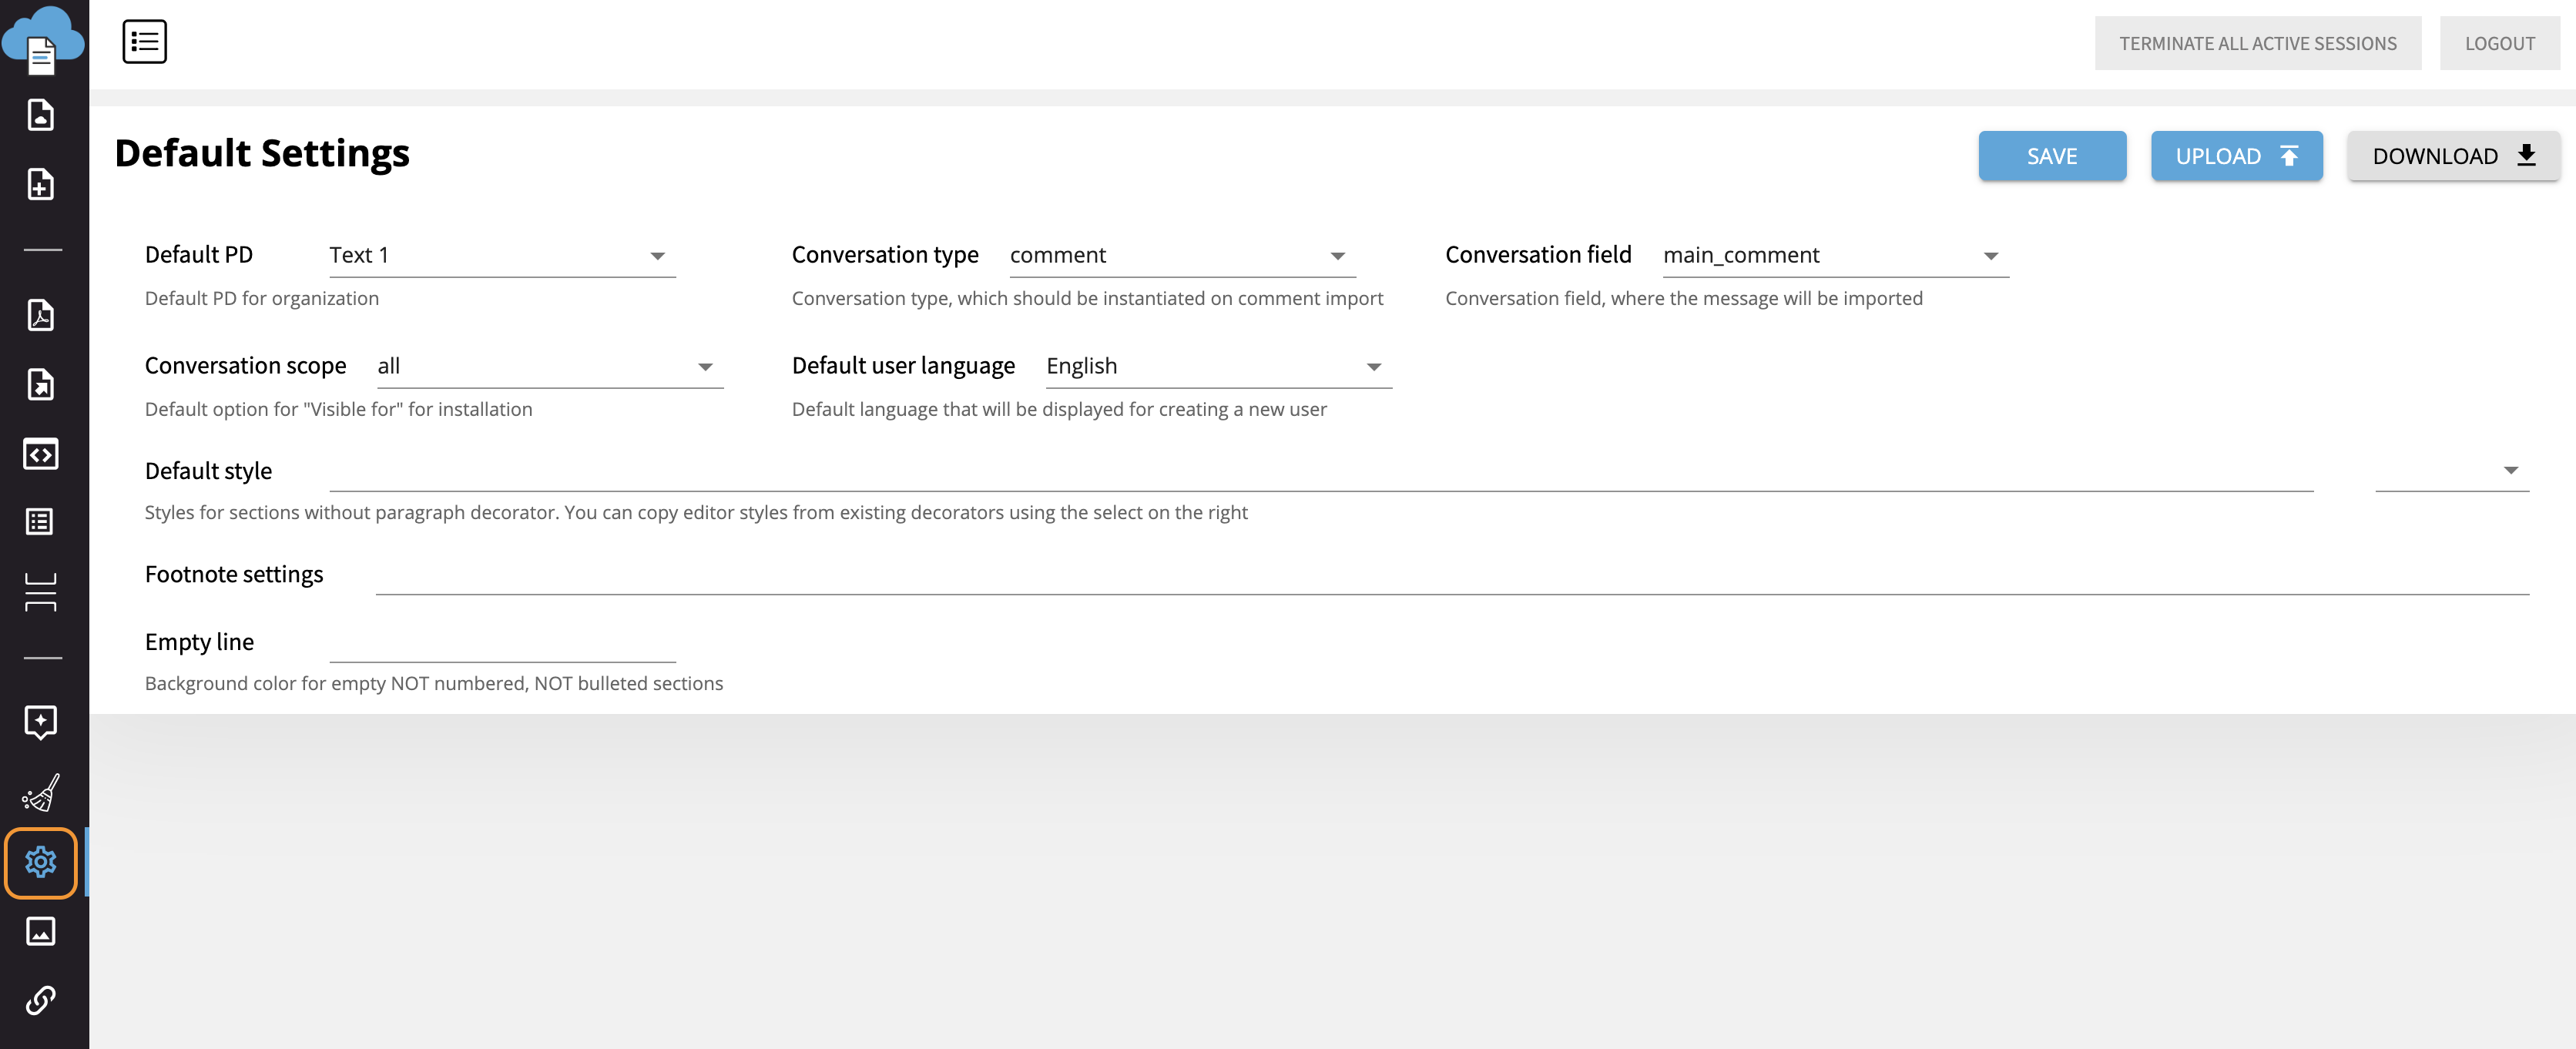
The list of default settings
Default PD means a style of text in a document that is set as standard. So, if you choose the variant ‘Text 1’ in Default PD (as in the Image 165), when you start creating your document, the whole text will be inserted in this particular style automatically.
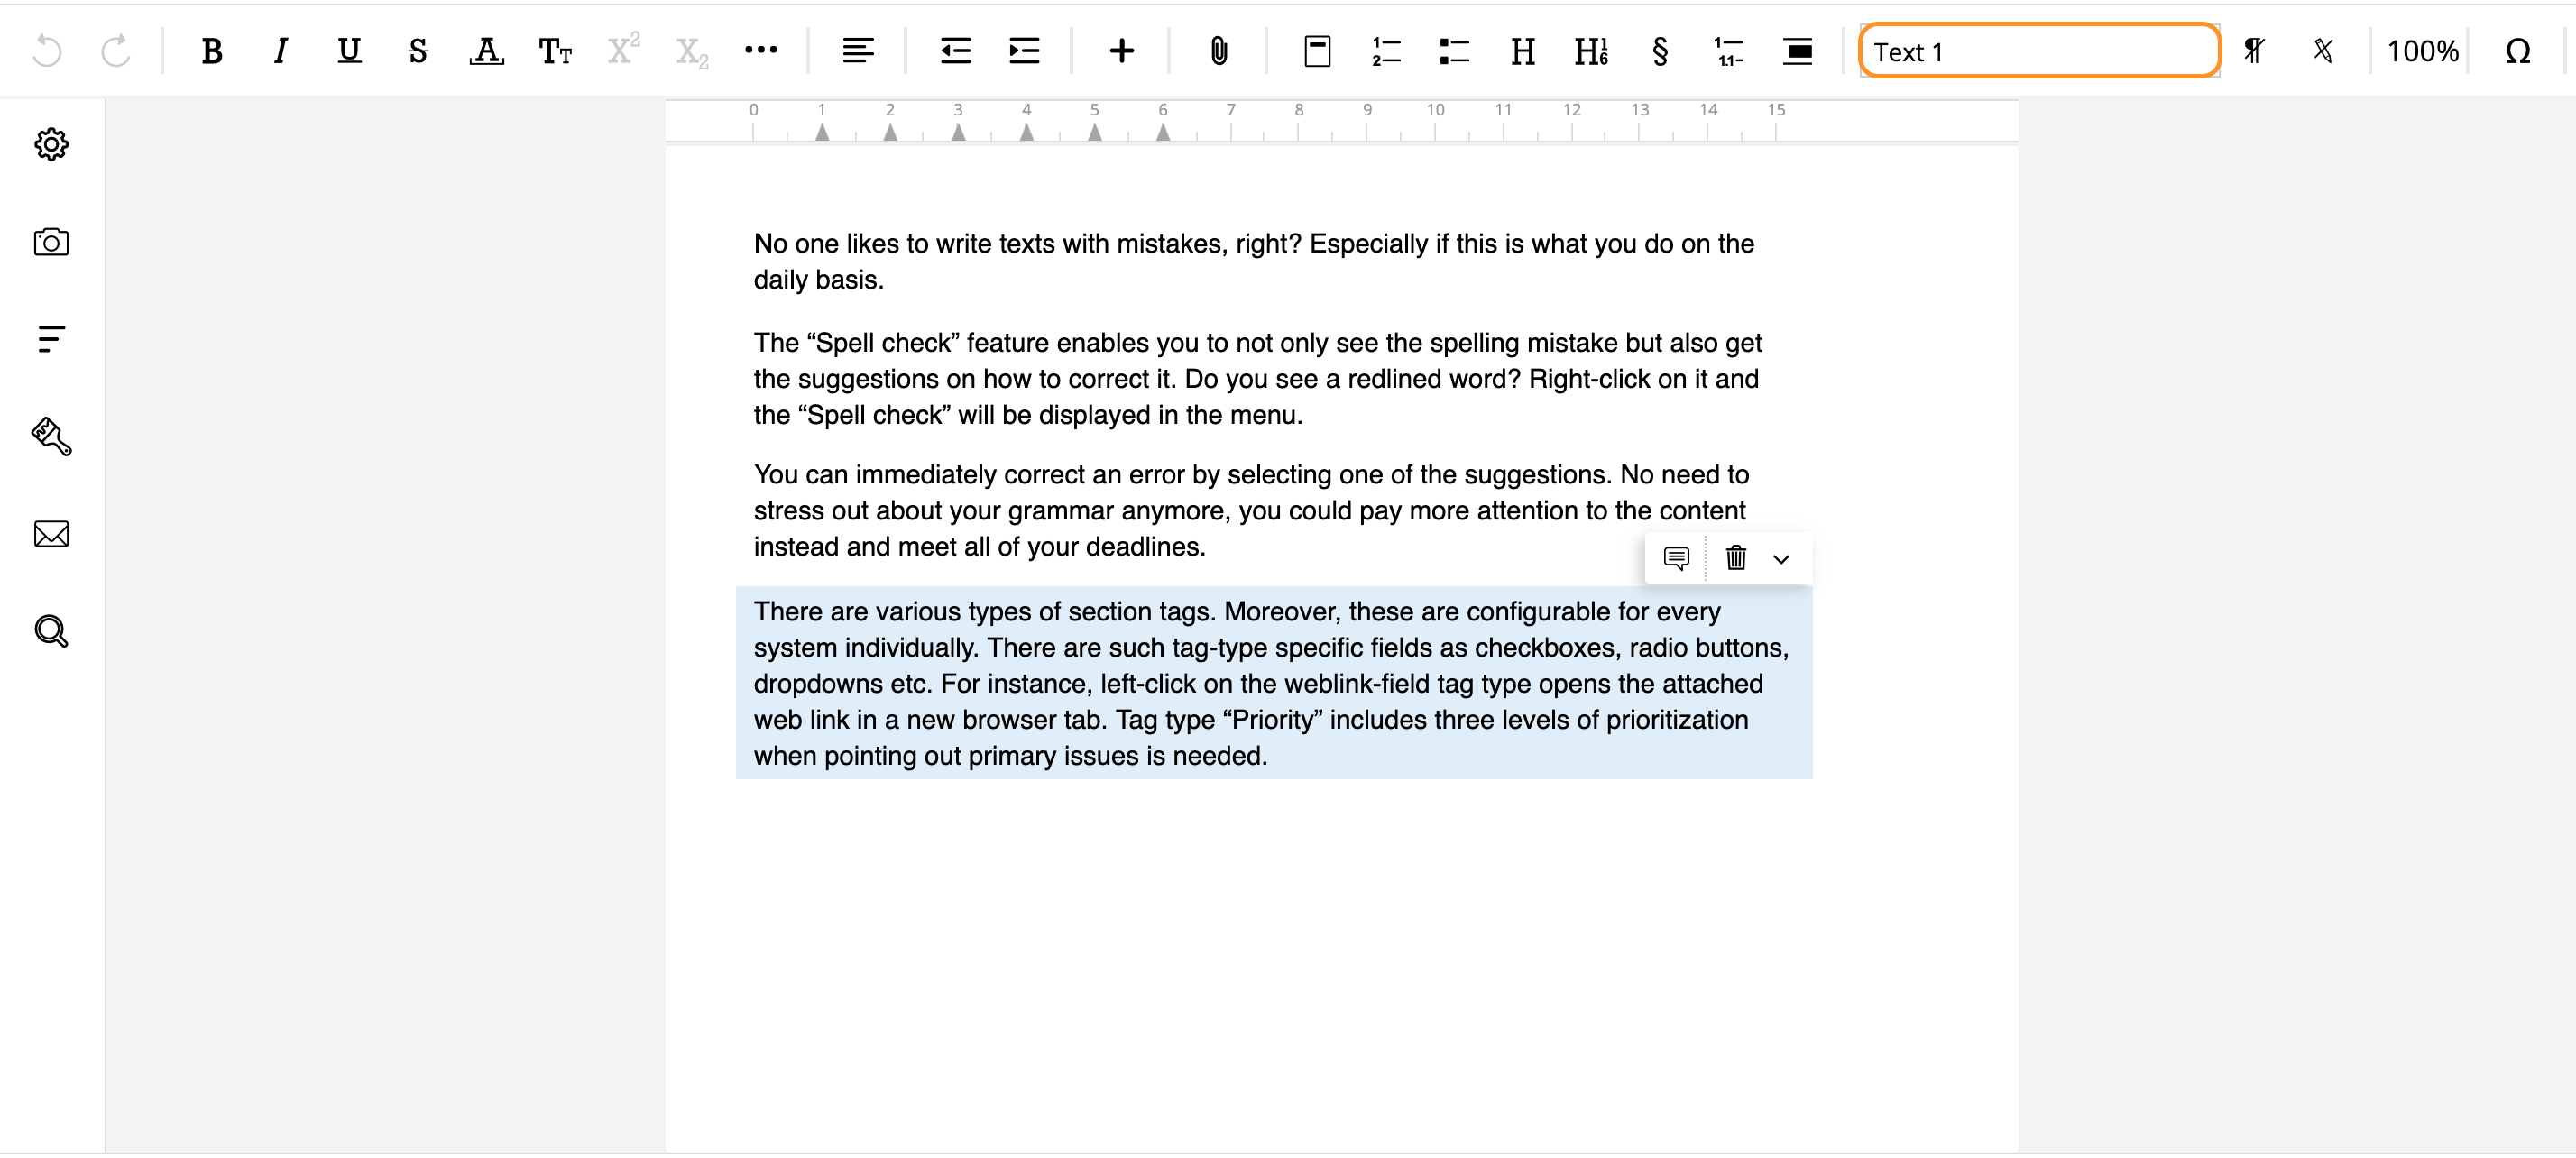
Default PD - Text 1 - in editor highlighted
Conversation type is a form in which a comment added in a Word-document will be displayed after importing it to SMASHDOCs. In SMASHDOCs the most suitable and frequently used type is comment. So when you choose this type, all your feedback left in Word will look like a comment in SMASHDOCs.
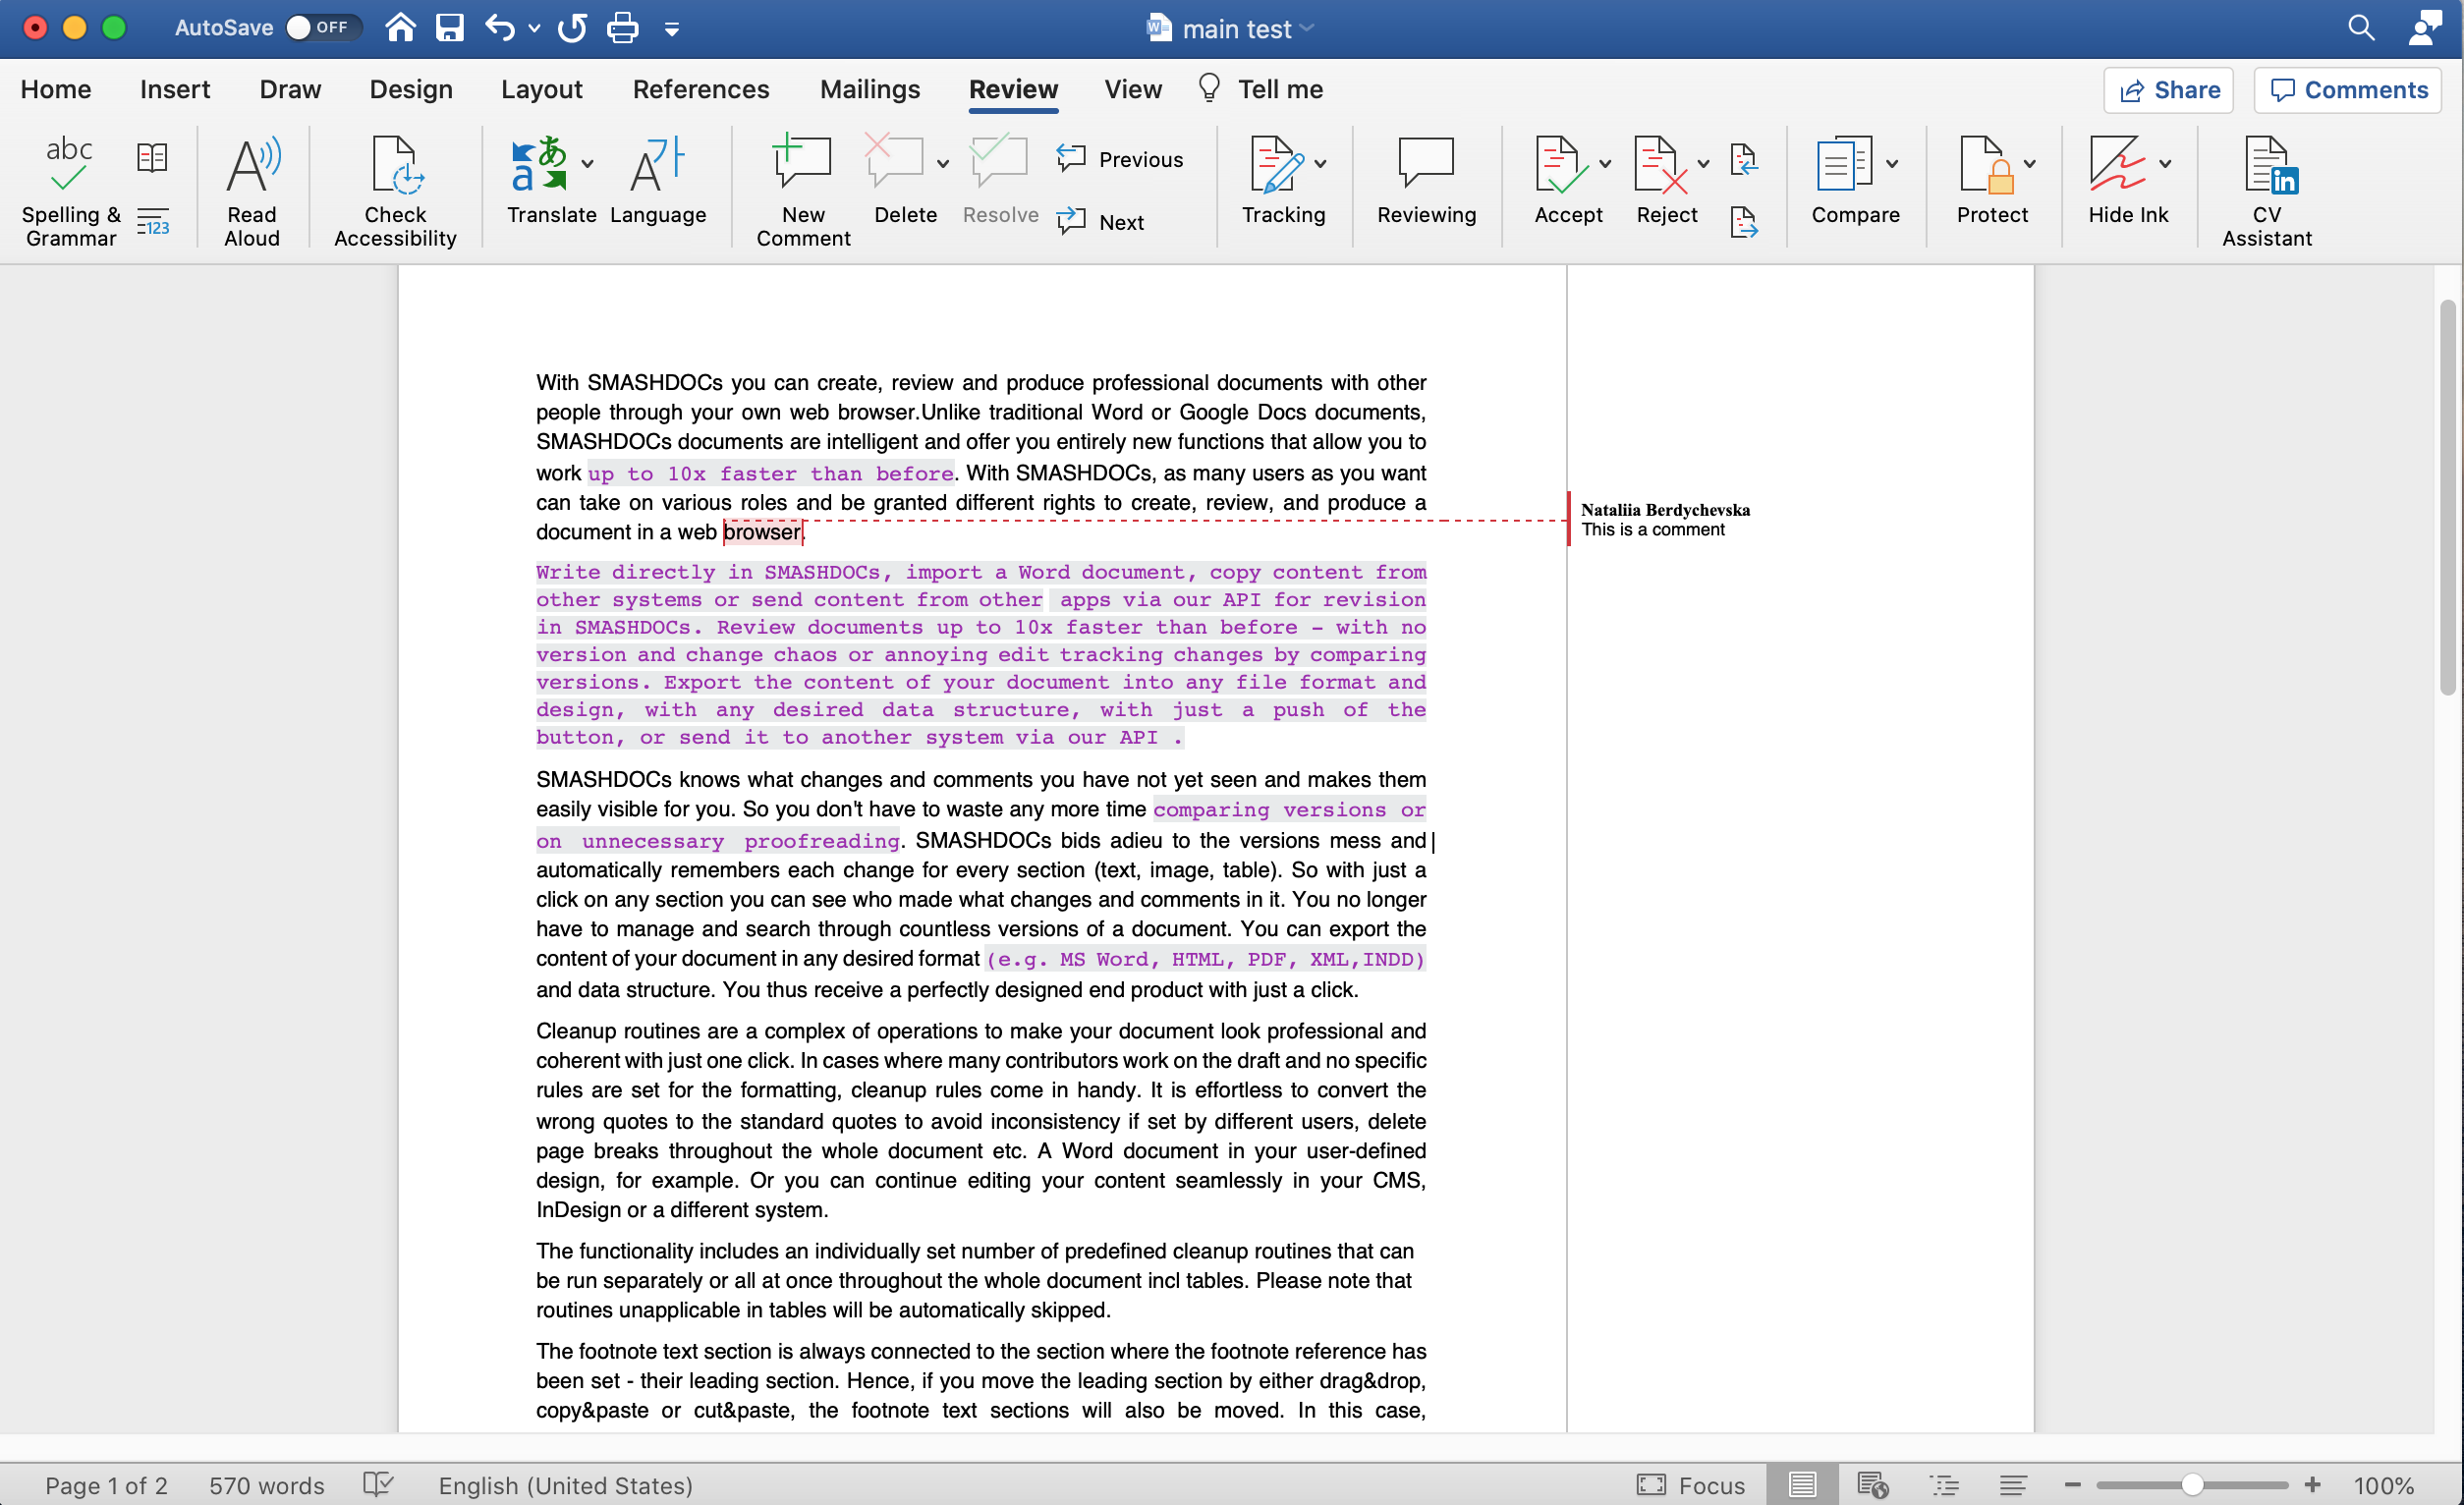
Adding a comment in a Word document
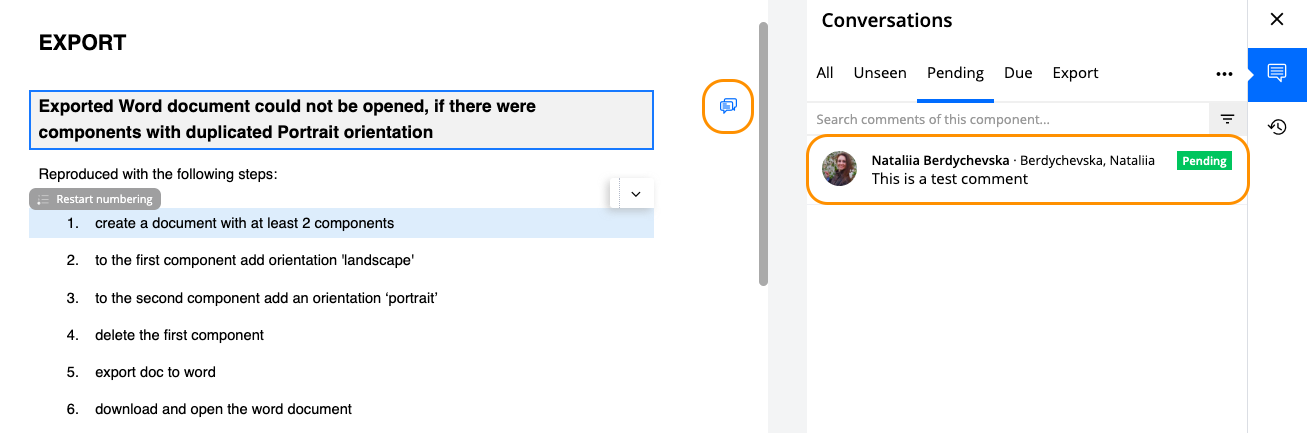
Outlook of the comment after importing Word document into SMASHDOCs
Conversation field is a place where the main message is transmitted. When you set a particular conversation field as a default one, all your messages will be imported in chosen field. The most widespread type of conversation field is main comment.
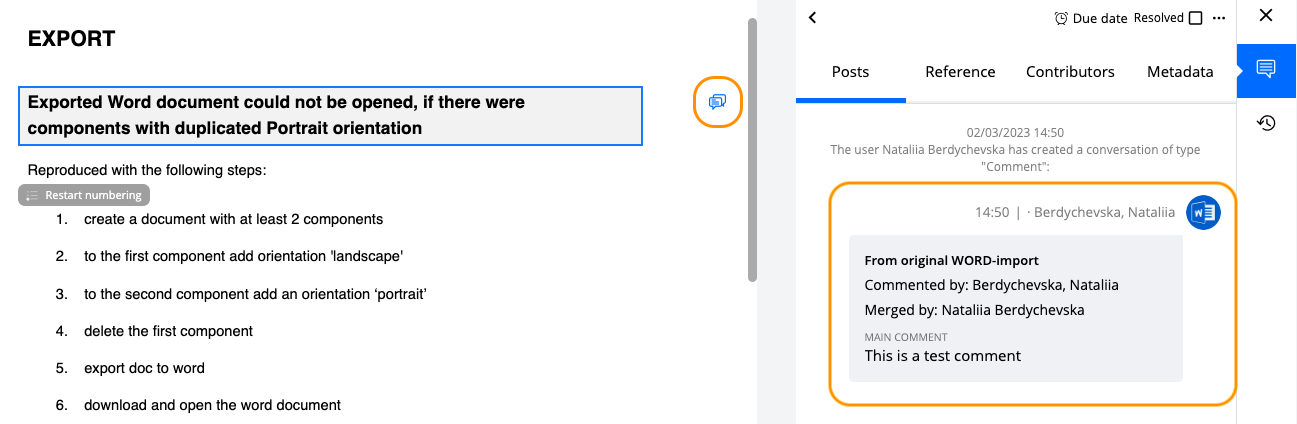
The message of the comment after importing Word document into SMASHDOCs
By setting default conversation scope you will decide who is allowed to see comments in the document. You can decide upon all invited users in the document or only you if you are administrator.
Default user language can be chosen among all supported languages in SMASHDOCs (see Image 184). This language is displayed during creating a new user (see Image 185).
Default style can be set for components that do not possess any paragraph decorators. You can leave this field empty and there will be no default styles for components without paragraph decorators, or you can select one on the right side, copy this editor style and insert into the line ‘Default style’. You can also insert your own style in this line.
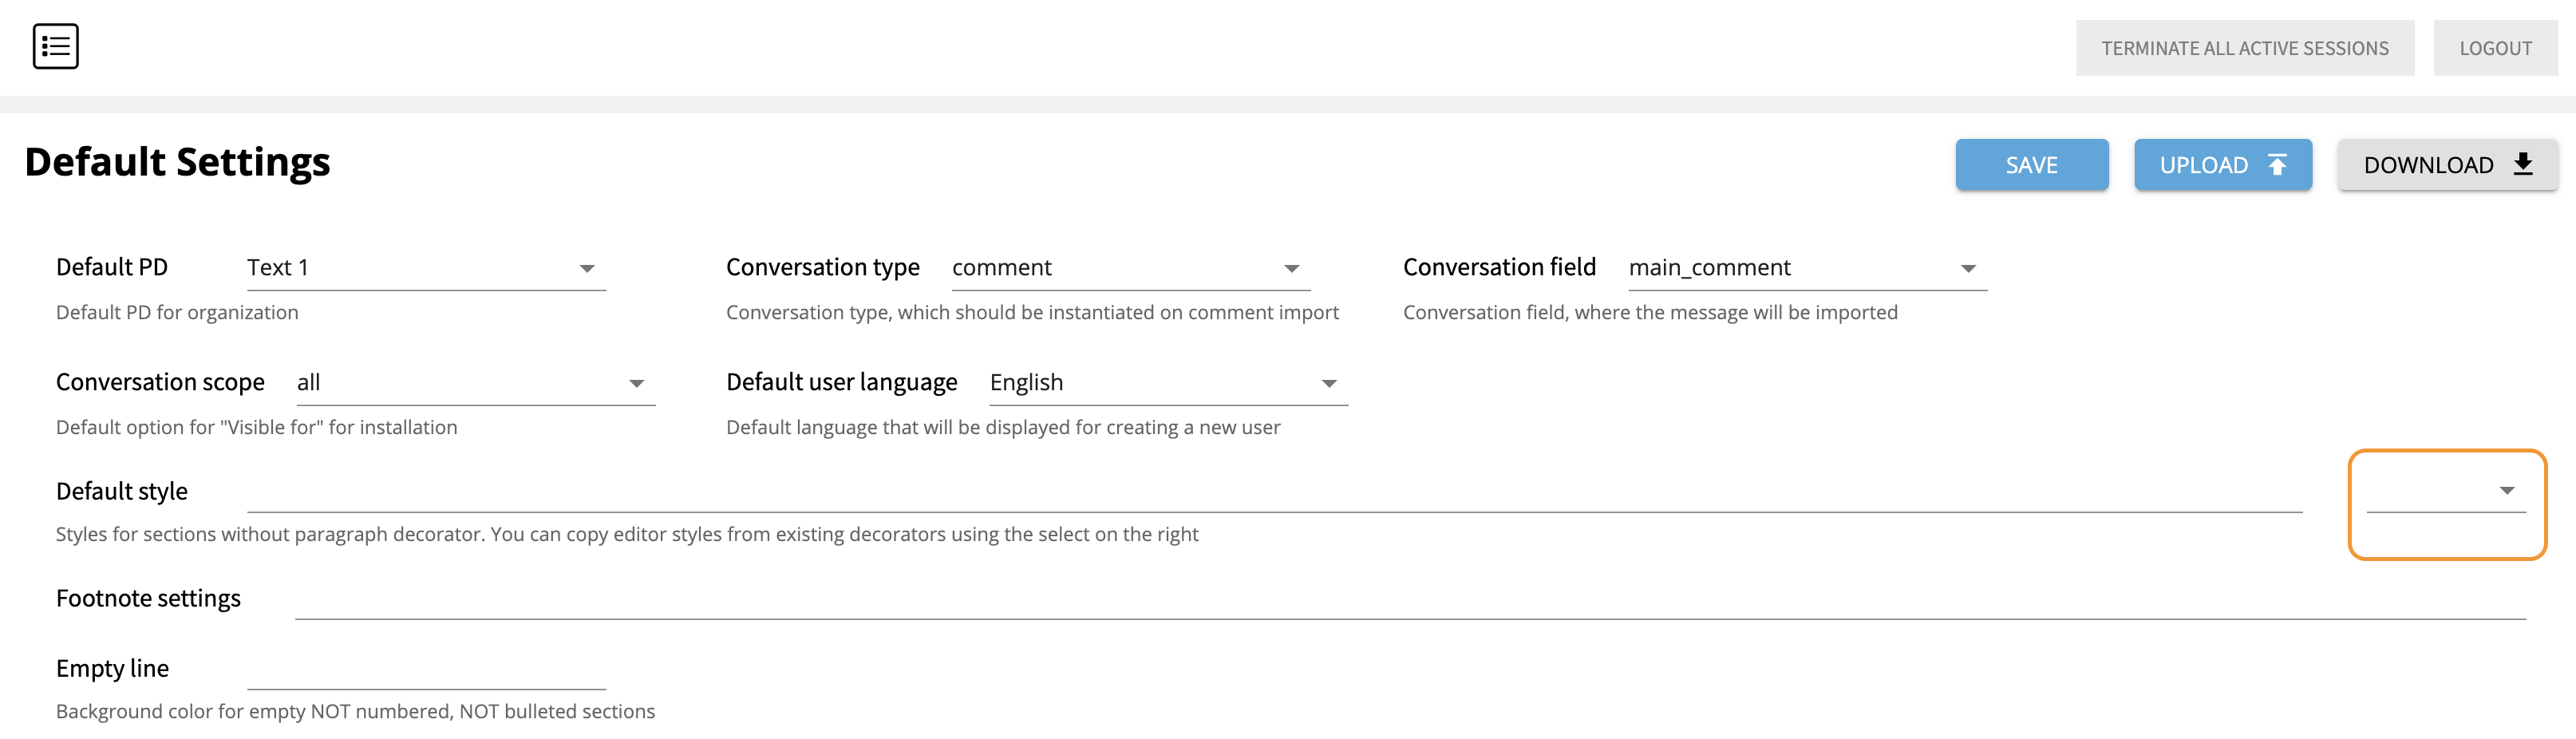
Choosing a default style highlighted
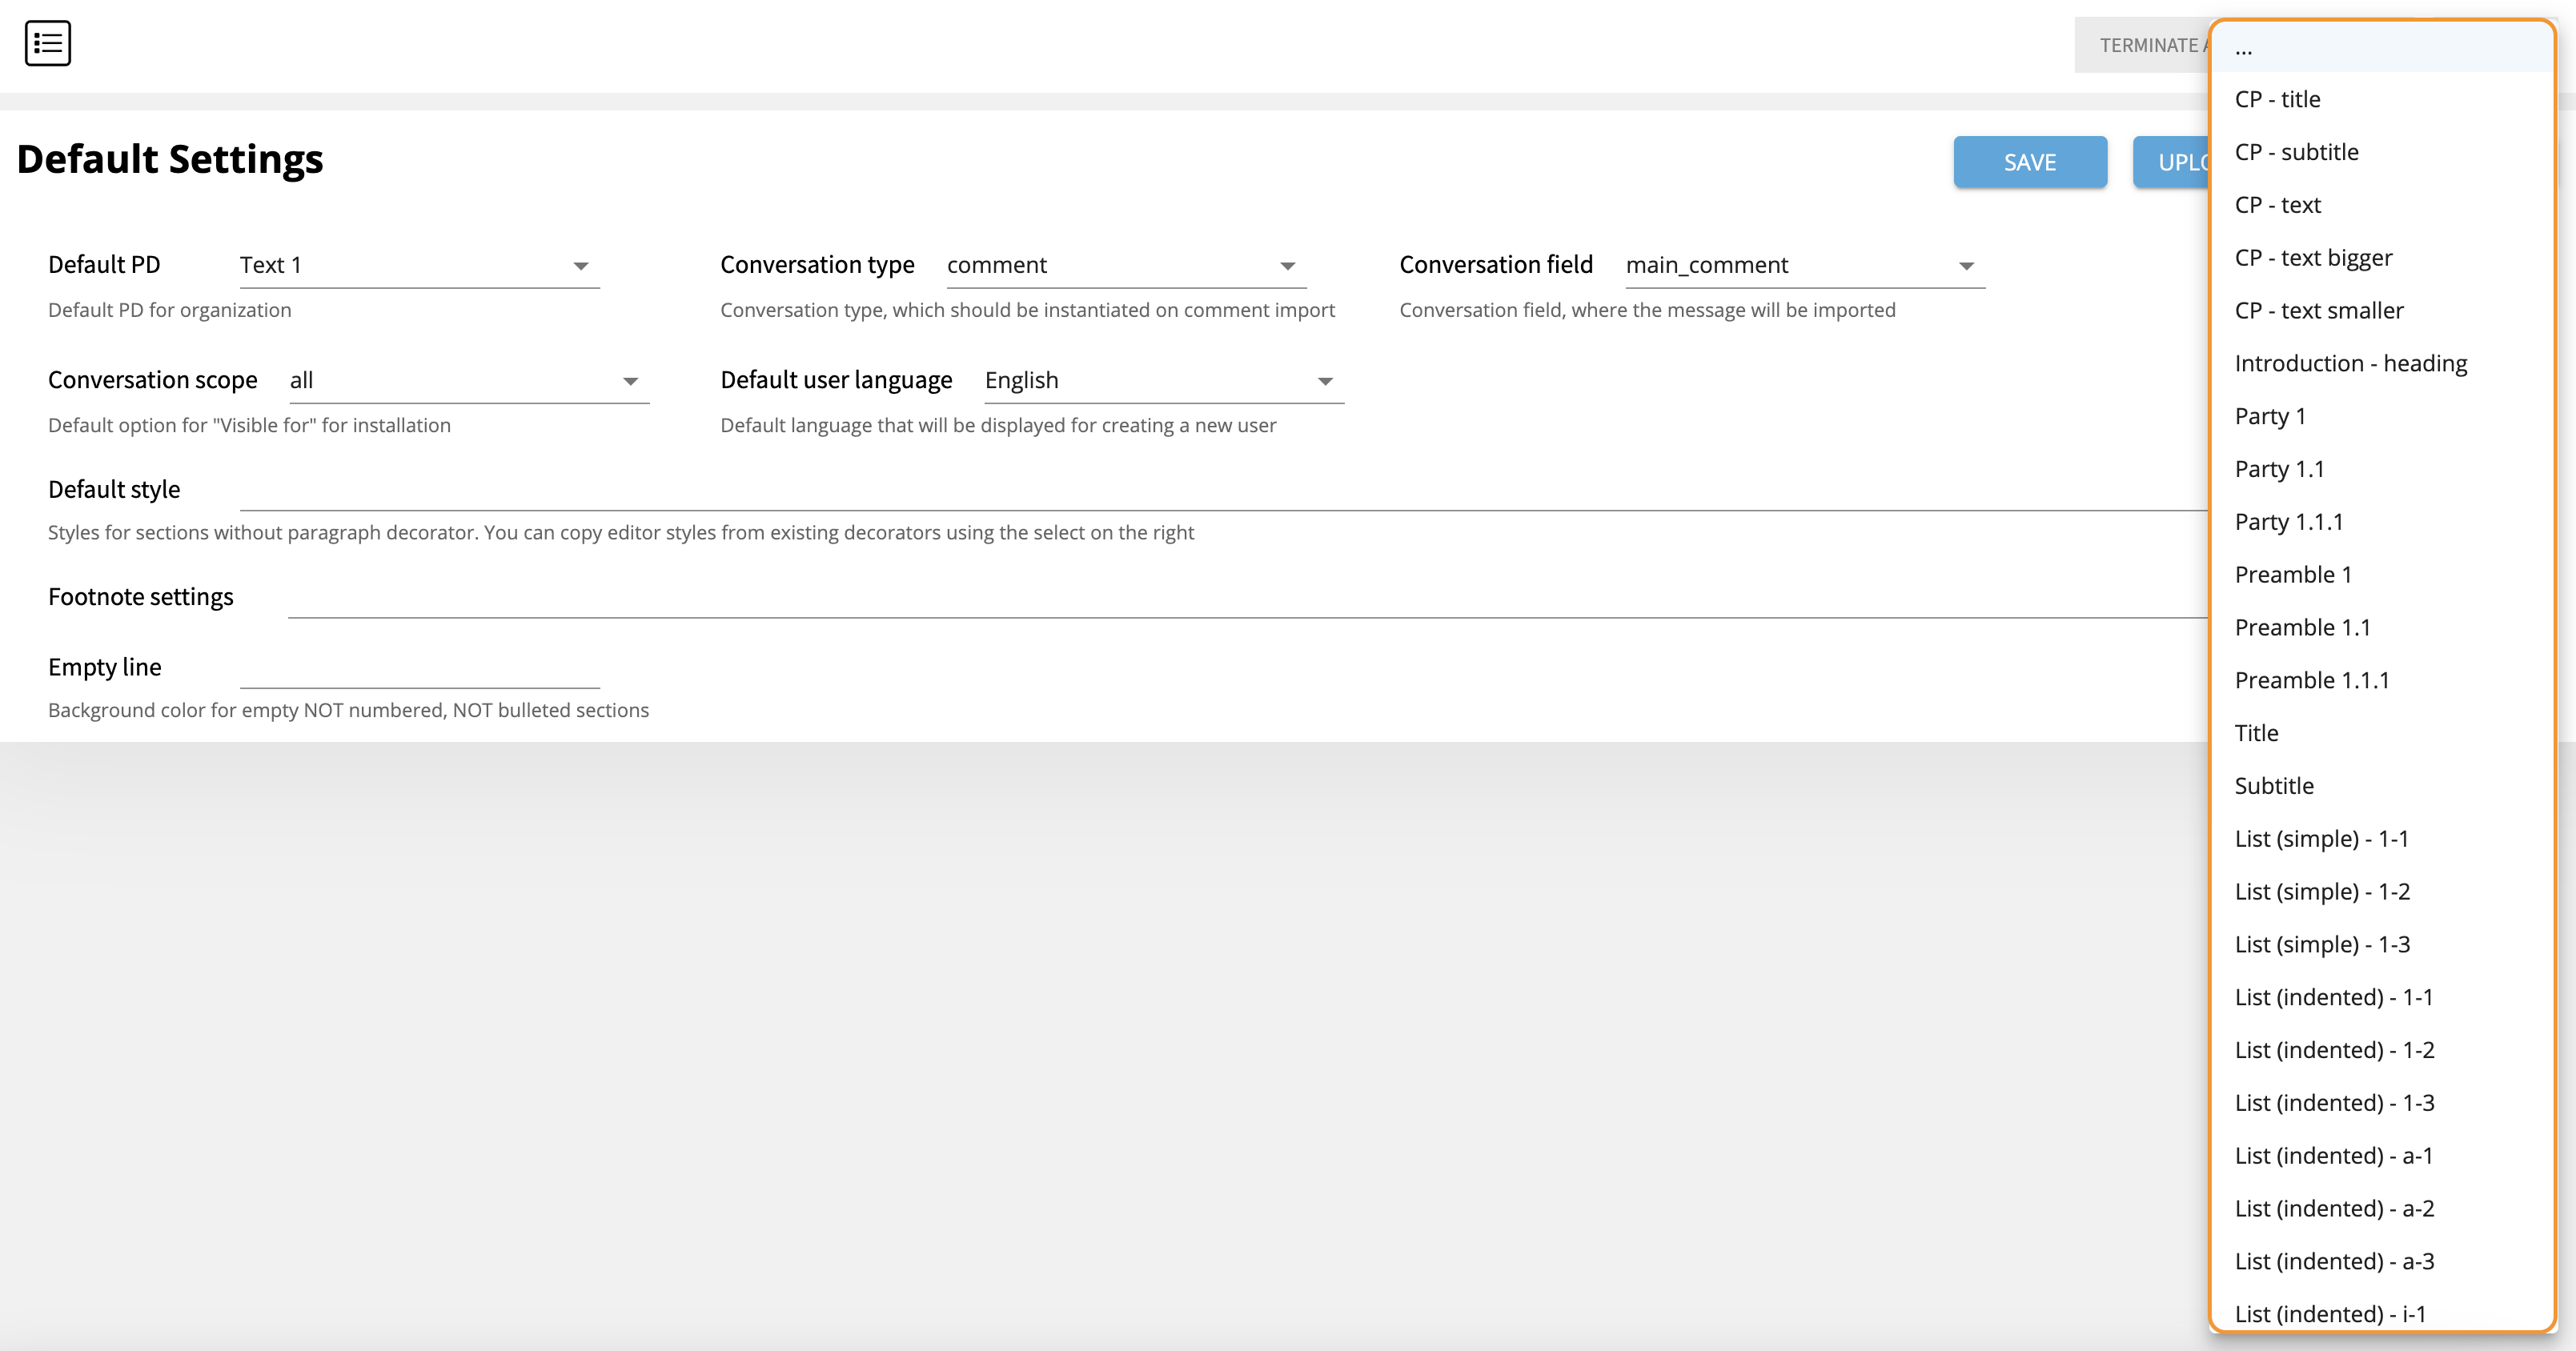
The list of styles to be chosen as a default style highlighted
Footnote settings allow to configure the outlook of footnotes in a system through the AdminUI page. You can set color, font-family and font-style of footnote text. To do that you have to insert all required information in the corresponding line (see Image 172).
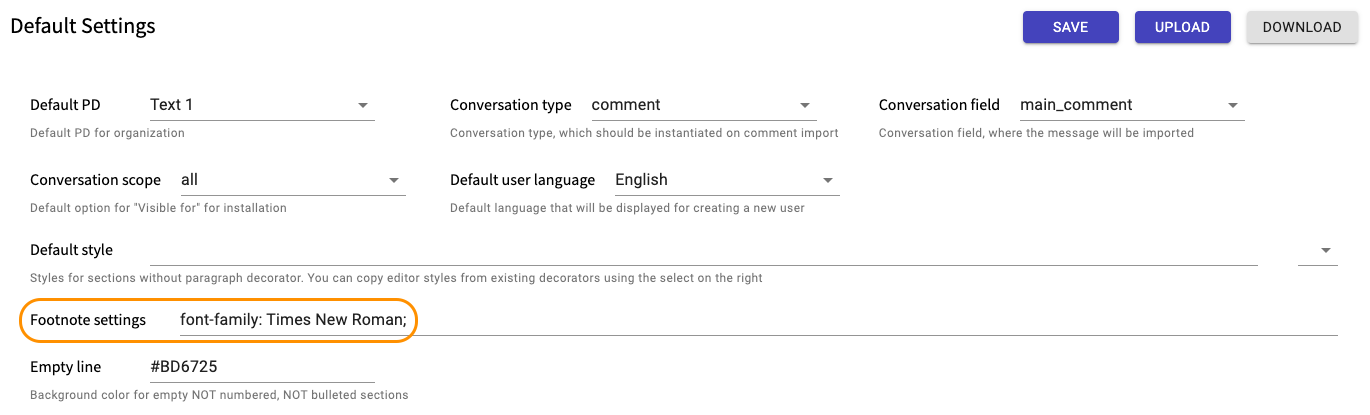
Footnote settings
Empty line setting shows background colors for empty components without text, numbers or bullets. If you leave this field empty, such lines in your text will be white and not visible. If you insert there a code of any color, these lines acquire then indicated color.
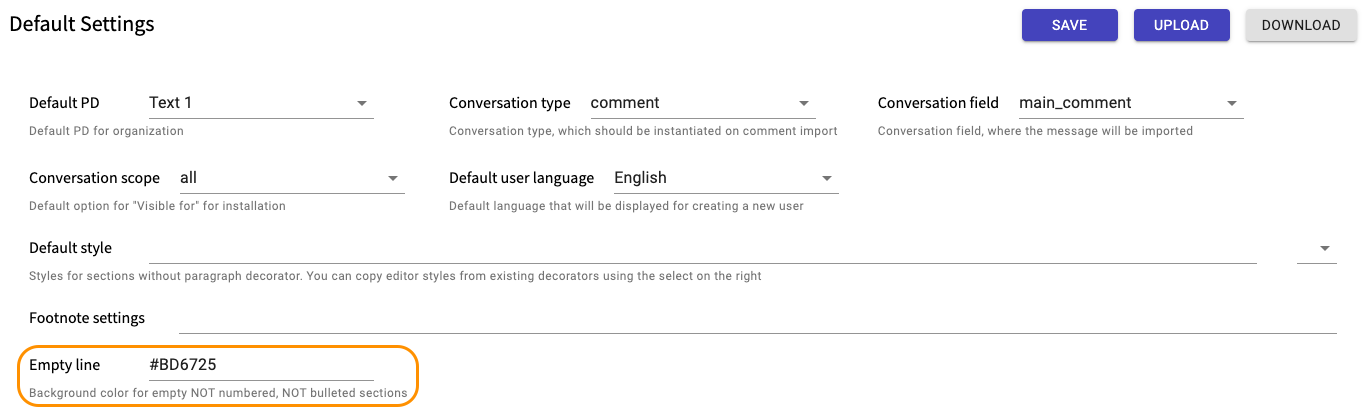
Inserting a code of color highlighted
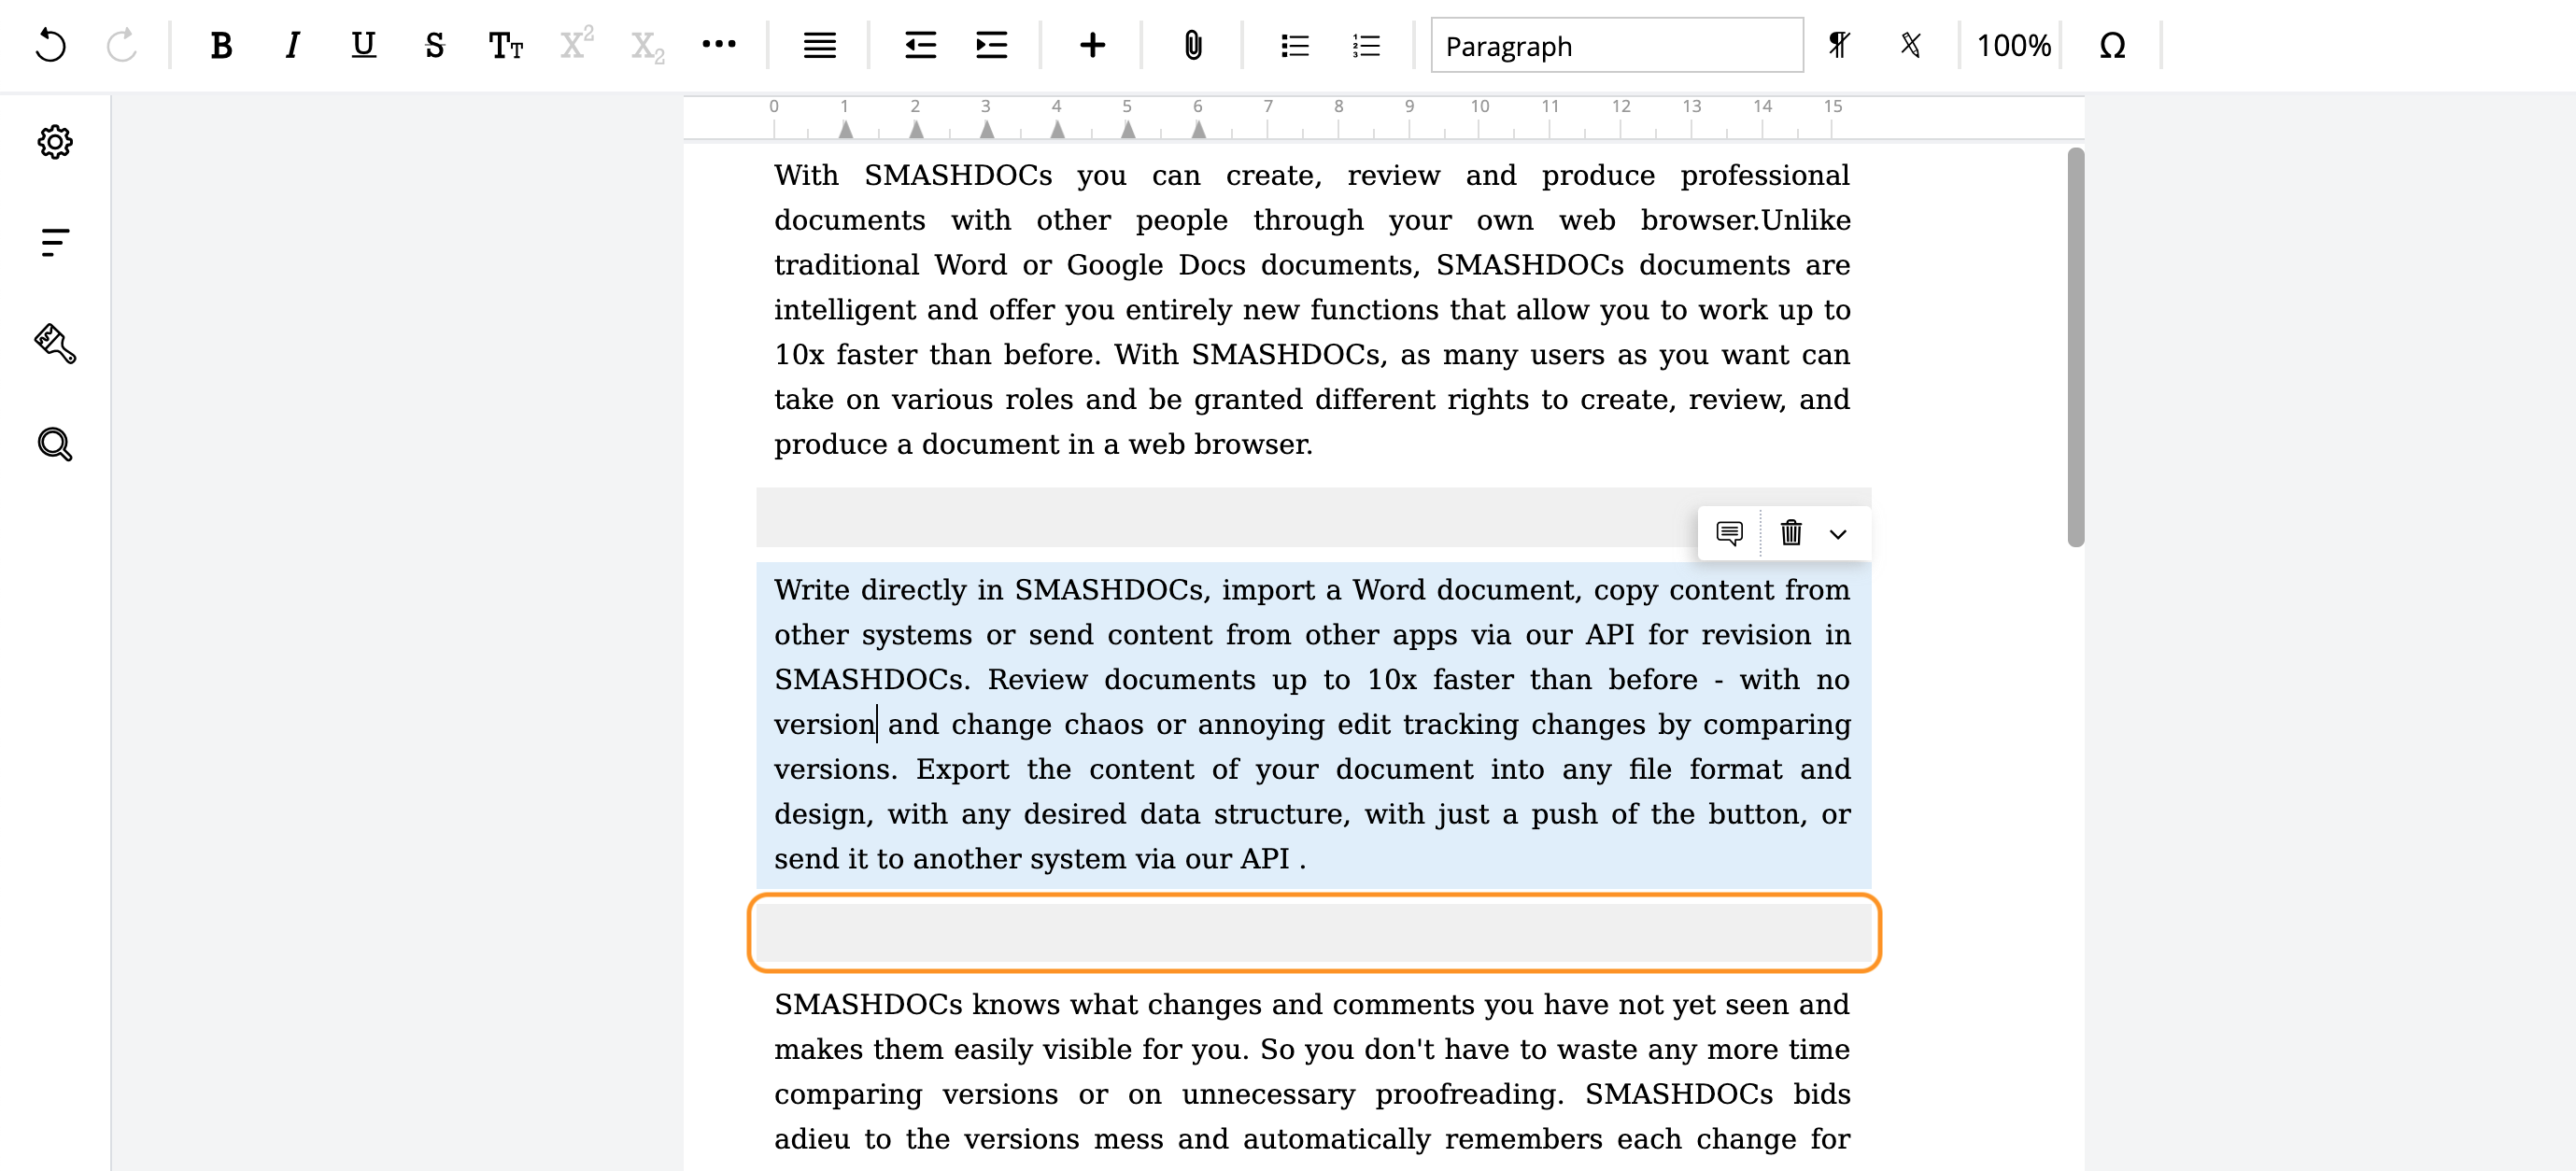
Empty line filled with the code of color White Smoke
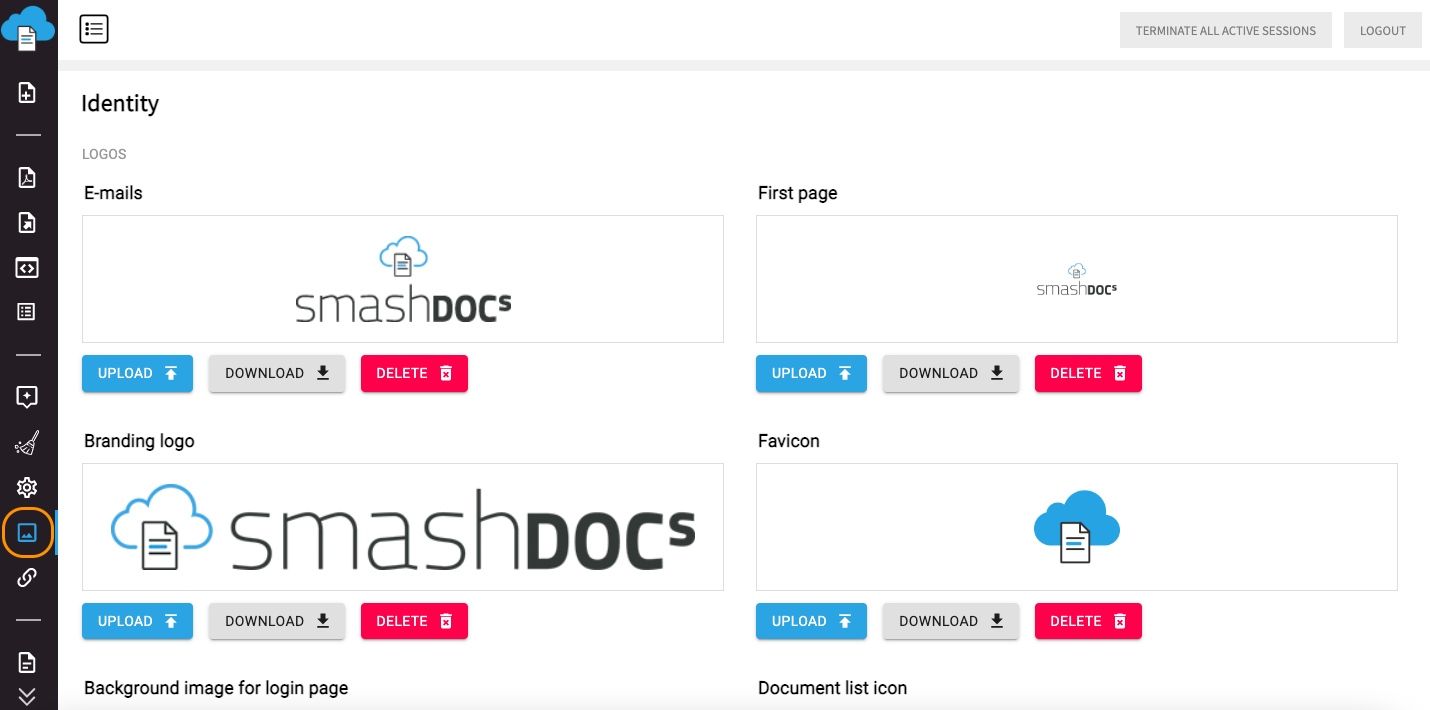
22Identity settings
In the list of identity settings logos for various aspects of SMASHDOCs system are available, as well as a set of bulk-options, that are applicable to them. You can set logos for e-mails, first page of your system, branding logo and favicon by uploading a corresponding image to the Admin page.

Logos for SMASHDOCs system
You can also download and/or delete these icons.
Also, there are different points of page editing, such as text for login page, color schema, system colors.
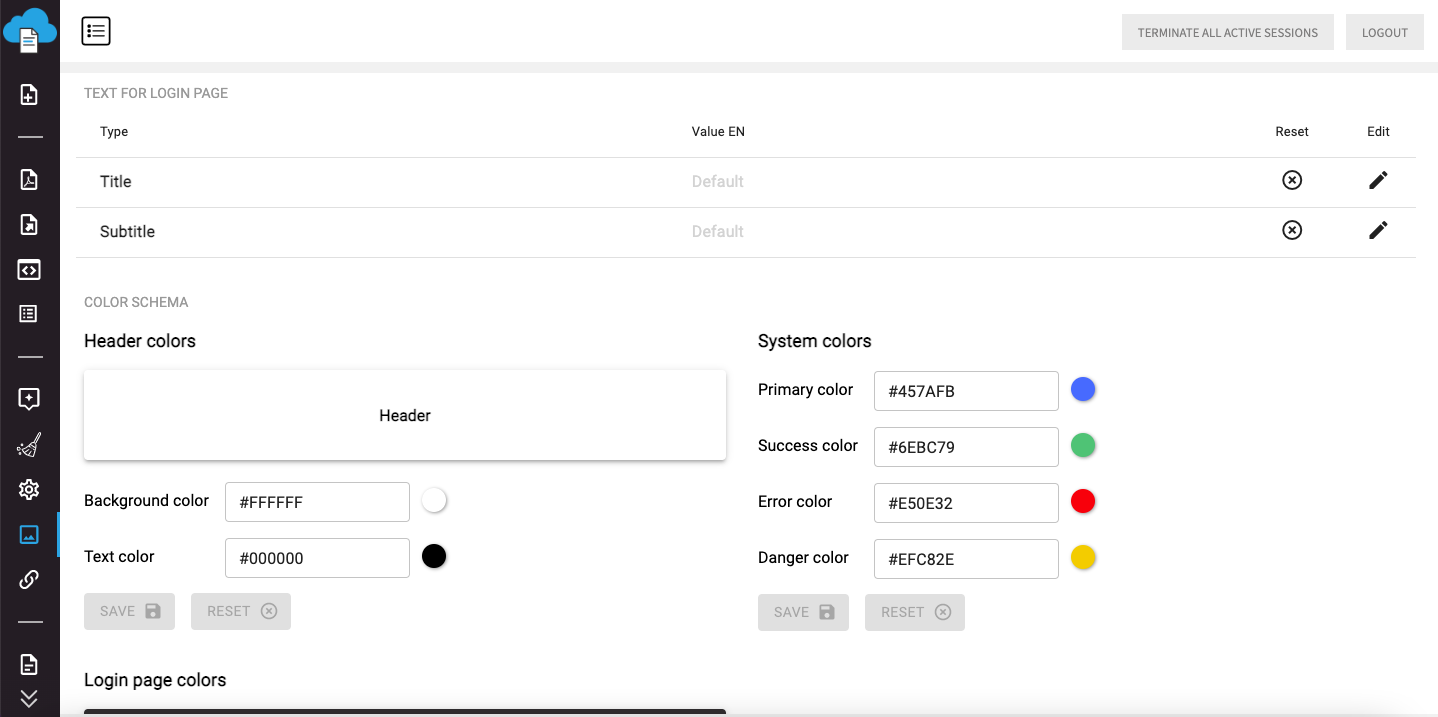
Editing the look of login page
System colors are applied to the account in the SMASHDOCs system. Primary color shows standard actions during the working process with a document.
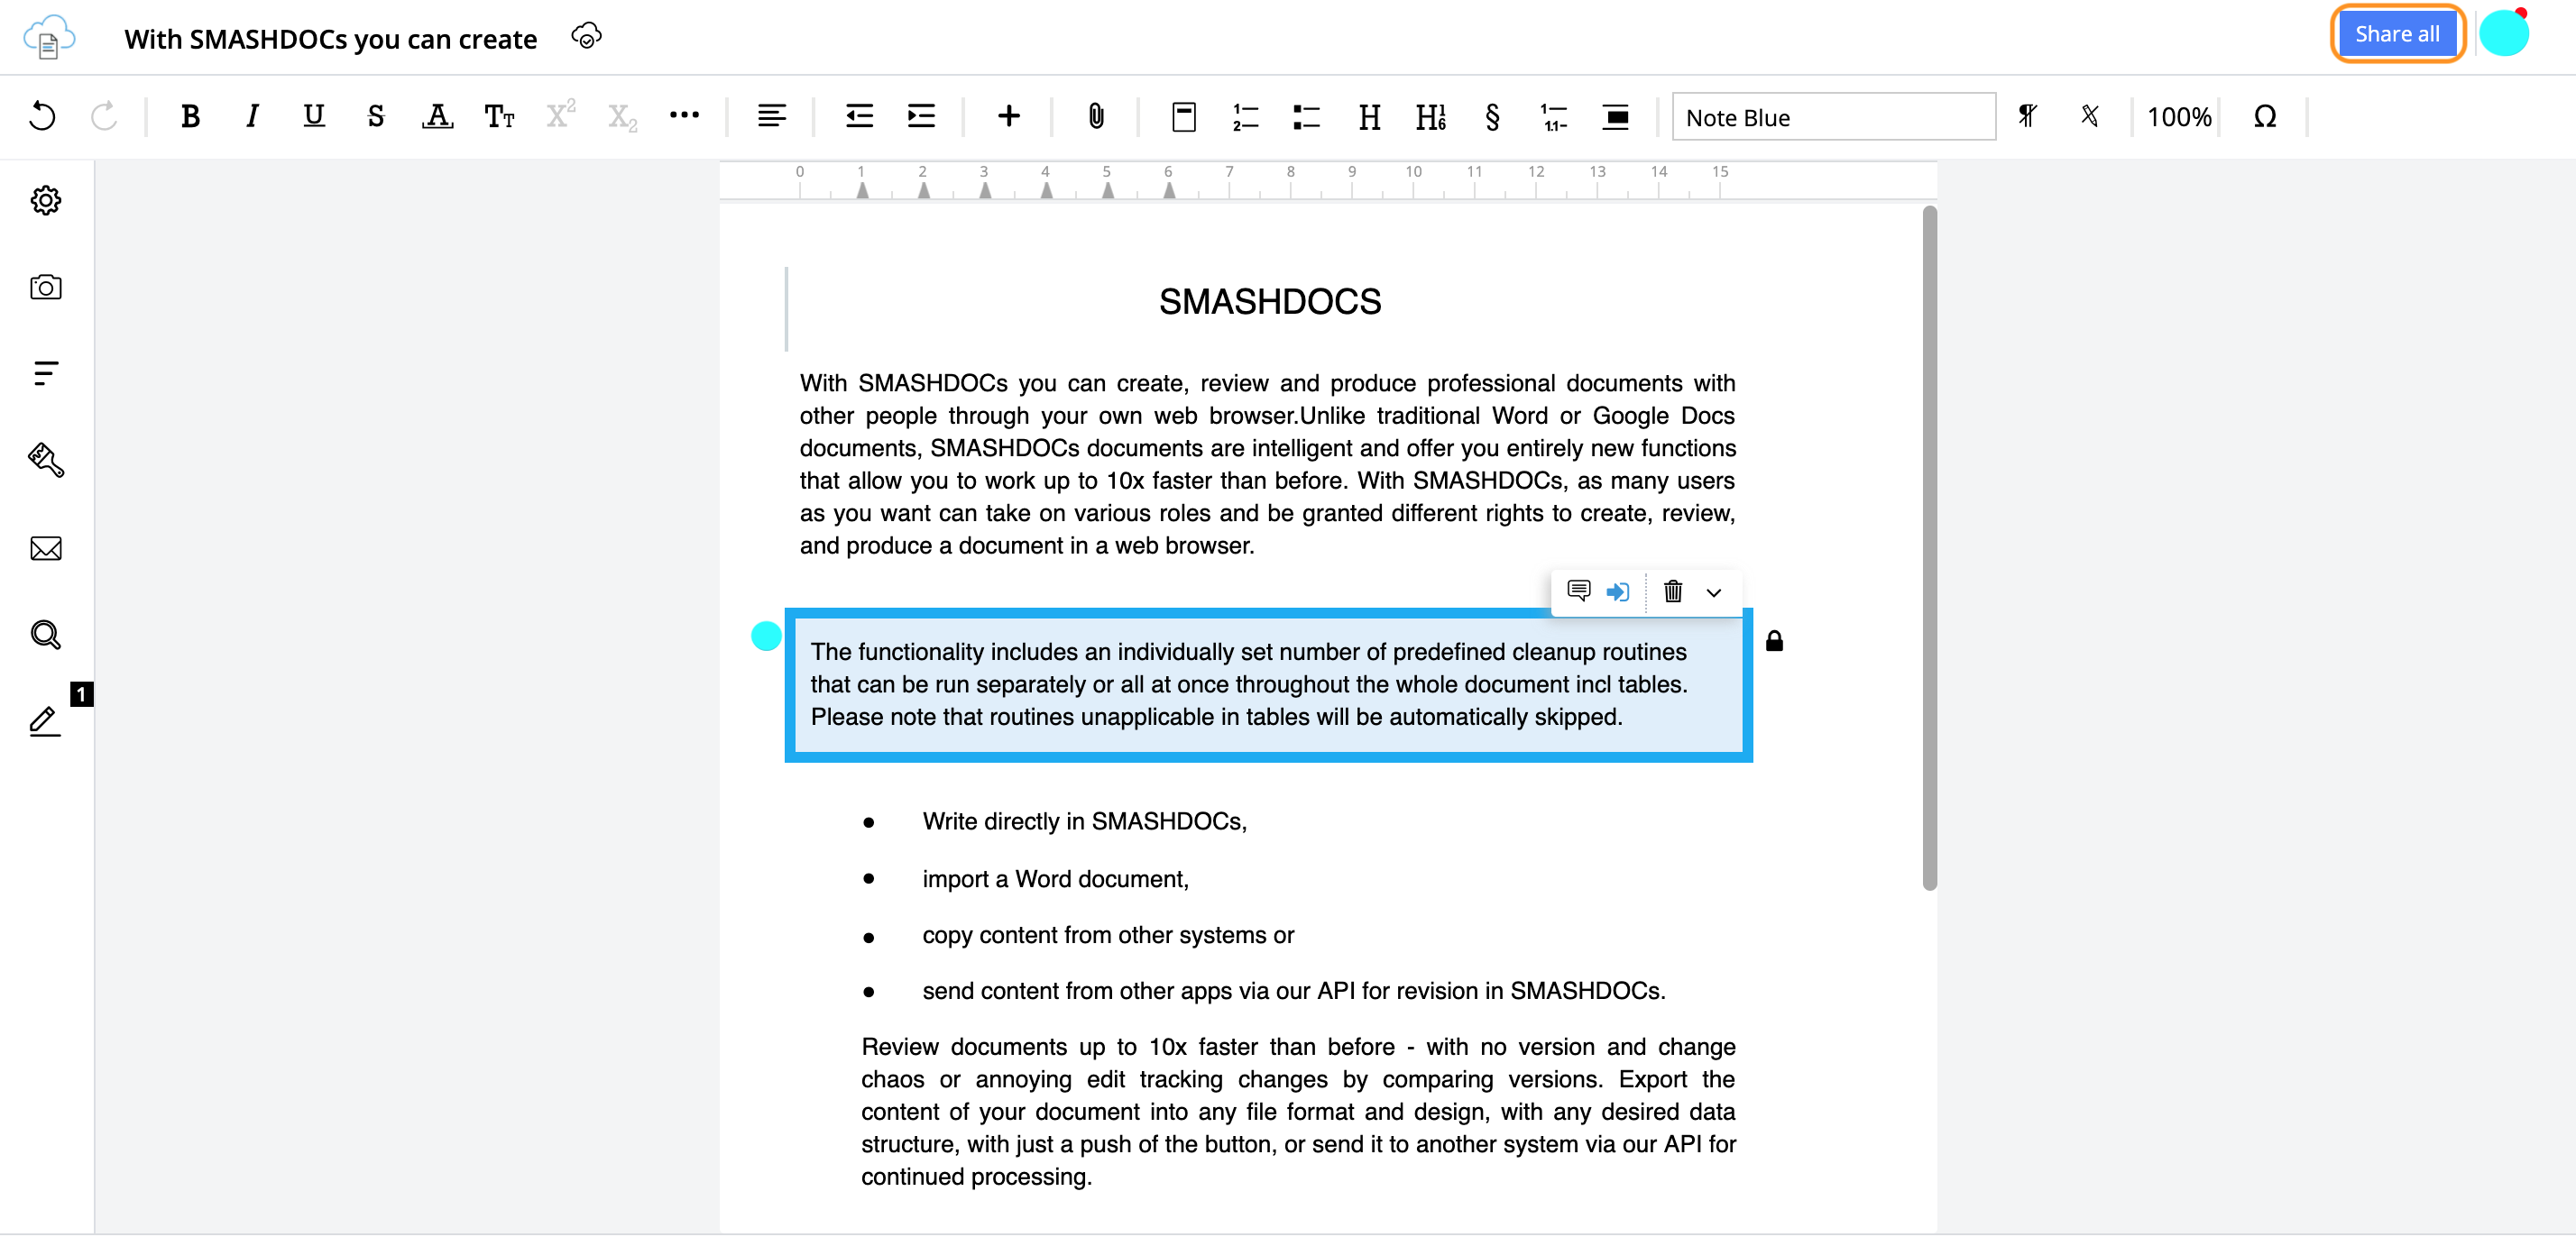
Primary blue color highlighted
On the picture it is clear that primary color #457AFB (see Image 176) is displayed in the function ‘Share all’.
Success color appears, if action has been performed and you can proceed with the work in the document. Error color appears, if the action has gone wrong and it needs to be corrected. Such functions as ‘Accept all’ and ‘Reject all’ can be provided as an example of success and error colors.
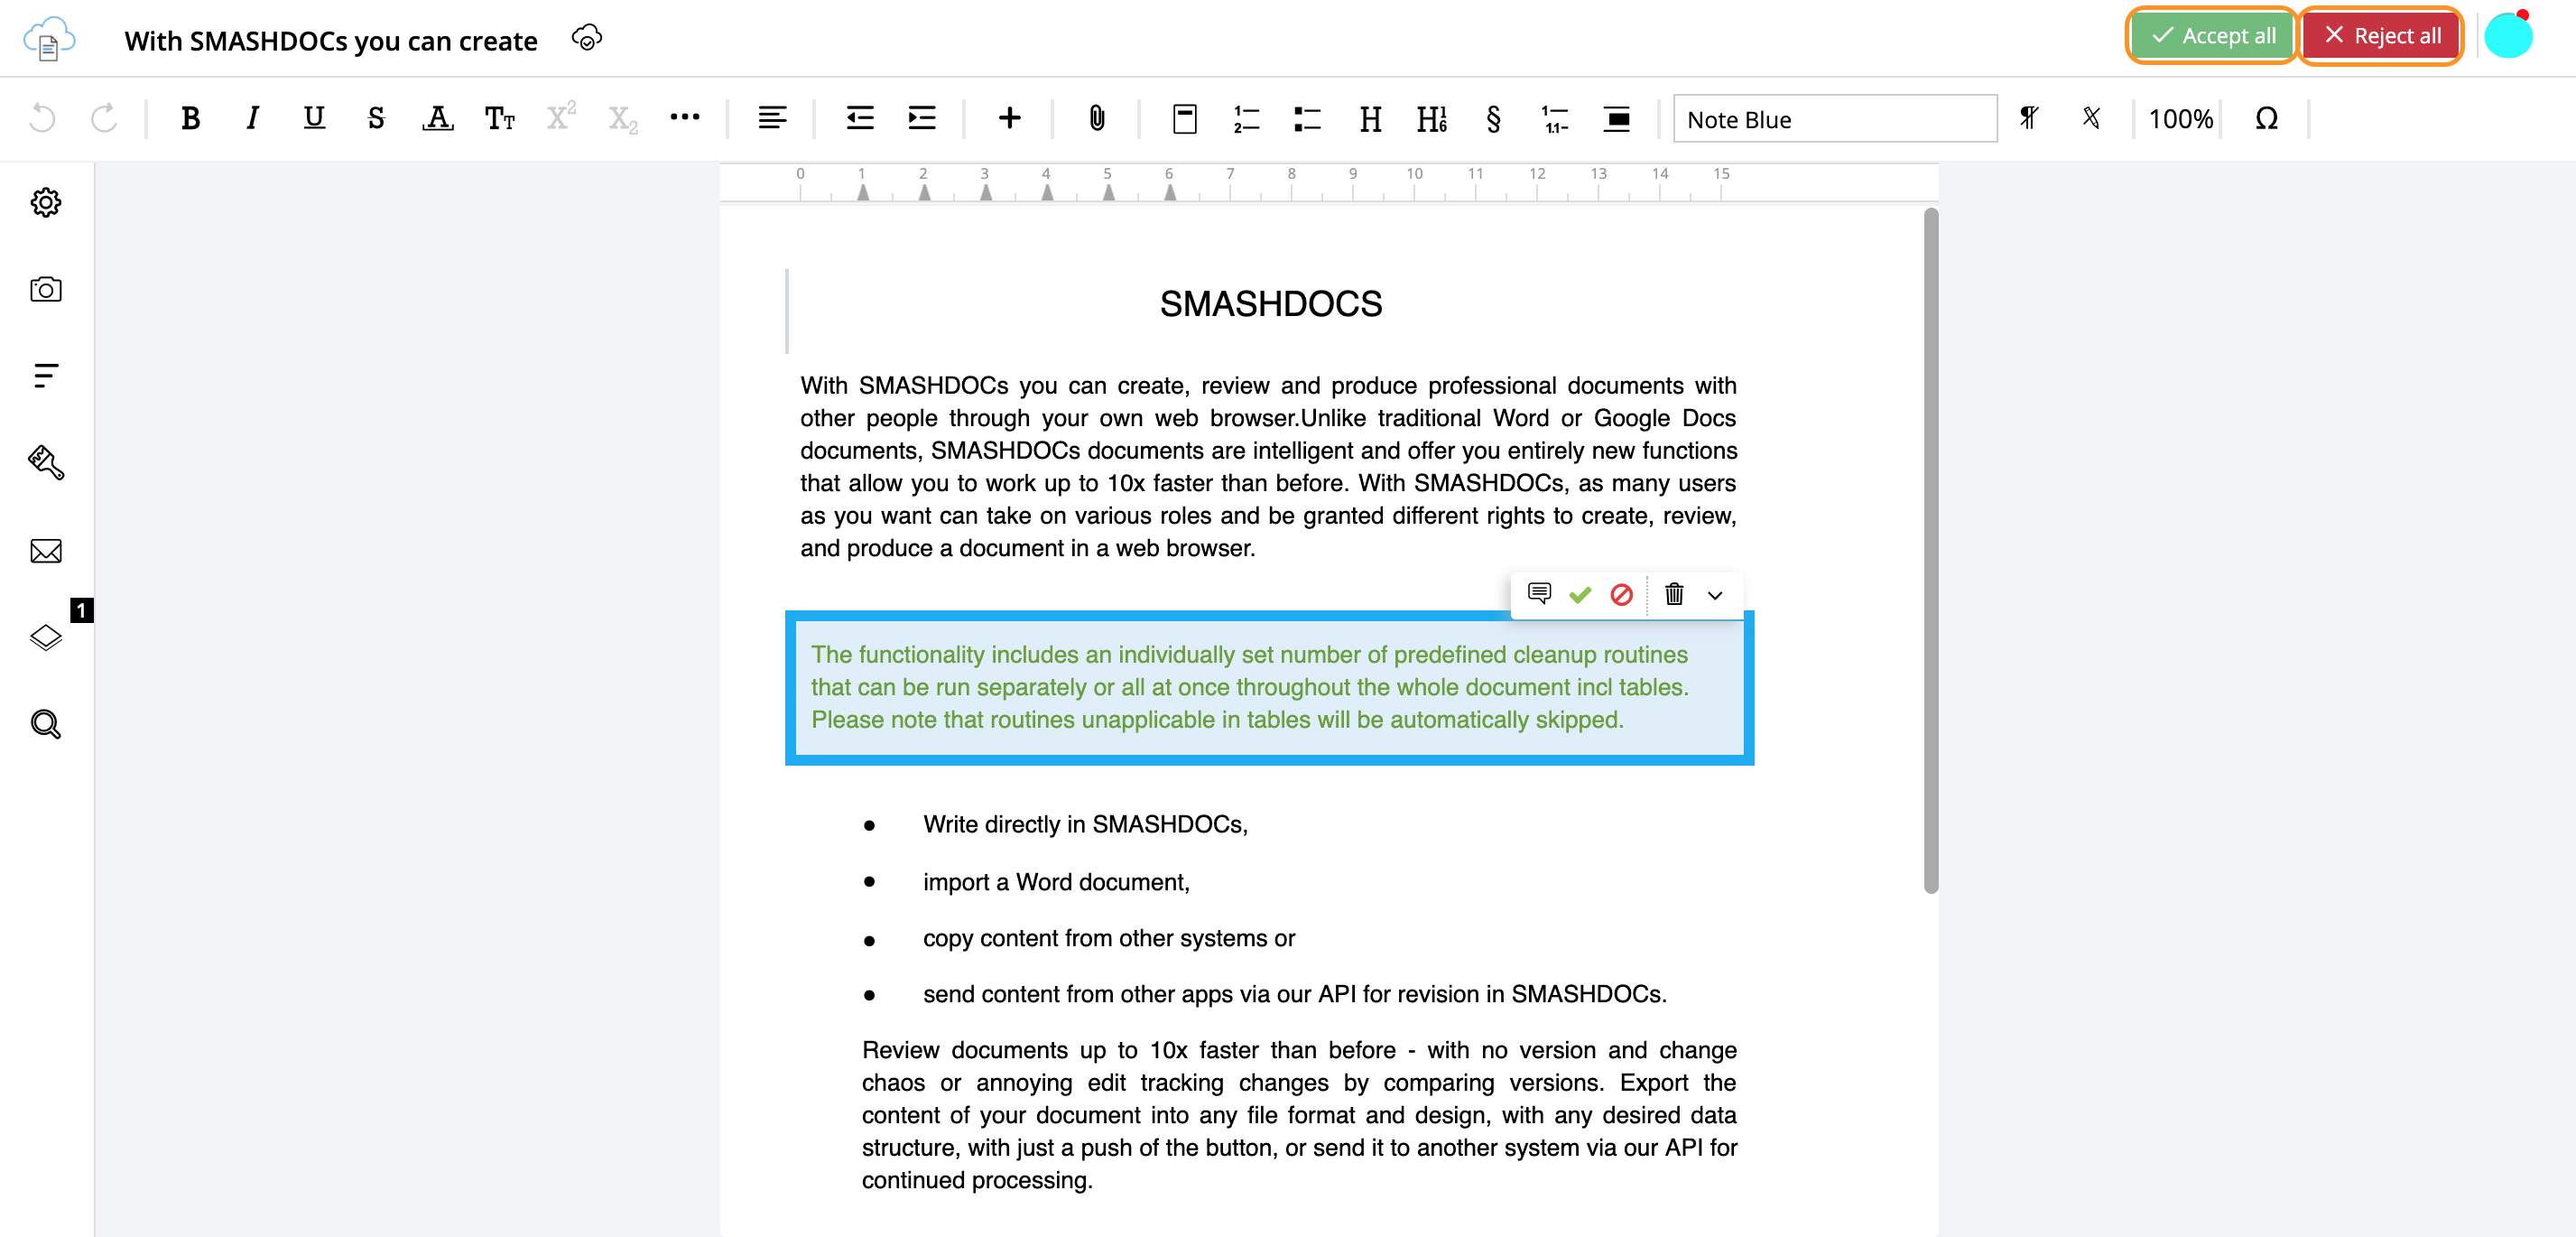
Success and error colors highlighted
In identity settings it is also possible to set table background colors.
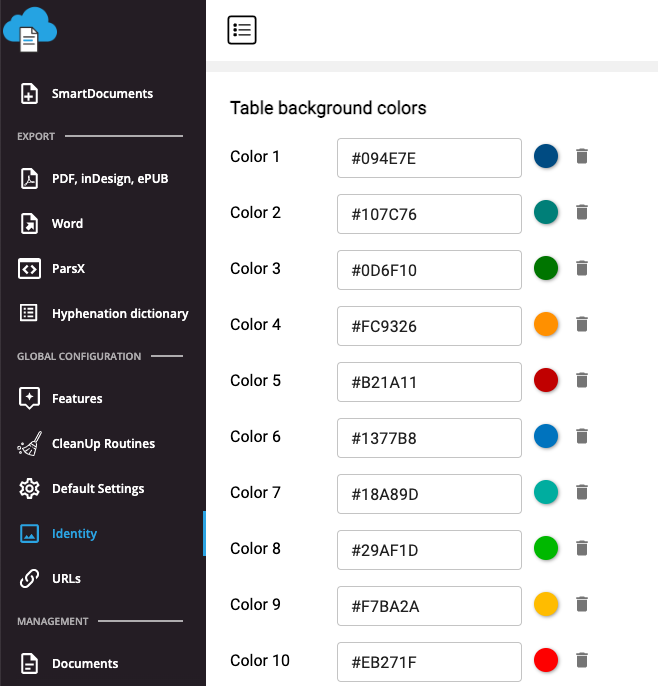
Table background colours
The number of colors to be set is unlimited. To add a new color click on the corresponding Plus-button and after you have inserted code of the color, click “Save”.
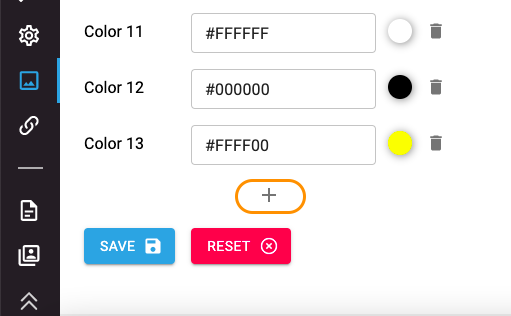
Button to add a new color
If you have removed a color accidentally, click “Reset” and this color will reappear.
22.1Adding new language for the login page
If you want to display the text on your login page in several languages (the supported ones are English, German, Russian, French FR, French CA, Spanish, French BE, Dutch BE), you can follow the next steps.
1.First, go to the Admin section and click on the “Identity” tab:
"Identity" tab highlighted
2.Then scroll to the “Text for login page” and click on the “Edit”. Here you can insert your own version for every supported language.
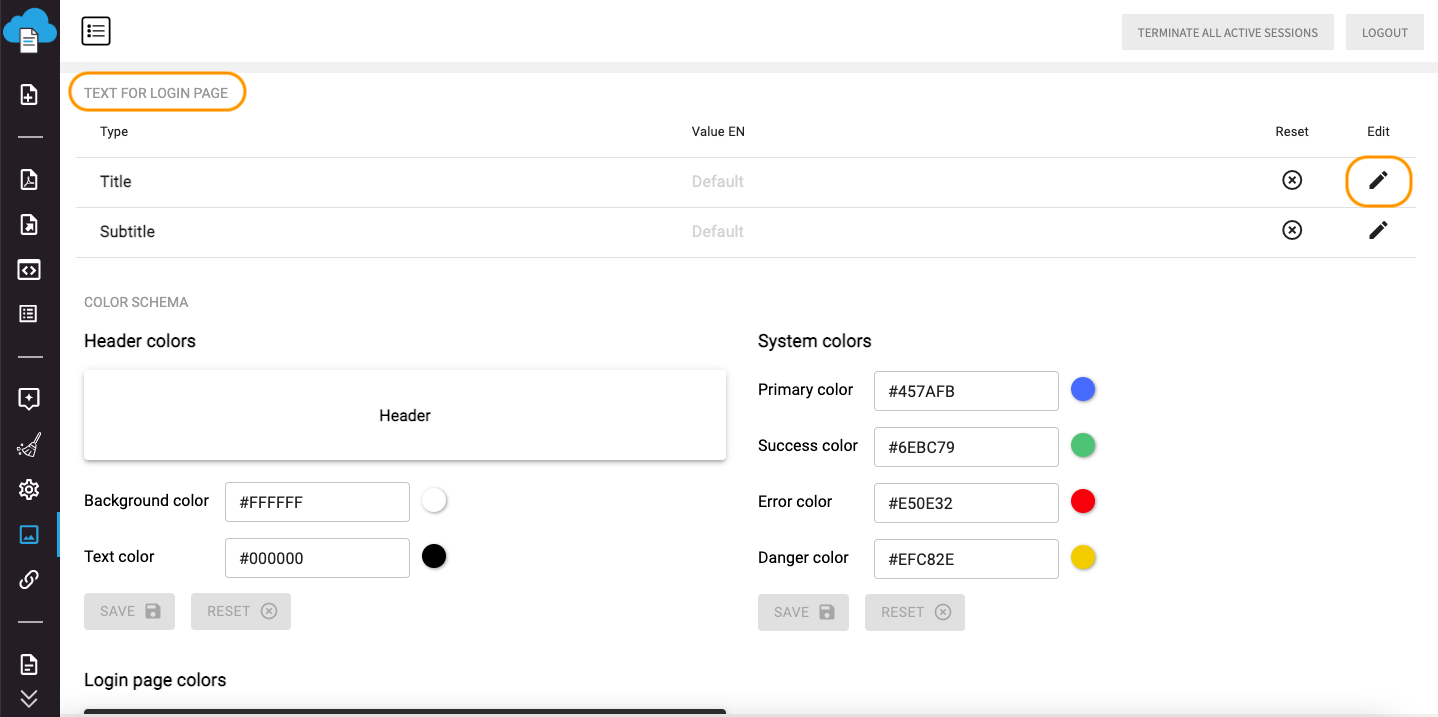
"Edit" icon highlighted
3.Change the text in title and/or subtitle.
After you inserted text for login page title and clicked “Save”, go to the login page and check the text. It should be displayed on the login default picture during registration. You can change the language on the registration page below and the language of the text will be changed too.
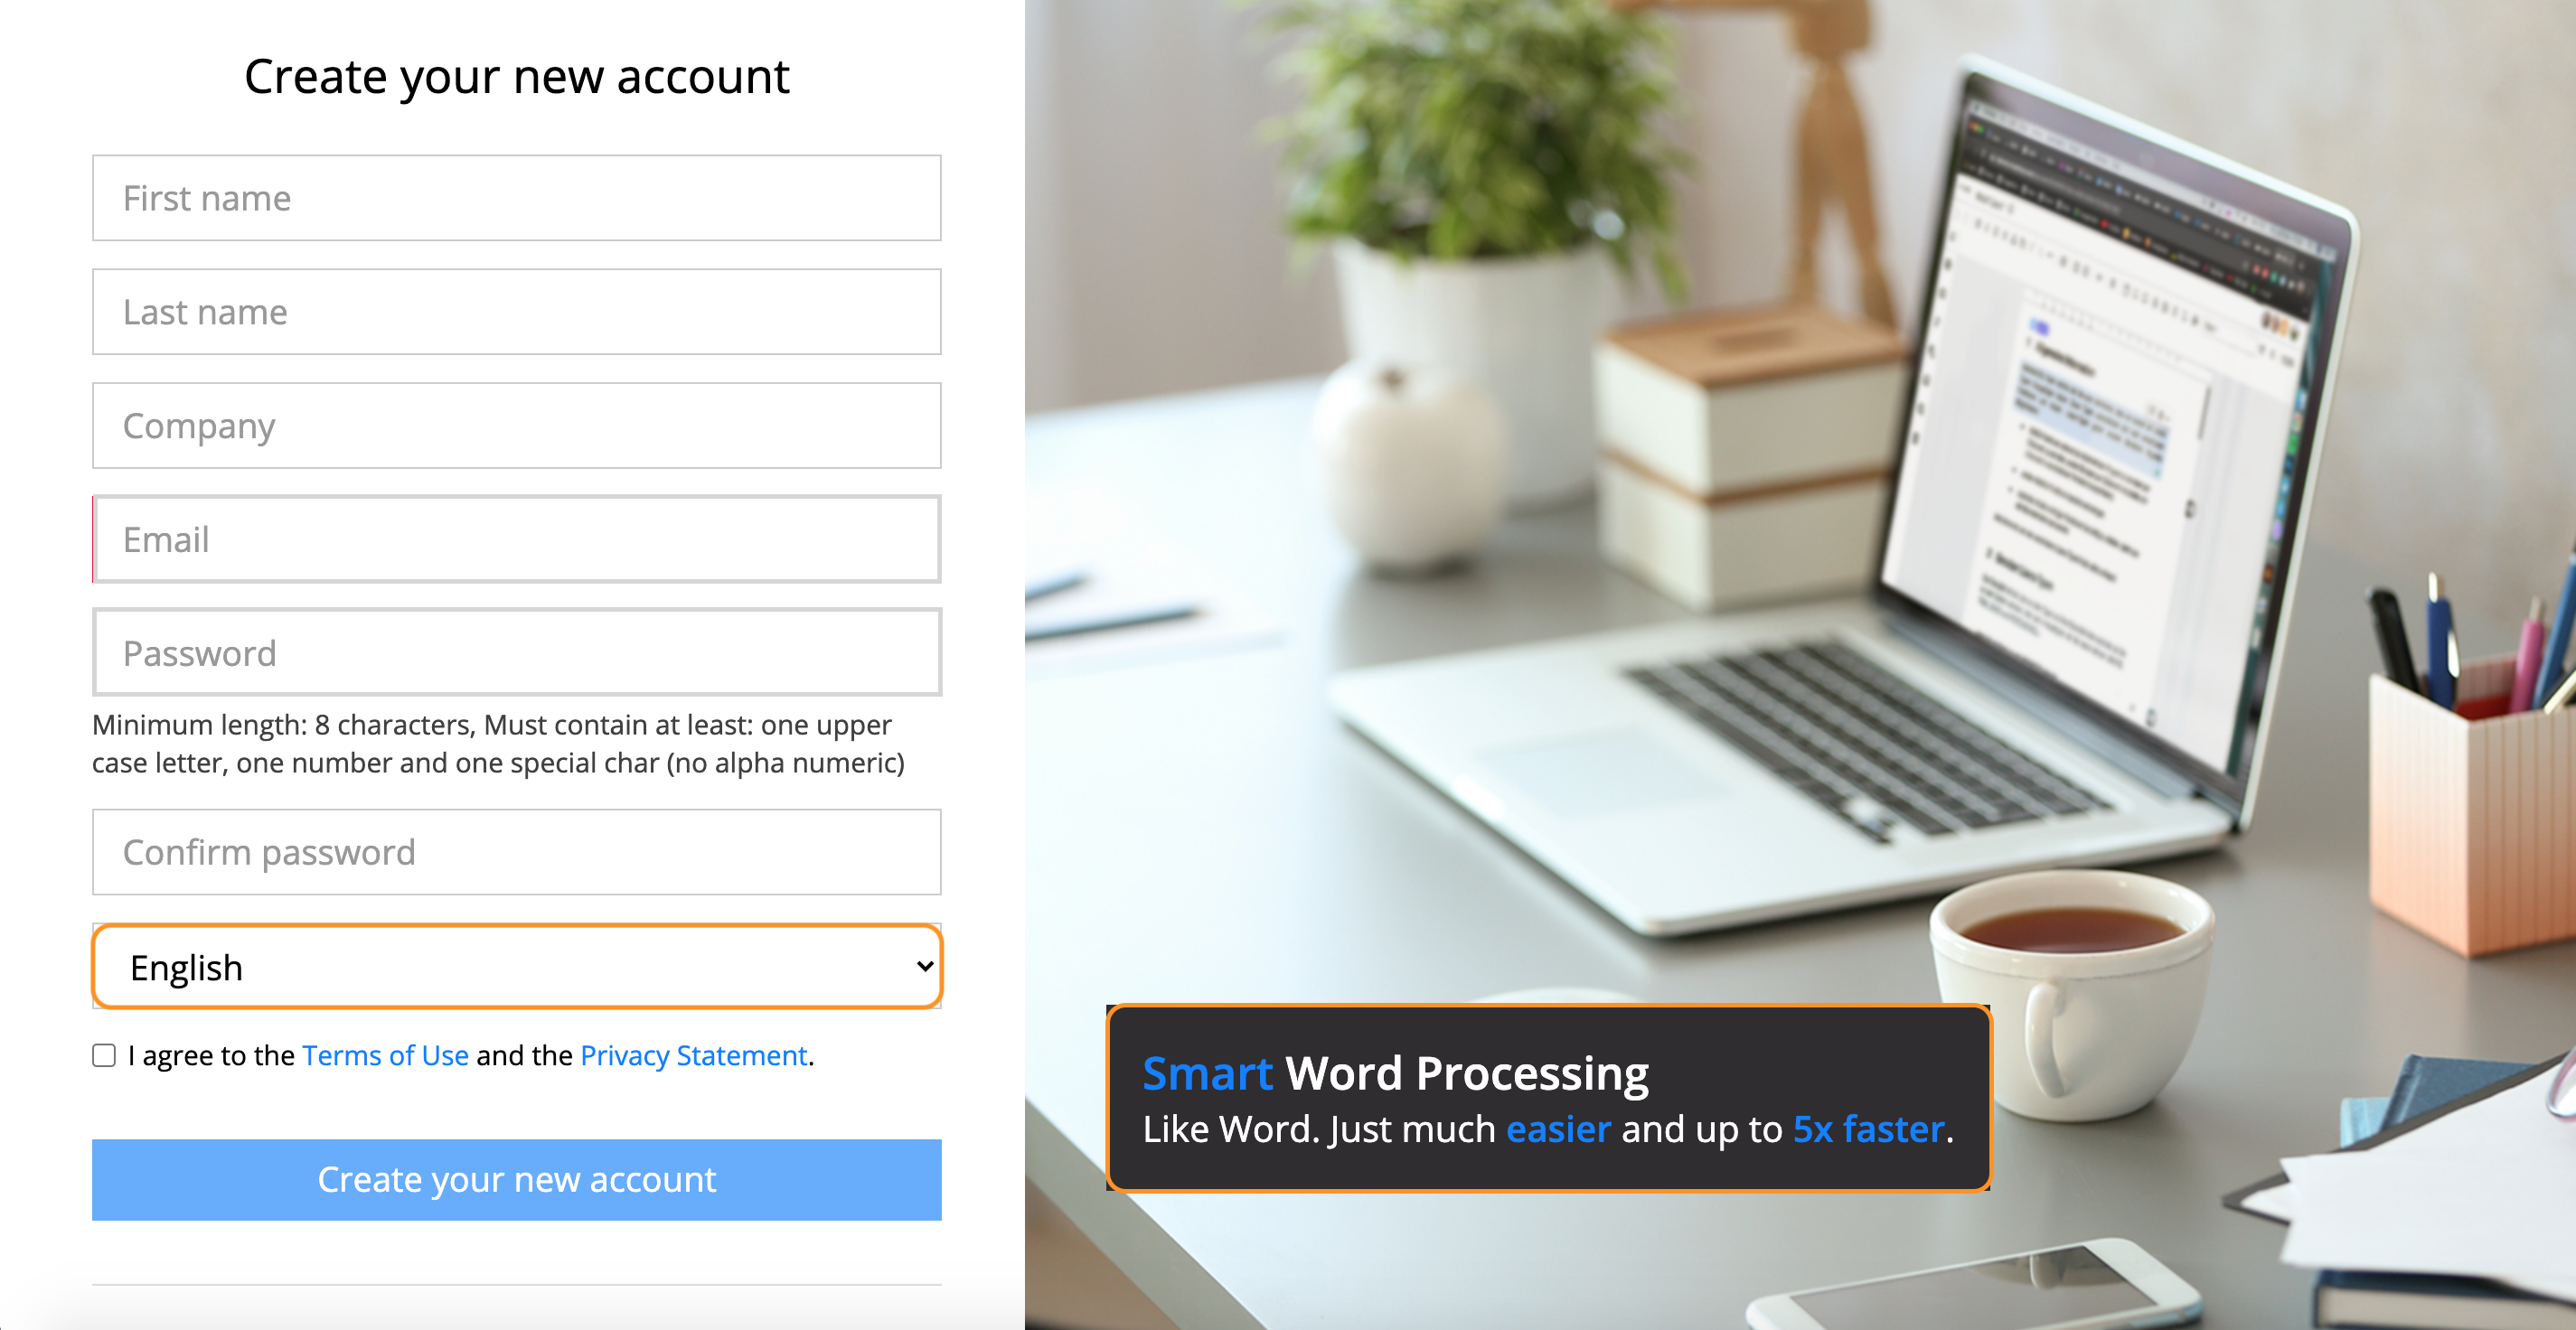
Edited text for login page title highlighted
4.To set the default language for the login page, go to the “Default Settings” tab and choose the desired option.
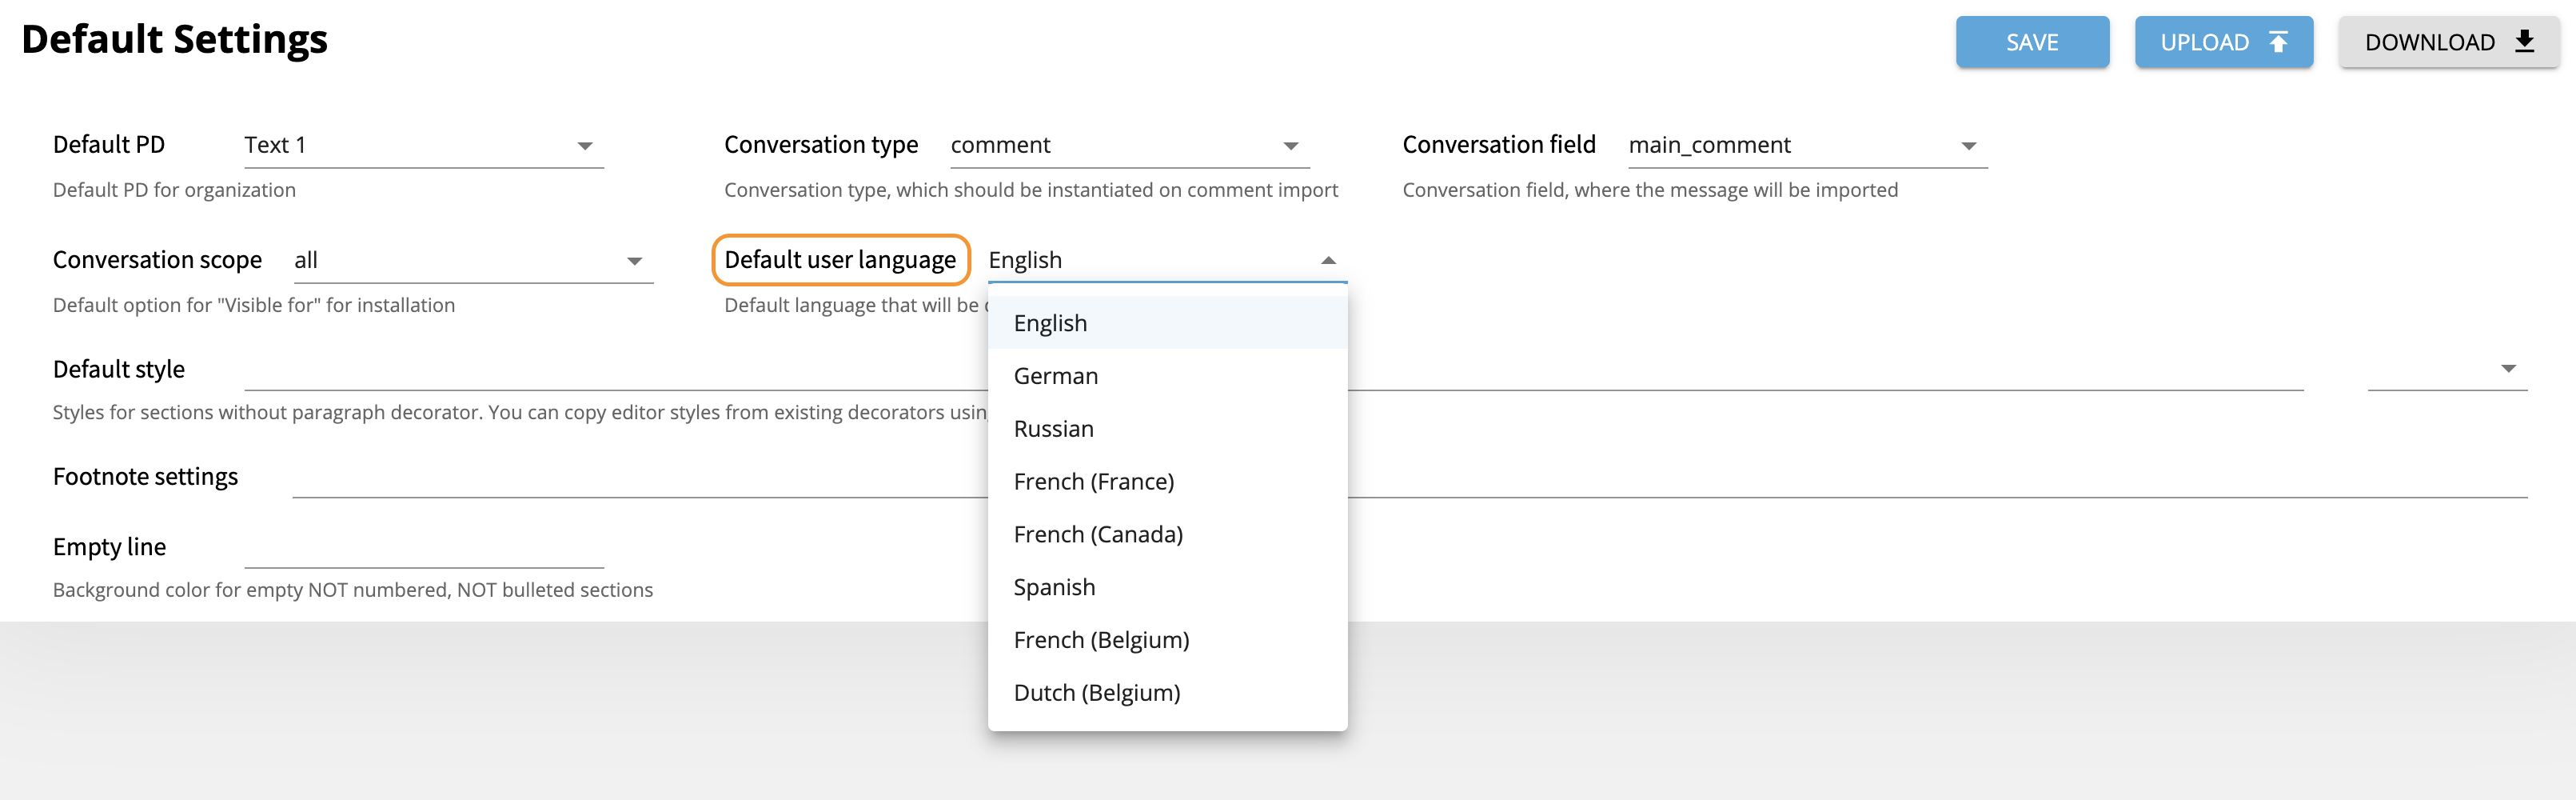
"Default Settings" and "Default user language" highlighted
As a result, you have your default language login page.

Default language highlighted
When a user switches the language to set up a new account, the login page text also changes.
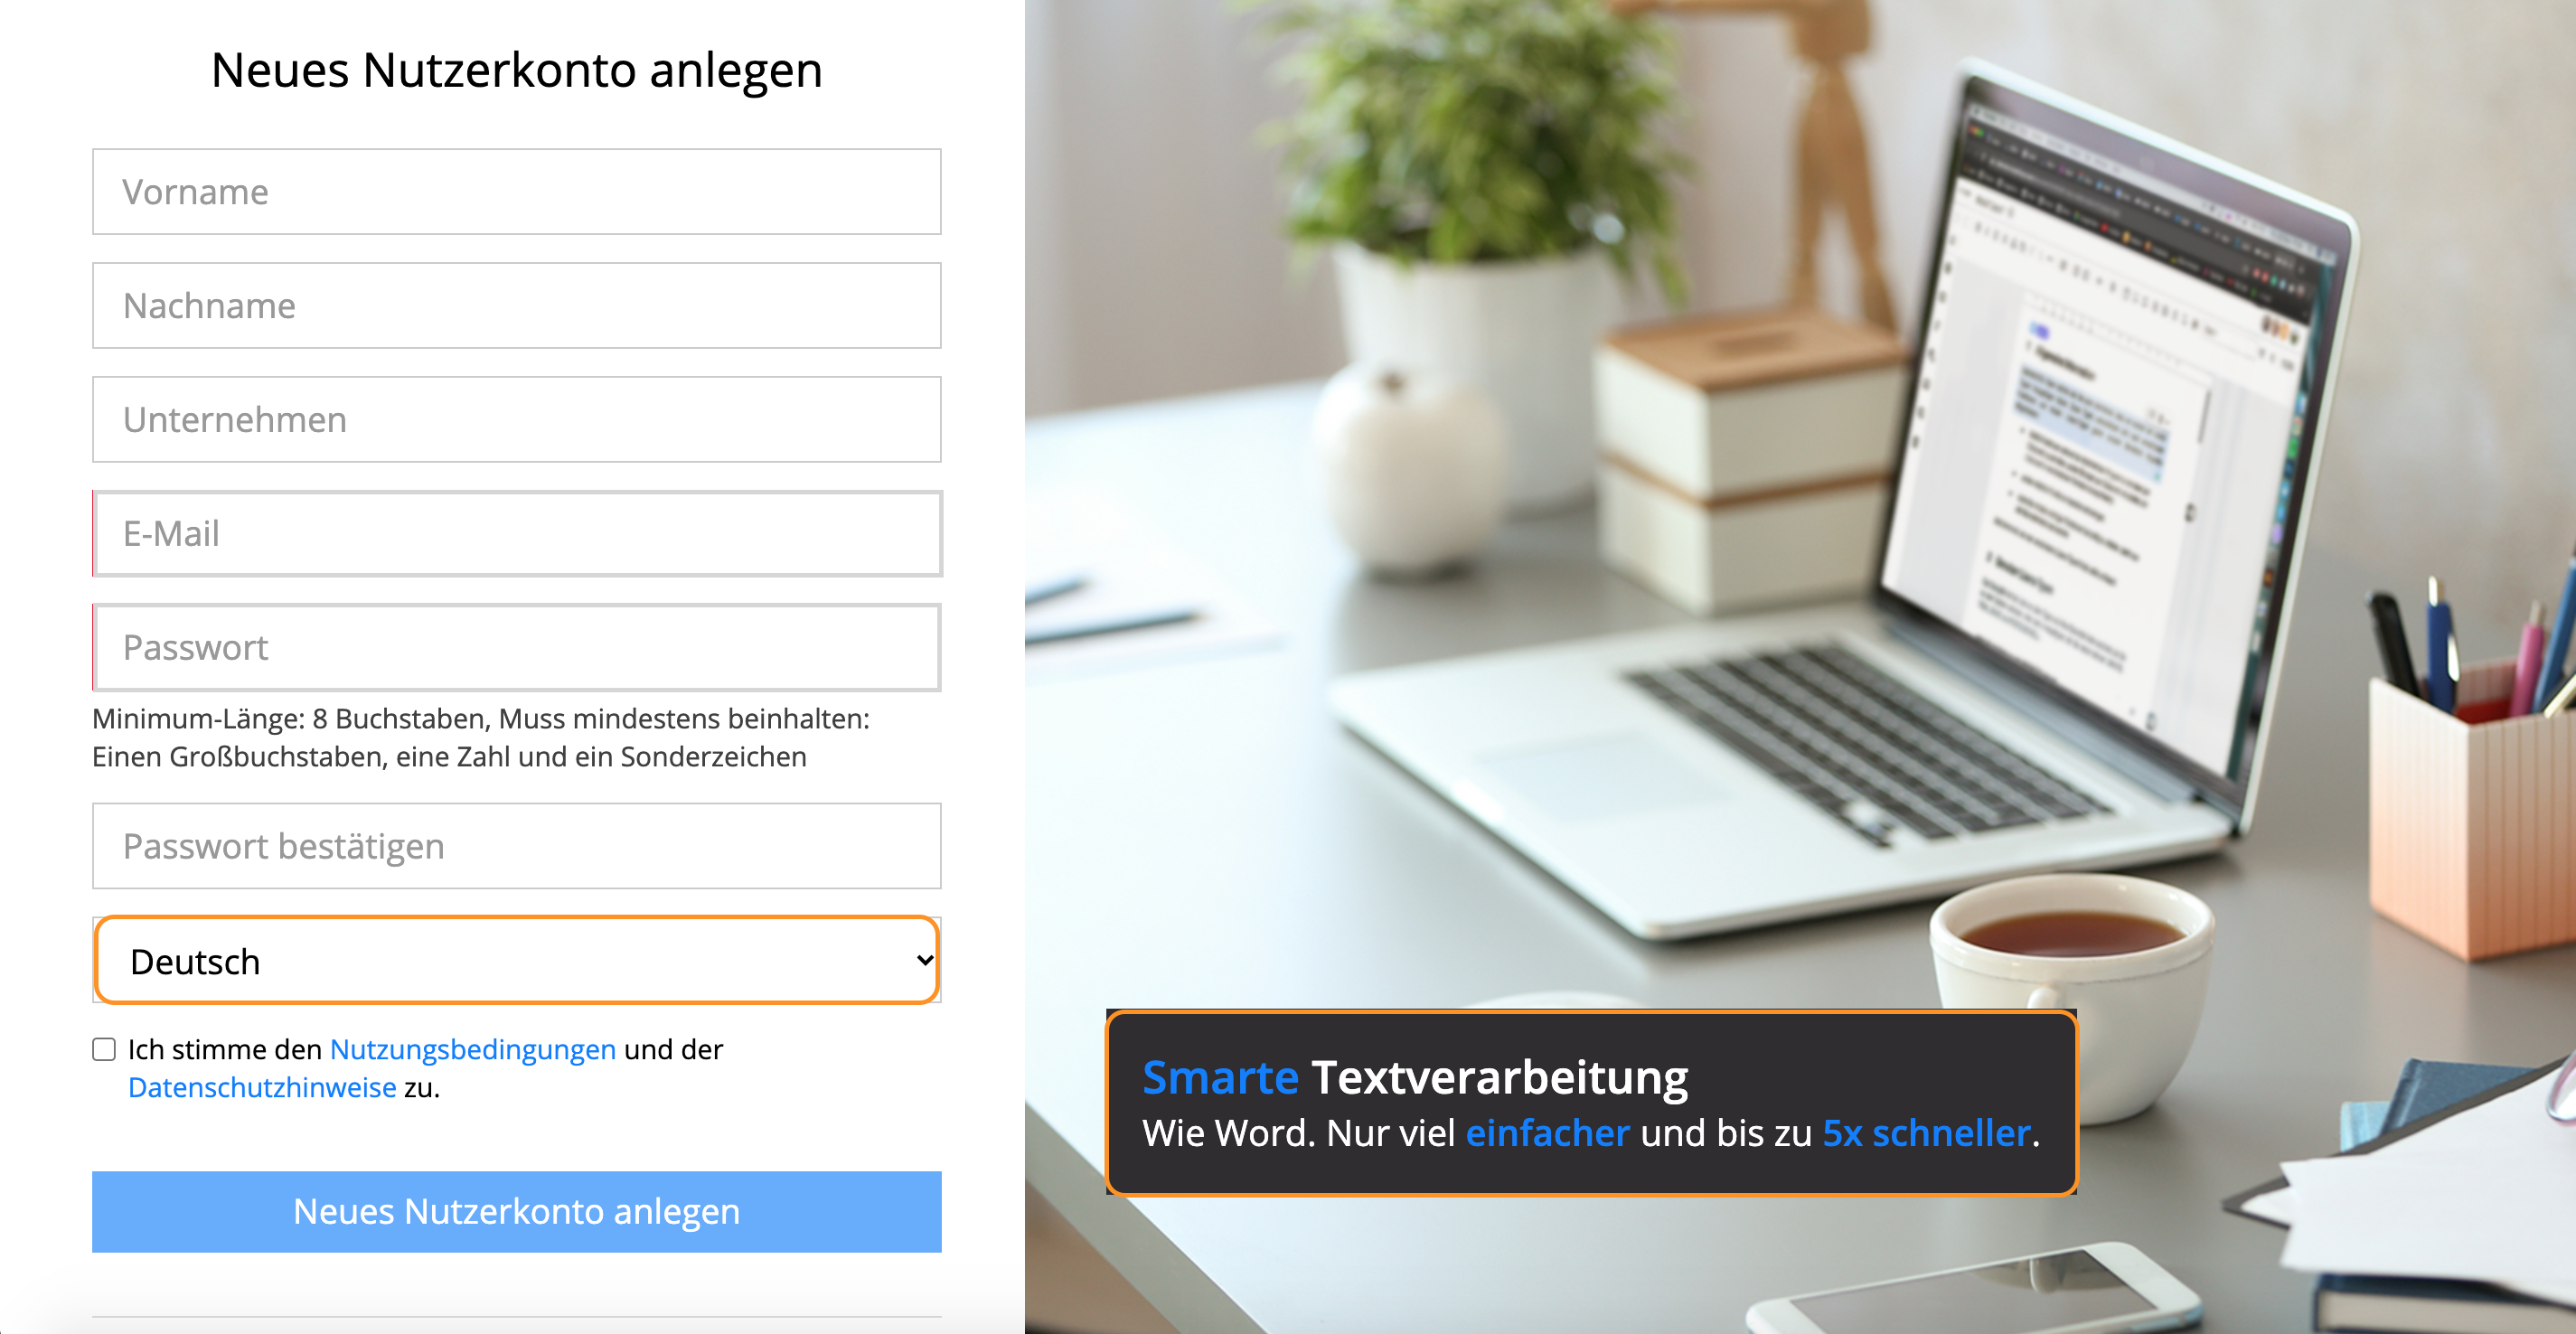
Language change highlighted
23URLs settings
On the page with URLs settings you can add links to any points you need by uploading a .json file with URLs.
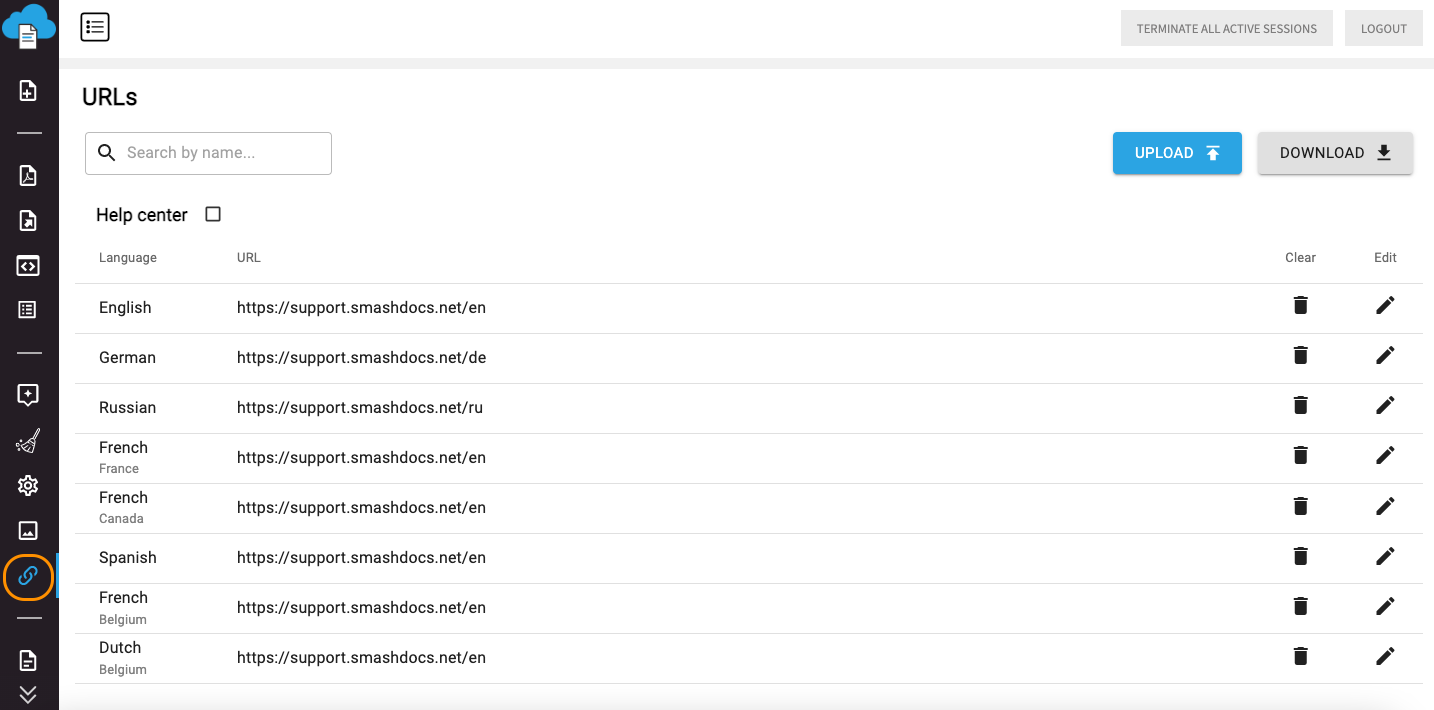
URLs settings
In the SMASHDOCs account these links will be available in the right corner above the page.
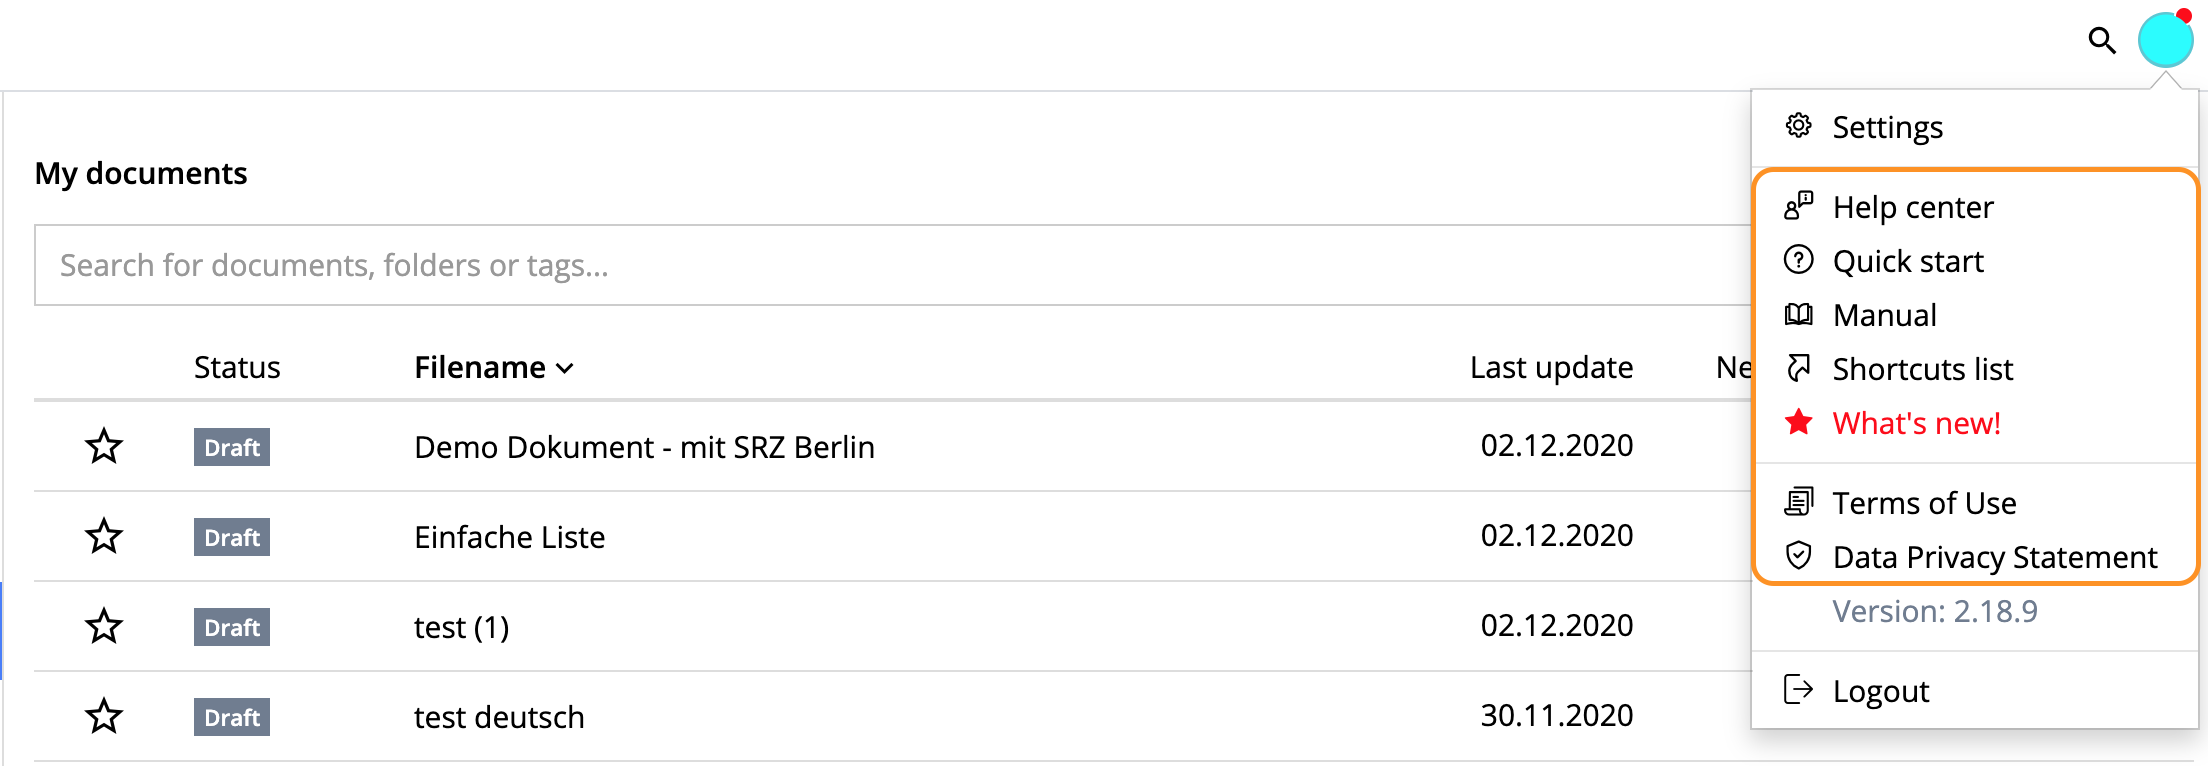
Available links in the SMASHDOCs account
Click any of highlighted points and you will be switched to the required web-page.
If there is a representative link that one should be able to go to right out of view mode of the opened document, you can simply add it to the branding logo at the top of a page in your AdminIU.
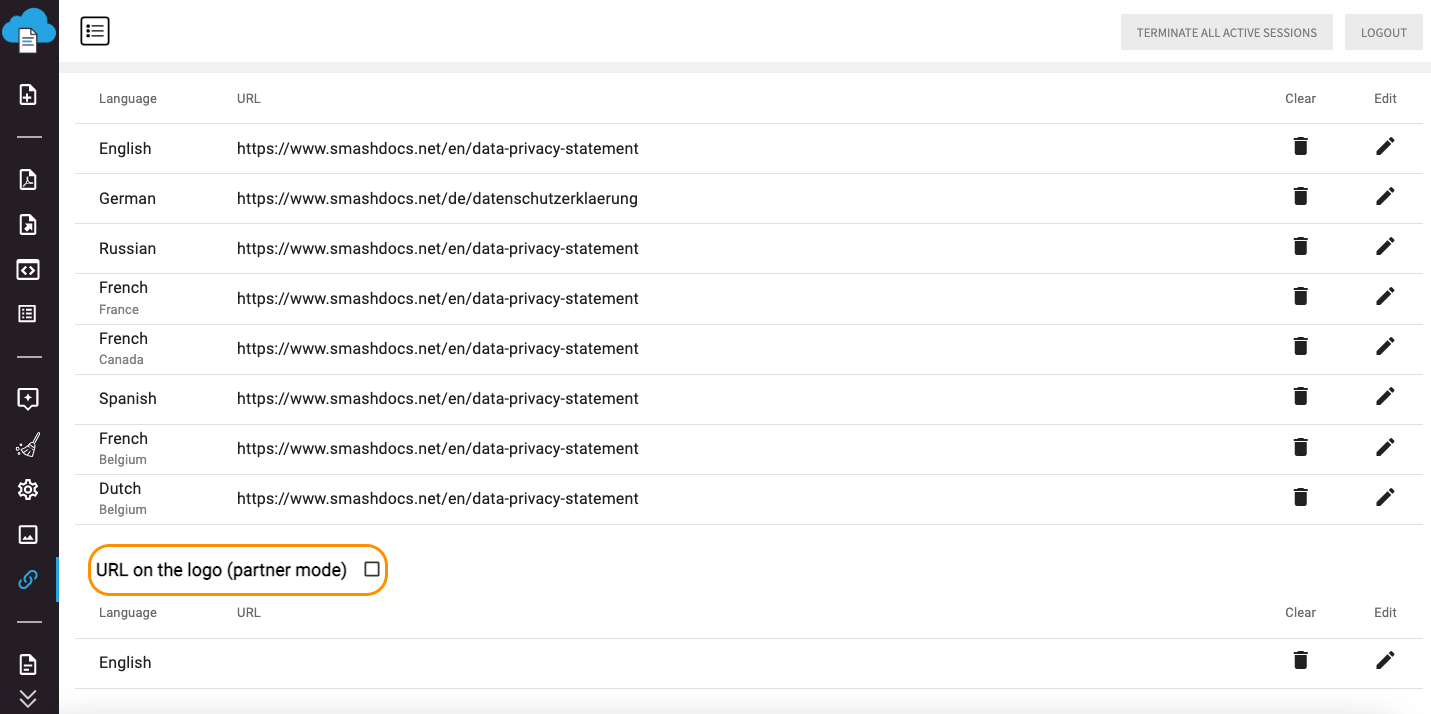
Adding URL to the logo
Branding logo with the supposed URL highlighted
Note: works only for partner mode.
You can clear, edit URLs, search them by names in the Admin page and download a .json file with the list of all URLs from the admin page.
24The list of created documents
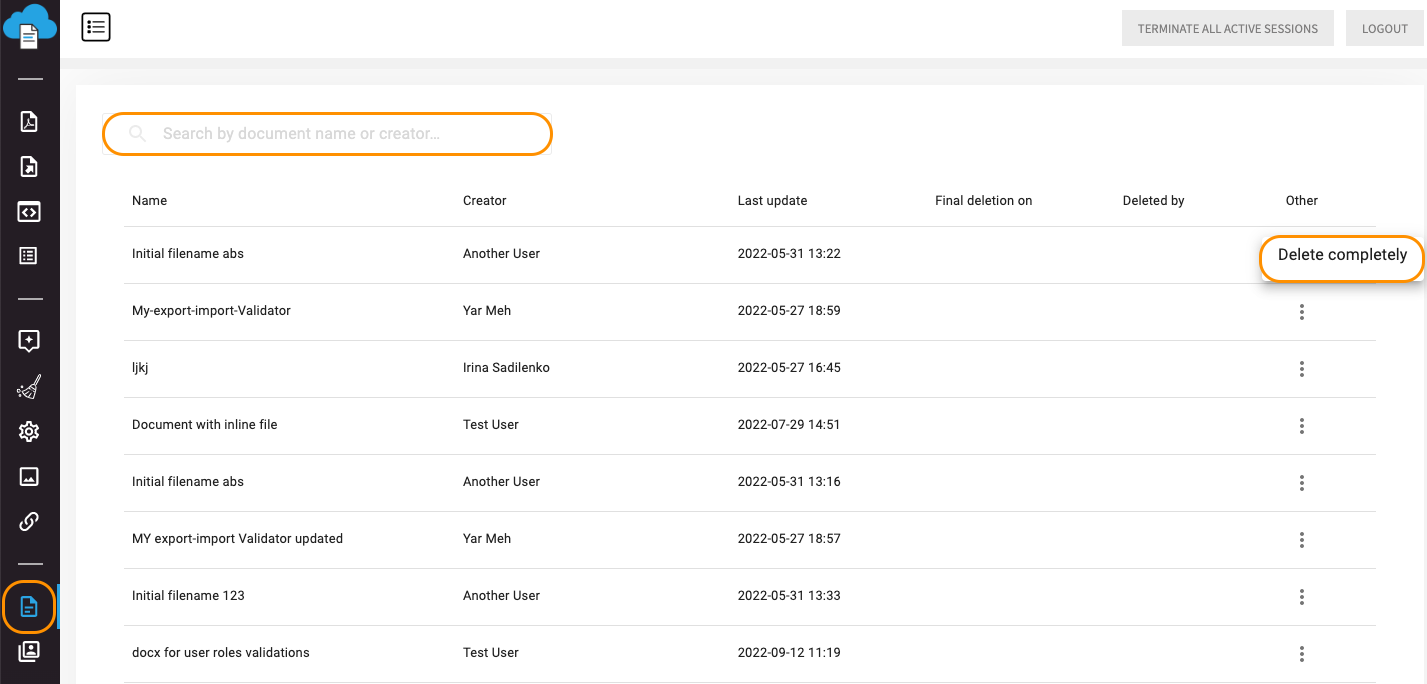
In the page where the list of created documents is displayed there is such information about documents that exist in SMASHDOCs system as the name of a document, creator, last update of a document and in case it was deleted, details of this deletion (date and who this document was deleted by).
The list of created documents
If you need to find out information of a particular document, fill in the name of this document or creator in the line ‘Search by document name or creator’, and then you will be able to see the time when the document was updated the last time, or in case it has been already deleted, the date of final deletion and who it was deleted by.
If you would like to delete this document directly from the Admin page, find the column ‘Other’, click the three-dots sign and you will find the option ‘Delete completely’. After you press it, the information in columns ‘Final deletion on’ and ‘Deleted by’ appears automatically.
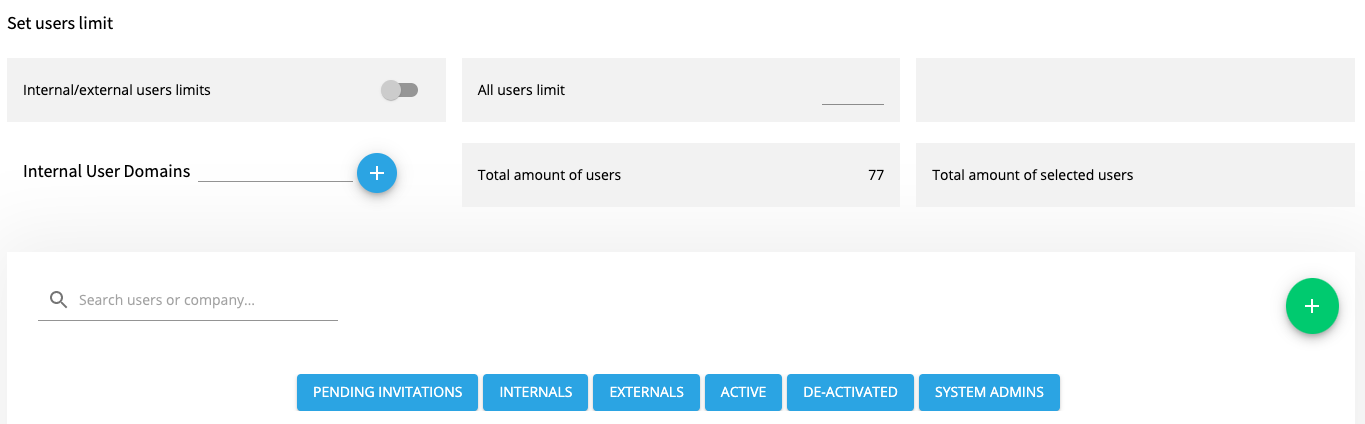
25Users settings
As you move to users settings, you will firstly find options for setting user limitations.
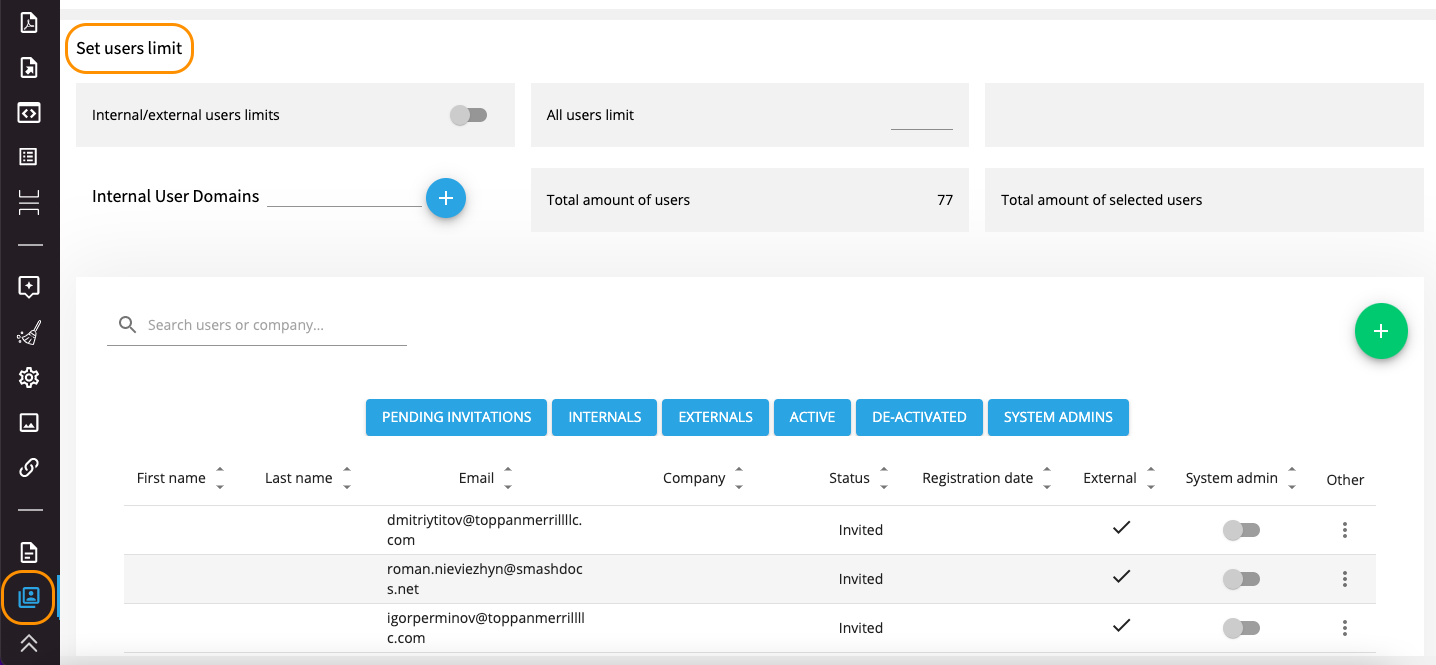
Users settings
With this option it is possible to set limits on the number of users in the system. This means that no more than the indicated number of users have permission to be registered in your system. If the option “Internal/external users limits” is switched off, you can set all users limit (see Image 192). In case you need to set different limits for internal and external users, switch on this option and two separate fields for internal and external users limits will appear, where you have to indicate the exact number of users in your system.
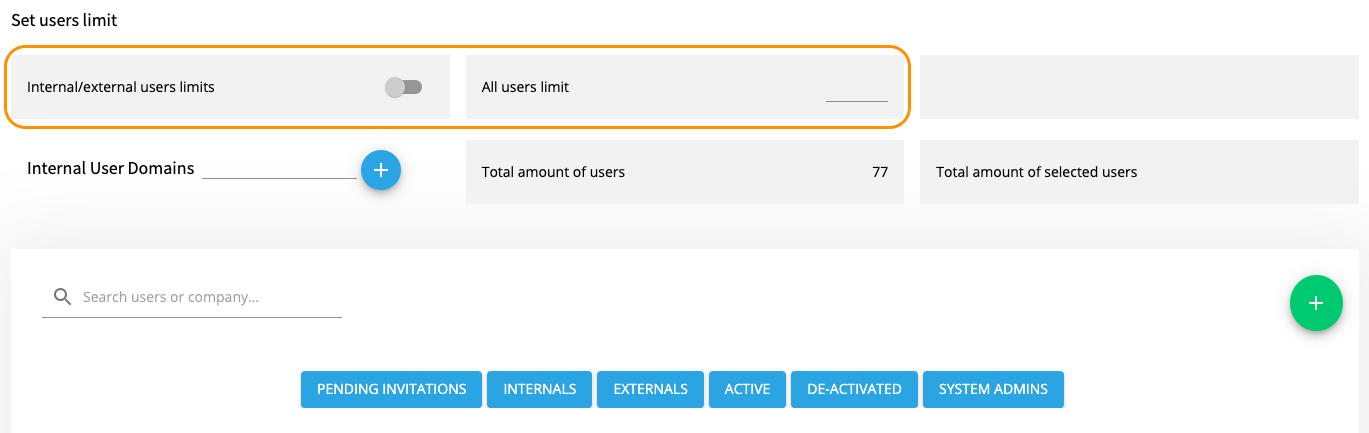
Internal/external users and all users limits highlighted
In case you need to set limitation on number of users per document or on the amount of documents per system, open the tab “Features” and find there the part “System limitations”.
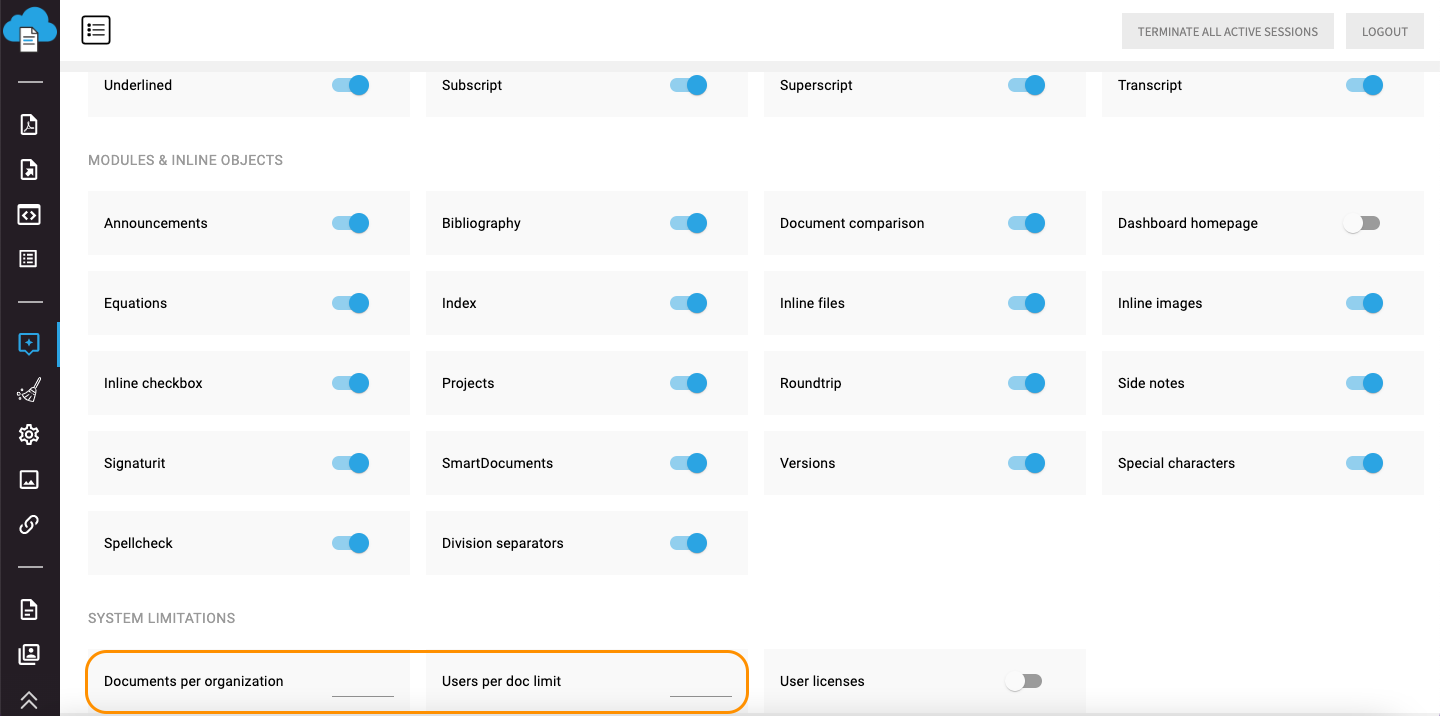
Setting limits on users per document and documents per system
Here you can indicate the limited number of documents that can be created in your system and also the number of users that can be invited to a document.
You can also get the information about total amount of users that are registered in the system. This information is placed in the field "Total amount of users" near the limitation settings.
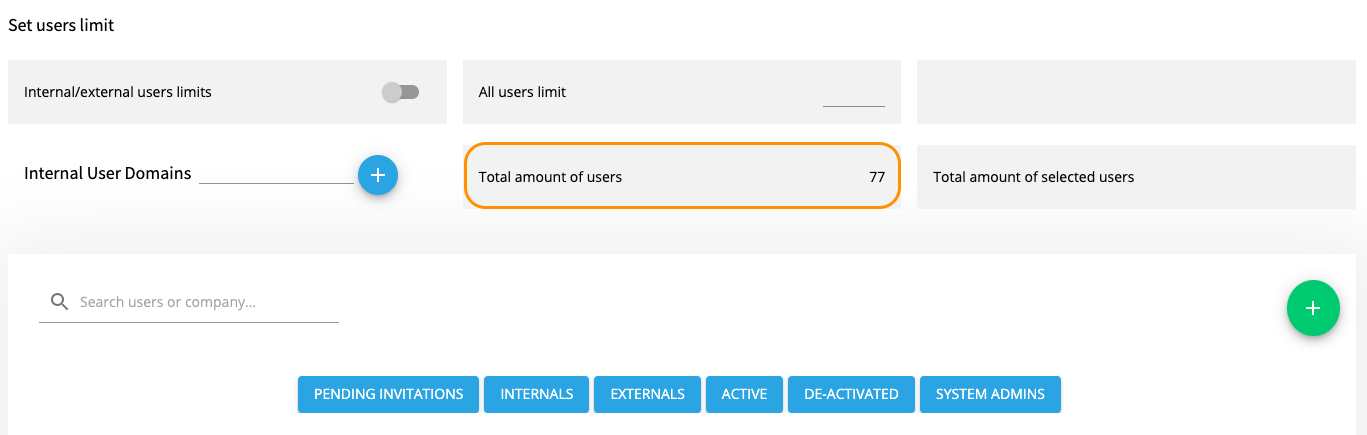
Showing total amount of users in Admin UI
This number is updated each time there are some changes in the number of users in the system.
In the field "Total amount of selected users" a number of users is displayed that refer to a chosen filter among "Pending invitations", "Internals", "Externals", "Active", "De-activated", "System admins".
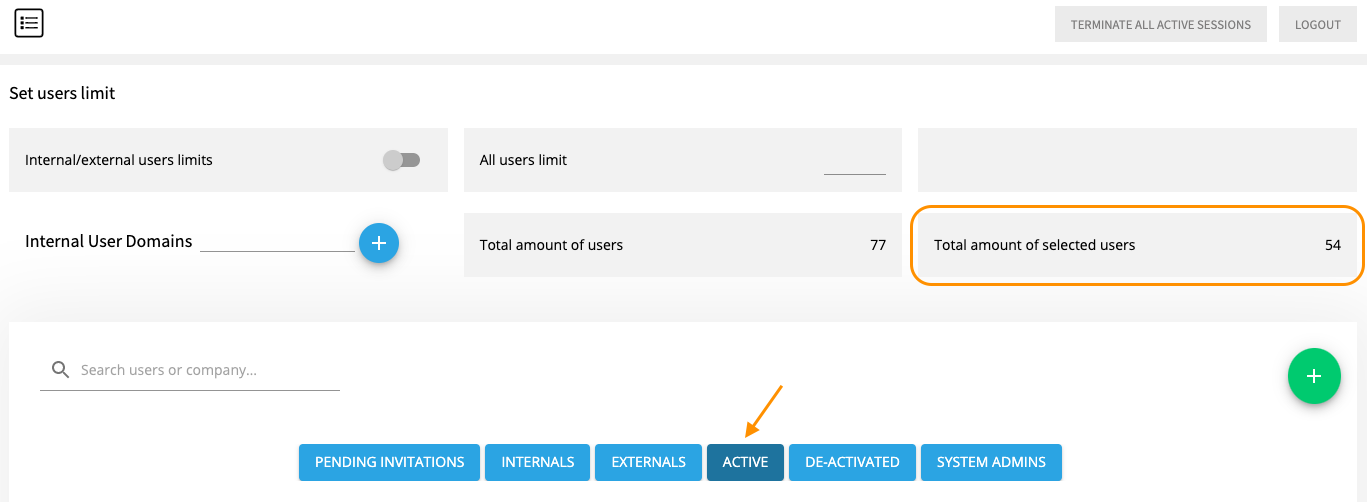
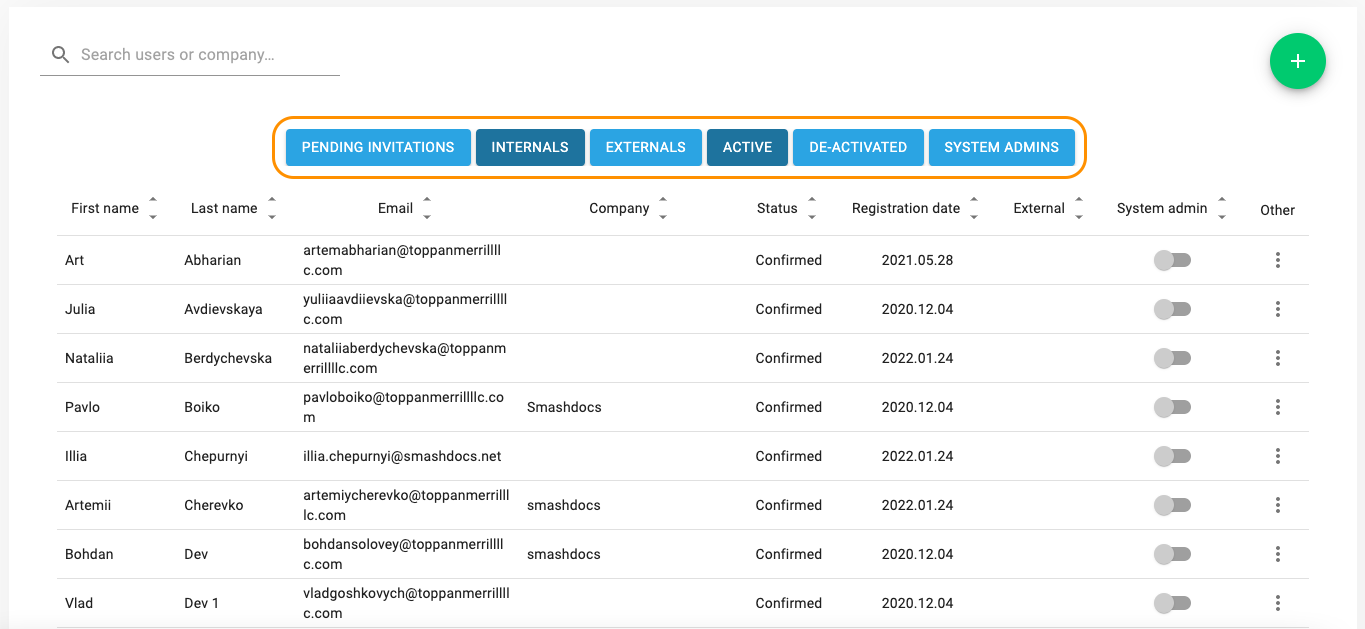
The amount of users relating to the selected filter "Active"
When you select several filters at once, the number of users referring to the last chosen filter will be shown. If you deselect the filter, the field "Total amount of selected users" will become empty.
Behavior of the field "Total amount of selected users" after deselecting filters
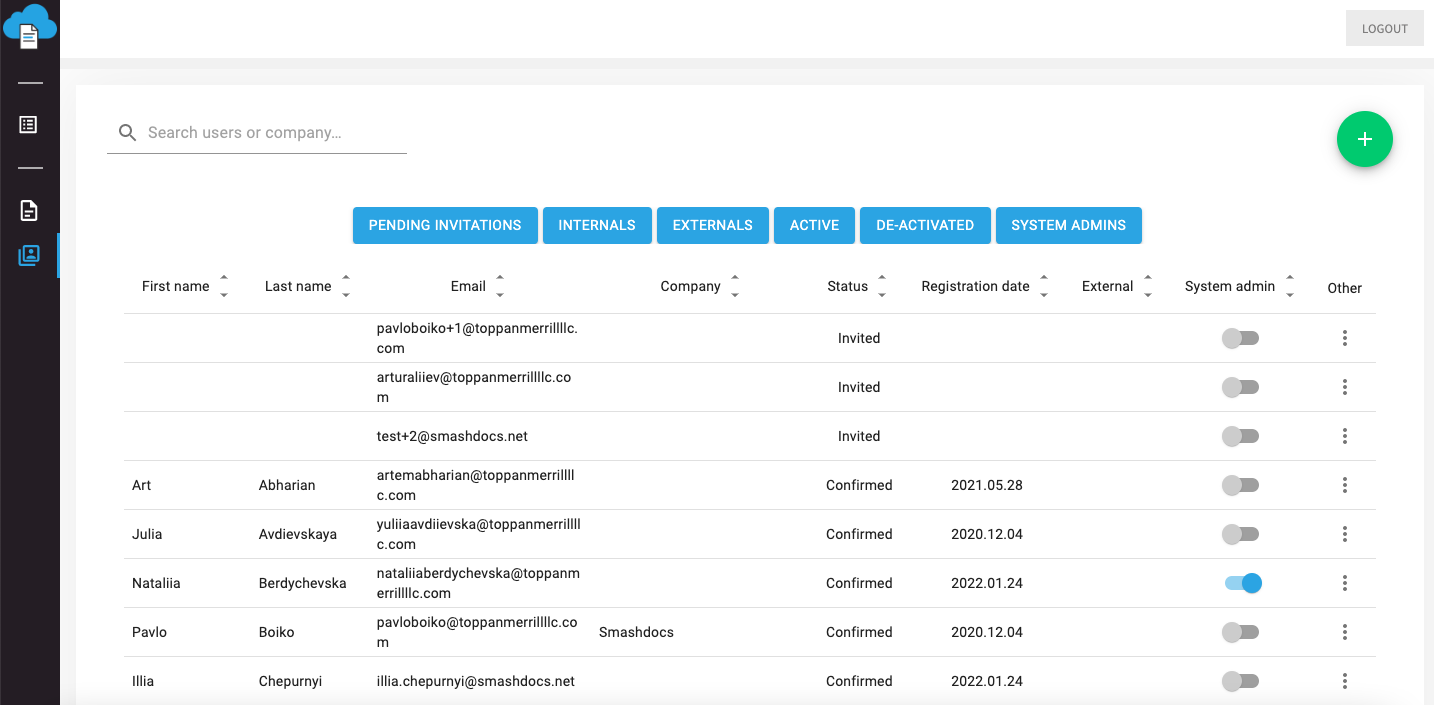
In the list of users that is shown in the tab “Users” you will find the first and the last name of each user, their emails, companies, statuses that each user may have, registration date, whether a user is external, internal or the system administrator and other options that can be applied to users in the system.
In each column that provides all required information about users there are two arrow-buttons that change the order, users are displayed in the list.

Buttons to change the order users are displayed in the list
When you click an upper arrow-button in any column, there appear some changes in sorting users in the list. So, in the columns “First name”, “Last name”, “Email”, “Company” and “Status” after activating an upper arrow-button, the list of users will be displayed in the alphabetical order. In the column “Registration date” the list will be shown, starting with the user who was registered the earliest. In the column “External” external users will be displayed first. In the column “System admin” users with the activated toggle “System admin” will appear at the beginning.
Click the arrow-button downwards - and the list will be transformed to the opposite outlook of the above described result.
Users with the status “Invited” can be manually confirmed on our internal user management page.
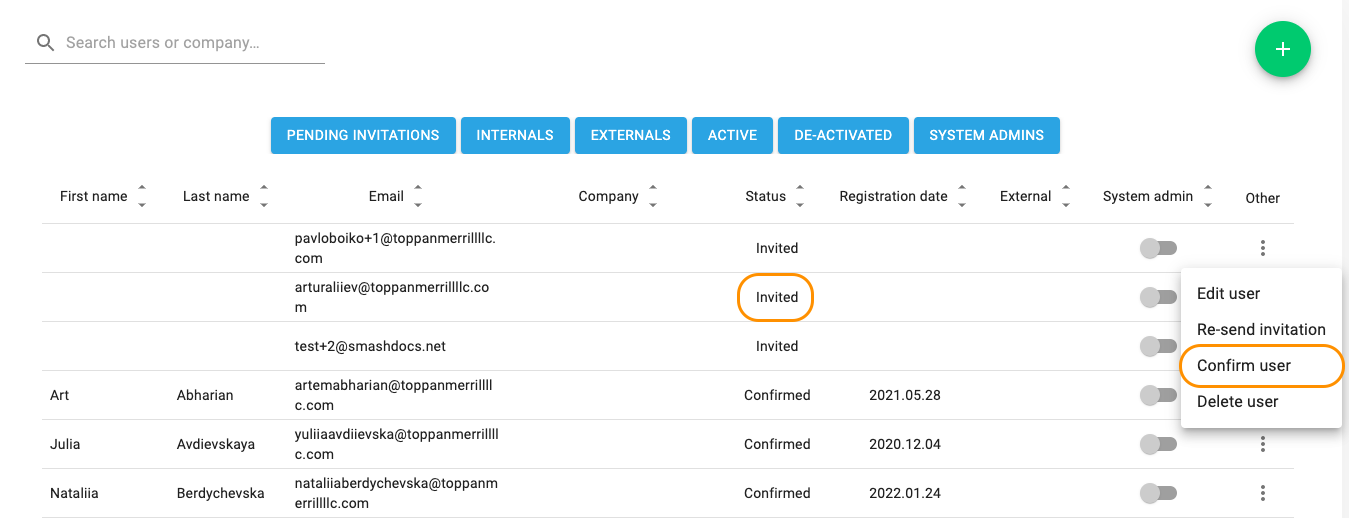
Button to confirm a user manually highlighted
This is extremely helpful, in case the invited users can not find their confirmation email. Once the user is manually confirmed, the temporary password should be set.
You can also re-send the invitation to the user, edit and delete users.
There are special filters for following users with different statuses.
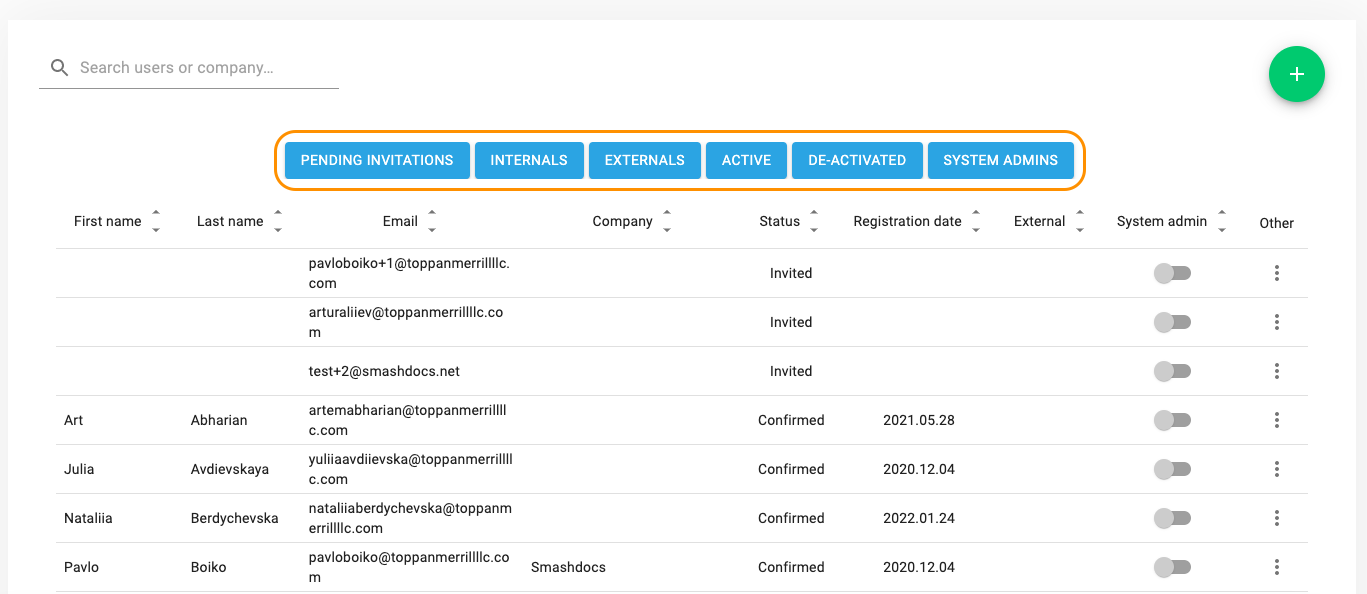
Groups for different user statuses
Click any filter you would like to check and you will see the list of users with required status only. You can also select several filters at once to find users with all chosen statuses together.
Several filters activated at once
It is also possible to search users or company through the search field (see Image 200).
SMASHDOCs automatically generates random sign combinations that can also be switched until a suitable or easier combination has been found.

Generation of temporary password highlighted
Once the user successfully logs in to the system with the generated password, he can immediately change it to the desired one.
For already confirmed users a new password can also be set. This option helps out if the user tried to log in with the wrong password too many times and failed to reset the password as specified in the instructions afterward. If the login was unsuccessful too many times in the row, the system does not let such a user through, until the password is set manually for him, and he logs in to the system with its help.
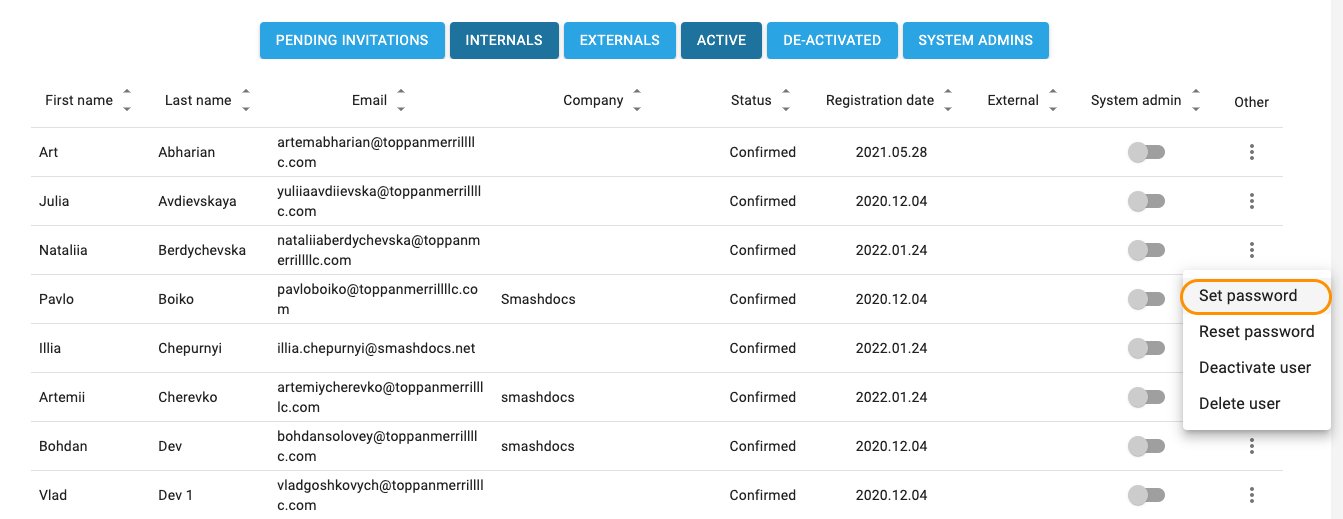
Button to set users password manually highlighted
You can reset password, deactivate or delete user as well.
Once the eSign-function is activated in your system, only internal users have access to eSign process and can be authorized to it automatically. Internal users are identified by Internal User Domains.
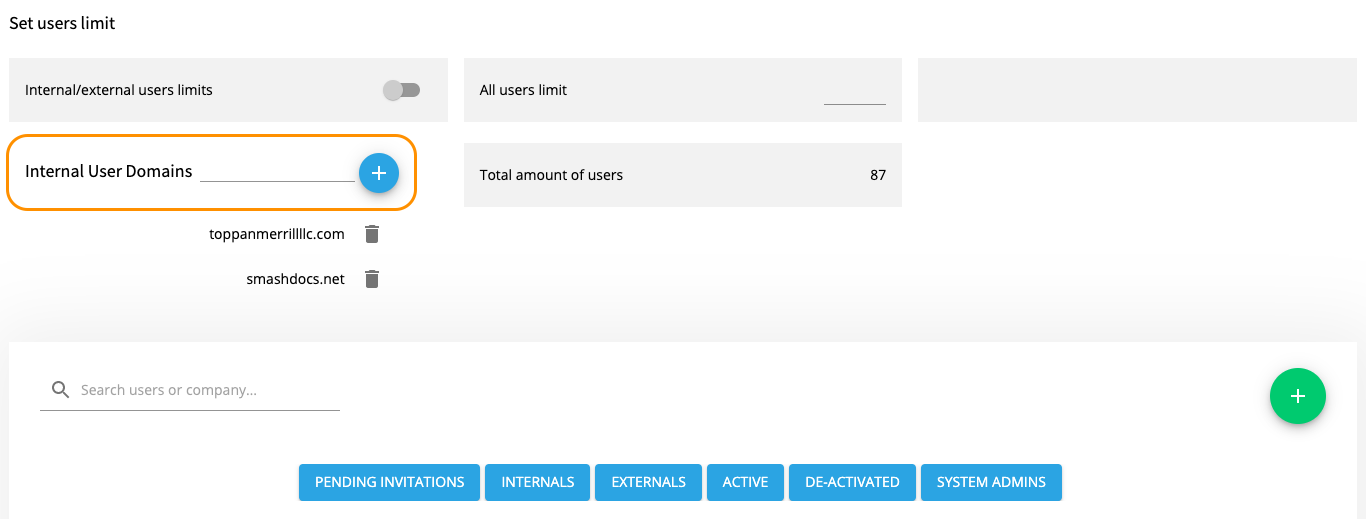
Internal User Domains highlighted
If the field “Internal User Domains” is empty, this means that all users are external. To become an internal user, the address of your domain must be added to the field “Internal User Domain”. To do this, insert the required address in the line.
Also, you can set all users in the system as internal by inserting a symbol “*” into Internal User Domains line.
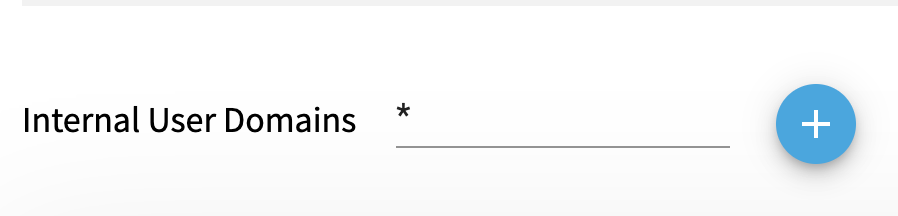
The symbol * to set all users internal highlighted
Also, there is an opportunity for several users to work and make changes simultaneously in such tabs as Special Characters, Quick Format Buttons, Inline-Styles or the Paragraph Decorators. Be sure that all data are saved in this case.
25.1Admin Console management for system admins
The user management page enables the system admin to display, update and insert users in an organization. Button “User management” can be found in the menu under the avatar.
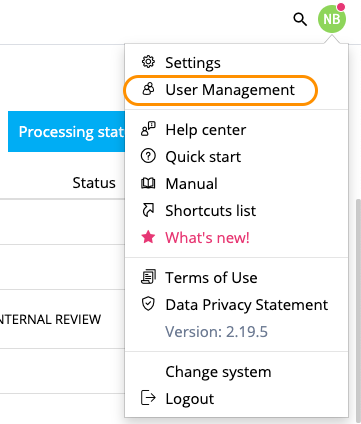
User management button displayed in the menu under users avatar
Once you land on the user management, in the Admin page two tabs will be available - users settings and the list of created documents.
The outlook of Admin page for system admins
In the tab “Users” except for setting limitations and dividing users to external and internal, you are able to apply all functions to the users, that are described in the paragraph “User management settings” (see 25).
In the tab “Documents” all functions are available for system administrators, that are described in the paragraph “The list of created documents” (see 24).