Module "Excel365 integration"
1General
Due to the integration of Excel with SMASHDOCs it is possible to edit not only texts in the SMASHDOCs editor, but also tables that have been previously created in Excel. For that users should import an Excel table into SMASHDOCs and the information that has been added to the Excel table can be displayed then in the editor. However, there are three key notions to remember while adding an Excel table to SMASHDOCs:
●only those Excel tables that have been created in OneDrive account can be connected with SMASHDOCs;
●you cannot add the whole table to the editor. Instead, only a selected part of the table can be visible in SMASHDOCs;
●the added Excel table cannot be edited in SMASHDOCs as a usual table in the editor. If you want to edit your Excel table from SMASHDOCs, you should click on it and this table will open as a separate tab in your browser. Then it becomes available for editing.
The detailled steps how to connect Excel tables to SMASHDOCs, as well as how to edit them, will be described further.
2How to connect Excel to SMASHDOCs
To start editing your Excel table directly from the SMASHDOCs account you should set the connection of these two applications. Note: Excel tables can be connected with SMASHDOCs from your OneDrive account only. So, you should firstly log into your Onedrive, then create an Excel table there. Then you will be able to start the connection process.
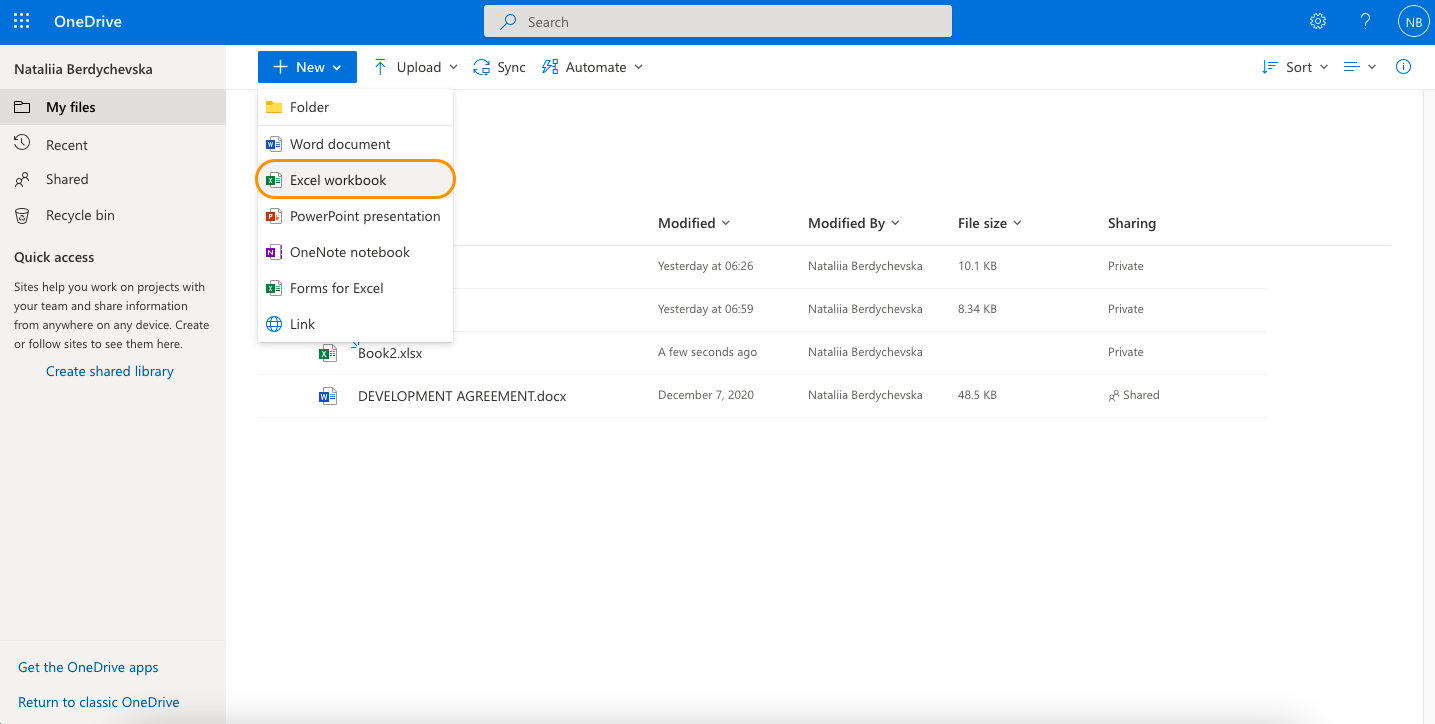
Creating an Excel table in OneDrive account
After you have opened a table, click "Insert" in the upper list of tabs.
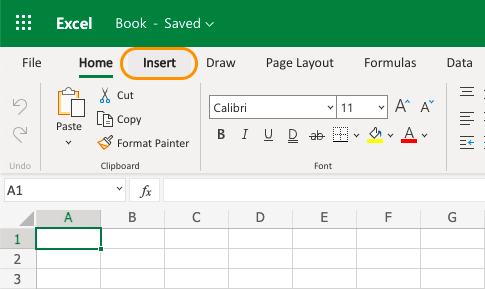
Tab "Insert" in the Excel
There find the option "Office Add-Ins" and open it.
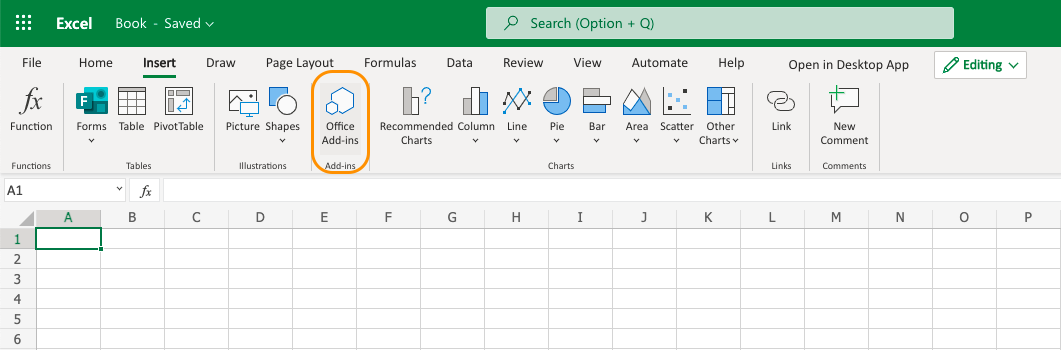
Option "Office Add-ins" highlighted
A dialog window will appear afterwards, where you have to upload your add-in file. It is an XML-file which provides the possibility to set the connection between Excel from OneDrive and SMASHDOCs. For each system this add-in file is unique.
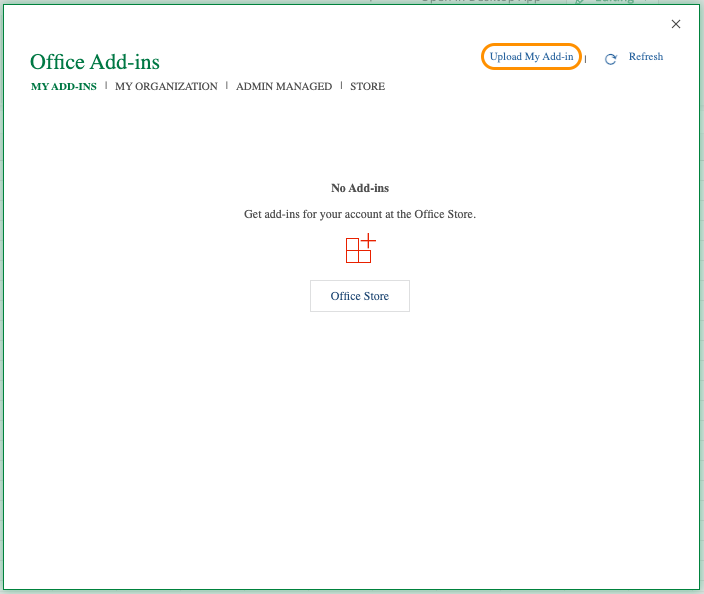
Option "Upload My Add-in" displayed
After that choose the corresponding XML-file from your device and click the button "Upload".
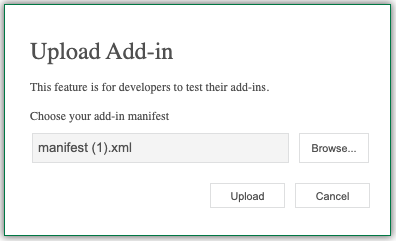
Uploading Add-in
As soon as uploading has been launched successfully, go back to your Excel table and there will appear a SMASHDOCs-sign, which means that now you are ready to add your Excel table to the document in SMASHDOCs.
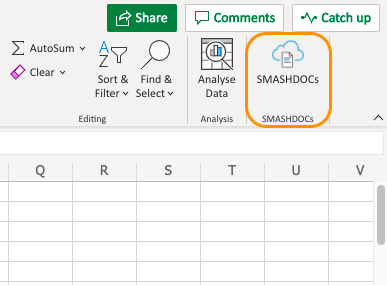
SMASHDOCs-sign in the Excel file
When you open the SMASHDOCs sign, you will see a button "Login".
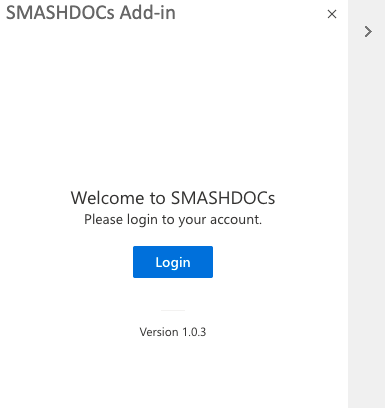
A button "Login" to integrate a new Excel table
Click this button, then insert your login and password, afterwards press "Integrate" - and you will be able to add sections from your Excel table to the document in SMASHDOCs.
3How to add Excel tables to SMASHDOCs
When you have created your table in Excel and are ready to integrate it to SMASHDOCs, the next step is to go to your SMASHDOCs system, find there the option "Excel365 table" in the upper toolbar and select it.
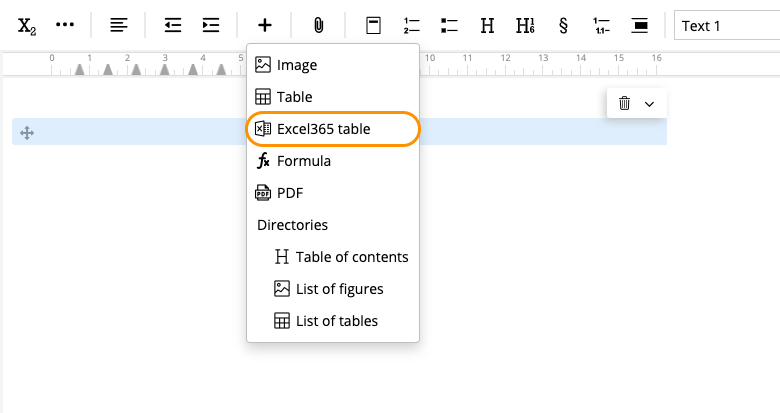
Option "Excel365 table" displayed
You will receive then a window to insert the link of your Excel table.
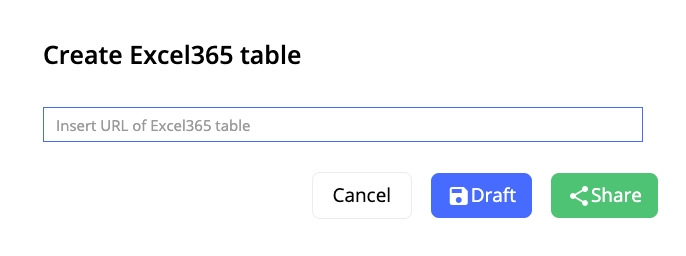
Create Excel365 table in SMASHDOCs
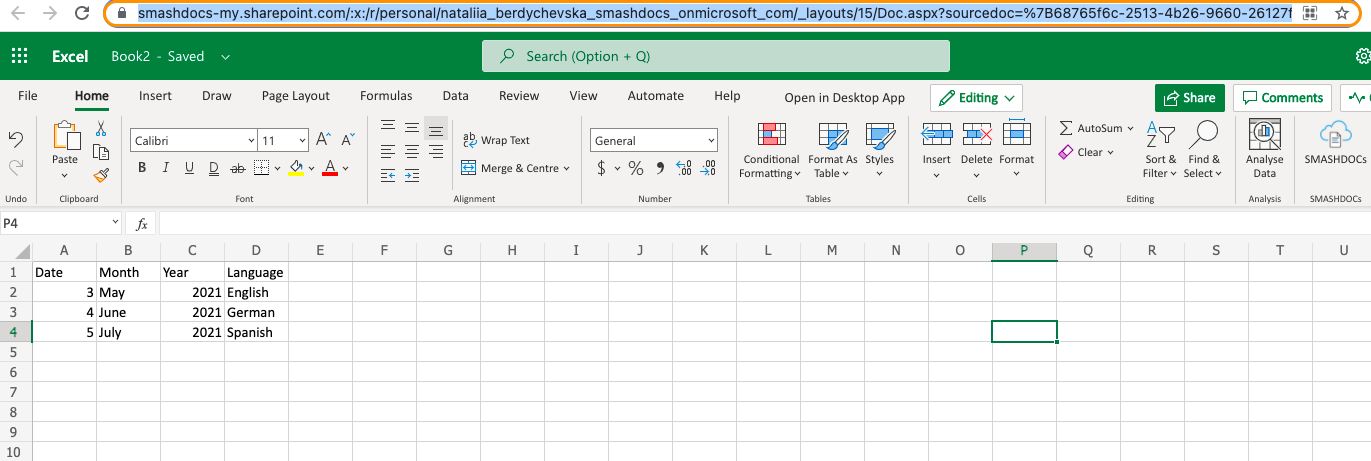
Go back to your Excel table created in OneDrive account and copy there the table link.
Link of the Excel table
Then insert this link in the required field in SMASHDOCs (see Image 9).
You can also decide, whether you would like to add your table in draft or review mode. Press "Draft" or "Share" and the Excel table will be opened as a separate tab in your browser.
To add the information from the created table in Excel to the SMASHDOCs editor, you should firstly select the part of your table that should be displayed in SMASHDOCs and open the SMASHDOCs sign in the Excel.
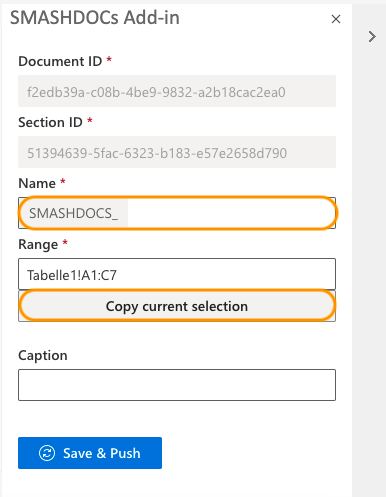
Obligatory lines "Name" and "Range"
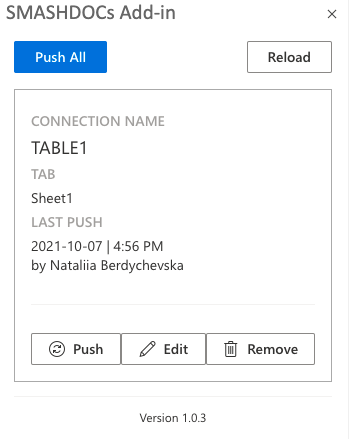
After choosing a required part of a table, insert the name of the table and click "Copy current selection" in the line "Range", then press "Save & Push" (see Image 11). You will get a short notification that everything has been saved and a window with the information about the last push, as well as with applicable options towards the connection - "Push", "Edit" and "Remove".
Window with the options to push changes, edit and remove connection
The selected part of your table will appear then in the SMASHDOCs editor.
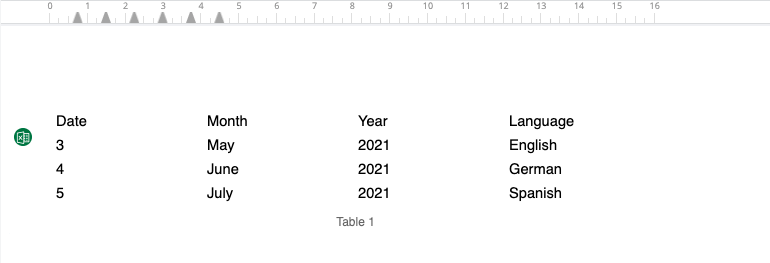
The display of Excel tables in the SMASHDOCs editor
4How to work with the Excel table from the SMASHDOCs editor
The green Excel sign on the left side of the table in SMASHDOCs indicates that this table has been imported from Excel.
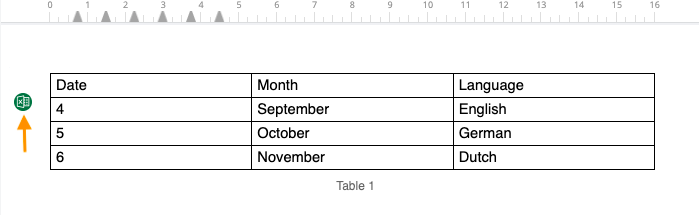
Green Excel-icon in SMASHDOCs editor
When you click on this table, it will open as a new tab in browser. There you will be able to edit the information in the table. As soon as the editing process is completed, do not forget to open SMASHDOCs sign again and press "Push" (see Image 12), so that all changes are saved in this table and properly displayed in the SMASHDOCs editor.
You can add as many sections of one Excel table within a single document in SMASHDOCs. In case you add more than one section in SMASHDOCs, for each of these sections zou should create separate tables in the editor. To do this, start creating another Excel365 table in SMASHDOCs editor and insert the link of the current Excel table (see (How to add Excel tables to SMASHDOCs)). After that, in the Excel table that will be opened as a separate tab select the required section, open SMASHDOCs-sign, fill in the line "Name" and click "Copy current selection" (see Image 11). Then press "Save and push" and the selected section will be added to the new table in SMASHDOCs.
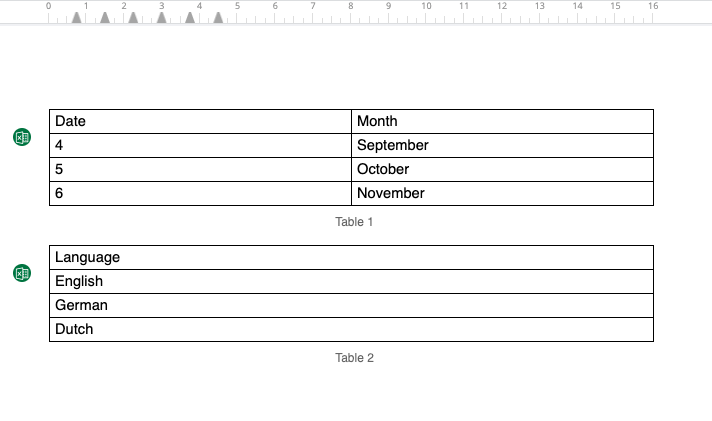
Several sections of a single Excel table within a single document in SMASHDOCs
If you want to remove connection, go to the Excel, open SMASHDOCs sign and click there "Remove" button (see Image 12). You will then get a notification to confirm the removing connection or cancel the process.
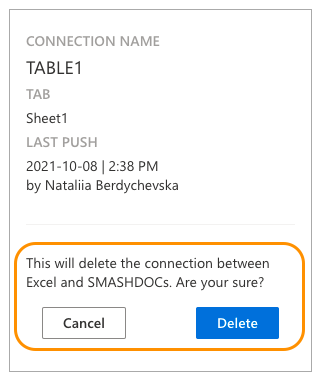
Notification to confirm or cancel deletion
As soon as connection is removed, the table in the SMASHDOCs editor is no more displayed with a green Excel sign and can be edited as a usual table.
It is also worth mentioning that you cannot add sections from another Excel table in a document, if you have not completed the previous connection. In this case a notification appears where there are two options to select:
●close the other connection and delete table;
●go to the other table and finalize the connection there.
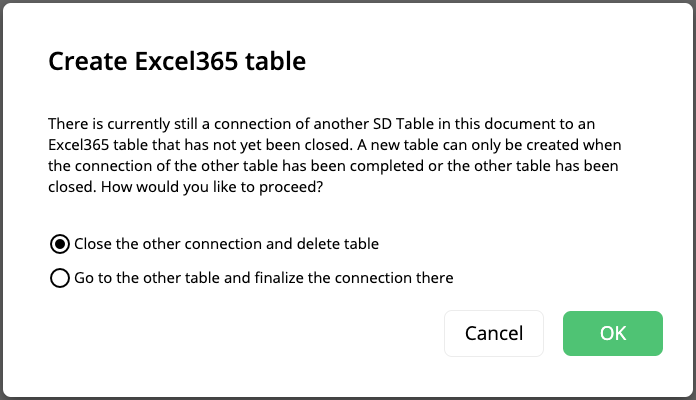
Notification in case of creating the second connection in a document with already existing Excel table
Choose the option "Close the other connection and delete table" - and the previously added table will be deleted, so you will be able to proceed creating a new one. In case of selecting "Go to the other table and finalize the connection there" your new table will be removed and you will be redirected to the previous table.